.png)


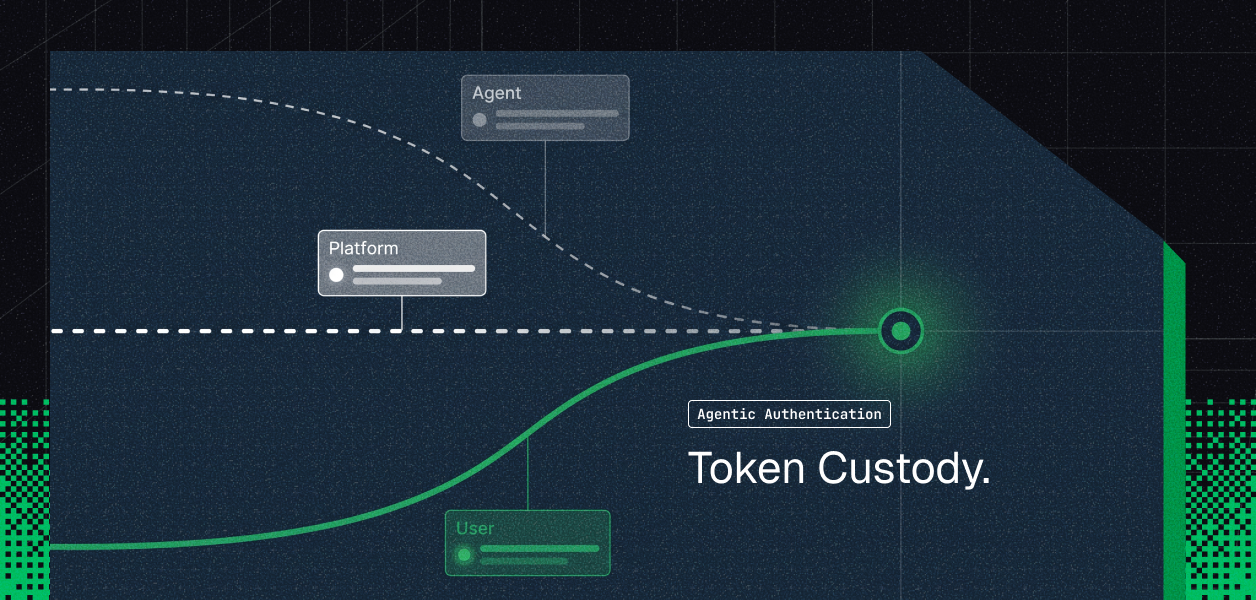
Most agent demos break in production for the same reason: the runtime is ready, but the auth layer is not. Claude Managed Agents and OpenClaw both handle tool execution well. Neither handles whose token runs at 2 am, how it stays fresh across a long session, or what happens when a Slack admin revokes access mid-incident.
This blog walks through exactly where both runtimes fall short in authentication, how Scalekit fills each gap, and includes a complete, working incident response agent for Datadog, Linear, and Slack that you can run today.
Claude Managed Agents compresses months of agent infrastructure work into a few API calls. You define an agent once with a model, a system prompt, a set of tools, and one or more MCP servers. Anthropic takes it from there. The platform runs the entire agent loop for you, handling tool discovery, execution, retries, streaming, and session state management. You do not build any of that infrastructure yourself.
OpenClaw works differently. Instead of a managed cloud runtime, it runs on your own infrastructure, a VPS, a Docker container, or an AWS Lightsail instance, and the agent loop lives inside OpenClaw itself rather than on Anthropic's servers. You connect it to messaging platforms like Telegram, Discord, Slack, and WhatsApp so your users can interact with the agent through those channels.
Both runtimes face the same authentication gap. Neither ships with multi-user OAuth management, proactive token refresh, pre-built connectors, or a re-auth experience when tokens are revoked. The execution layer is solved, but the identity layer is not.
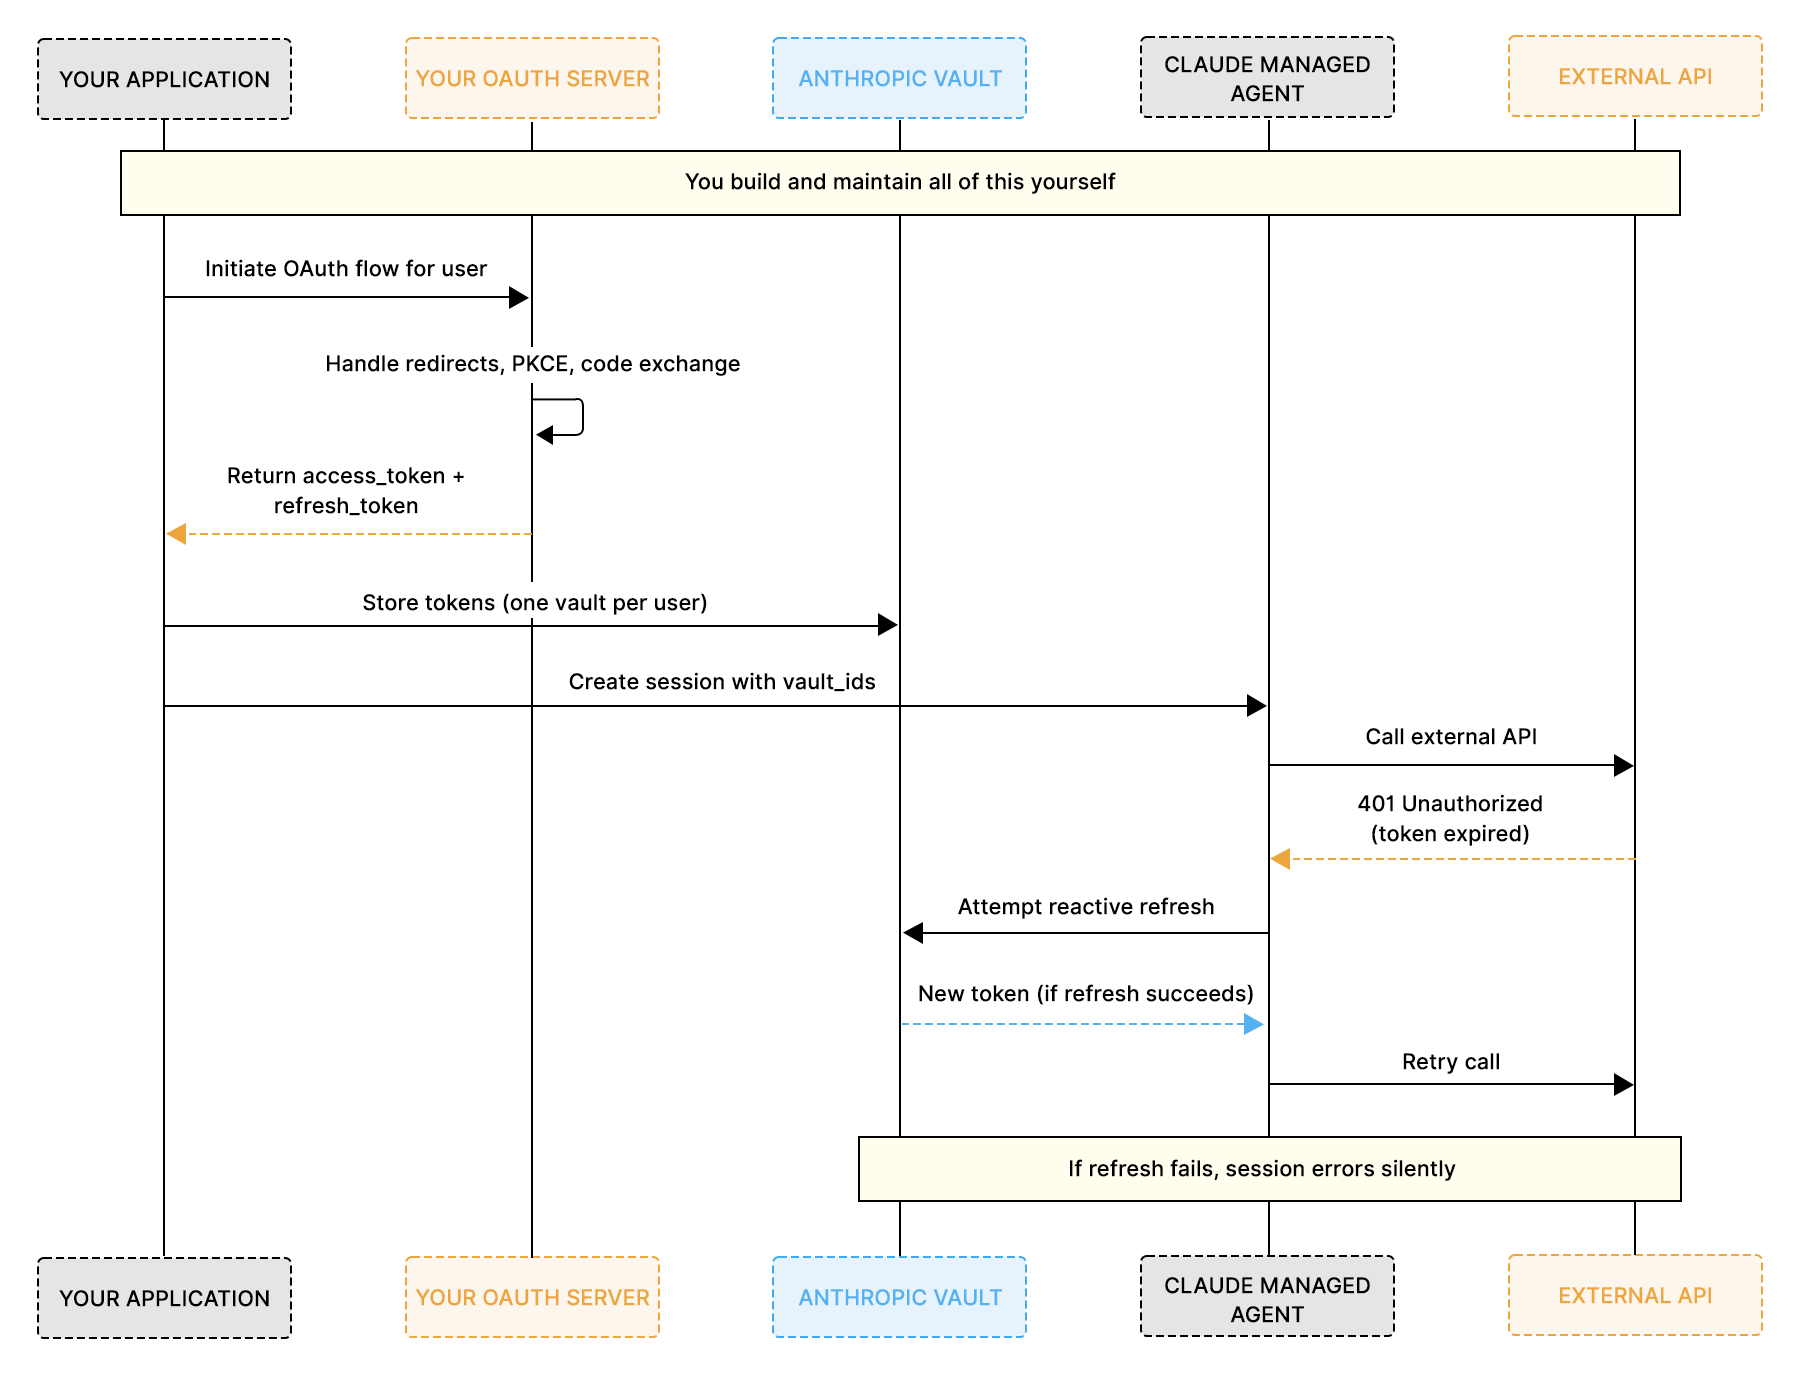
For authenticating with third-party services like Datadog, Slack, and Linear, Claude Managed Agents ships with Vaults, a per-user credential store hosted by Anthropic. The Vault workflow operates as follows:
Token refresh is the one additional mechanism Vaults provide, and it only fires after something breaks. The agent hits a 401 mid-session, the vault attempts a refresh using the stored refresh token, and if that cycle does not complete cleanly, the entire session fails. There is no proactive check, no pre-flight validation, and no way to catch an expired token before it kills a running task.
OpenClaw has no equivalent mechanism. There is no built-in credential store, no token injection, and no refresh logic. If your OpenClaw agent needs to call Datadog or Slack on behalf of a user, you are building that infrastructure entirely from scratch.
This covers the fundamentals, but the problems start to appear when you move from a single-user prototype to a multi-user production system.
The following diagram shows how the Vault approach works and where you are responsible for building infrastructure yourself:
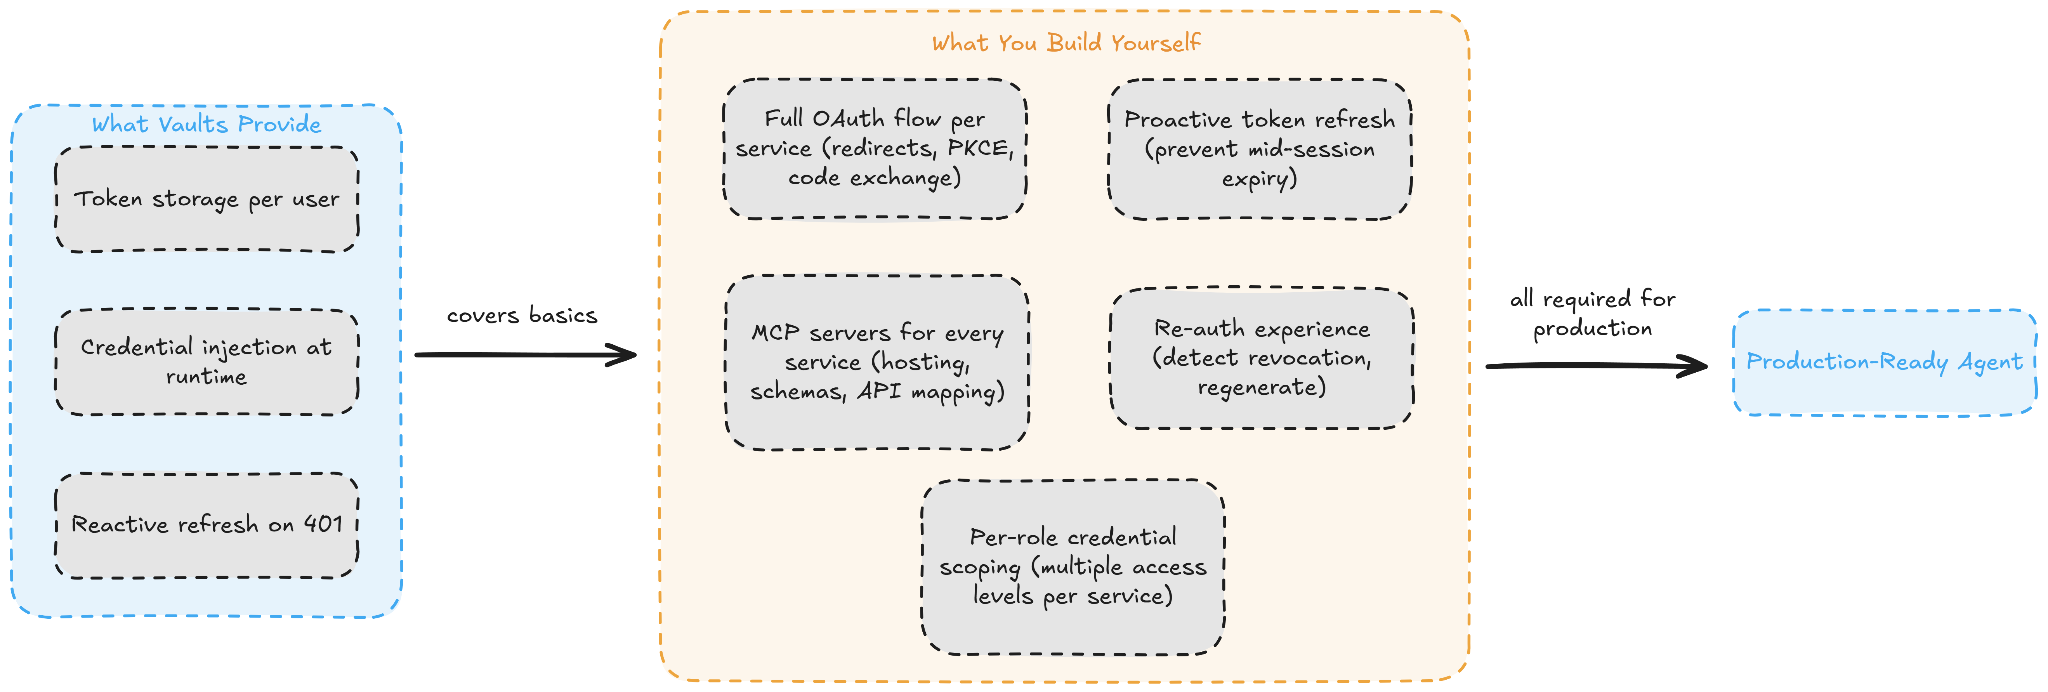
Vaults give Claude Managed Agents a starting point for credential storage, but everything beyond storage is left for you to build. OpenClaw ships with no credential management at all. Neither runtime handles OAuth flows, token refresh lifecycle, connector integrations, or re-authorization out of the box. Here is a closer look at the five specific gaps that emerge as you move toward production, and how each affects both runtimes.
Vaults store tokens, but they do not initiate OAuth flows. They do not handle redirect URIs, exchange authorization codes, run PKCE verification, or manage consent screens. For every external service your agent connects to, you need to architect and host a complete OAuth implementation yourself.
At a small scale, this is manageable. At the production scale, the numbers compound quickly. If your agent connects to four services and you have 100 users, that is 400 separate OAuth flows that you need to design, build, and maintain. Each service has its own scope, token format, and expiry window.
For OpenClaw, the problem is the same, but it starts one step earlier. There is no credential store to even receive the tokens once you have obtained them. You are building OAuth and storage from scratch for every service.
The vault only triggers a token refresh when the agent actually hits a 401 error during an active session. Claude Managed Agents is designed for long-running tasks that can persist across minutes or hours. If a token expires mid-session and the 401-to-refresh cycle does not complete cleanly, the entire session fails. You end up debugging a runtime failure instead of catching a configuration error before it ever reaches the user.
OpenClaw has no refresh mechanism at all. A token that expires mid-conversation fails silently, with no recovery path or retry logic.
Scalekit takes a fundamentally different approach. It proactively refreshes tokens before every tool call, so the agent session never encounters an expired credential, regardless of which runtime you are using.
Neither Claude Managed Agents nor OpenClaw ships pre-built MCP servers for external services. Vaults accept credentials for any MCP server URL, but Anthropic does not build or maintain those servers. Datadog, Slack, Linear, Salesforce, Notion, GitHub: for each one, you need to build or source the MCP server yourself.
This goes well beyond writing OAuth code. You also need to host the MCP server, define tool schemas, map API endpoints, handle errors, and manage versioning for each service you want to connect.
When a token is revoked or expires in a way that the vault cannot refresh, the session fails silently with a session.error event. There is no built-in mechanism to detect this scenario, generate a re-authorization link, surface it to the user through your application, and resume the session once the user completes the flow.
OpenClaw has no session error event or detection mechanism either. A revoked token silently breaks the conversation with no way to surface a re-auth link to the user.
In both cases, you need to build that entire detection, notification, and recovery loop yourself.
This gap is specific to Claude Managed Agents. The vault enforces a hard constraint: only one active credential per mcp_server_url per vault. If you need a read-only Datadog token for one agent role and a full-access token for another, you need separate vaults or separate MCP server URLs. At scale, this per-role credential scoping adds significant architectural complexity to your system.
For OpenClaw, there is no credential scoping layer, so multi-role architectures require building the scoping logic from scratch.
The following diagram summarizes everything the Vault provides against everything you still need to build on your own:
Managed Agents is built for long-running, multi-step tasks that span multiple services. Its vault system is designed for simple, single-service credential injection. The more services your agent connects to and the more users it serves, the more OAuth infrastructure you need to layer on top.
Scalekit AgentKit is not a replacement for Claude Managed Agents or OpenClaw. It is the identity and authentication layer that both runtimes intentionally leave out. The integration pattern works the same way for both: you call ensure_instance() with a user identifier, you receive a pre-authenticated MCP URL, and you pass that URL to the agent as its MCP server. Scalekit handles everything underneath that URL.
Before looking at code, it helps to understand the three objects that Scalekit uses to manage the authentication lifecycle:
The integration follows three distinct phases, each with a clear boundary of responsibility.
Phase 1: One-time setup
You call create_config() once to declare which connections and tools your MCP server exposes. This defines your agent's capability surface and does not change from user to user.
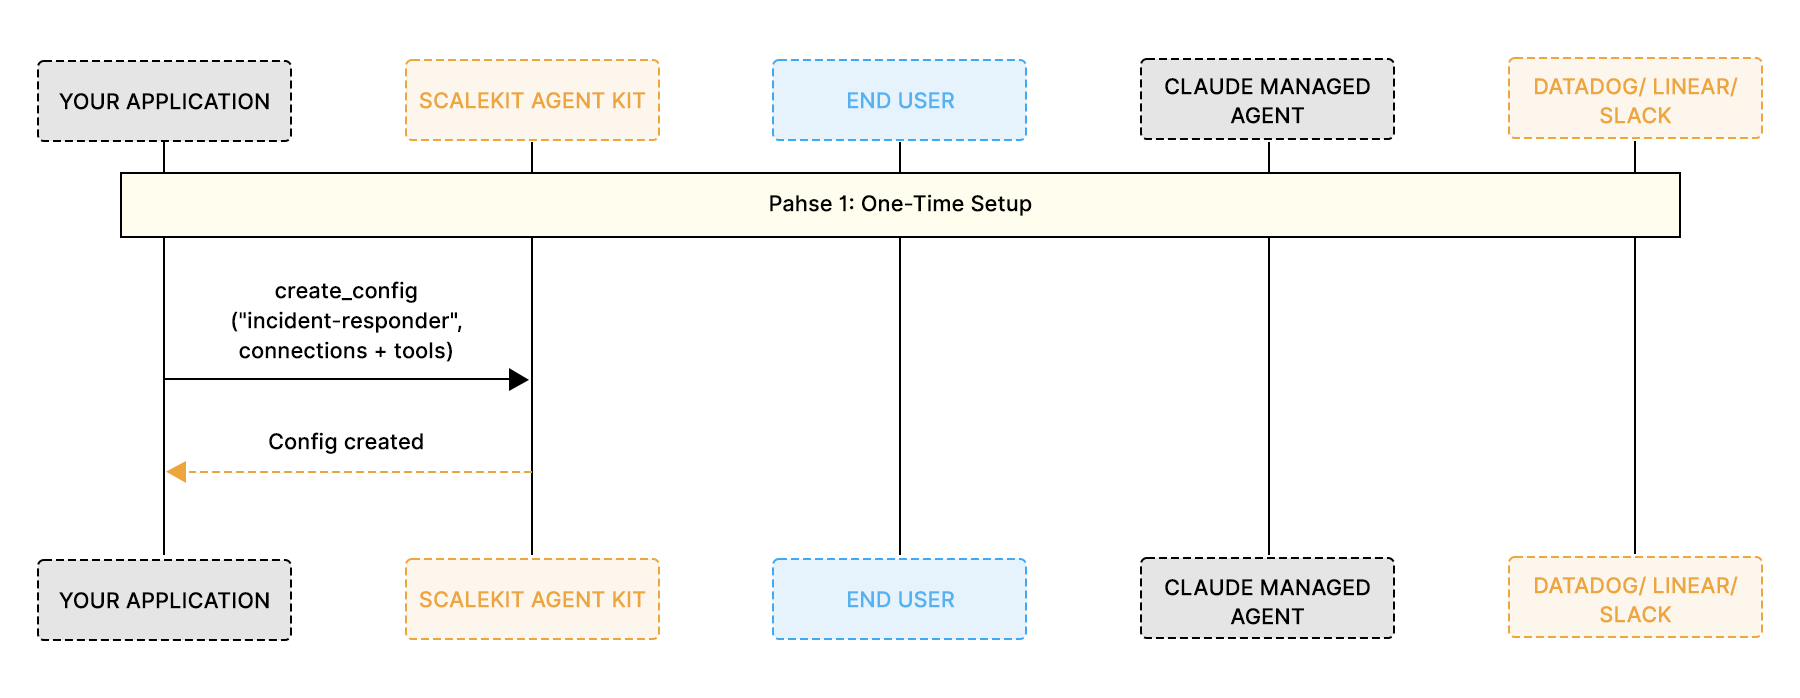
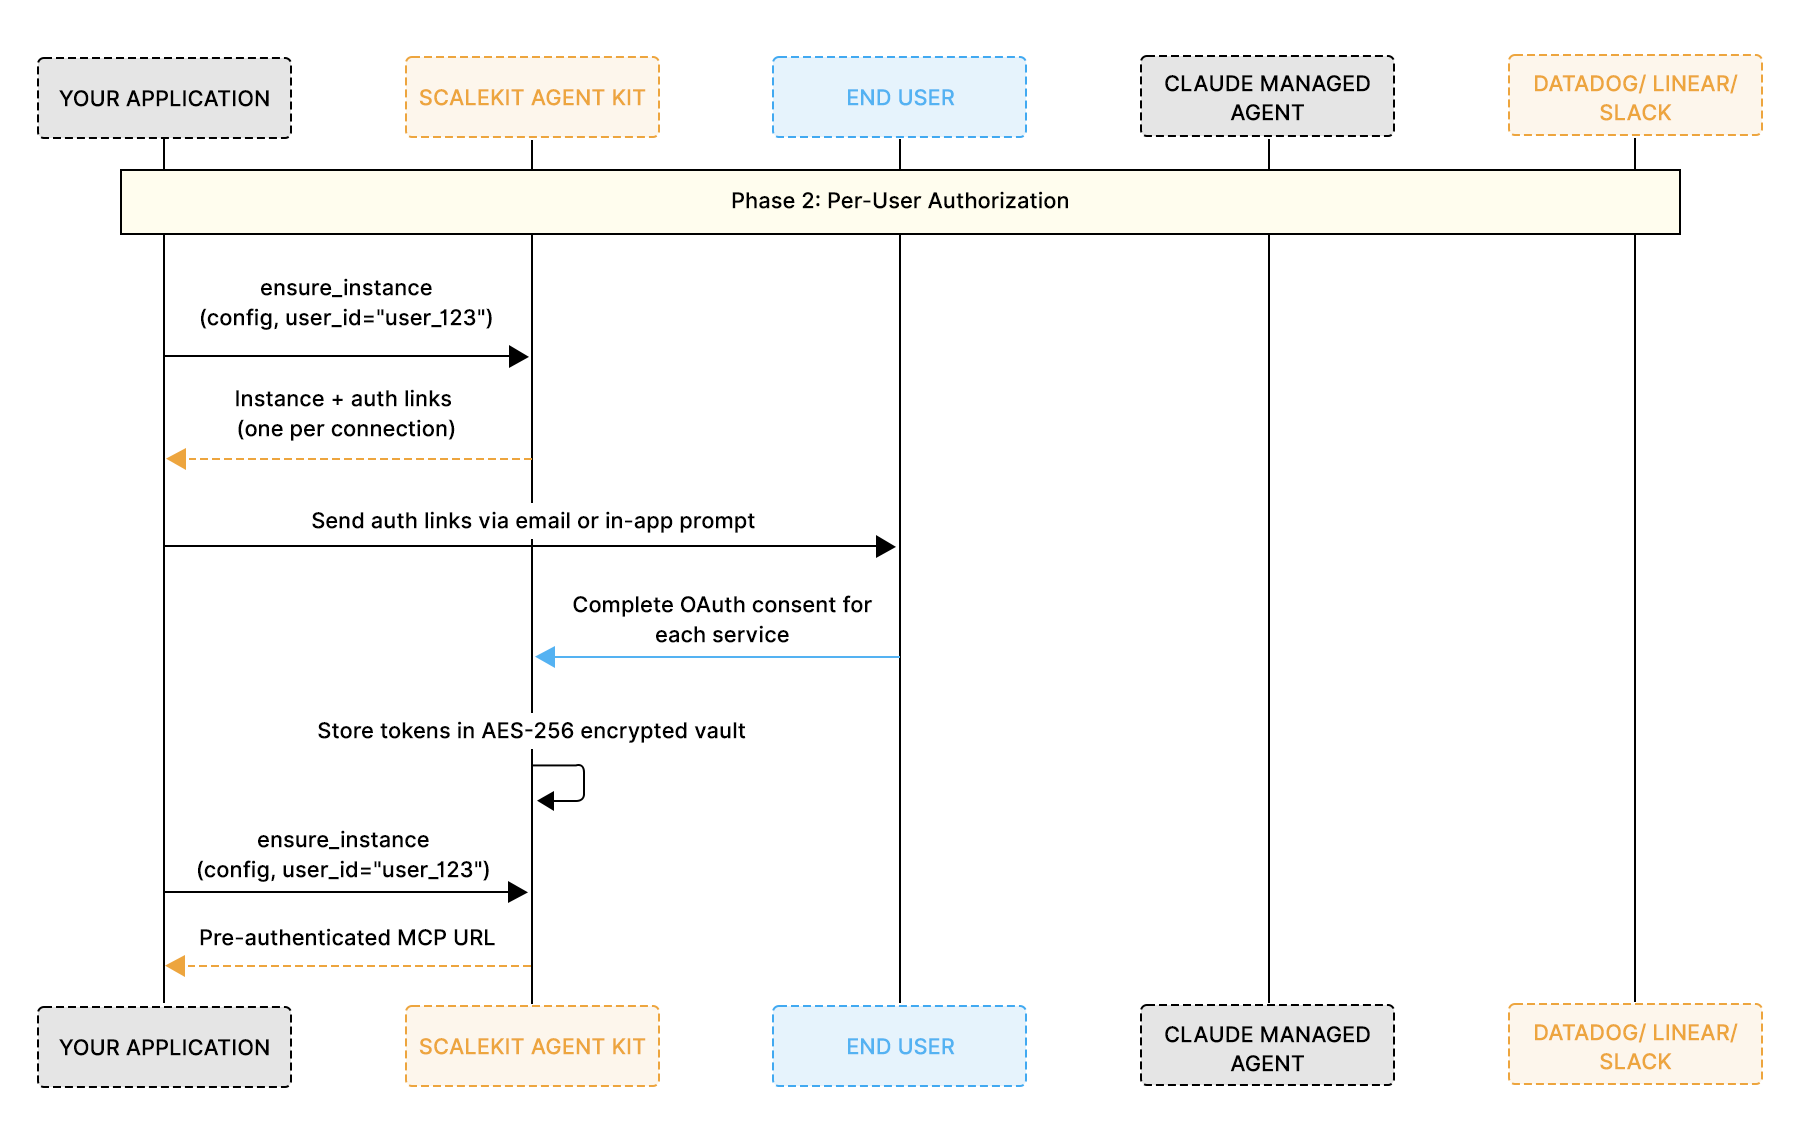
Phase 2: Per-user authorization
You call ensure_instance() for each user. If the user has not yet authorized a connection, Scalekit generates an authentication link. Once the user completes the OAuth flow through that link, you receive a unique, pre-authenticated MCP URL for that specific user.
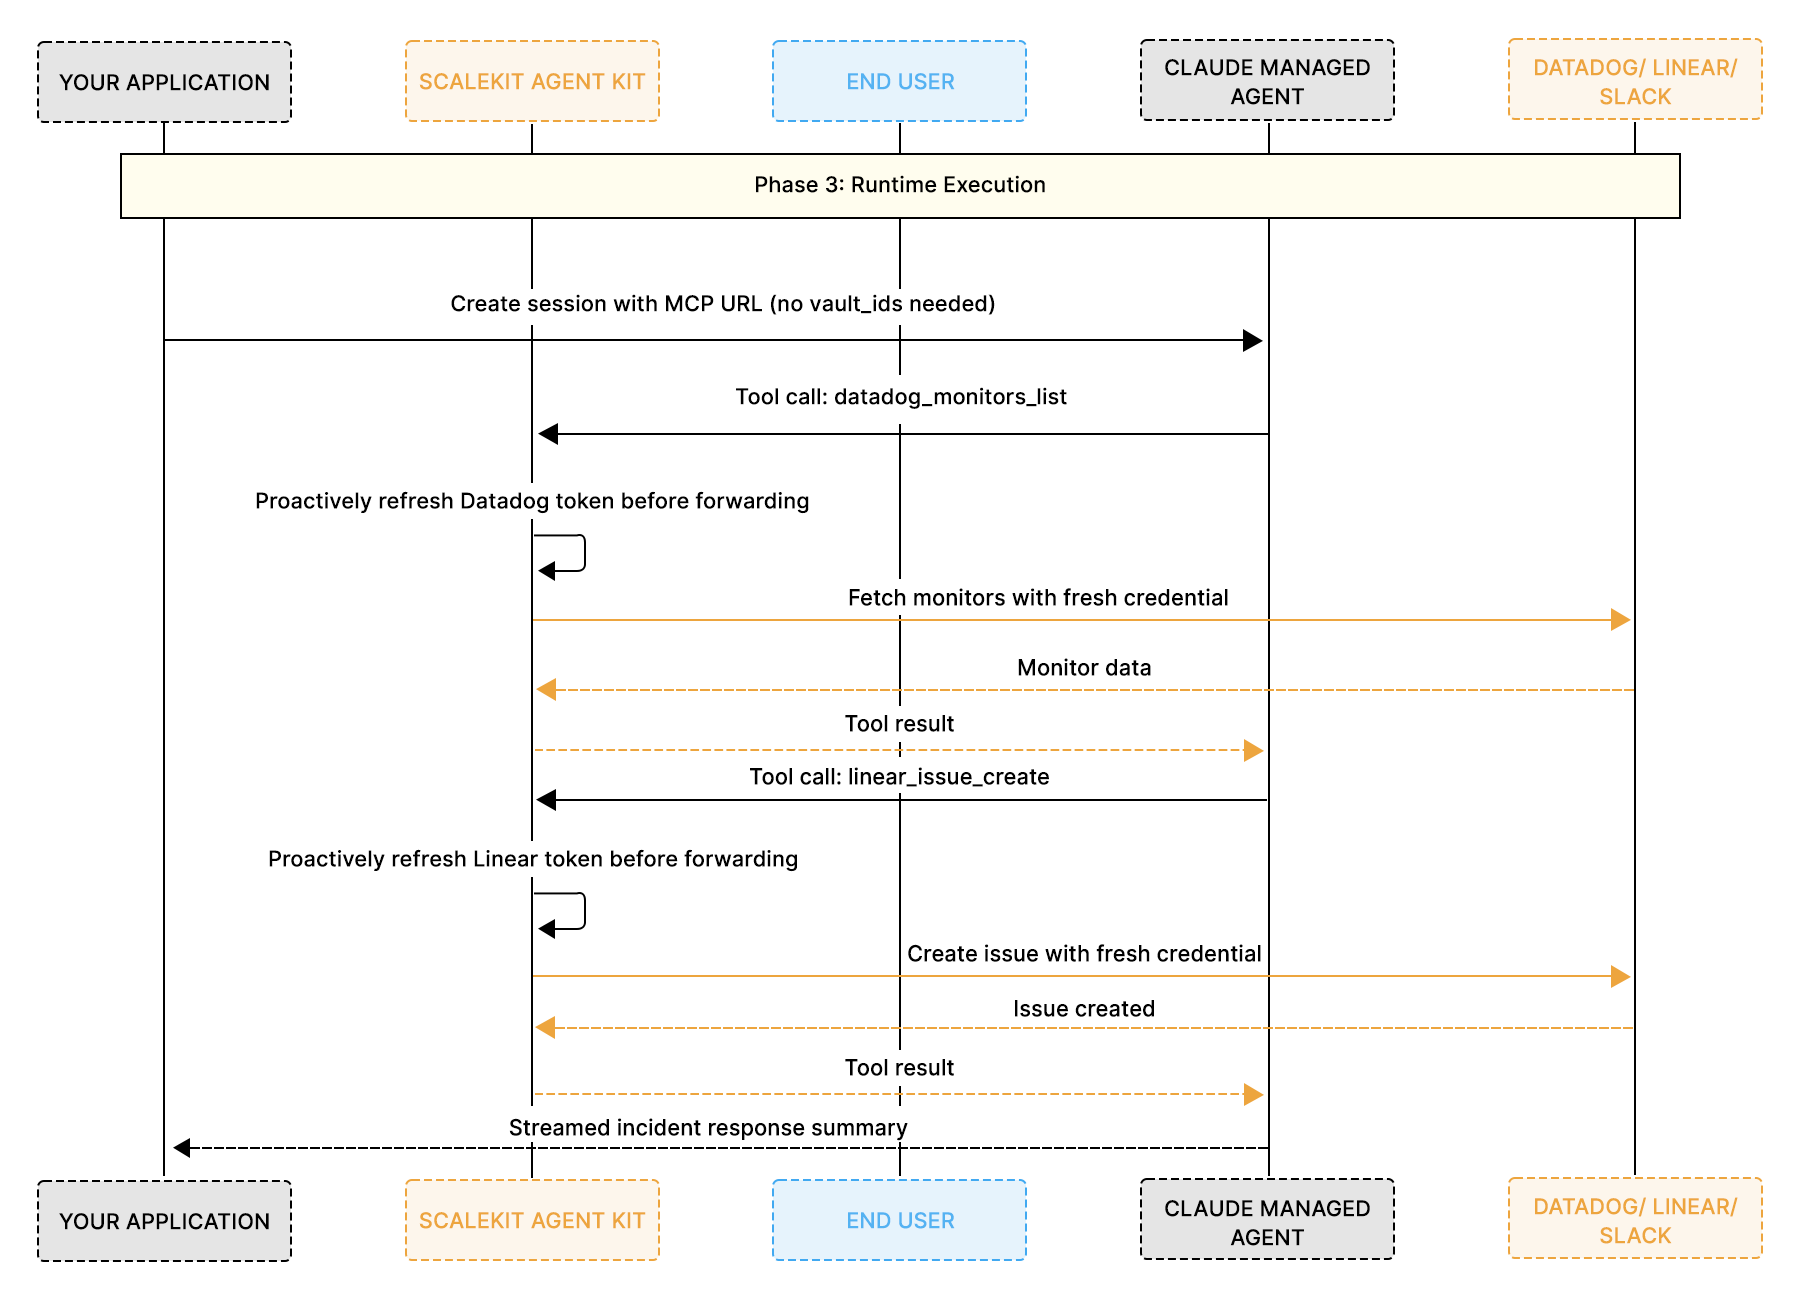
Phase 3: Runtime execution
You pass the MCP URL to the agent as its MCP server. When the agent calls a tool, Scalekit routes the request using that user's stored credentials, which are proactively refreshed before the call. Your application code does not manage any part of this loop.
Here is how each vault limitation maps to a specific Scalekit capability:
The clearest way to understand what Scalekit removes from your codebase is to compare the two approaches side by side.
What you now own and maintain:
Three separate OAuth servers, three MCP servers, and the entire token refresh and re-auth infrastructure disappear from your codebase. Scalekit manages all of it behind a single MCP URL.
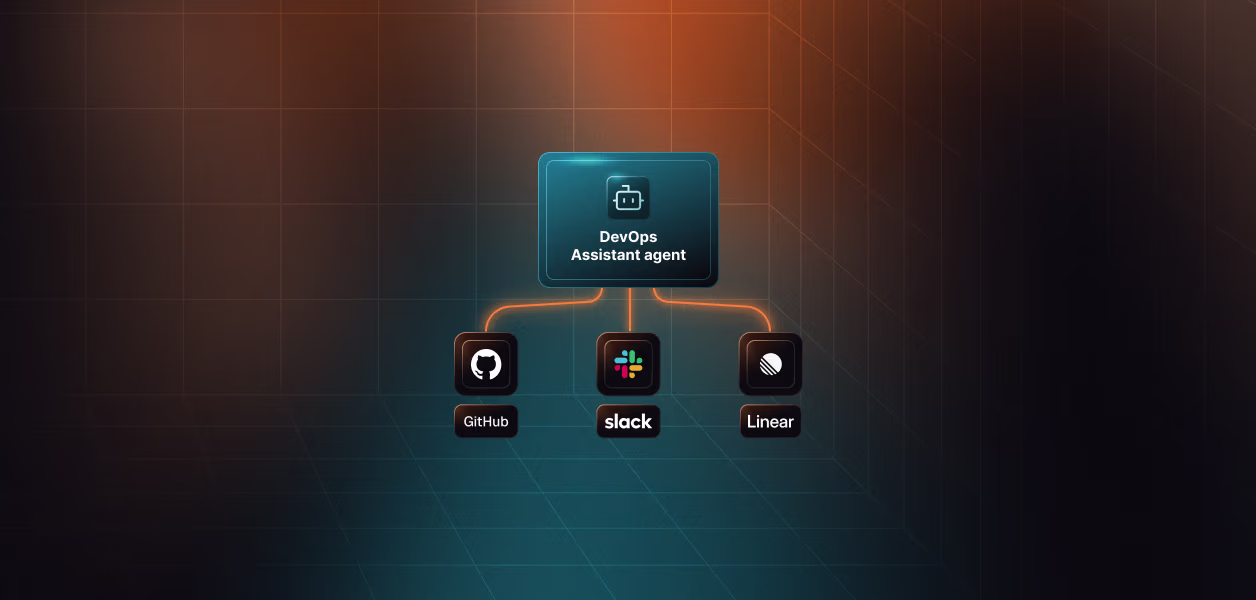
Now that the authentication layer is clear, here is what it looks like in practice. The following walkthrough builds a Claude Managed Agent that triages Datadog alerts, creates Linear tickets, and notifies the team via Slack, all authenticated through Scalekit. Every concept from the sections above maps directly to a step in this code.
The following is a complete walkthrough for building a Claude Managed Agent that triages Datadog alerts, creates Linear tickets, and notifies the team via Slack, all authenticated through Scalekit. This is the kind of multi-service agent that enterprise SRE and DevOps teams actually need in production.
The code is organized around the natural lifecycle of the integration: one-time setup, per-user authorization, and per-session execution. Steps 1 and 2 are identical if you are building with OpenClaw only. Steps 3 through 5 are specific to Managed Agents.
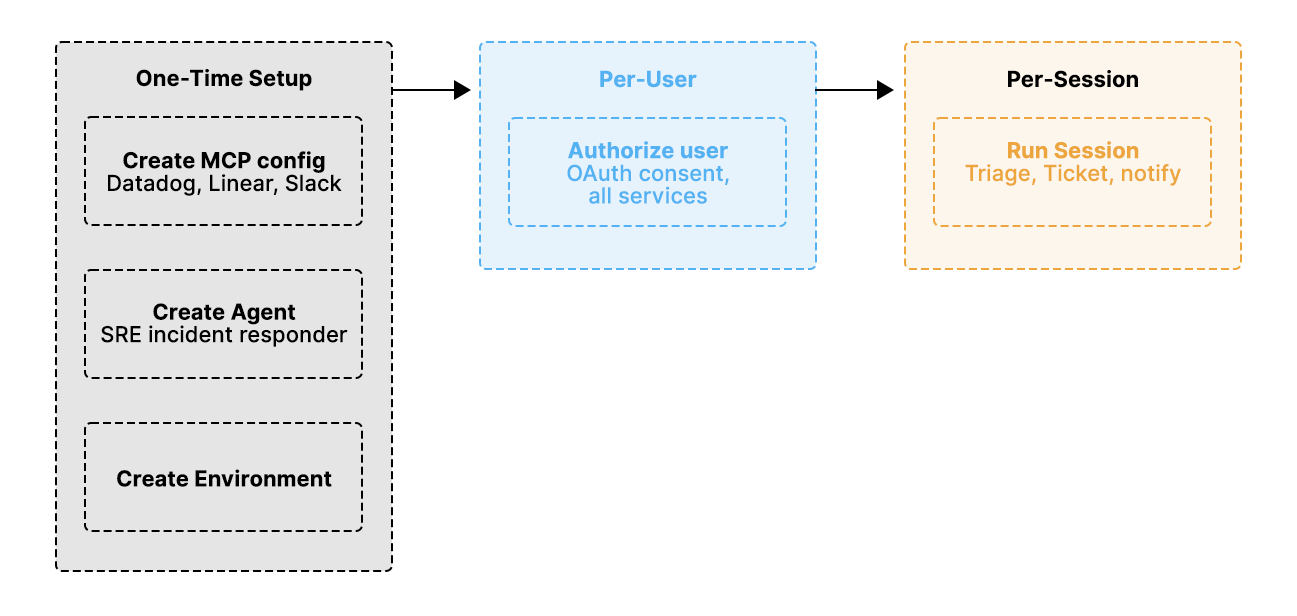
The MCP config declares which connections and tools your agent can access. You create it once, and it is reused across every user and every session. For an incident response agent, the config exposes monitoring tools from Datadog, issue management tools from Linear, and communication tools from Slack.
This tells Scalekit to create an MCP server configuration named "incident-responder" that exposes 9 tools across 3 services. Each connection is whitelisted to only the tools this agent needs. The Datadog connection provides read access to monitors and incidents. The Linear connection allows creating and updating issues. The Slack connection enables posting messages and listing channels.
By whitelisting specific tools per connection, you enforce the principle of least privilege at the infrastructure level. The agent cannot send emails, delete Slack channels, or modify Datadog dashboards because those tools are simply not exposed through this config.
You can also create separate configs for different agent roles. An on-call config might expose all three services, while a read-only reporting config might only expose Datadog monitoring tools without Linear or Slack write access.
Before the agent can call Datadog, Linear, and Slack on a user's behalf, that user must authorize each connection. The ensure_instance() method is idempotent, which means it is safe to call on every session start. If the user is already authorized for all three services, it returns the MCP URL immediately without repeating any OAuth flow.
When a user has not yet authorized a connection, Scalekit generates a magic link for that specific service. The user opens each link in their browser, completes the OAuth consent screens for Datadog, Linear, and Slack, and Scalekit stores all resulting tokens in an AES-256-encrypted vault. From that point forward, every call to ensure_instance() for that user returns the pre-authenticated MCP URL instantly, covering all three services through a single URL.
In a production application, store the MCP URL in your database alongside the user record and call ensure_instance() at the start of every session to verify that all authorizations are still active.
If you are using OpenClaw, set the returned mcp_url as the value of TOOL_ENV_URL in your .env file. The scalekit-agent-auth skill picks it up automatically at runtime.
The agent definition is created once and reused across all sessions via agent.id. The MCP URL you pass here is a per-user value returned by ensure_instance() in Step 2.
For this demo we read it from an environment variable, but in production, you should fetch it from your database per user and call ensure_instance() at the start of every session to verify the auth state before passing the URL. Notice there are no vault_ids anywhere in this code. The Scalekit MCP URL already carries the user's identity and authorized connections for all three services.
The Anthropic Console confirms the agent is live with the Scalekit MCP server attached. The MCP URL you passed in the code appears here as the connected tool source.
The always_allow permission policy means the agent executes every tool call without pausing for human confirmation. This works well for a demo, but requires thought in production. Because the policy applies at the toolset level and covers all tools exposed through that MCP server, you cannot mix always_allow and always_ask within a single toolset.
If you want human approval on write operations like Linear ticket creation and Slack messages, create two separate Scalekit MCP configs: one scoped to read-only Datadog tools with always_allow, and one scoped to Linear and Slack write tools with always_ask. Each config gets its own toolset in the agent definition.
One important security consideration: the MCP URL is pre-authenticated and encodes the user's identity and authorized connections for all three services. Never expose this URL in client-side code, API responses, or logs. It should only be passed server-side.
An environment is the cloud container where the agent runs. You create it once and reuse the environment.id across all sessions.
This is the script you run every time you want the agent to perform a task. It creates a session, sends the incident response task as a user message, and streams the agent's response in real time. The agent will pull data from Datadog, create tickets in Linear, and post summaries to Slack, all through the single Scalekit MCP URL.
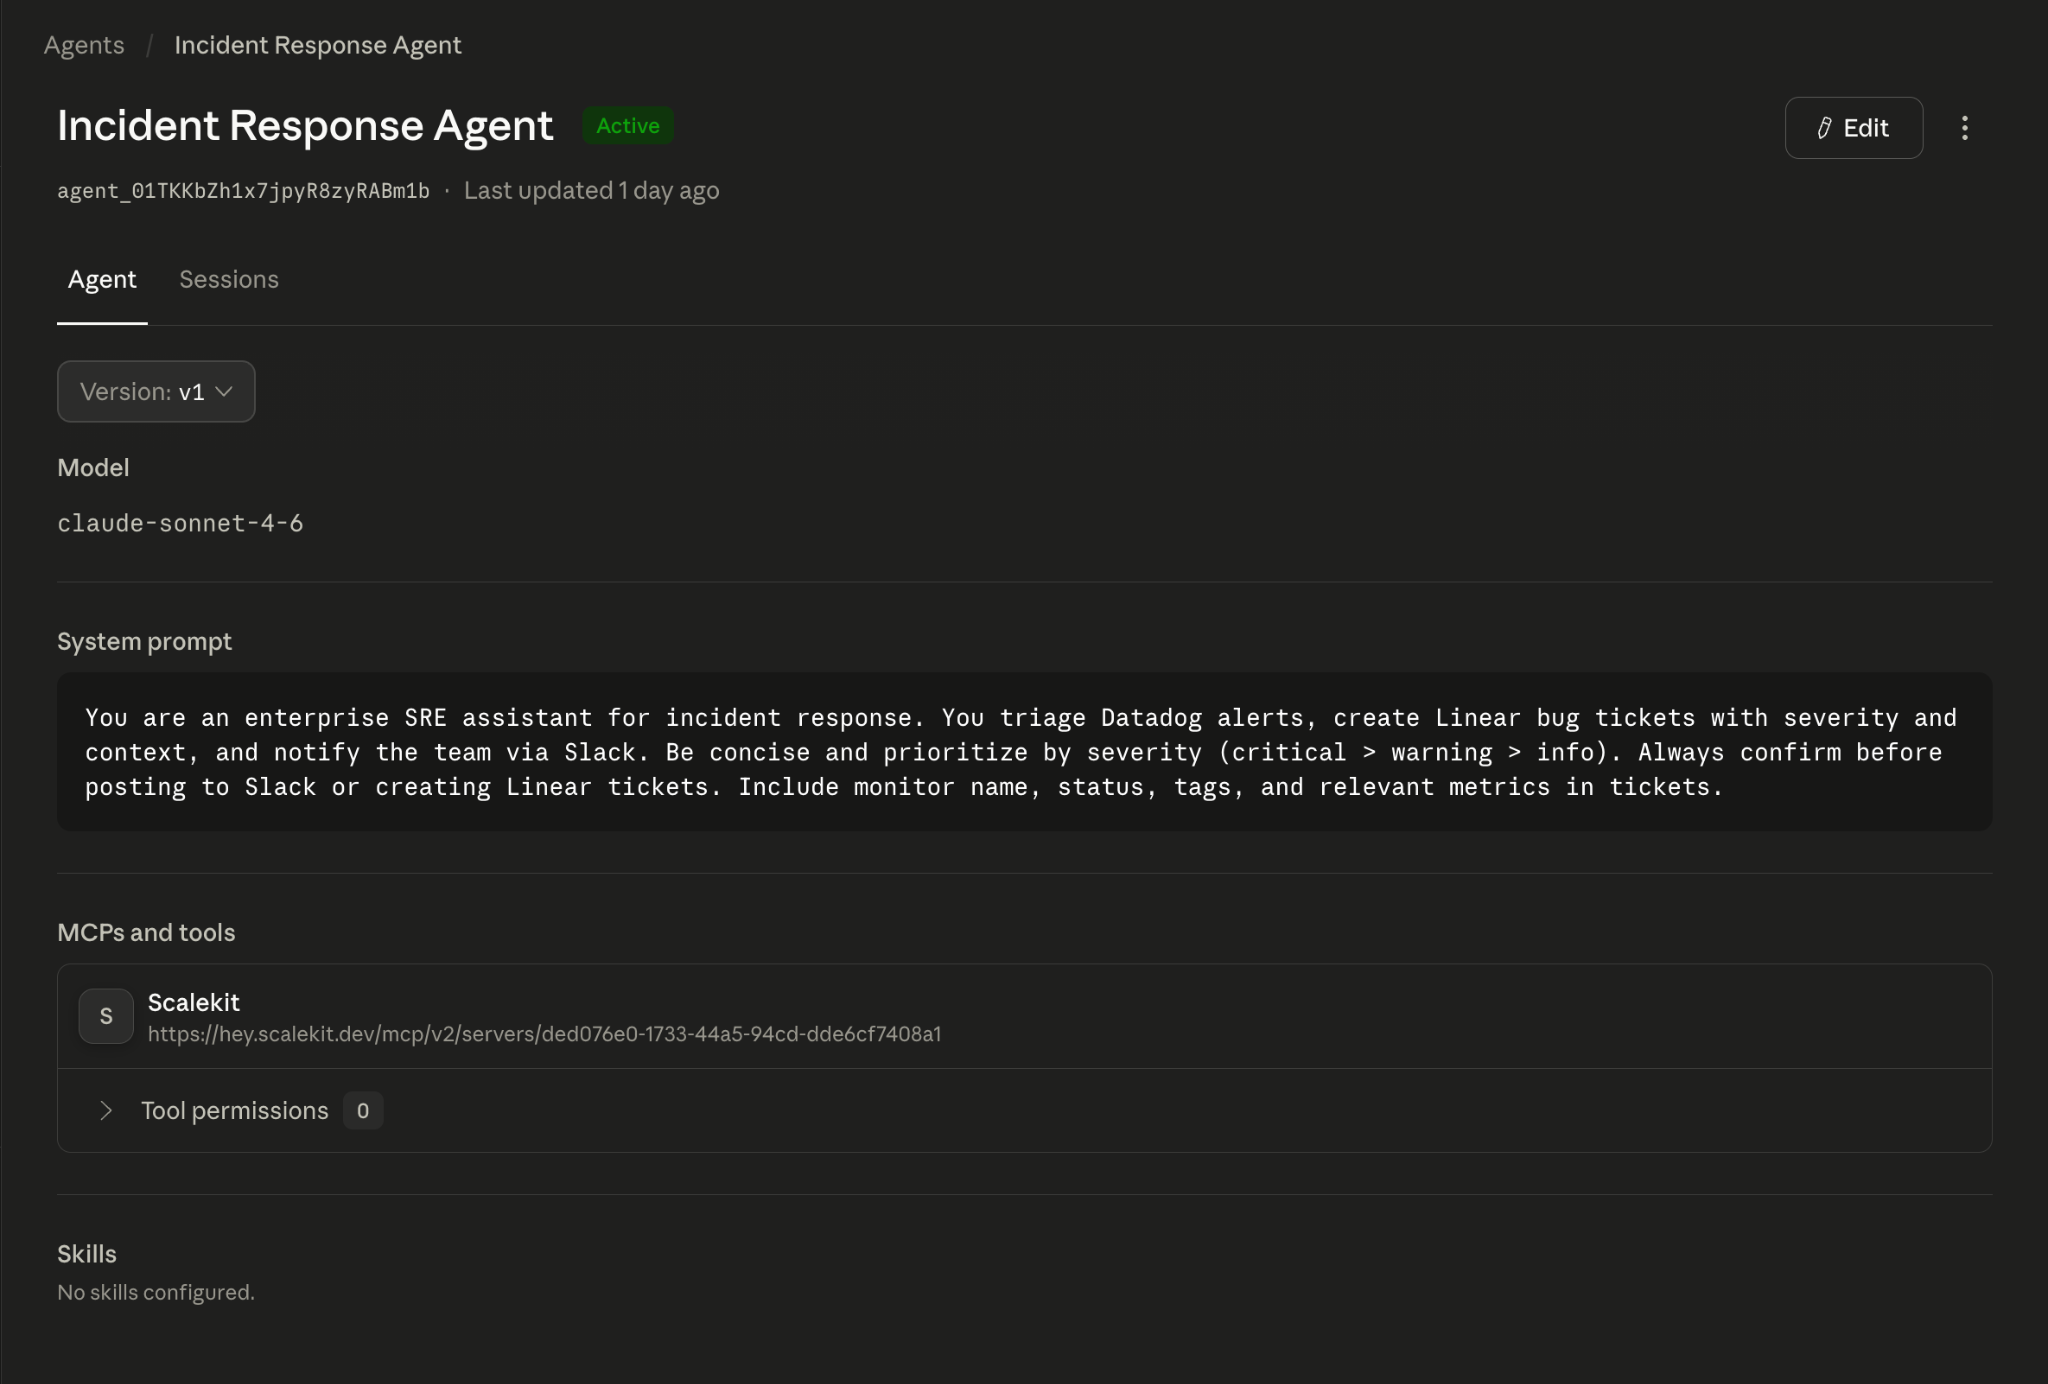
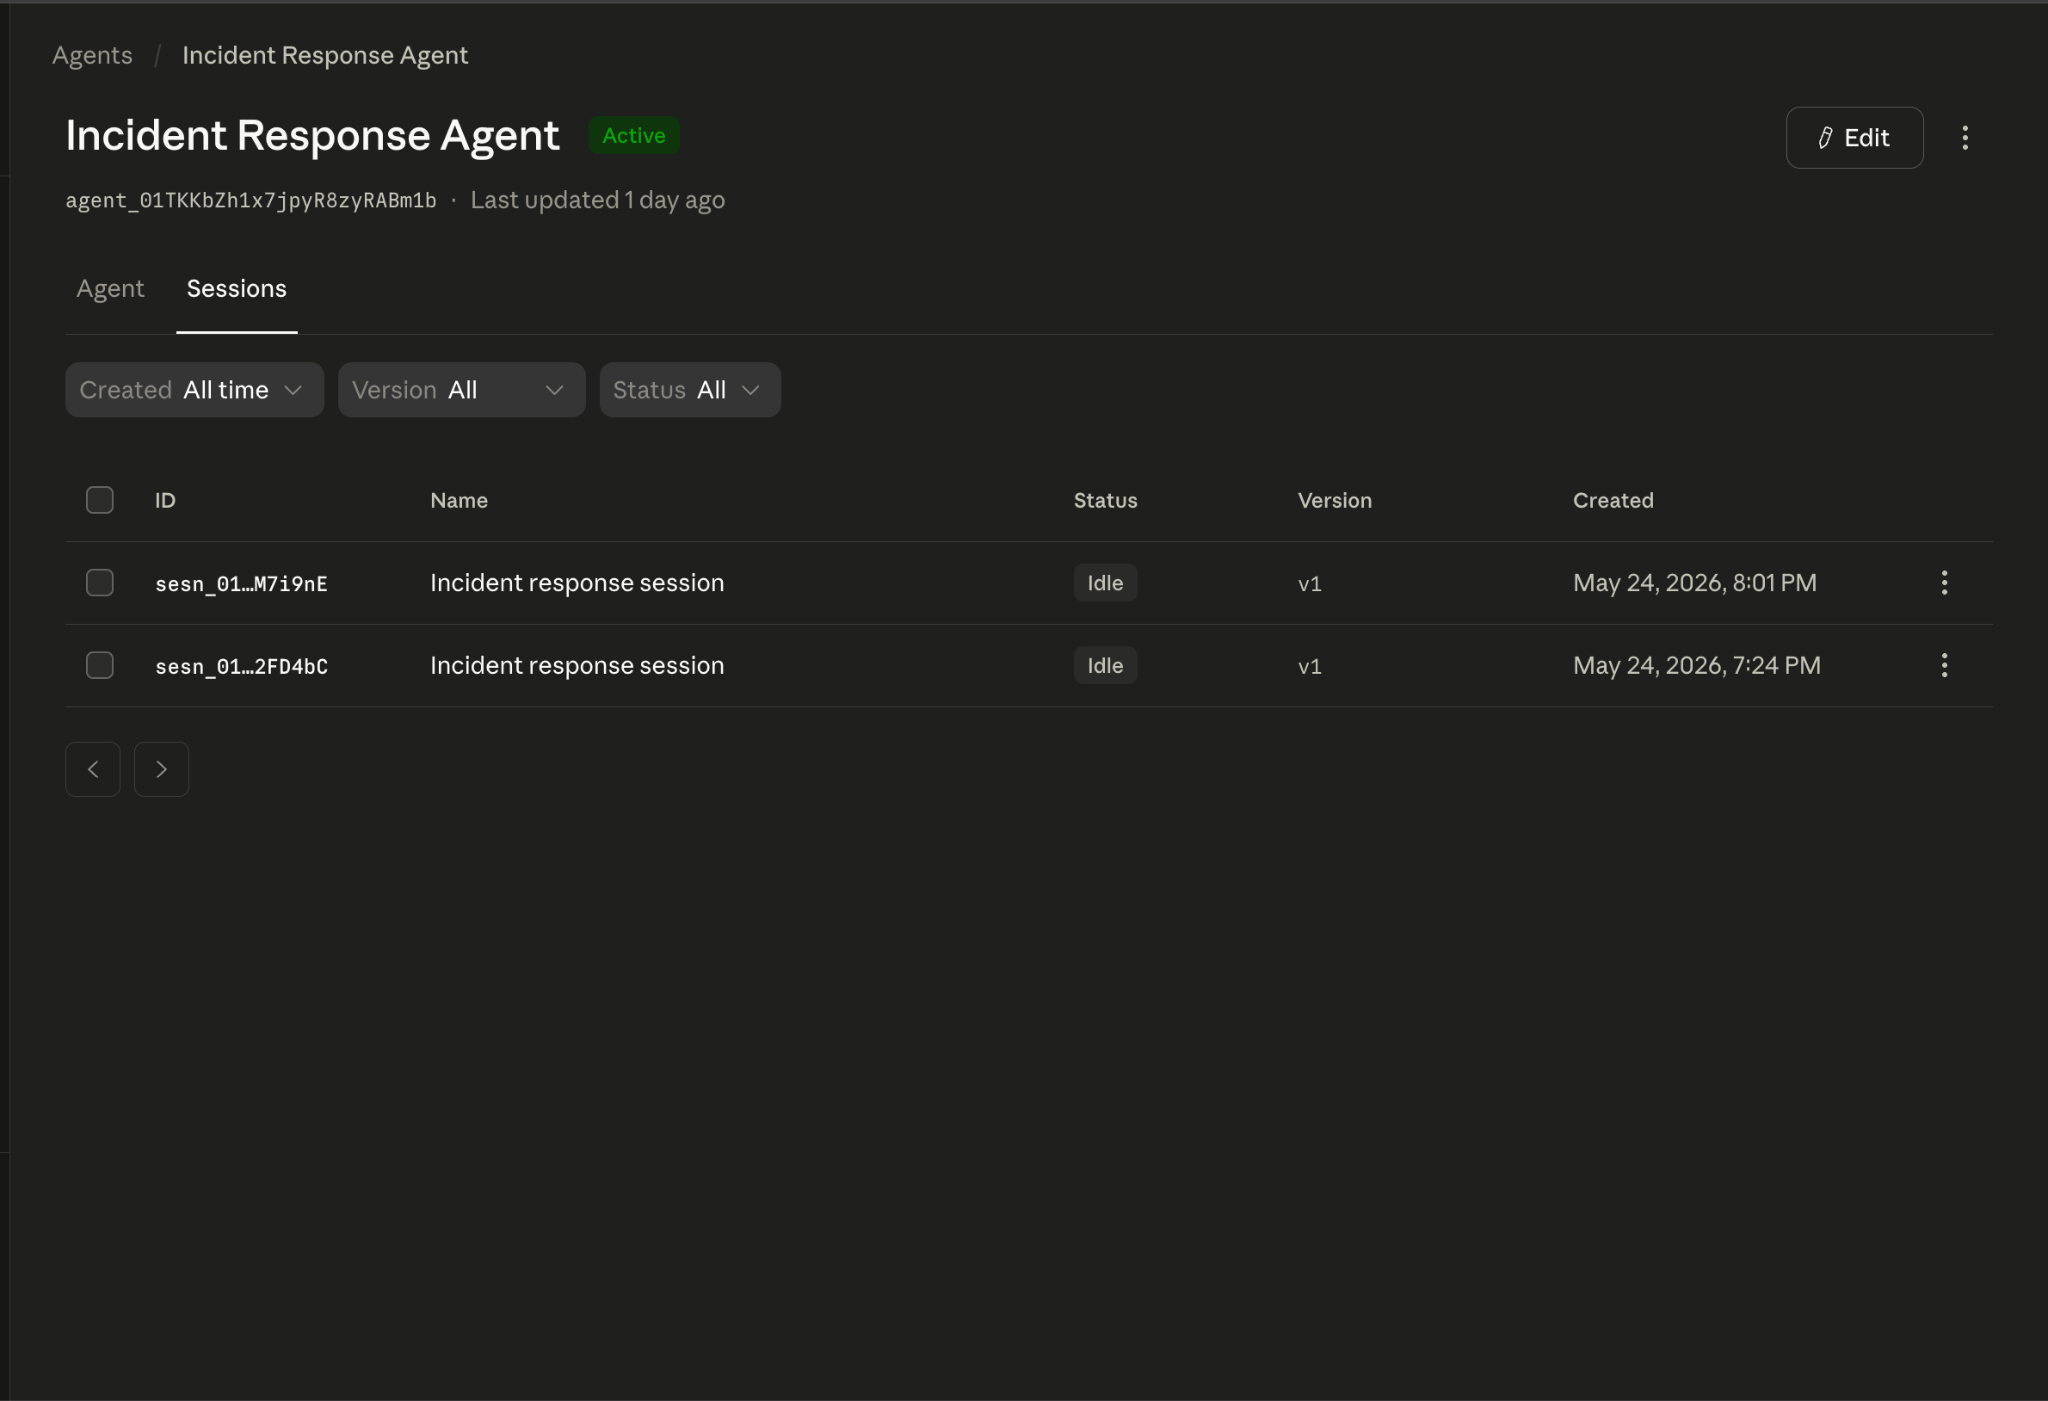
We ran this agent against a production Datadog environment, a Linear workspace, and a Slack channel. Here is the actual output from the session:
Both sessions show as Idle, the Anthropic platform term for a cleanly completed session. The timestamps match the live test run.
The agent pulled all eight monitors from Datadog, identified four with missing data, created a high-priority Linear ticket (INF-29) with the full breakdown, and posted a summary to the team's Slack incident channel.

Three services, three sets of credentials, all managed through a single Scalekit MCP URL, with no custom authentication code.
Every tool call the agent makes is logged in the Scalekit dashboard with the connector, exact tool name, user identity, timestamp, and duration. The Datadog call completed in 287ms at 20:01:46.
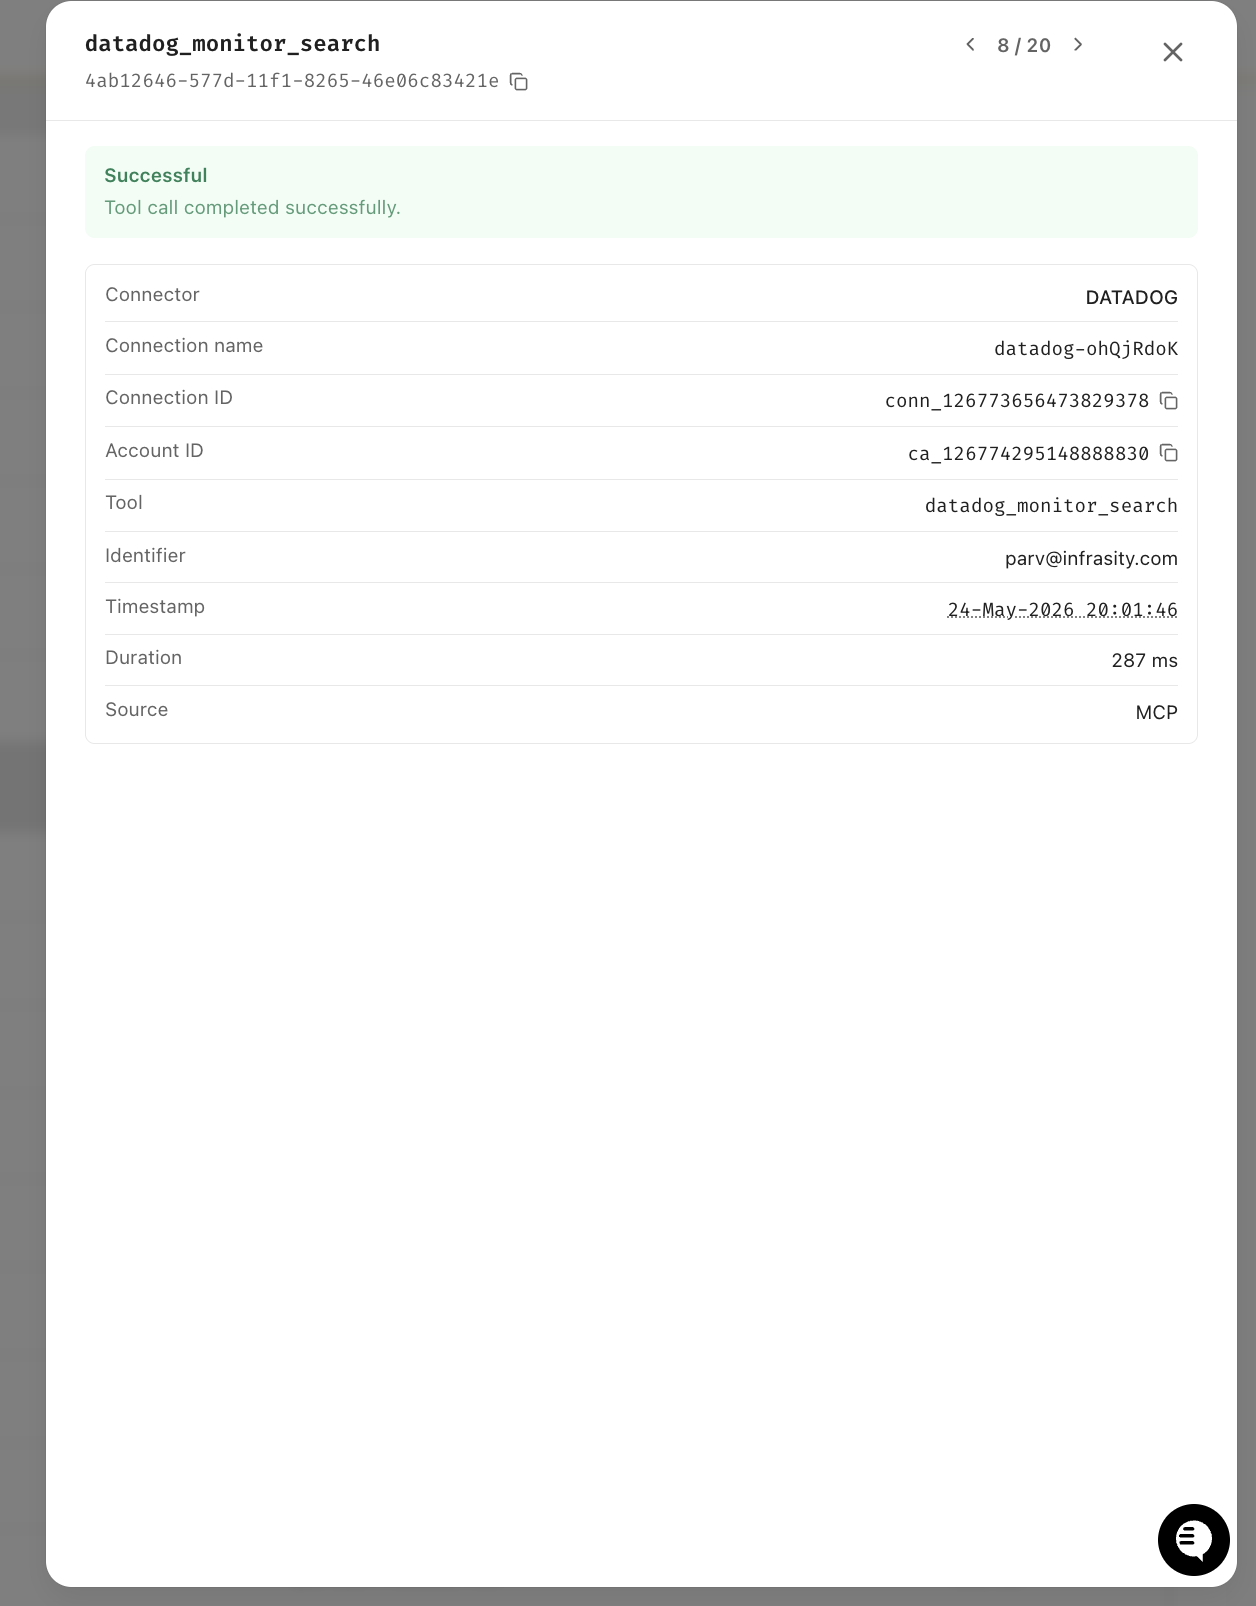
The Linear call followed 3 seconds later, at 20:01:49, and completed in 145ms.
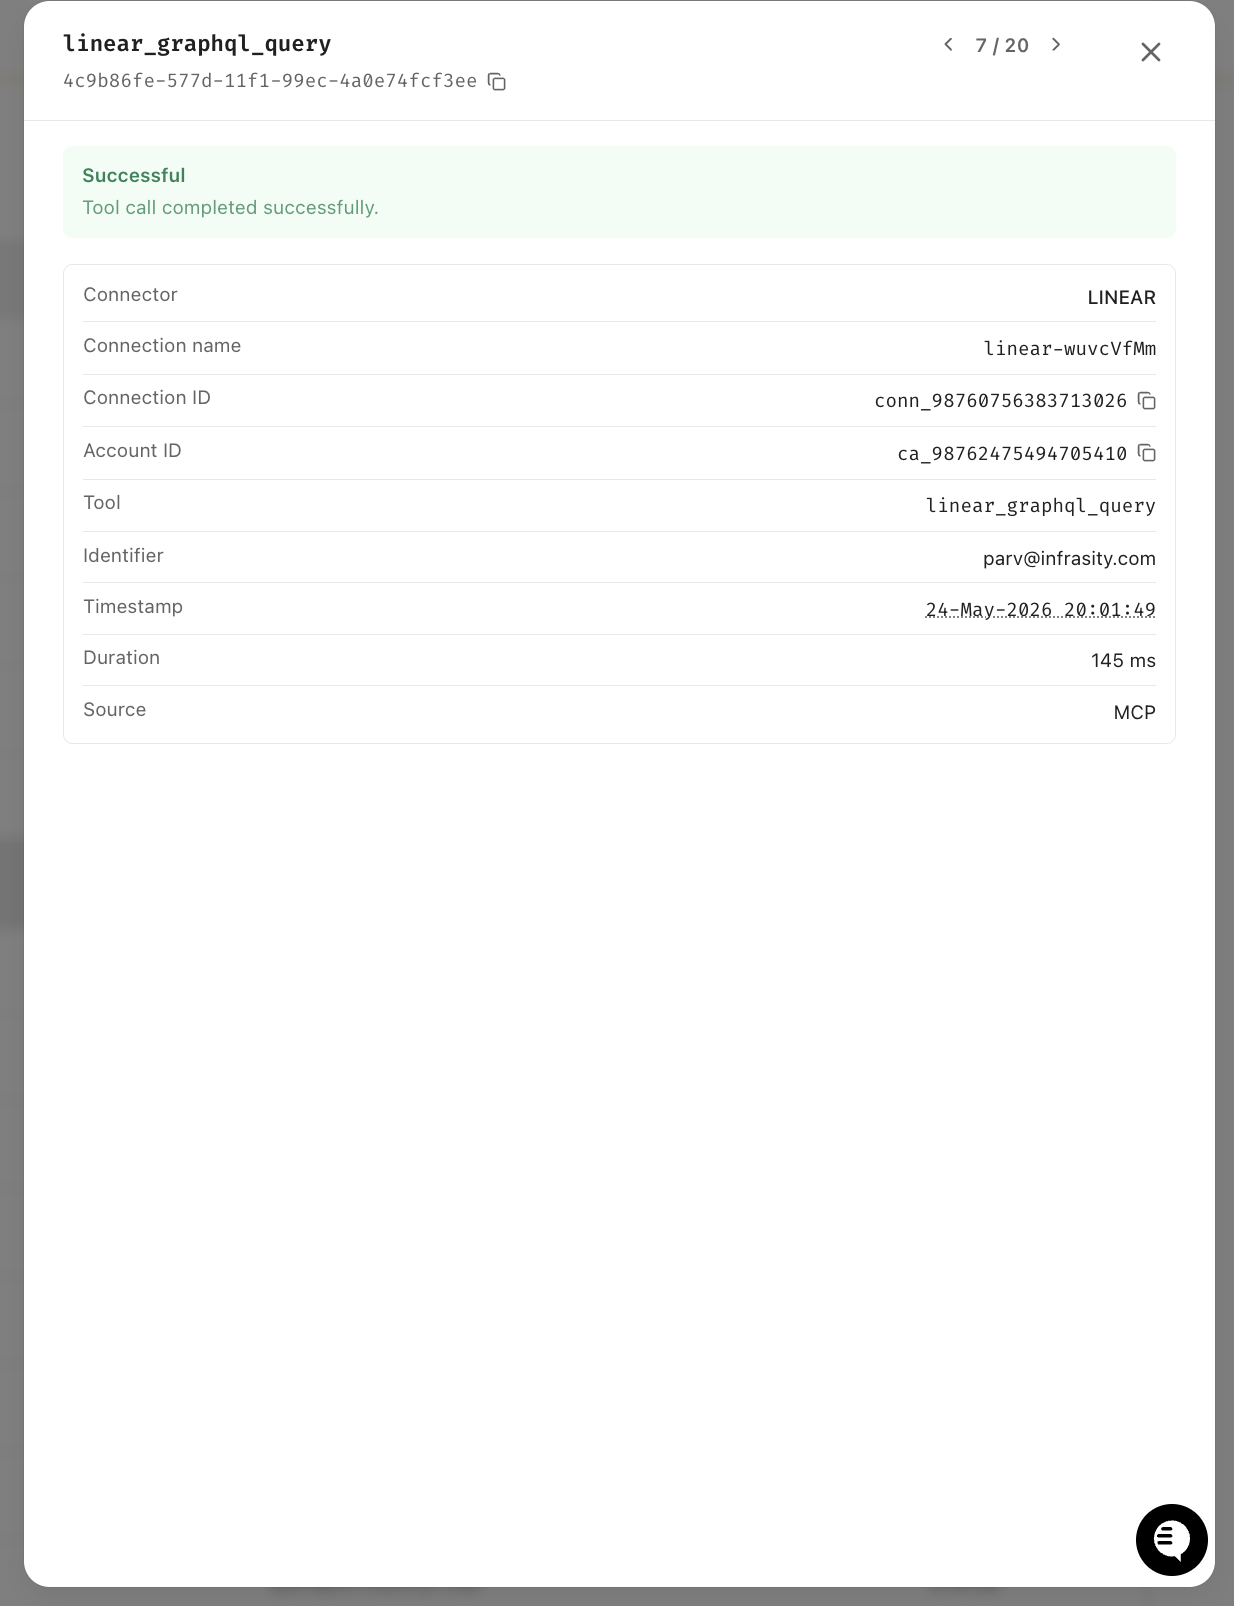
Both logged under the same user identifier, one audit trail across two services, zero custom logging code.
To make a multi-service incident response session work, Scalekit handled the following responsibilities entirely on its own, without any custom code on our part:
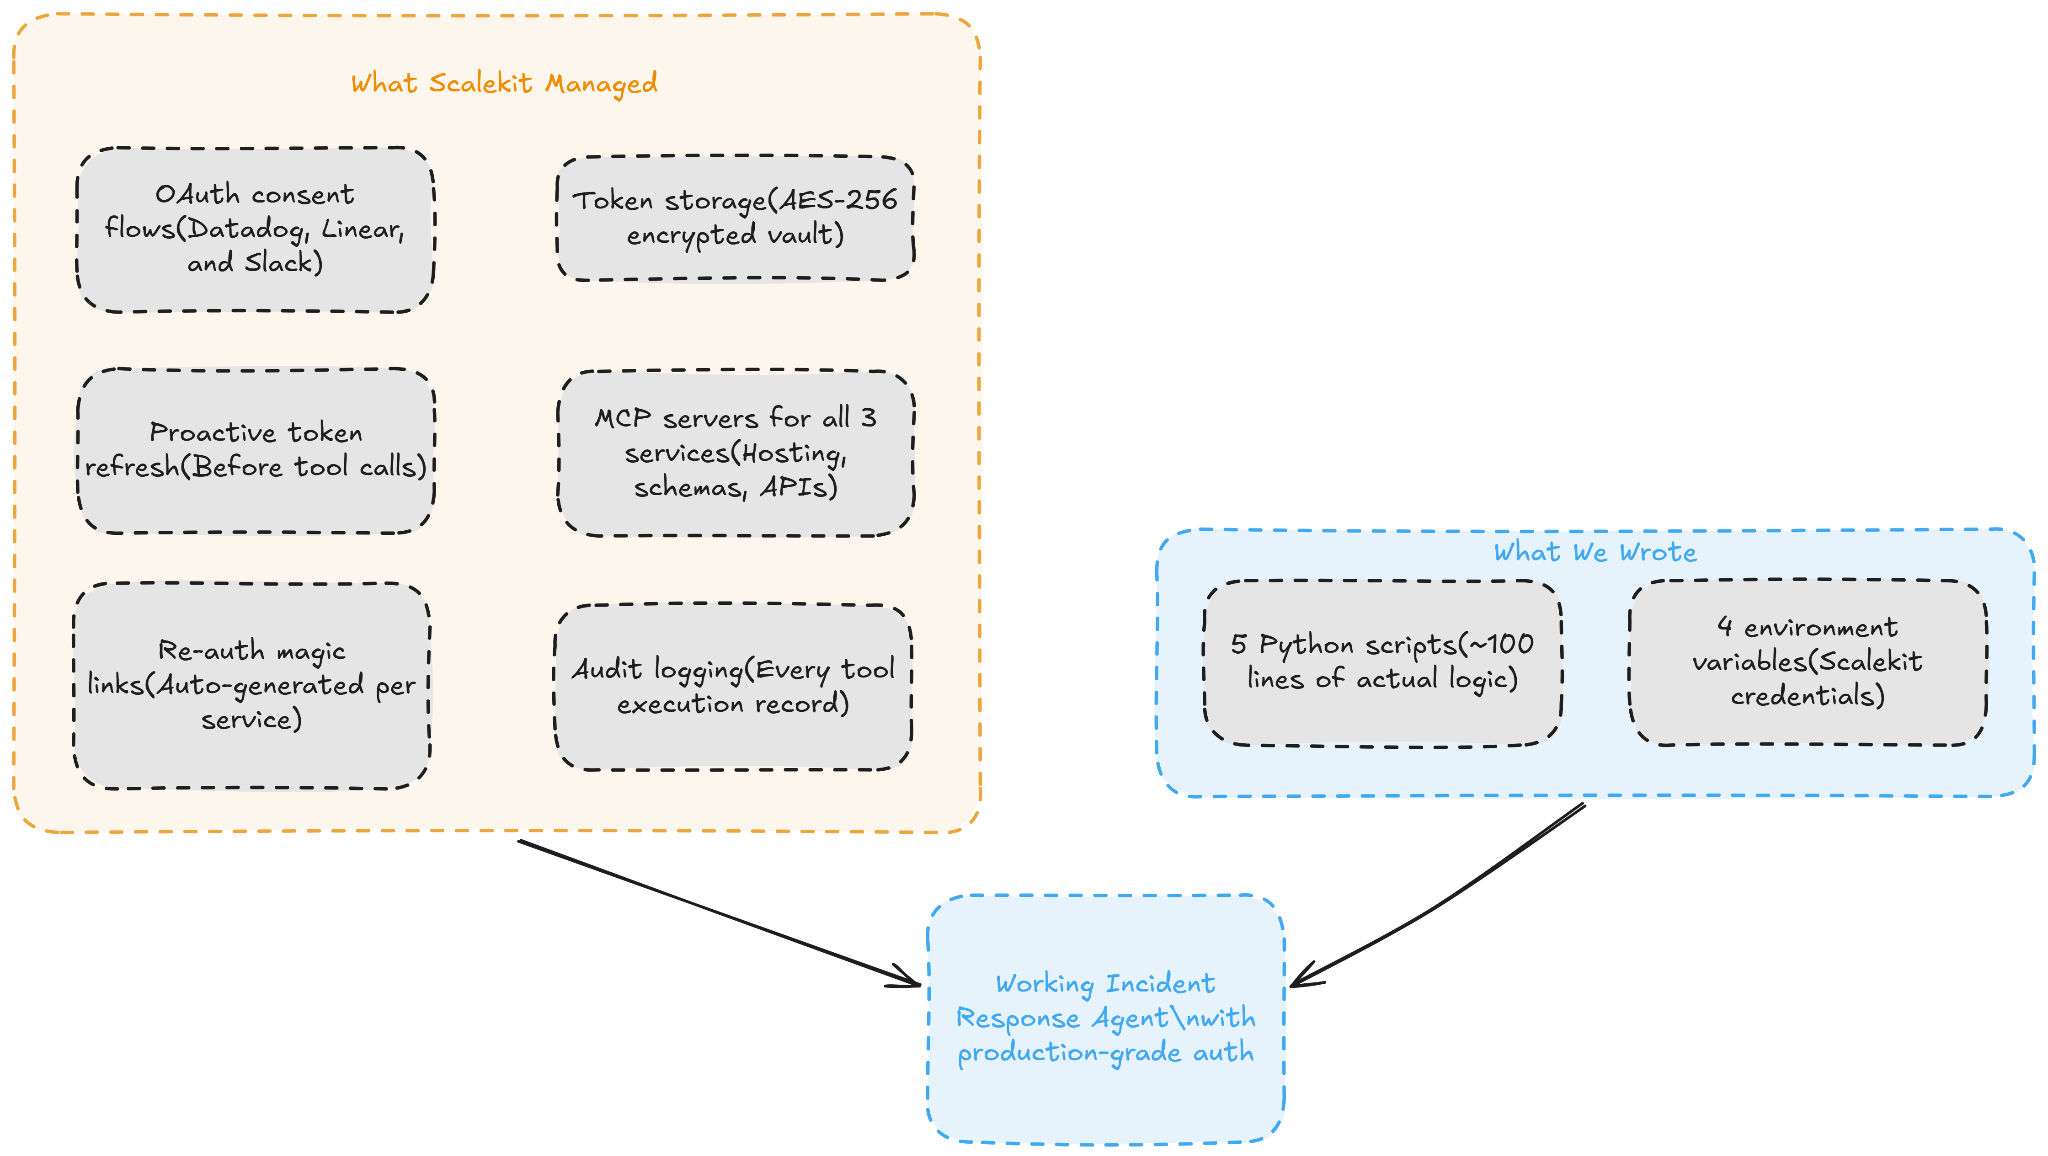
We wrote five Python scripts totaling roughly 100 lines of actual logic, configured four environment variables, and got a production-grade incident response agent that authenticates across three enterprise services.
Everything else, the OAuth servers, the MCP servers, the token vault, the refresh logic, the re-auth flows, and the audit trail, is infrastructure that Scalekit manages on our behalf.
Steps 1 and 2 from the walkthrough above are identical for OpenClaw. The only difference is how you pass the MCP URL to the runtime. Instead of calling agent.create() and sessions.create() through the Anthropic API, you install the Scalekit skill and configure four environment variables. OpenClaw handles the agent loop itself, and the skill manages all credential operations transparently.
Add these to your .env in the OpenClaw project root. Set TOOL_ENV_URL to the MCP URL returned by ensure_instance() in Step 2:
From that point, when a user asks the agent to interact with a connected service, the skill looks up the active connection in Scalekit, verifies it is authorized or generates a magic link if not, retrieves the available tool schemas, and executes the tool call transparently. The same token refresh, re-auth, and audit logging that Scalekit provides for Managed Agents applies here too.
Any connector configured in Scalekit works with both Claude Managed Agents and OpenClaw. Here are the most commonly used ones:
For services not in the catalog, you can use Bring Your Own Provider to configure your own OAuth application and expose it through the same MCP URL pattern.
The runtime problem is solved. Claude Managed Agents handles complex multi-tool pipelines on Anthropic infrastructure, and OpenClaw brings conversational agents to Telegram, Slack, and Discord. Both are production-ready and do their jobs well.
The part that catches teams off guard is the auth. Everything works fine in the demo with one user and a hardcoded token. The problems show up when real users hit Datadog, Linear, and Slack through the same agent at odd hours. Expired tokens, silent session failures, revoked access with no recovery path. Building that infrastructure yourself is weeks of work that has nothing to do with what your agent actually does.
Scalekit is the layer that handles it all. One ensure_instance() call per user returns a pre-authenticated MCP URL that covers all connected services. Tokens refresh before they expire, revoked access triggers a magic link, and every tool call is logged. Your agent code stays simple, and the OAuth flows you were about to build never need to get written.
Anthropic's fully managed runtime for AI agents. You define the model, system prompt, tools, and MCP servers once — Anthropic handles tool discovery, execution, retries, and session state. It entered public beta in April 2026.
An open-source personal AI assistant framework that runs on your own infrastructure and connects to messaging platforms like Telegram, Discord, Slack, and WhatsApp. It manages its own agent loop and supports multiple LLM providers. The Scalekit integration is a single skill install via Clawhub with four environment variables — no custom code required.
Neither ships with multi-user OAuth management, proactive token refresh, pre-built connectors, or a re-auth experience when tokens are revoked. Claude Managed Agents has Vaults for basic token storage. OpenClaw has nothing. In both cases, you build the rest yourself unless you use Scalekit.
It handles everything Vaults don't: OAuth consent flows, token storage, proactive refresh before every tool call, 75+ pre-built connectors, and automatic re-auth magic links when tokens are revoked. Your agent gets a single pre-authenticated MCP URL per user — no custom auth code required.
One call: ensure_instance(config_name, user_id). Scalekit returns a pre-authenticated MCP URL that covers all connected services for that user. Pass it to your agent. No vault_ids, no token management, no refresh logic on your end.
Yes, it's idempotent: it creates a per-user MCP instance on the first call and returns the same instance on subsequent calls. If a connection isn't authorized yet, it returns an auth link. Once authorized, it instantly returns the ready-to-use MCP URL.
Yes, create a separate Scalekit MCP config for each role; each config whitelists specific tools for its connector. An on-call agent gets full Datadog, Linear, and Slack access. A reporting agent gets read-only Datadog. Each user gets a scoped MCP URL per config, with no vault proliferation.