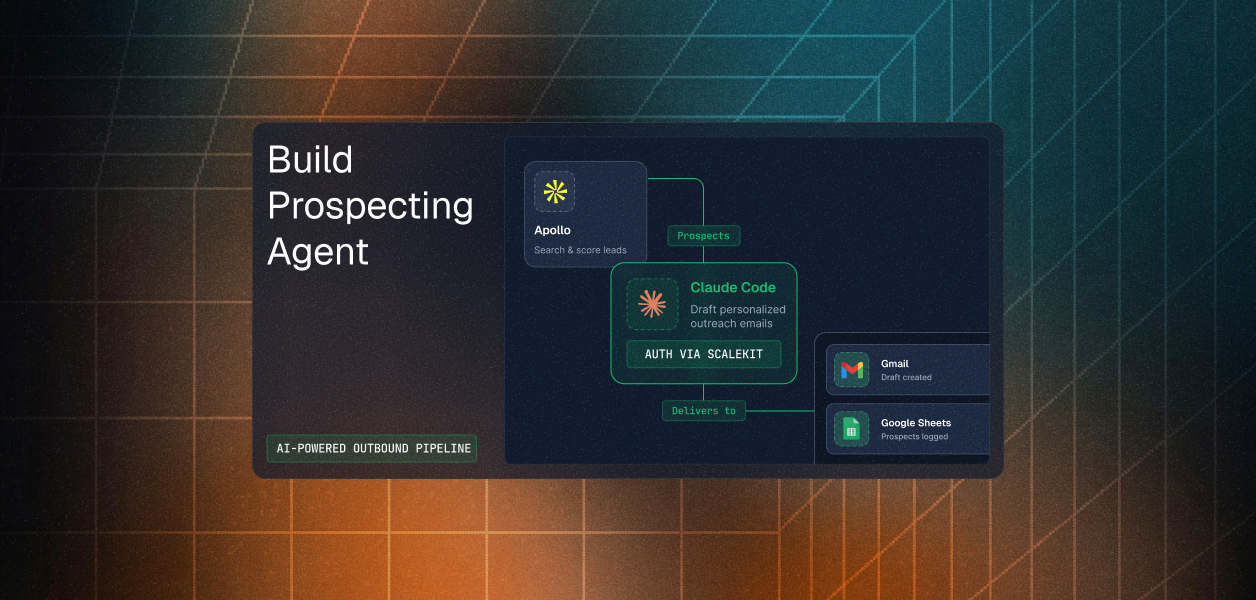
Build Prospecting Agent: Apollo, Gmail, Google Sheets, Claude Code, Scalekit


TL;DR
- A prospecting agent that searches Apollo for ICP-matched contacts, scores them on account and persona fit, saves personalized drafts to Gmail, and logs everything to a Google Sheets tracker – all in under 60 seconds per batch.
- The authentication layer across all three services - Apollo, Gmail, and Google Sheets (including Apollo's OAuth vs. API key split and Gmail's sensitive scope requirements) is handled by Scalekit's Claude Code plugin, which eliminates token management, refresh logic, and scope configuration from the implementation entirely.
- The full source code is available on GitHub and can be run with your Scalekit, Apollo, Gmail, and Google Sheets credentials in under 10 minutes.
Every SDR knows the painful rhythm: find a prospect in Apollo, open their LinkedIn to double-check the title, grab the company description, check for recent funding, write an email that doesn't sound like the other 40 in their inbox, paste it into Gmail, log it in the Sheet, repeat. Across 50 prospects a week, that adds up to 12 to 15 hours of work that requires no selling skill and shouldn't require a human at all.
The prospecting agent fixes this.
Rather than stitching together disconnected steps manually, the agent handles the entire sequence in a single run. It pulls ICP-matched contacts from Apollo, scores them on both account fit and persona fit, generates a personalized email grounded in real buying signals, saves it directly to Gmail Drafts, and logs every prospect to a Google Sheets tracker, all without the sales representative touching a single system until it is time to review and send. What previously consumed two workdays now runs in under 60 seconds per batch.
This guide builds an agent that handles the full sequence automatically. But before we get to the pipeline logic, we need to talk about the part that actually takes the most time; and it isn't making the agents discover or qualify prospects or write emails.
The Real Time Sink: Connecting 3 Services that Each Do OAuth Differently
Most tutorials about outbound automation skip straight to the API calls. They'll show you the Apollo search endpoint, the Gmail drafts API, the Sheets append method – and it all looks clean. The hard part doesn't show up until you try to run this for real users, not just yourself.
Here's what you're actually dealing with across these 3 services:
Apollo Has 2 Completely Different Auth Systems and It's Easy to Conflate Them
For personal use, you authenticate with an API key, which is generated in Settings, passed in a header, done in five minutes.
For an agent acting on behalf of other Apollo users (which is what a B2B SaaS outbound product requires), you must implement OAuth 2.0, a separate registration process that requires submitting your app through Apollo's developer portal and waiting for approval before credentials are issued. Developers typically build a working prototype using API keys and only discover the OAuth requirement when they try to let real users connect their own accounts.
Once you're in the OAuth path, Apollo's scope model is the next friction point. There are ten distinct scopes. contacts_search, accounts_search, and person_read are restricted to paid plans; if a user on a free plan connects and you call these endpoints, you get a runtime error, not an authorization failure. You need to know which scopes your agent needs before registration because editing scopes after the fact forces every existing user through re-authorization. Get this wrong once and it's a painful rollout.
Gmail's Scope Tiers Change Your Deployment Timeline
Gmail scopes are split into three tiers: non-sensitive, sensitive, and restricted. Creating drafts requires gmail.compose, which is a sensitive scope. Sensitive scopes require Google to review and verify your app before users outside your test group can connect without seeing an "unverified app" warning. Restricted scopes require that review plus an annual third-party security assessment. Under-scope and your agent fails at runtime; over-scope and enterprise IT admins will block your consent screen under admin_policy_enforced.
There's also token revocation behavior specific to Gmail: Google revokes all OAuth refresh tokens containing mail scopes whenever the user changes their password. In enterprise Workspace deployments with mandatory password rotation, this happens routinely. When it does, the account status moves to REVOKED with no automatic retry. Your agent needs to detect this and prompt re-authorization.
Google Sheets Access Tokens Expire Every Hour
That's the shortest window of any major OAuth provider. That means your refresh logic must be proactive. A stale token mid-operation produces a silent 401 that looks like a permissions problem, which is painful to debug. Sheets also has a hard requirement: you must register your own Google Cloud OAuth credentials. There's no managed app shortcut. Every user's consent screen must show your specific Google Cloud project, and any project requesting user data scopes must pass Google's app verification before it can be used by more than 100 accounts.
Managing all of this yourself: token storage, refresh cycles, revocation detection, scope validation, and per-user isolation across three different services means writing a significant amount of infrastructure before writing a single line of business logic. That's the problem Scalekit solves – it's an Auth provider for AI agents.
Prerequisites for Building the Outbound Prospecting Agent
Before starting, you should confirm that the following are in place so the setup process goes smoothly from the very first command.
- Claude Code
- Scalekit account, free tier is sufficient; get credentials at app.scalekit.com. For real-world use-cases, you will have a PAYG model.
- Apollo, an account with API access. Note: apollo_search_contacts and apollo_enrich_contact require a paid plan. The agent includes a USE_SAMPLE_DATA=true fallback if you want to test the pipeline without Apollo credits
- Gmail and Google Sheets, accounts with permission to create drafts and write to spreadsheets
- A blank Google Sheet, create one and copy the Sheet ID from the URL (the alphanumeric string in docs.google.com/spreadsheets/d/SHEET_ID/edit)
- Python 3.11+
For Gmail: if you're running this inside a Google Workspace org for internal use, gmail.compose works without additional verification. For external production deployments where users outside your Workspace connect, plan for Google's OAuth verification process before launch, it typically takes several days.
How Authentication Works Across The 3 Services with Scalekit
Scalekit provides a unified authentication layer designed specifically for agent-based workflows that need to act across multiple services on behalf of a user, and it removes the credential management problem entirely from the application layer, allowing development time to be spent on workflow logic instead. The only credential your application manages is the Scalekit API key.
Rather than managing each integration separately, Scalekit offers three concrete advantages that keep the codebase focused on what the pipeline actually does:
- Connectors are configured once through the Scalekit dashboard and remain active across all pipeline runs without re-authorization
- All API interactions run through a single interface via
execute_tool(), regardless of which underlying service is being called - Token refresh, scope management, and connection state are handled automatically across all three connectors, so the agent never encounters a stale credential mid-run
With the authentication layer fully managed by Scalekit, the rest of this guide focuses on building out the pipeline logic itself, starting with connector configuration in the dashboard.
How to Set Up Your Connectors in Scalekit
Getting all three connectors active before writing any code means the pipeline logic can be tested end-to-end from the very first run, without encountering authorization failures partway through a batch.
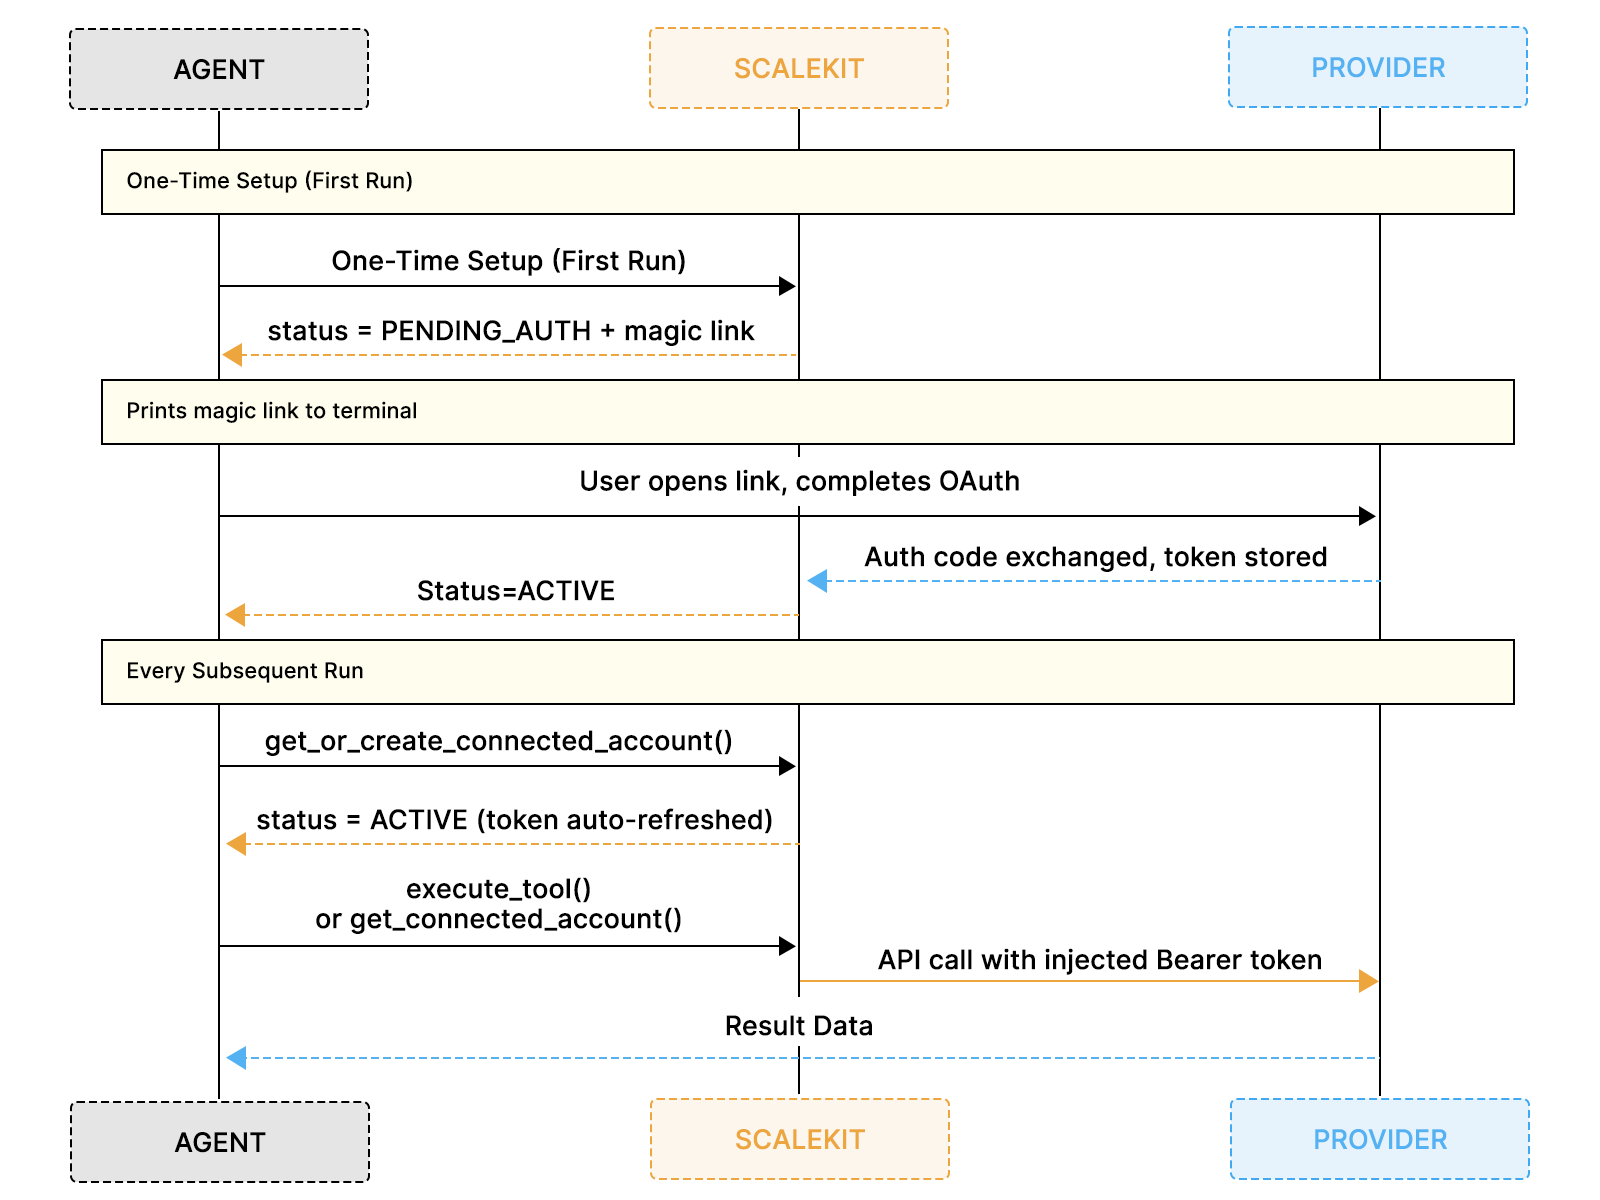
The diagram above shows how the one-time connector setup in the dashboard feeds into the first-run OAuth flow, after which every subsequent run proceeds immediately without any manual authorization steps.
Step 1: Create Your Scalekit Account and Workspace
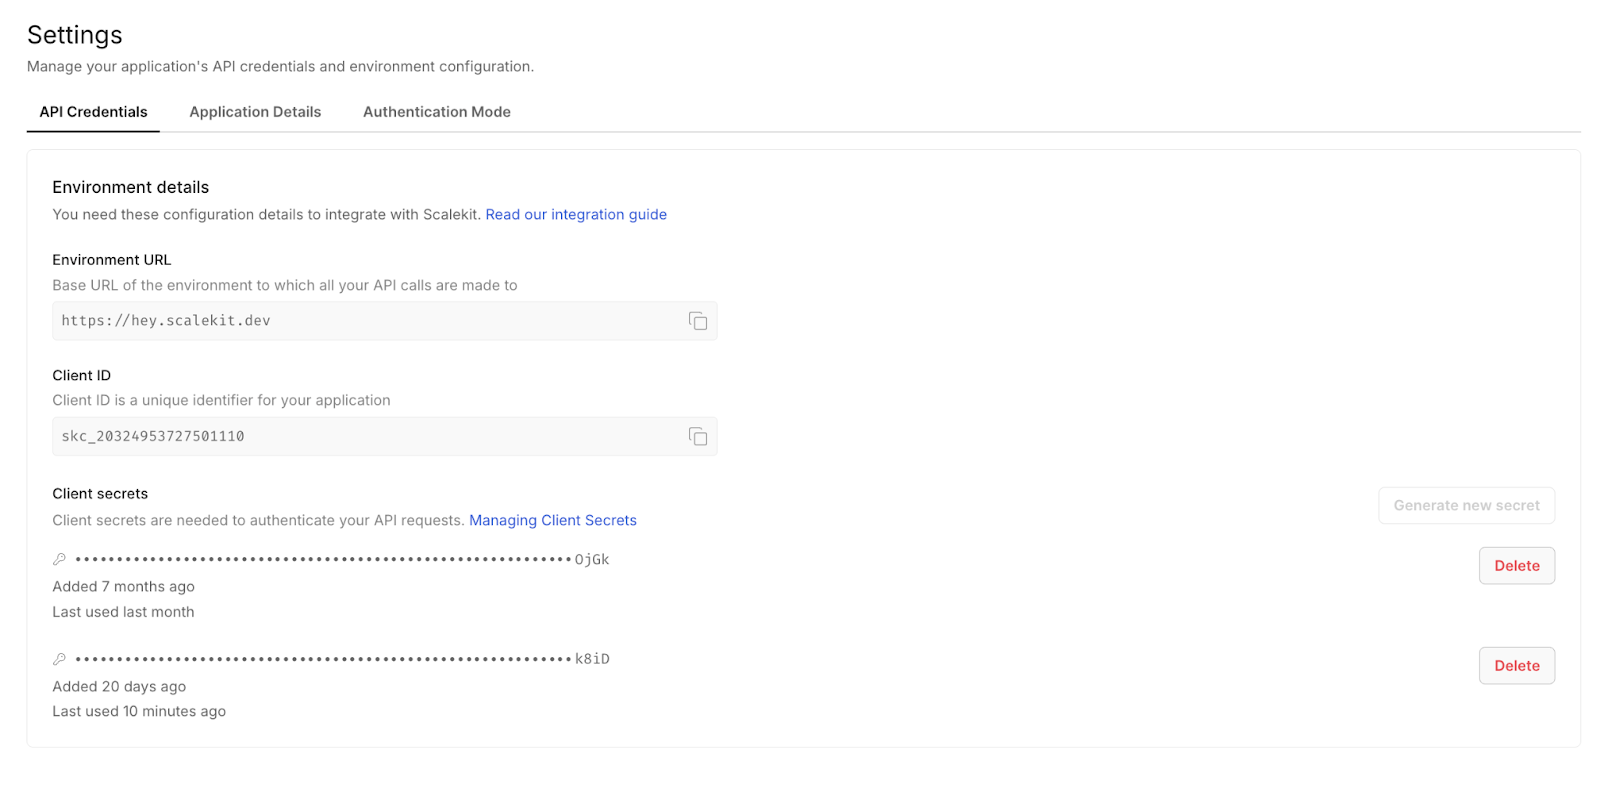
Go to scalekit.com and create a free account. Once inside, create a new workspace for this project. Your workspace generates a SCALEKIT_ENV_URL, SCALEKIT_CLIENT_ID, and SCALEKIT_CLIENT_SECRET, all of which should be added to your .env file before running any code.
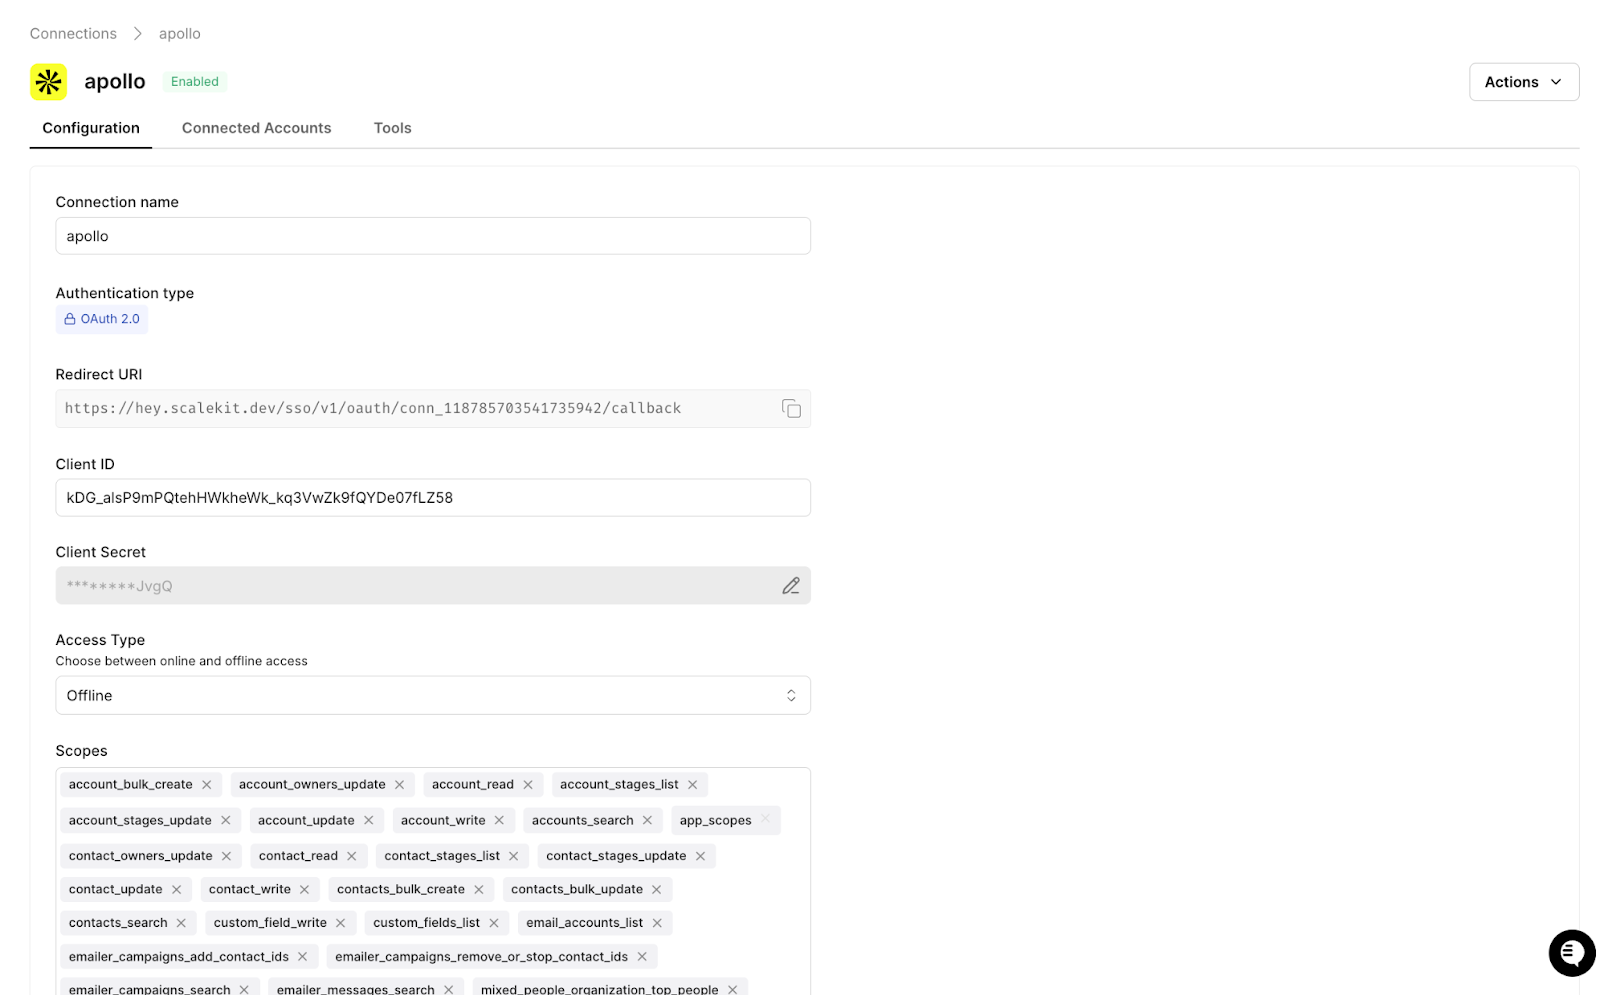
Step 2: Add the Apollo Connector
In the Scalekit dashboard, navigate to Agent Auth → Connections, search for Apollo, and add it to your workspace. Select the scopes needed for people search and enrichment, and Scalekit will manage the API key securely from that point forward without any additional configuration on your side.
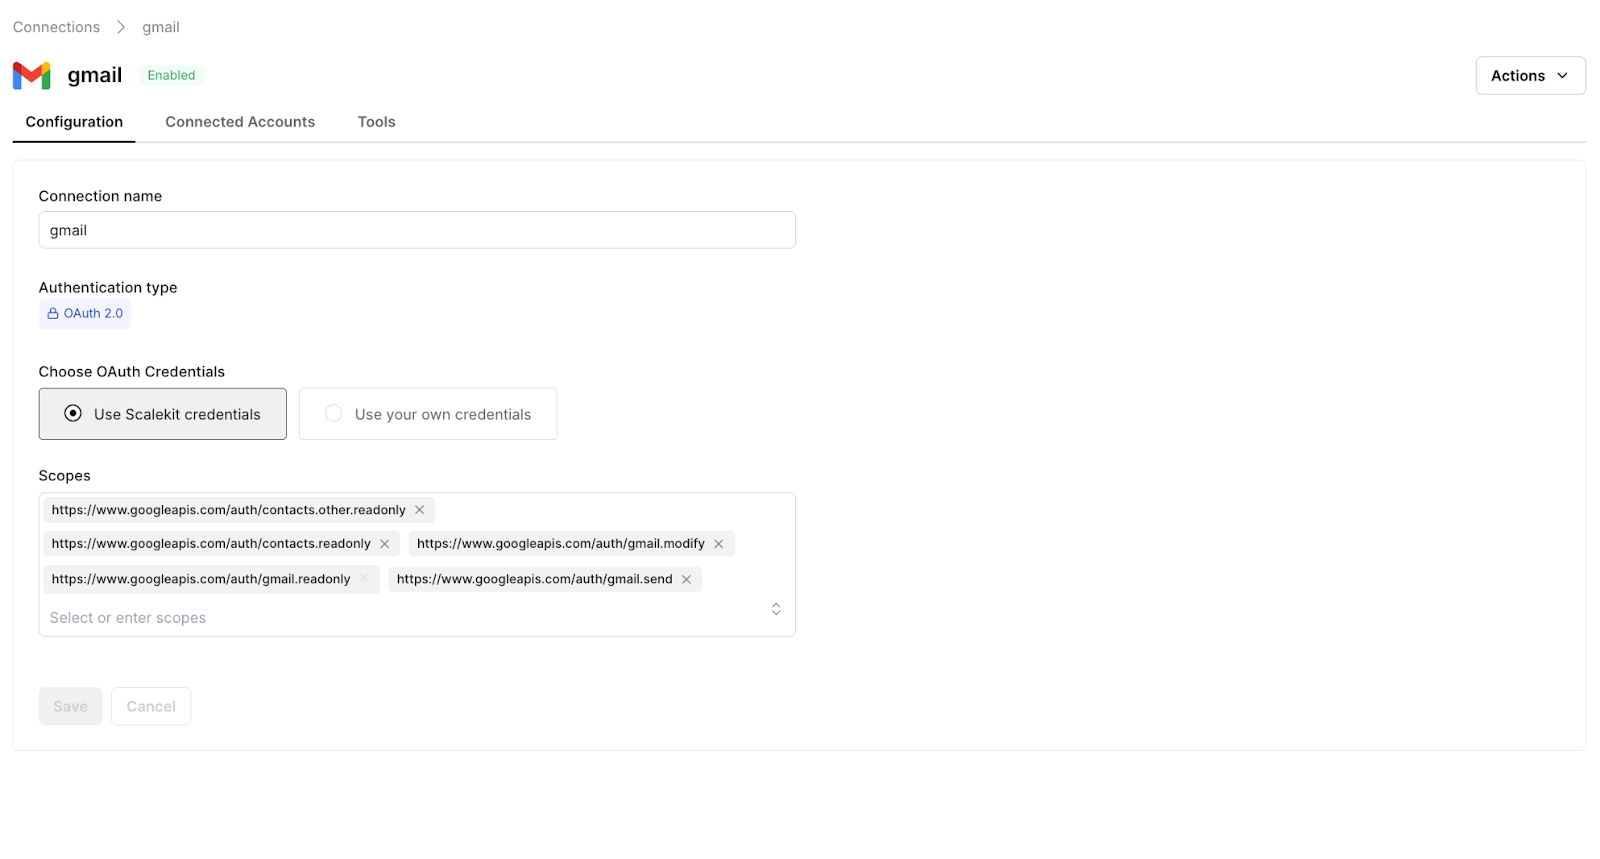
Step 3: Add the Gmail Connector
Add Gmail and select the gmail.compose scope, which grants permission to create drafts without requiring full inbox access. Scalekit handles the sensitive scope authorization flow and all subsequent token refreshes automatically, so no additional Google configuration is required for internal Workspace usage.
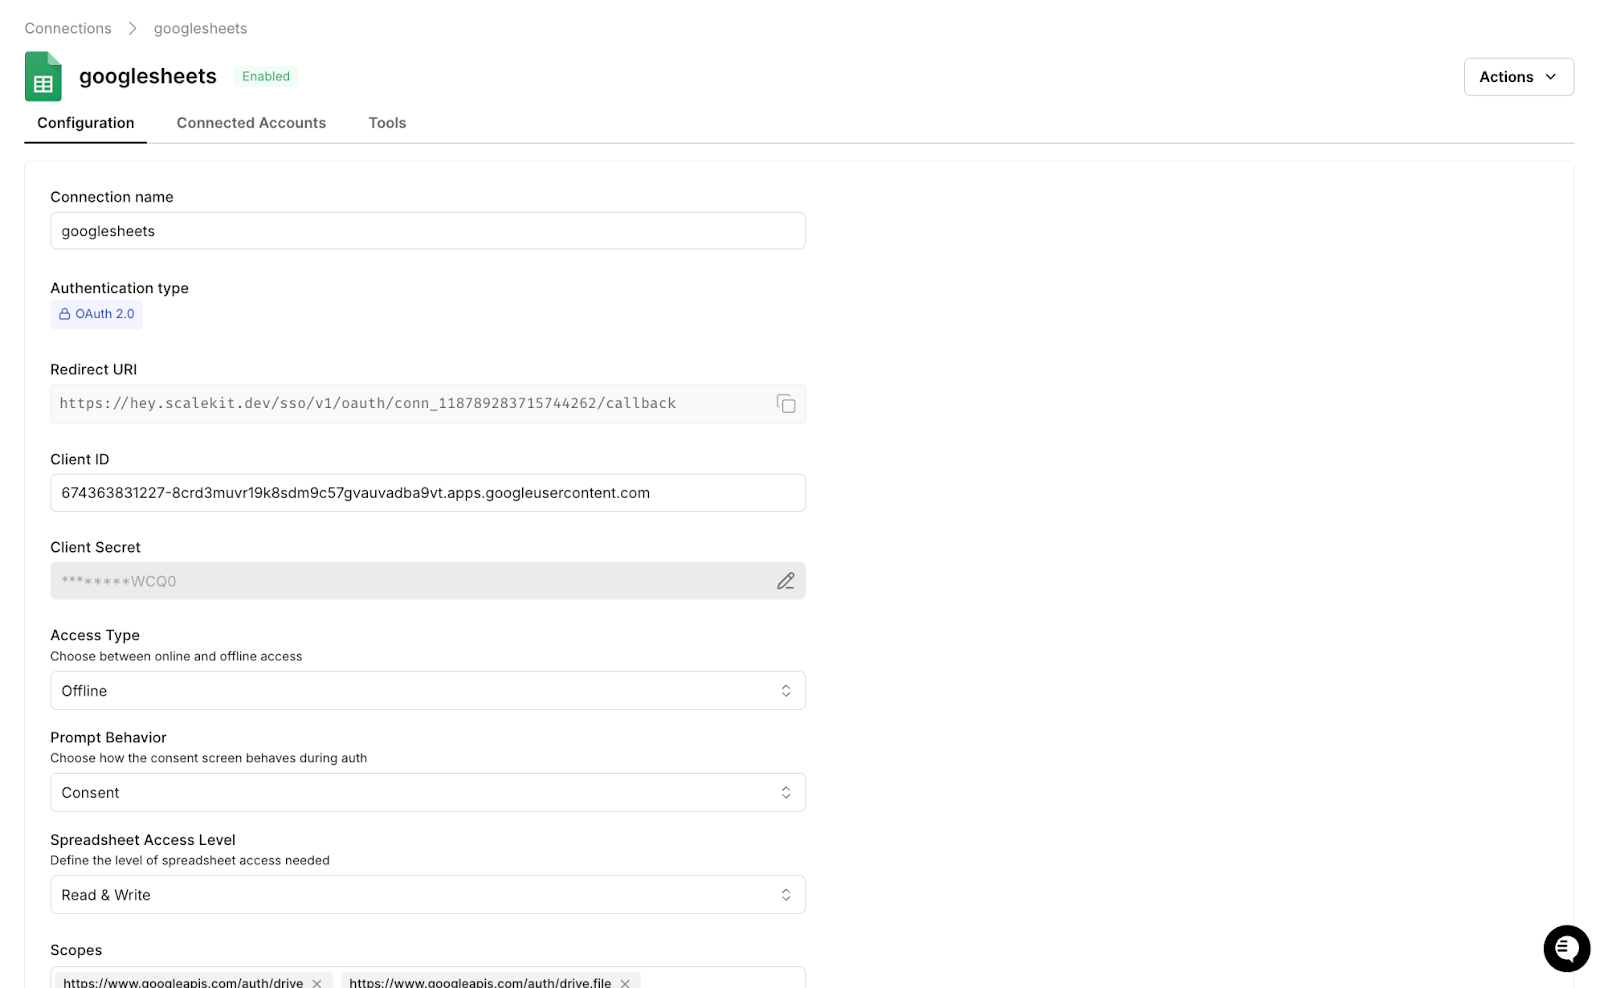
Step 4: Add the Google Sheets Connector
Add Google Sheets with the spreadsheets scope to enable both read and write access. Scalekit manages OAuth token refresh for Sheets using the same mechanism it uses for Gmail, so one consistent interface handles credential management for both services without you needing to implement any of it directly.
Once all three connectors are active, every integration in this workflow maps directly to an execute_tool() call, and authentication is fully handled, so you can move straight into wiring up the pipeline logic.
Setting Up Auth with Claude Code
With the Scalekit plugin installed in Claude Code, the authentication layer across all three connectors is configured with just two terminal commands before any application code is written.
From there, give Claude Code the following prompt to generate the Scalekit client and a reusable auth check function that the rest of the pipeline depends on:
Claude Code generates the following client initialization and authorization helper, which serves as the foundation for every execute_tool() call that follows:
You call ensure_authorized() once per connector at startup, and on the first run, Scalekit prints a magic link for any connector that has not yet been authorized. The user completes OAuth once, the tokens are stored, and every subsequent run proceeds directly to ACTIVE status without prompting again. There is no token management code to write and no refresh logic to debug, which means the rest of the implementation can focus entirely on the data flow that actually moves prospects through the pipeline.
How to Search Apollo for ICP-Matched Prospects
Apollo exposes a people search API that accepts job titles, industries, employee ranges, and other targeting filters, and the agent sends these parameters directly through execute_tool() without any custom HTTP handling required on your side.
All targeting parameters are stored as environment variables in your .env file, which means updating your ICP criteria never requires touching the application code. To change who the agent searches for, update the relevant variable and re-run:
For each contact returned by the search, the agent enriches the record with company context, recent signals, and tech stack data to give the scoring step enough signal to work with accurately:
Scalekit handles the Apollo API key and rate limiting transparently behind execute_tool(), so the only thing that changes between campaigns is the values in your .env file.
How to Score Prospects Against Your ICP
Because not all Apollo results carry equal weight against your ideal customer profile, the agent scores each prospect on a scale of 0 to 100 against your ICP criteria before deciding which contacts advance to the email drafting step. This scoring pass is what ensures the pipeline produces focused, high-quality output rather than flooding the sales representative with low-signal drafts.
Results are sorted by score and trimmed to the value set in PROSPECT_LIMIT, so a VP of Sales at a 300-person SaaS company that just raised a Series B scores 90 and moves forward, while a Director of Operations at a 10-person logistics company scores 0 and never reaches the draft step. This filtering is what keeps every subsequent step in the pipeline focused on contacts who are genuinely worth the outreach effort.
How to Draft Personalized Outreach Emails
Email drafting is the step that traditionally consumes the largest share of an SDR's preparation time, and it is where the quality of enrichment data makes the biggest difference between outreach that converts and outreach that gets ignored.
The agent pulls buying intent signals, ICP scores, and firmographic context directly from Apollo and maps them into the message structure using variables such as {{First Name}}, {{Company Name}}, and {{Buying Signal}}. Every email references something specific to that prospect's actual situation, whether that is a recent funding round, a hiring spike, or a technology keyword pulled from their website, so the same template scales across hundreds of prospects without losing the precision that makes outreach feel researched rather than broadcast.
This is the core of what makes the pipeline worth building. The intent signals Apollo surfaces and the variables the agent maps into each draft are what allow a single SDR to send highly personalized outreach at a volume that would otherwise require a full team writing emails manually one by one.
When OPENROUTER_API_KEY is set, an LLM writes each email using a structured prompt that anchors every message directly to the prospect's buying signals:
The output references a specific, real signal such as a recent funding round, a new executive hire, or a headcount expansion, rather than making a generic industry observation that any competitor could have written without doing any research at all.
If the API key is not configured or the LLM call fails for any reason, the agent falls back to a template that still references the prospect's top buying signal rather than producing a fully generic message that would undermine the value of the enrichment data already gathered:
The fallback is intentional because the sales representative should receive a usable draft regardless of whether the LLM is available, and in both cases, the email lands in Drafts ready for the representative to review before anything is sent.
How to Save Outreach to Gmail Drafts Automatically
Gmail does not expose a draft-creation tool via execute_tool(), so the pipeline goes directly to get_connected_account() to retrieve a fresh OAuth token from Scalekit's token vault and then calls the Gmail REST API. Scalekit manages the entire OAuth lifecycle including token storage, expiry tracking, and refresh, so the token returned is always valid regardless of how long the agent has been running. The draft is never sent.
The draft lands in the sales representative's Gmail Drafts folder with the subject and body already written, with prospect-specific variables such as {{First Name}} and {{Company Name}} mapped inline so the same template scales across the entire batch without losing personalization. The representative reviews the structure, confirms the variables are pulling correctly, and the sequencer handles the rest at send time.
The screenshot below shows exactly what that looks like in practice, with variables embedded in the opening line, a concise three-paragraph body, and a 15-minute call ask at the close.

How to Log Every Prospect to Google Sheets
With each draft created and saved to Gmail, the final step in the pipeline appends a complete record for every prospect to the tracking spreadsheet via execute_tool(), giving the sales team a single source of truth to work from across every prospect in the batch.
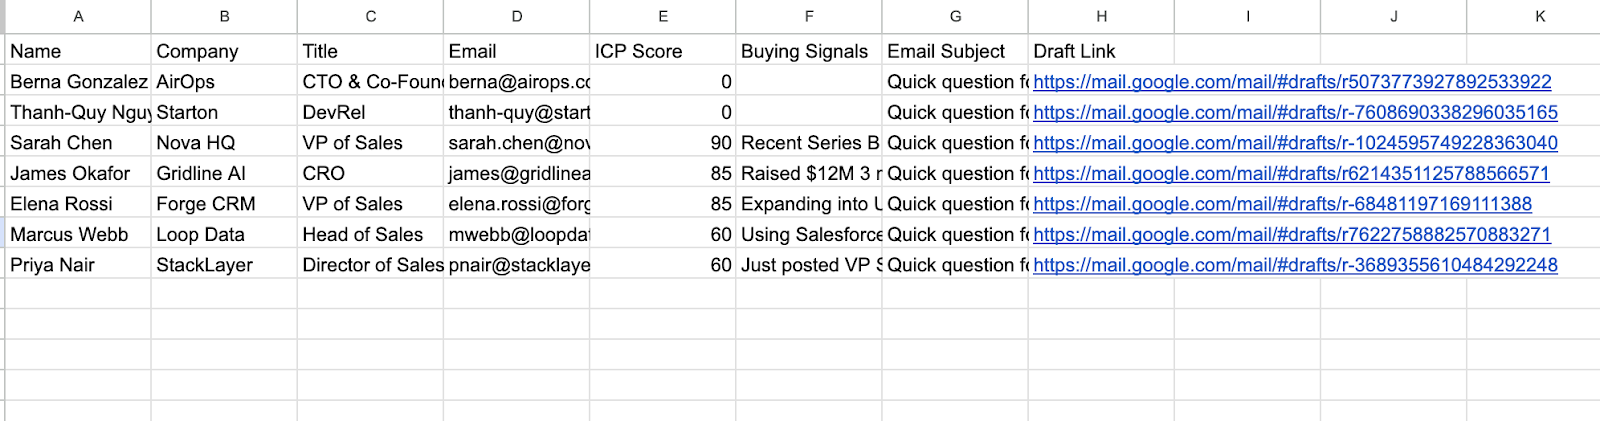
Each row written to the sheet captures the prospect's name, company, title, email, ICP score, the buying signals that triggered the outreach, the email subject line, and a direct link to the Gmail draft. The sheet serves as both a complete audit trail and a daily work queue, with no separate research documents to maintain and no manual copy-pasting between systems.
The screenshot below shows exactly what that looks like after a full pipeline run:
How to Run the Full Outbound Pipeline
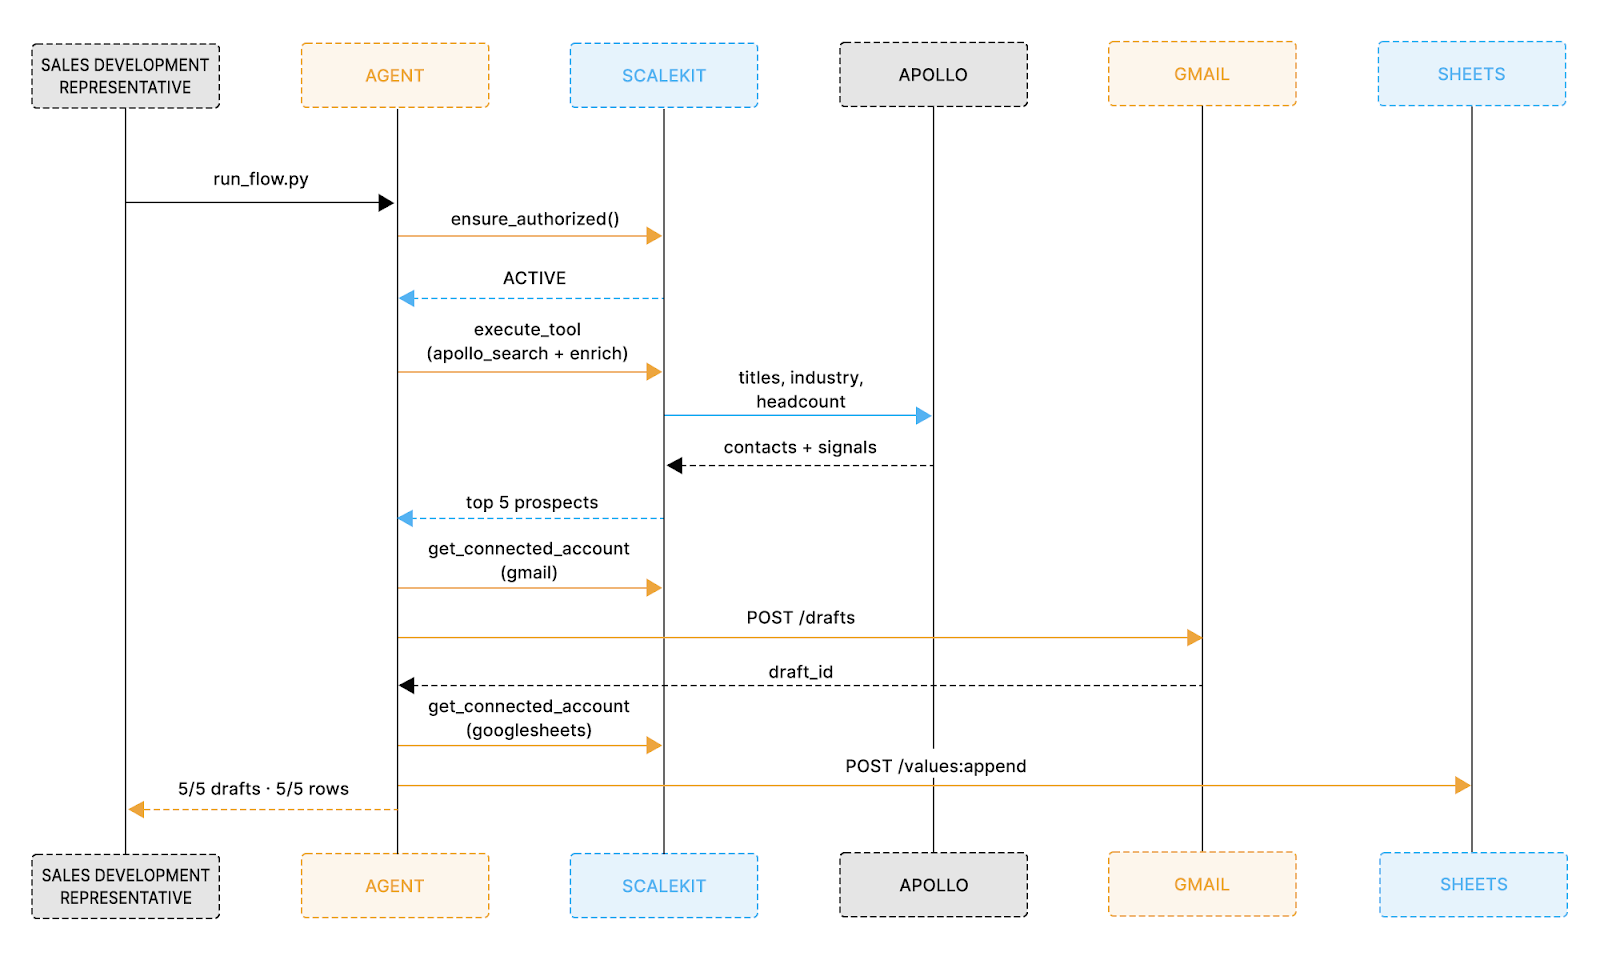
With all connectors configured and environment variables set, the entire pipeline runs from a single command. Before looking at the code, the sequence diagram below shows exactly how each system is called in order, from the moment the sales representative triggers the run to the moment the Sheet is fully populated.
With that flow in mind, install the dependencies and run the pipeline with the following two commands:
Once running, the agent prints a live status update for every step so you can see exactly what is happening at each stage:
Each step maps directly to what the sequence diagram shows: auth is verified first, Apollo is searched and enriched, drafts are created one per prospect, and each row is logged to Sheets before the final confirmation prints. LLM drafting takes 3 to 5 seconds per prospect and each execute_tool() call completes in 1 to 2 seconds, so the full pipeline for five prospects runs consistently under 60 seconds from the first auth check to the final Sheets confirmation.
What to Check Before You Go Live
Before running in a live environment, review these considerations to avoid unexpected behavior on the first production run.
Apollo: Check your plan's monthly enrichment credit limit before large batches. Start with PROSPECT_LIMIT=5 and increase gradually. Consider caching results locally to avoid consuming credits on duplicate runs.
Gmail: gmail.compose is a sensitive scope. Internal Google Workspace use requires no extra verification. External production deployments require Google's OAuth verification process, so plan for that in advance.
Google Sheets: Scalekit handles token refresh automatically. Your SHEETS_ID is the alphanumeric string in the sheet URL: docs.google.com/spreadsheets/d/SHEETS_ID/edit.
Scheduling: The agent exits cleanly after each run with no persistent process required. A cron job at 7am gives sales representatives a fully populated Sheet before the day's first standup.
Error logging: Every failure is captured in a _errors list with a final summary of prospects found, drafts created, and rows logged. If Gmail goes unavailable, the pipeline exits immediately with a clear message rather than silently producing zero drafts.
Connector names: Google Sheets is registered as googlesheets, and Apollo tools are apollo_search_contacts and apollo_enrich_contact. For Sheets, the pipeline tries execute_tool(googlesheets_append_values) first and falls back to REST if not enabled. For Gmail, the pipeline goes directly to get_connected_account() plus Gmail REST, with Scalekit managing the token throughout.
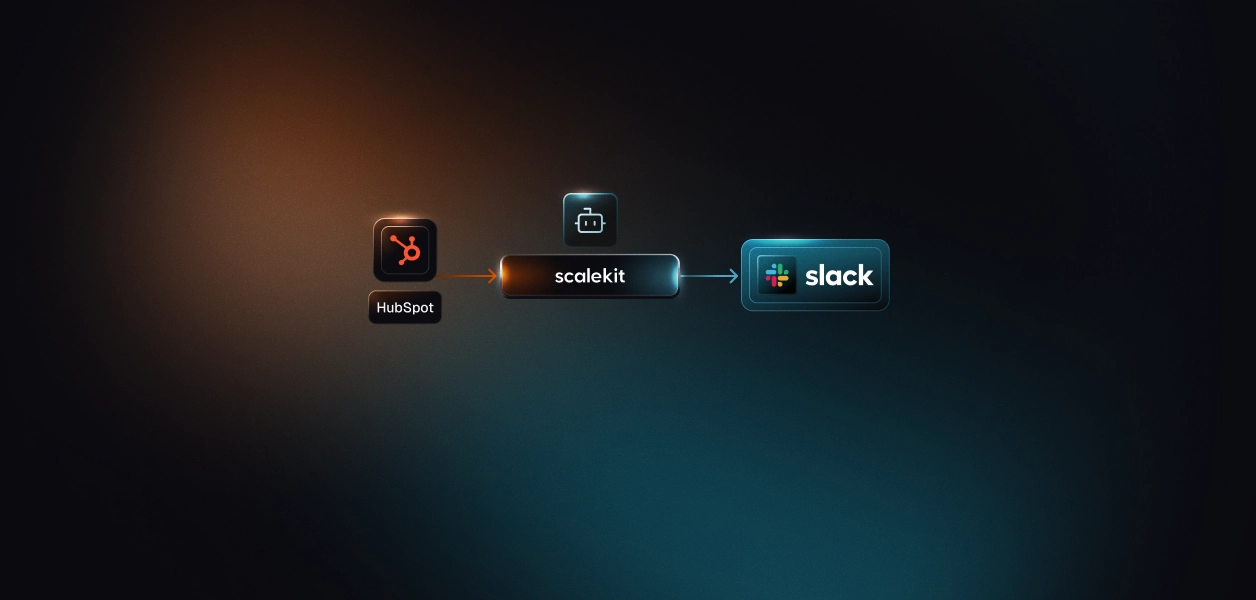
What to Do When You Want to Add a New Service
The pattern above extends directly to other connectors. If you later need to log to HubSpot instead of Sheets, add a Slack notification when a high-score prospect is found, or pull company news from a different source, the auth layer stays identical: get_or_create_connected_account(), get_authorization_link() once, execute_tool() forever after.
Scalekit maintains each connector; you maintain none of them.
The full source code is available on GitHub and runs with your Scalekit, Apollo, Gmail, and Google Sheets credentials in under 10 minutes.
If you're a developer, join Scalekit's Slack community if you're stuck developing your agent, and seek help/guidance.
FAQ
How does Scalekit know when to refresh an OAuth token mid-run?
Scalekit holds all tokens in its own vault and checks expiry on every call. get_connected_account() returns a fresh token if the stored token is about to expire, and execute_tool() automatically injects a valid token into every outbound request. There is no refresh logic to write and no risk of a stale credential failing mid-batch.
What happens when a Scalekit tool is not yet enabled in my dashboard?
Every connector has a two-tier fallback. Tier 1 tries execute_tool(). If the tool is not enabled, Scalekit raises an exception, the code catches it silently, and Tier 2 calls the provider's REST API directly using a fresh token from get_connected_account(). Both tiers produce identical results. The terminal output shows which path each call took.
What if I do not have an Apollo account yet?
Set USE_SAMPLE_DATA=true in your .env. The agent skips Apollo entirely and uses five bundled sample prospects to run the full pipeline, producing real Gmail drafts with real draft IDs and real rows in your Google Sheet. This is also the recommended first run to verify that Gmail and Google Sheets are connected correctly before introducing Apollo into the flow.
How do I run this pipeline for multiple SDRs on the same team?
Each sales representative gets their own Scalekit-connected account identified by their email address. Add one entry per representative to CONNECTOR_USERS and loop the pipeline over them. Scalekit manages each representative's OAuth tokens independently in its vault, so there is no credential sharing, no token collision, and no manual re-authorization required when a token expires for one account but not another.