Most support escalations aren't sudden. They're a billing message on Monday, a follow-up on Wednesday, and "I'm canceling" on Friday; three conversations that never got connected.
This agent catches that pattern in real time. It reads Intercom conversations, scores them for escalation signals (repeated replies, long open time, frustrated language), creates a structured Linear issue, and pings the right Slack channel with full customer context already attached.
No LLM in the core detection loop. No custom webhook plumbing. One auth layer for all three services.
The full code is on GitHub. Clone the repo, configure your connectors in Scalekit, and have it running in about 15 minutes.
Customer Escalation Signals are Obvious, then What's The Problem?
Your support team already knows what a bad conversation looks like. The problem is scale: a support lead managing 200 open threads can't manually cross-reference reply counts, open duration, and customer tier for each one.
The signals are consistent:
A customer who's replied 4+ times without resolution
A thread open longer than 24 hours on an enterprise account
Language that shifted from "can you help" to "cancel" or "manager"
Any one of these is a flag. Combined, they're a churn indicator. But they're spread across Intercom, not ranked by MRR, and not linked to a Linear ticket; so they get missed until someone escalates manually.
This agent closes that gap. Every conversation runs through the same evaluation on every cycle. No signal gets ignored because the queue was busy.
How This Escalation System Works: A Signal-Driven Pipeline
To solve this consistently, the system is designed as a structured, signal-driven pipeline rather than an open-ended autonomous agent. Each execution is triggered by polling or a webhook, processes recent conversations through a fixed sequence of steps, and then exits.
This approach avoids unnecessary complexity such as persistent memory or iterative decision-making loops, and instead focuses on predictability and reliability. Every conversation is evaluated using the same sequence, making the system easier to test, reason about, and operate in production environments.
At a high level, each run follows a consistent flow: detect escalation signals, evaluate customer value, create an issue in Linear, send an alert via Slack, and write the results back to Intercom. This ensures that every escalation is handled in a structured and repeatable way.
How Every Conversation Gets Evaluated
On each run, the system fetches recent conversations from Intercom (e.g., those updated in the last few minutes) and evaluates each one individually.
Each conversation then moves through a structured sequence of steps, similar to how an experienced support lead would review whether it needs escalation. The difference is that this evaluation happens consistently across every conversation, without relying on manual attention.
At a high level, the system processes each conversation through five stages, combining signal detection, contextual enrichment, and automated routing.
Signal Detection: The system analyzes the conversation for escalation indicators, such as keywords like "cancel," "frustrated," or "manager," as well as heuristics, including conversations that open outside a defined time window, high reply counts, and negative sentiment patterns. Since escalation signals are often subtle and spread across multiple messages, combining these factors provides a more reliable trigger.
Customer Value Check: The system retrieves company data from Intercom, including plan tier, MRR, and lifecycle stage, to determine routing priority. Enterprise customers and accounts above a defined threshold are automatically prioritized.
Issue Creation: For conversations that meet the escalation criteria, a structured issue is created in Linear with full context, including conversation summary, customer metadata, and the reason for escalation. This ensures that the receiving team has everything needed to take action immediately.
Team Alert: A structured alert is sent to the appropriate Slack channel, routing high-priority cases and standard issues to their respective teams. Each alert includes enough context to minimize back-and-forth and reduce response time.
Conversation Annotation: Finally, the system writes an internal note back to the conversation with the escalation details, issue link, and routing status. This prevents duplicate escalations and ensures that anyone viewing the conversation has full context.
What Automated Escalation Detection Changes for the Team
By the time a support lead or account manager looks at an escalated conversation, the detection and routing work is already complete. Instead of discovering problems reactively, the team works with a structured, enriched context from the moment an escalation is flagged.
Early detection, not late discovery: Frustration signals are caught as they emerge, not after the customer explicitly asks for a manager. The average detection time drops from days to minutes.
Consistent prioritization across all conversations: Every conversation is evaluated against the same thresholds. High-value customers are never accidentally deprioritized because a queue was busy.
Immediate context in every alert: Each Slack alert includes the customer's plan tier, MRR, conversation summary, escalation reason, and a direct link to both the Intercom conversation and the Linear issue. The responder can act immediately without context-switching.
Audit trail from detection to resolution: The Linear issue captures the full context: why the escalation was triggered, what the customer said, and what their account looks like. This makes post-incident reviews straightforward.
No duplicate escalations: Once a conversation is escalated, the system tracks it and skips it on subsequent runs. The team never receives the same alert twice.
The impact is operational, not just technical teams; they no longer discover churn risks after the fact; they catch them in real time, with better speed, accuracy, and consistency.
How the Escalation Flow Works Behind the Scenes
So far, we have looked at the problem, the system design, and the high-level process for each conversation. To make this more concrete, let's break down how decisions are made and how different services interact during execution.
Decision Flow: How Each Conversation Is Evaluated
The diagram below shows how a conversation moves through signal detection, customer value check, and routing before being written back to Intercom.
To make the flow easier to follow, here is how each step in the diagram maps to the actual pipeline:
Detects escalation signals using keyword matching + heuristics: The system analyzes the conversation's content, reply count, open duration, and keyword patterns to determine whether escalation is warranted.
Check de-duplication state: Conversations that have already been escalated are skipped to prevent duplicate alerts.
Pull customer context from Intercom: Company data plan tier, MRR, lifecycle stage determines the routing priority.
Create a structured Linear issue: The issue includes conversation summary, customer metadata, escalation reason, and a direct link back to Intercom.
Route to the appropriate Slack channel: High-value customers go to #customer-support with a priority alert. Standard accounts go to #support-engineering.
Annotate the Intercom conversation: An internal note is added with the Linear issue link and escalation status.
Execution Flow: How Services Interact During a Run
While the previous diagram focuses on decision-making, the next diagram shows how the system interacts with each service during execution.
Each execution cycle follows a consistent sequence:
Check connector authentication: The system verifies that Intercom, Linear, and Slack are all active via Scalekit.
Fetch recent conversations from Intercom: The agent retrieves an OAuth token from Scalekit and calls the Intercom REST API directly. Scalekit handles token refresh automatically.
Detects escalation signals: The agent uses keyword matching and heuristic rules (open duration, reply count) to determine whether escalation is warranted. No LLM required for the core detection logic.
Pull customer data from Intercom (if escalation detected): Company metadata (plan tier, MRR) is fetched via the Intercom API using the same Scalekit-managed token.
Create a structured issue in Linear: The agent calls execute_tool("linear_issue_create") through Scalekit, which has pre-built tools for Linear.
Post a structured alert to Slack: The agent calls execute_tool("slack_send_message") through Scalekit to post to the appropriate channel.
Add an internal note to the Intercom conversation: The agent calls the Intercom API directly to add a private note with the Linear issue link and escalation status.
This agent uses two integration patterns through Scalekit: execute_tool() for connectors with pre-built tools (Linear, Slack), and direct API calls with Scalekit-managed OAuth tokens for connectors that don't yet have pre-built tools (Intercom). Both patterns benefit from Scalekit's token storage, automatic refresh, and magic link authorization, so once pre-built tools ship for Intercom, migrating is just a matter of swapping the API calls for execute_tool() calls. The auth layer doesn't change.
How Escalations Are Delivered to Your Team
The output of each escalation is delivered as a structured Slack message in the appropriate team channel.
This message is designed so that an account manager or support lead can immediately understand the situation, access relevant context, and begin responding without opening Intercom.
Each part of the message is generated from real data within the pipeline:
Customer tier and MRR are pulled from Intercom company data
Escalation reason and sentiment are determined by keyword matching and heuristic rules based on conversation content
Linear issue link provides a direct path to the engineering or support ticket
The conversation link takes the responder straight to the Intercom thread
At the same time, the same information is written back to Intercom as a private internal note. This ensures that, whether a team member starts in Slack or directly in Intercom, they have access to the same complete escalation context.
This output layer is what makes the system immediately useful in day-to-day workflows. It bridges automation with how support teams already operate.
Prerequisites
A Scalekit account (free tier is sufficient) with a new workspace created for this project
An Intercom workspace with API access enabled and at least a few test conversations available
A Linear workspace with projects configured for receiving escalations (e.g., "Support Escalations," "Engineering Bugs")
A Slack workspace with routing channels already created: #customer-support and #support-engineering
Python 3.11 or newer is installed locally
Project Setup
The entire agent lives in a single file called run_flow.py. Clone the repo and install the three dependencies it needs:
git clone https://github.com/scalekit-developers/workflow-agents-demos
cd workflow-agents-demos/intercom-linear-slack-agent
pip install scalekit-sdk-python requests python-dotenv
Create a .env file in the project directory with credentials for every service the agent connects to:
# Scalekit workspace credentials
SCALEKIT_ENV_URL=https://your-workspace.scalekit.dev
SCALEKIT_CLIENT_ID=skc_...
SCALEKIT_CLIENT_SECRET=test_...
# Identity used when calling each connected service
INTERCOM_USER=support@yourcompany.com
LINEAR_USER=support@yourcompany.com
SLACK_USER=support@yourcompany.com
# Connector names -- must match your Scalekit dashboard exactly
INTERCOM_CONNECTOR=intercom
LINEAR_CONNECTOR=linear
SLACK_CONNECTOR=slack
# Escalation thresholds
ESCALATION_MRR_THRESHOLD=500
ESCALATION_MAX_OPEN_HOURS=24
ESCALATION_MAX_REPLIES=3
# Slack channels for routing
SLACK_CHANNEL_ESCALATIONS=#customer-support
SLACK_CHANNEL_TRIAGE=#support-engineering
POLL_INTERVAL_MINUTES=2
POLLING_MODE=false
One important detail on connector names: these values must match the connector names in your Scalekit dashboard exactly, including any auto-generated suffixes. When you create a connector in the Scalekit dashboard, it may append a random suffix (e.g., slack-sKfekCVz instead of slack). Check your dashboard and use the exact name. For Slack and Linear, the connector name becomes the prefix for execute_tool() tool names; a mismatch causes calls to fail silently.
Why Authentication Is the Hardest Part of Multi-Tool Automation
Before writing any escalation logic, you need all three services authenticated and ready. In a typical setup, that means three separate auth implementations, each with its own quirks.
Intercom uses OAuth with both the conversation-read and company-data scopes. Requesting only conversation access means your agent cannot pull customer tier or MRR data, which silently breaks the prioritization logic without any error message.
Linear uses OAuth with workspace-level scoping and project-level permissions. A token authorized for one workspace cannot create issues in another, and project IDs must be resolved at runtime because they change across environments.
Slack requires both token scopes to be set up in the Slack App dashboard before any OAuth flow runs. If chat:write is missing, the API returns a cryptic not_in_channel error even when the bot is in the channel.
Managing all three independently means building token storage, refresh logic, and error handling for each one before writing a single line of escalation logic. This is where most multi-service agent projects stall.
How Scalekit Handles Auth Across All Three Connectors
Scalekit is an authentication layer designed for agents that need to interact with multiple services. Instead of implementing three separate OAuth flows and managing three sets of tokens, you configure each connector once in the Scalekit dashboard and interact with all of them through a single interface.
Configure once, run forever: Each connector goes through its auth flow exactly once. On the first run, Scalekit generates a magic link for any connector not yet authorized. Every subsequent run picks up from ACTIVE without prompting again.
Two clean patterns, one auth layer: Linear and Slack use execute_tool() for pre-built tools; one call does everything. Intercom uses Scalekit-managed OAuth tokens with direct API calls for now until pre-built tool support lands, at which point it moves to the same execute_tool() pattern. Both go through Scalekit today, so there's no separate token management for any service, and no auth rewrite when the tool support ships.
Zero token management. Token expiry, refresh cycles, and connection state are all handled by Scalekit. The agent never stores a token or hits a mid-run failure because a credential silently expired.
How to Set Up Connectors in Scalekit
Before the agent can run, it needs access to all three services it interacts with: Intercom (to read conversations), Linear (to create issues), and Slack (to send alerts).
In Scalekit, these integrations are configured as connectors, and each connector represents an authenticated connection to a service on your account.
Set up all three connectors before writing any code. On the first run, the agent checks whether these connections are active. Once all three are connected, you can run the full pipeline end-to-end: fetch conversations from Intercom, create issues in Linear, and send alerts in Slack.
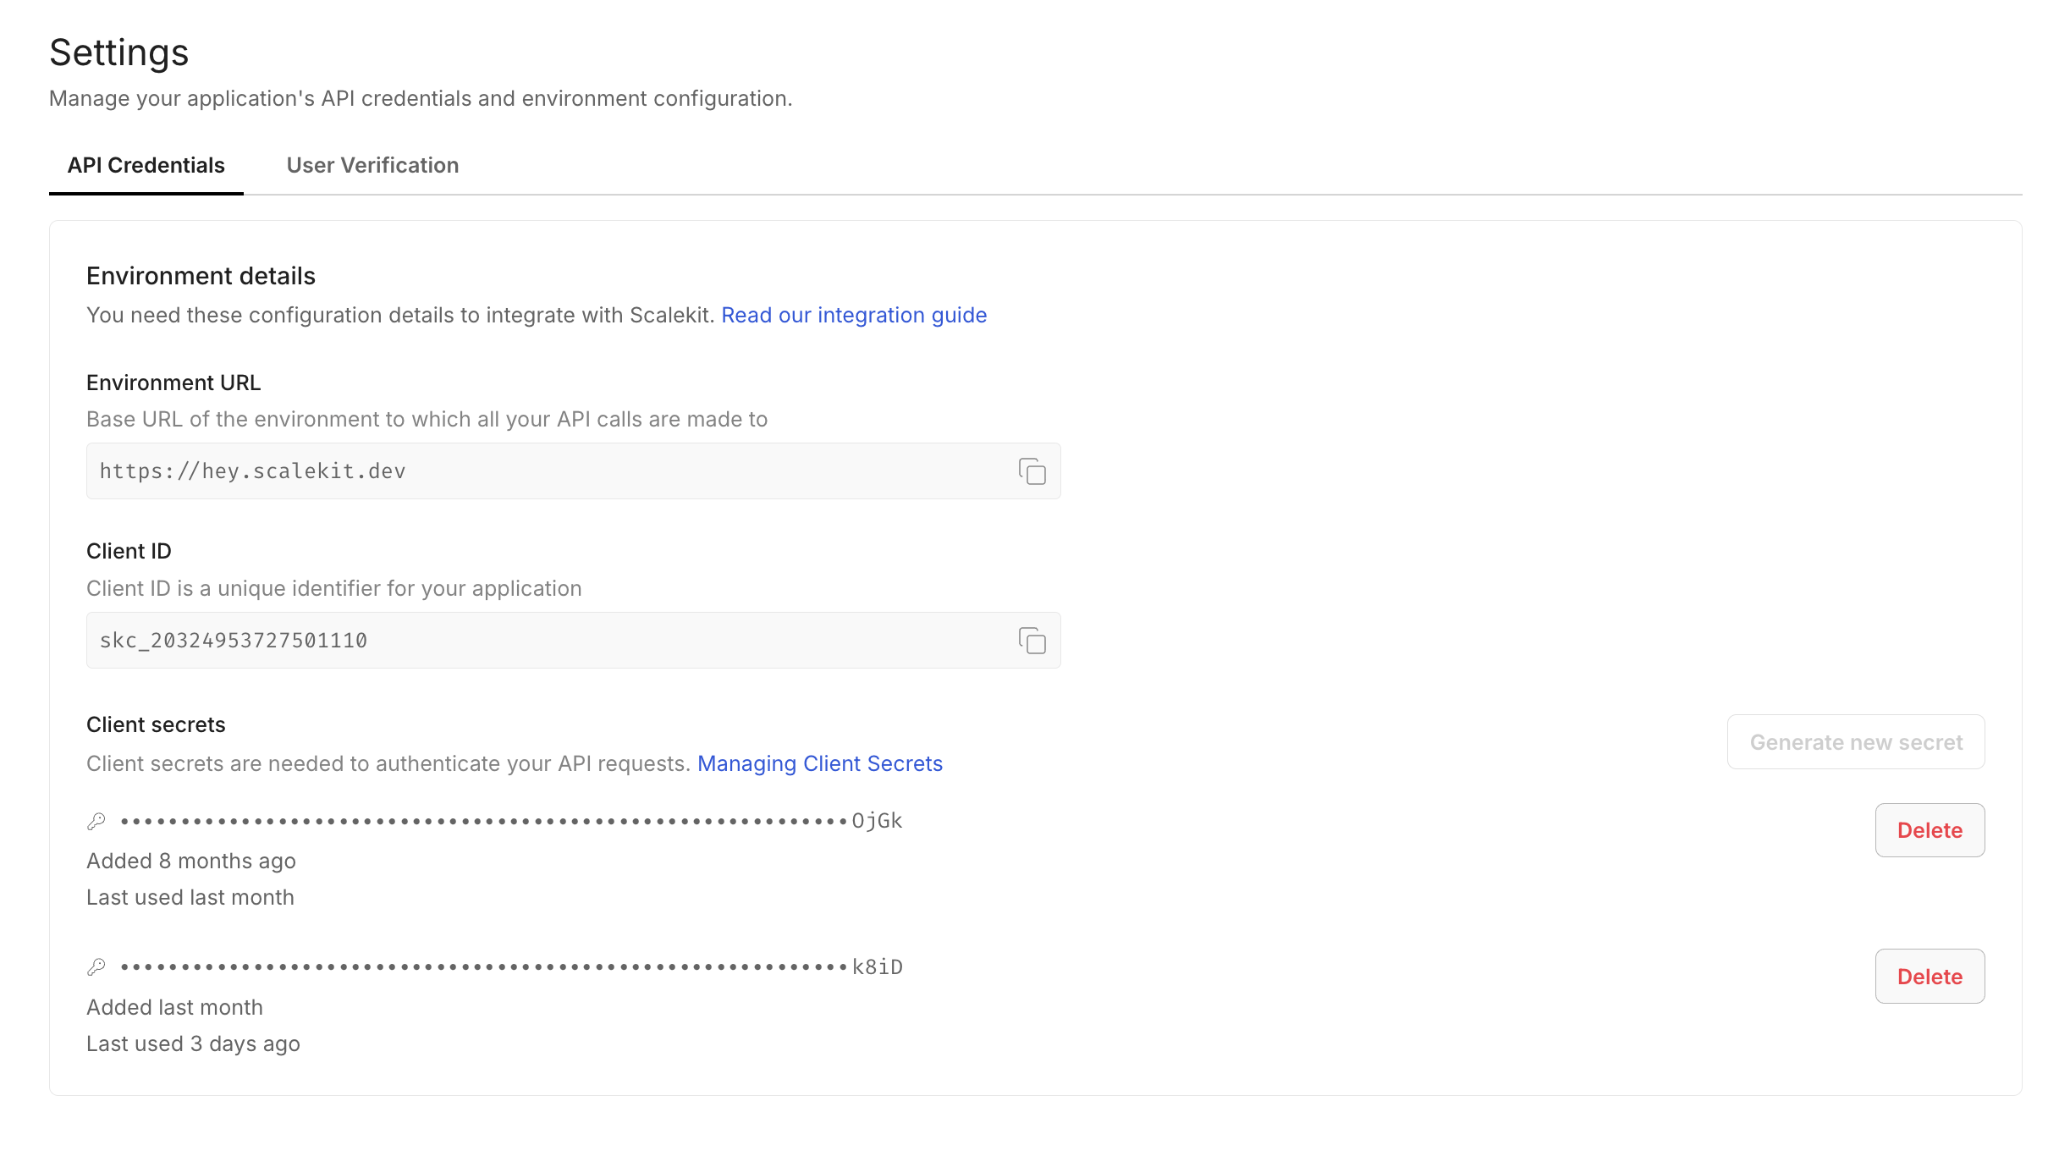
Step 1: Create Your Scalekit Account
Go to scalekit.com, create a free account, and create a new workspace for this project. Copy the SCALEKIT_ENV_URL, SCALEKIT_CLIENT_ID, and SCALEKIT_CLIENT_SECRET from the workspace dashboard into your .env file.
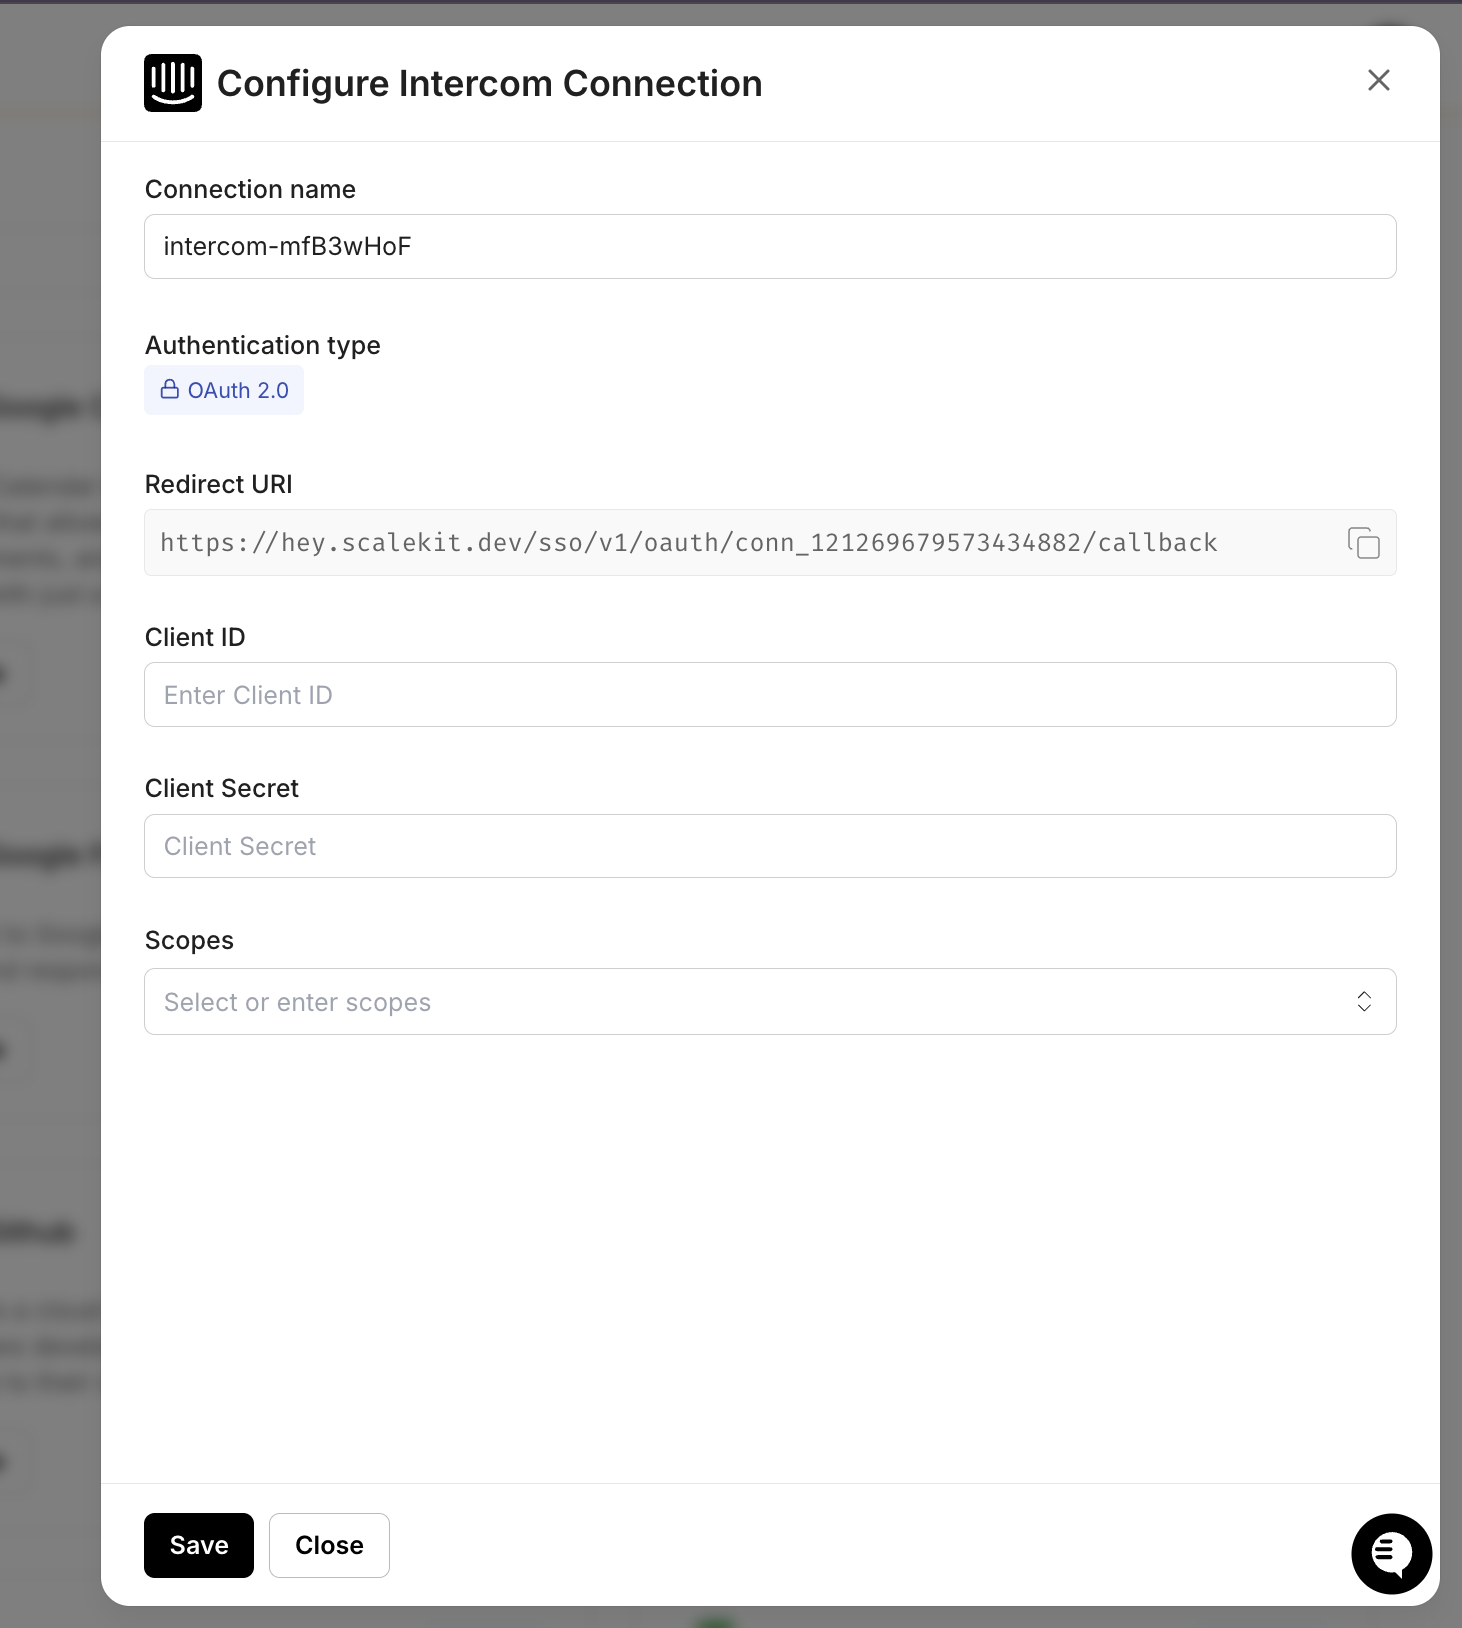
Step 2: Add the Intercom Connector
In the Scalekit dashboard, navigate to Agent Auth > Connections and search for Intercom. Complete the OAuth flow with both conversation and company data scopes. Make sure to authorize access to the workspace where your support conversations live. Without company data scopes, the agent cannot pull customer tier or MRR information, and all escalations will default to standard priority.
Step 3: Add the Linear Connector
Add Linear with scopes for creating and updating issues. After completing OAuth, note your team ID and project names. The agent needs these to route issues to the correct project. You can find the team ID in Linear under Settings > Workspace > API.
Step 4: Add the Slack Connector
Add Slack with the chat:write and users:read scopes. The Scalekit Slack connector requests chat:write.public during OAuth, so the installed bot can post to any public channel without being manually invited. Just pass the channel name or ID at runtime, and it works. You only need to run /invite @your-bot-name if you plan to route to a private channel.
Setting Up Auth with Claude Code
Once your connectors are configured in the Scalekit dashboard, the Scalekit Claude Code plugin generates the authentication setup the agent needs to read conversations from Intercom, create issues in Linear, and send messages to Slack.
Set up Scalekit auth for Intercom, Linear, and Slack. I need to read conversations and company data from Intercom, create issues in Linear, and post messages to Slack channels.
Once Claude Code generates the auth scaffold, the setup follows three parts:
Step 1: Initialize the Scalekit Client and Connector Map
The client initialization connects to your Scalekit workspace. The agent uses two Scalekit interfaces: sk.connect for connectors with pre-built tools (e.g., Linear, Slack), and sk.actions for retrieving OAuth tokens to call APIs directly (e.g., Intercom).
Not all connectors have pre-built execute_tool() support yet. This agent uses two patterns, both managed through Scalekit, and the second pattern is designed to migrate into the first as pre-built tool coverage expands:
Pattern 1: execute_tool() for Linear and Slack: Scalekit has pre-built tools for these connectors. One call does everything.
def linear_tool(tool_name: str, **kwargs) -> dict:
result = connect.execute_tool(
tool_name=tool_name,
identifier=CONNECTOR_USERS[LINEAR_CONNECTOR],
tool_input=kwargs,
)
return result.data or {}
def slack_tool(tool_name: str, **kwargs) -> dict:
result = connect.execute_tool(
tool_name=tool_name,
identifier=CONNECTOR_USERS[SLACK_CONNECTOR],
tool_input=kwargs,
)
return result.data or {}
A Linear issue creation looks like linear_tool('linear_issue_create', title='...', teamId='...') and a Slack post looks like slack_tool('slack_send_message', channel='#customer-support', text='...').
Pattern 2: Direct API calls with Scalekit-managed tokens for Intercom: Scalekit stores and auto-refreshes the OAuth token. The agent retrieves it and calls the Intercom REST API directly.
An Intercom fetch looks like intercom_api('get', '/conversations') to get a conversation, and a company lookup looks like intercom_api('get', f'/companies/{company_id}'). The token is always fresh, and Scalekit handles refresh behind the scenes.
When Scalekit ships pre-built tools for Intercom, this pattern collapses into the same shape as Linear and Slack — intercom_tool('intercom_conversation_list') instead of intercom_api('get', '/conversations'). The auth flow, token storage, and refresh logic stay identical; only the call site changes.
Step 3: Ensure All Connectors Are Authorized
The ensure_authorized() function runs once at startup for each connector and confirms it is in ACTIVE status. If a connector needs authorization, it generates a magic link on the spot so you can complete OAuth without going back to the dashboard.
def ensure_authorized(connector: str) -> None:
resp = actions.get_or_create_connected_account(
connection_name=connector,
identifier=CONNECTOR_USERS[connector]
)
if resp.connected_account.status != 'ACTIVE':
link = actions.get_authorization_link(
connection_name=connector,
identifier=CONNECTOR_USERS[connector]
).link
print(f'Authorize {connector}: {link}')
input('Press Enter after authorizing...')
else:
print(f' {connector} -- ACTIVE')
On the first run, this function pauses for any connector that needs authorization. On every subsequent run, all three connectors print ACTIVE and the pipeline proceeds immediately.
The Six-Step Escalation Flow
With authentication in place, this is the core logic of the customer escalation agent. On each run, the agent retrieves recent Intercom conversations and evaluates whether any should be escalated.
The flow is broken into six steps, each mapping to how a support team would handle escalation manually, but in an automated way. The steps are independent, so if one fails (for example, Linear is unavailable), the agent can still detect signals, send Slack alerts, and annotate the conversation in Intercom.
Step 1: Fetching Recent Conversations from Intercom
The agent queries Intercom for conversations updated within the polling window. It filters out already-escalated conversations using a local state file at state/escalated_conversations.json. This file persists across restarts, so a polling agent that gets restarted mid-day does not re-escalate conversations it already handled.
def fetch_recent_conversations() -> list[dict]:
""" Fetch open Intercom conversations, filter out already-escalated ones."""
data = intercom_api('get', '/conversations', params={'per_page': 20})
conversations = data.get('conversations', [])
return [c for c in conversations if not _is_escalated(str(c.get('id', '')))]
Step 2: Detecting Escalation Signals
For each conversation, the agent combines keyword matching with heuristic rules to determine whether escalation is warranted. The system uses a scoring approach: keyword detection, open duration, and reply count each contribute to a cumulative score. Any conversation with a score of 0.4 or higher triggers escalation.
ESCALATION_KEYWORDS = [
'cancel', 'frustrated', 'unacceptable', 'terrible', 'worst',
'manager', 'supervisor', 'lawsuit', 'legal', 'refund',
'ridiculous', 'disappointed', 'angry',
]
def detect_escalation_signals(conversation: dict) -> dict:
"""Combine keyword matching + heuristic rules to detect escalation."""
signals = []
score = 0.0
text = extract_conversation_text(conversation).lower()
# Keyword detection
matched = [kw for kw in ESCALATION_KEYWORDS if kw in text]
if matched:
signals.append(f"Keywords: {', '.join(matched)}")
score += 0.4
# Open duration
created_at = conversation.get('created_at')
if created_at:
created = datetime.fromtimestamp(created_at, tz=timezone.utc)
hours_open = (datetime.now(timezone.utc) - created).total_seconds() / 3600
if hours_open > MAX_OPEN_HOURS:
signals.append(f"Open for {hours_open:.0f} hours")
score += 0.3
# Reply count
stats = conversation.get('statistics') or {}
reply_count = stats.get('count_replies', 0)
if reply_count > MAX_REPLIES:
signals.append(f"{reply_count} customer replies")
score += 0.3
sentiment = 'frustrated' if score >= 0.7 else 'negative' if score >= 0.4 else 'neutral'
return {
'should_escalate': score >= 0.4,
'signals': signals,
'score': score,
'sentiment': sentiment,
'escalation_reason': '; '.join(signals) if signals else 'No escalation signals',
'category': _guess_category(text),
}
The scoring is deliberately simple: keywords contribute 0.4, long open duration adds 0.3, and excessive replies add 0.3. A single strong signal (like "cancel" or "lawsuit") is enough to trigger escalation. Multiple weaker signals compound. No LLM is required for the core detection logic, which keeps the pipeline fast and deterministic.
Step 3: Checking Customer Value
For conversations that cross the escalation threshold, the agent pulls company data from Intercom to determine routing priority. Enterprise customers and accounts above the MRR threshold receive P0 priority; all others receive P1.
def get_customer_context(conversation: dict) -> dict:
"""Pull company data from Intercom to determine routing priority."""
contacts = conversation.get('contacts', {}).get('contacts', [])
if not contacts:
return {'tier': 'unknown', 'mrr': 0, 'company_name': 'Unknown', 'priority': 'P1'}
contact_id = contacts[0].get('id')
if not contact_id:
return {'tier': 'unknown', 'mrr': 0, 'company_name': 'Unknown', 'priority': 'P1'}
try:
contact = intercom_api('get', f'/contacts/{contact_id}')
companies = (contact.get('companies') or {}).get('data', [])
if not companies:
return {'tier': 'unknown', 'mrr': 0, 'company_name': 'Unknown', 'priority': 'P1'}
company_id = companies[0].get('id')
company = intercom_api('get', f'/companies/{company_id}')
plan = (company.get('plan') or {}).get('name', 'unknown')
mrr = company.get('monthly_spend', 0) or 0
is_high_value = plan.lower() in ['enterprise', 'business'] or mrr > MRR_THRESHOLD
return {
'tier': plan,
'mrr': mrr,
'company_name': company.get('name', 'Unknown'),
'priority': 'P0' if is_high_value else 'P1',
}
except Exception:
return {'tier': 'unknown', 'mrr': 0, 'company_name': 'Unknown', 'priority': 'P1'}
Step 4: Creating a Linear Issue
With escalation confirmed and customer context in hand, the agent creates a structured Linear issue. The issue includes everything the responder needs: conversation summary, customer metadata, escalation reason, and a direct link to the Intercom conversation.
Note the tool name is linear_issue_create (not linear_create_issue) and the team parameter is teamId (camelCase, not team_id). The priority parameter is omitted; passing it as an integer causes a template rendering error in the current API. You can find your team ID in Linear under Settings > Workspace > API.
Step 5: Alerting the Right Slack Channel
With the Linear issue created, the agent posts a structured alert to the appropriate channel. High-value customers go to #customer-support with a rotating light emoji. Standard accounts go to #support-engineering.
If the post to the target channel fails because the bot is not in the channel, the agent automatically retries on #support-engineering as a fallback. No alert is ever silently lost.
Step 6: Annotating the Intercom Conversation
The final step writes the escalation result back to Intercom as a private internal note. This serves two purposes: it prevents duplicate escalations on subsequent runs, and it gives the support agent immediate context about what happened.
Since Intercom doesn't have pre-built execute_tool() support yet, the annotation uses the Intercom REST API directly, in the same pattern as fetching conversations and customer data.
Once pre-built tools ship, this call becomes a one-liner like the Linear and Slack steps, with no change to how auth is handled. The internal note is visible only to your team. Any agent who opens the conversation in Intercom has immediate context about the escalation.
How to Run the Escalation Agent Pipeline
With connectors active and the .env file configured, start the agent:
python run_flow.py
The agent prints a live status update at each stage. Here is what a typical run looks like:
============================================================
Customer Escalation Agent: Intercom → Linear → Slack
============================================================
-- Step 0: Checking connector auth --
intercom-5JJfgWFl (demo@scalekit.com) -- ACTIVE
linear-wuvcVfMm (demo@scalekit.com) -- ACTIVE
slack-sKfekCVz (demo@scalekit.com) -- ACTIVE
-- Step 1: Fetching recent Intercom conversations --
Found 6 conversation(s) to evaluate
-- Conversation #123: "This is the third time I'm reaching out..." --
Signals: Keywords: cancel, frustrated, unacceptable, terrible, manager, legal, refund
Sentiment: frustrated | Score: 0.40
Customer: AcmeCorp | Enterprise | $2400.0/mo
Priority: P0
Linear: INF-42 created
Slack: #customer-support
Intercom: annotated
-- Conversation #124: "Hi, I had a quick question about..." --
Signals: none
Skipped -- no escalation signals
-- Conversation #125: "Thanks for your help!" --
Signals: none
Skipped -- no escalation signals
-- Conversation #126: "Can you update my billing info?" --
Signals: none
Skipped -- no escalation signals
-- Conversation #127: "Feature request: dark mode" --
Signals: none
Skipped -- no escalation signals
-- Conversation #128: "How do I export data?" --
Signals: none
Skipped -- no escalation signals
Flow complete. Processed 6 conversation(s), escalated 1 in 18 seconds
Running Continuously with Polling Mode
For continuous operation, set POLLING_MODE=true in your .env file. The agent loops automatically, polling Intercom every POLL_INTERVAL_MINUTES (default: 2 minutes). Stop it with Ctrl+C.
# In your .env
POLLING_MODE=true
POLL_INTERVAL_MINUTES=2
With connectors active and the .env file configured, start the agent:
python run_flow.py
Polling mode is enabled to run every 2 minutes. Ctrl+C to stop.
============================================================
Customer Escalation Agent: Intercom → Linear → Slack
============================================================
-- Step 0: Checking connector auth --
intercom-5JJfgWFl (demo@scalekit.com) -- ACTIVE
linear-wuvcVfMm (demo@scalekit.com) -- ACTIVE
slack-sKfekCVz (demo@scalekit.com) -- ACTIVE
-- Step 1: Fetching recent Intercom conversations --
Found 6 conversation(s) to evaluate
...
Flow complete. Processed 6 conversation(s), escalated 1 in 18 seconds.
Next run in 2 minute(s)...
The polling loop is fault-tolerant if a single cycle fails (e.g., a network timeout), the error is logged, and the next cycle runs normally; no single failure kills the process.
Here is the actual polling code from run_flow.py:
if __name__ == "__main__":
polling = os.environ.get("POLLING_MODE", "false").lower() == "true"
interval = int(os.environ.get("POLL_INTERVAL_MINUTES", 2))
if polling:
print(f"Polling mode enabled -- running every {interval} minute(s). Ctrl+C to stop.\n")
try:
while True:
try:
run_pipeline()
except Exception as e:
print(f"\nPipeline error: {e}")
print(f"\nNext run in {interval} minute(s)...")
time.sleep(interval * 60)
except KeyboardInterrupt:
print("\nStopped by user.")
else:
run_pipeline()
Two modes, one script:
Mode
.env setting
Behavior
Single run
POLLING_MODE=false (default)
Runs once and exits, ideal for cron jobs or manual testing
Continuous polling
POLLING_MODE=true
Loops every POLL_INTERVAL_MINUTES, catches errors per cycle, Ctrl+C to stop
The escalation agent lives in the run_flow.py file you set up earlier. Running this script executes one full cycle of the agent.
For business-hours-only coverage without keeping a process running, a cron job is a clean alternative:
What It Takes to Run This Pipeline Reliably in Production
While the core pipeline is straightforward, a few additional safeguards are required to make it reliable in a real-world environment where failures, retries, and rate limits are unavoidable.
Preventing Duplicate Escalations
The agent maintains a local state file to track escalated conversations. To avoid corruption and duplicate escalations:
State updates are written to a temporary file and atomically renamed, ensuring that crashes during writes never corrupt the state file
Conversation IDs are marked as escalated before the Linear issue is created, preventing duplicate issues if the process crashes mid-execution
The state file is capped to a fixed size, evicting older entries to prevent unbounded growth over time
This approach prioritizes avoiding duplicate alerts, which are more disruptive to support workflows than the occasional missed escalation.
Handling Intercom Webhook Retries
If you use webhooks instead of polling, Intercom retries failed deliveries with exponential backoff. The agent must handle idempotency:
Each webhook payload includes a conversation ID check the escalation state before processing
Return a 200 response immediately, then process asynchronously
If processing fails after the response is sent, the conversation will be caught on the next polling cycle as a safety net
Respecting API Rate Limits
To avoid hitting service limits during batch processing, the pipeline introduces a small delay between conversations.
This ensures compatibility with:
Intercom rate limits (varies by plan, typically 1,000 requests/minute)
Linear API limits (1,500 requests/hour)
Slack rate limits (~1 message/sec per channel)
De-duplicating Across Webhook and Polling
If you run both webhook-triggered and polling-triggered pipelines, the shared state file prevents double-processing. Both paths call _is_escalated() before taking action, so a conversation escalated via a webhook is skipped in the next polling cycle.
Common Pitfalls to Check Before Going Live
Before running the pipeline in a production environment, it is important to verify a few configuration details across each service. Most runtime issues are not caused by logic errors, but by small setup mismatches.
Intercom: Scope and Webhook Configuration
Make sure the OAuth flow includes both conversation and company data scopes. Authorizing only conversation access means the agent cannot determine customer value, and all escalations will default to P1 regardless of account size.
If using webhooks, verify that the HMAC signature validation is in place. Intercom sends an X-Hub-Signature header with each webhook payload. Skipping validation in production is a security risk.
Linear: Team and Project Mapping
Ensure the teamID passed to linear_issue_create matches the correct workspace. You can find it in Linear under Settings > Workspace > API. Note that the parameter name is camelCase (teamId), not snake_case.
For teams with multiple escalation paths (e.g., bugs routed to Engineering, billing issues routed to Finance), extend the project mapping logic to route based on the category field from classification.
Slack: Channel Access and User Lookup
For public channels, the Scalekit Slack connector's chat:write.public scope lets the bot post without being a member. For private channels, you must /invite @your-bot-name before the pipeline runs, message delivery fails with not_in_channel. Verify that the channel names in your .env file match the actual Slack channels. Use slack_list_channels via Scalekit to list available channels.
Conclusion
The challenge with customer escalations has never been a lack of tools, since most support teams already have Intercom, Linear, and Slack in place. What's missing is a system that consistently connects the signals across every conversation throughout the day, without relying on manual attention from a support lead already stretched thin.
This agent fills that gap by running the same cycle for every conversation, moving through signal detection, customer value checks, issue creation, team alerting, and conversation annotation in a predictable sequence. By the time a support lead opens Slack, escalations are already prioritized by customer value, with Linear issues linked and conversation context attached.
The same architecture extends naturally to more complex workflows, such as VIP customers triggering an automatic Calendly link, billing escalations pulling invoice data from Stripe before routing, or thresholds tuned differently per segment. Once the Scalekit connectors are in place, adding a new data source or routing rule becomes a matter of updating the escalation logic rather than rebuilding authentication. As pre-built tool support expands to services like Intercom, direct-API integrations will migrate to execute_tool() without any auth changes.
FAQ
Why use Scalekit instead of calling each API directly?
Each service has its own auth flow, token format, and refresh schedule. Scalekit handles token storage, refresh, and magic link authorization for all connectors. For services with pre-built tools (Linear, Slack), execute_tool() collapses the entire API call into one line. For services without pre-built tools yet (like Intercom), Scalekit still manages the OAuth token, you call the REST API directly with the auto-refreshed token, and migrate to execute_tool() later once pre-built tool support ships, without rewriting the auth layer.
Does Scalekit handle token refresh automatically?
Yes. It checks token expiry on every execute_tool() or get_connected_account() call and refreshes using the stored refresh token when needed. There is no refresh logic in the agent code, and no mid-run failures due to a token expiring during a long polling session.
Can I customize the escalation thresholds?
Yes. The keyword list, open duration threshold (ESCALATION_MAX_OPEN_HOURS), reply count threshold (ESCALATION_MAX_REPLIES), and MRR cutoff (ESCALATION_MRR_THRESHOLD) are all configurable via environment variables. The keyword list can be extended by editing the ESCALATION_KEYWORDS array in the code.
What if Linear or Slack is unavailable during a run?
Each step is independent. If Linear fails, the Slack alert is sent without a Linear issue link. If Slack fails, the agent retries on #support-engineering. The Intercom annotation always runs last, regardless, so every escalation is recorded even if earlier steps encountered errors.
Can I run this for multiple support teams?
Yes. Each team gets its own .env file with different Intercom credentials, a different Linear workspace, and different Slack channels. Run a separate instance per team. Scalekit manages each set of connected accounts independently.
How do I prevent re-escalation when a customer sends another message?
The agent tracks escalated conversation IDs in a local state file. Once a conversation is escalated, it is skipped on every subsequent run. If you want to re-evaluate a conversation (e.g., after it has been resolved and reopened), remove its ID from the state file.
What happens if the agent misses an escalation?
The polling approach means the agent checks every open conversation on each run. If a conversation was not flagged on one cycle (e.g., because it had only 2 replies), it will be re-evaluated on the next cycle when conditions change (e.g., the customer sends a third reply). Escalation signals are cumulative; the system catches up.