Build a Multi-User Zendesk Support Agent with Claude and Scalekit


TL;DR
- A working Claude agent (Python or TypeScript) that searches, updates, and comments on Zendesk tickets for individual users. Scalekit handles OAuth, token storage, and refresh. Your code just resolves the right identifier and calls scoped tools.
- User connects their Zendesk account once (you verify ownership)
- Call listScopedTools with the identifier to get Zendesk tools in Anthropic's native format
- In the Claude messages loop, when it wants to use a tool, call executeTool with the same identifier
Zendesk is easy for a solo test. Once the agent serves a team or real customers, a single shared token quickly becomes a problem.
Support teammates want the agent working only with their tickets and groups. Customers expect it to handle things inside their own Zendesk org, following their rules and fields. You shouldn't have to manage all the tokens and OAuth yourself.
This post shows how to give a Claude agent per-user Zendesk access. Scalekit takes care of the connections and auth. The agent receives tools scoped to the right person.
If you're adding Zendesk to a multi-user Claude agent, the schemas are rarely the hard part. The real work is making sure the agent always uses the correct user's credentials and permissions without you writing and maintaining all the OAuth plumbing.
By the end of this tutorial you will have:
- A way for users to connect their own Zendesk account.
- A secure OAuth flow handled by Scalekit.
- Per-user Zendesk connections stored safely via identifiers.
- A Claude agent that calls Zendesk tools scoped to the current user.
- Complete working code for per-user Zendesk tool calling in Claude agents that you can extend to search tickets, update status, add internal notes, and other workflows.
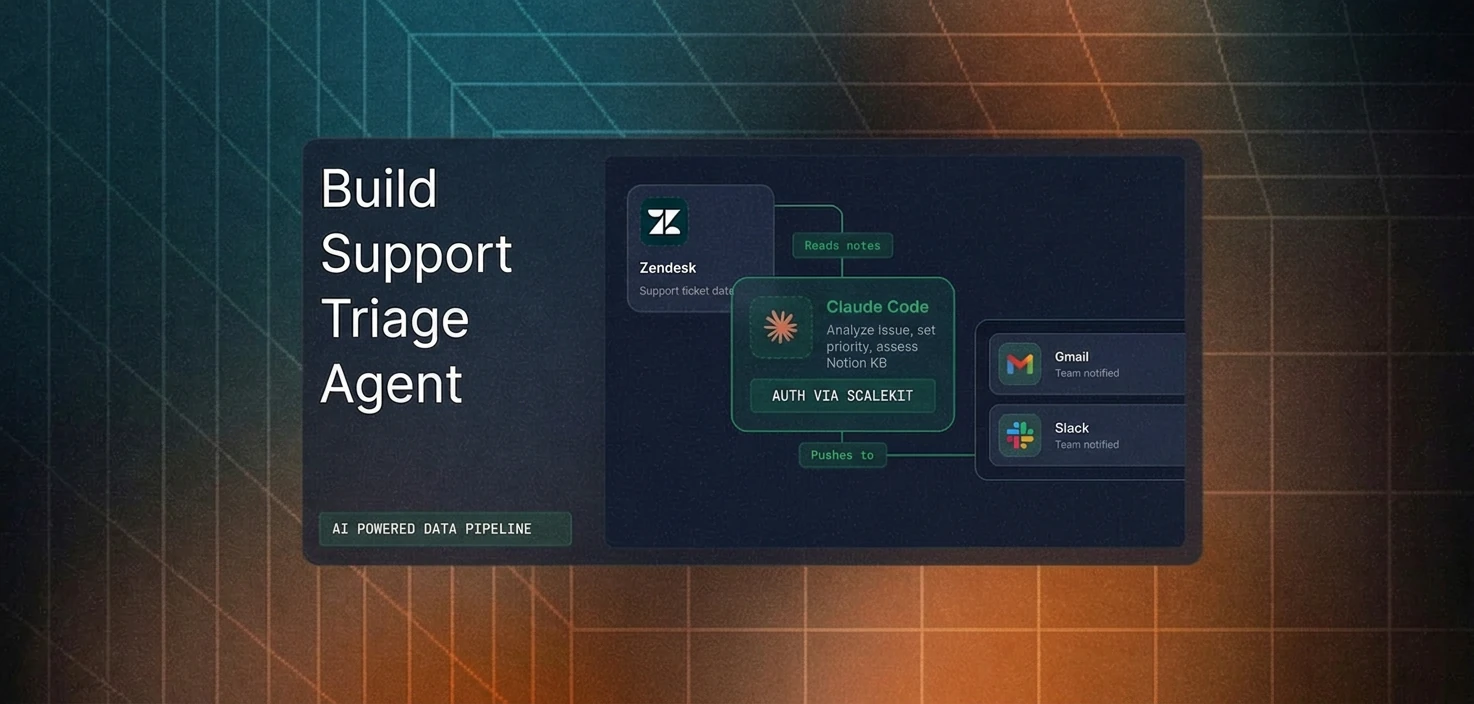
Architecture overview
When you're building a Claude agent for multiple users, the challenge is letting each person bring their own Zendesk account without sharing credentials.
You map your users to Scalekit identifiers. Scalekit handles the Zendesk OAuth, stores the tokens, and refreshes them. Your agent only passes the identifier when it calls tools.
The two key flows are:
- Connection time: The user connects their Zendesk through Scalekit. You verify that the authenticated user owns the identifier.
- Runtime: After your own auth check, you resolve the identifier and call listScopedTools and executeTool with it.
Here's the architecture:

The identifier is the secure key. Resolve it server-side after you authenticate the request, and always authorize before using it.
Who is this for
This is for developers building Claude agents that multiple people will use.
It could be an internal agent for your support or ops team, or a feature customers use inside your product. In both cases the agent needs to work with the correct person's Zendesk data and permissions.
You'd rather not also become responsible for managing Zendesk OAuth and tokens. This approach keeps the focus on the agent itself.
One shared account breaks down quickly
A single Zendesk token lets the agent search and update tickets. It works for a quick test.
As soon as multiple people use it, problems appear. Your teammate wants the agent to only see their tickets and groups. A customer expects it to work inside their own Zendesk org, respecting their custom fields and rules.
Handling this yourself means writing OAuth flows, storing tokens per user, managing refreshes and revocations, and keeping the mapping straight. It turns into a second project on top of the agent you actually want to ship.
Let Scalekit handle the identity
Scalekit manages the Zendesk connections and tokens for each identifier. Your code simply passes the correct identifier when the agent needs to act.
The tools the agent receives are already scoped to that user's data and permissions. When the agent wants to call a tool, you execute it with the identifier. None of the OAuth logic lives in the agent.
Prerequisites
- Python 3.9+ or Node.js 18+
- A Scalekit account with a Zendesk connection created (Agent Auth → Connections). Use an exact matching connection name (e.g. zendesk).
- An Anthropic API key.
- Basic familiarity with the Anthropic Messages API and tool calling.
New to any of these? See the Scalekit AgentKit quickstart and the Anthropic tool calling docs.
What becomes possible with the right account
When the agent uses the correct person's connection, it can actually help with real support work:
Search for high-priority open tickets (perhaps filtered to VIP customers). Update a ticket's status and add an internal note. Look up a user and review their recent history.
Everything happens with that user's permissions and data in Zendesk. No mixing of different people's information.
Get the connection set up first
Follow the standard pattern (getOrCreate + getAuthorizationLink + verify after redirect).
Ask Claude with the right tools in hand
Run the tool as that specific user
Full loop shown in the Complete Code section.
Supported Zendesk Tools
Common tools include:
- zendesk_tickets_search
- zendesk_tickets_update
- zendesk_users_search
- zendesk_tickets_create_comment
See the Scalekit Zendesk connector docs for the current full list.
Complete Code
TypeScript version (Python is very similar with the anthropic library):
Python notes: Use the Python Scalekit and Anthropic SDKs. The flow (getOrCreate, listScopedTools, messages.create with tools, tool_result feedback) is identical.
Run example:
The identifier does the heavy lifting
Use a different identifier and the agent works inside a completely different person's Zendesk. Claude only receives the tool definitions and the results.
Your code maps the authenticated request to the correct identifier. Never trust an identifier that comes from the client.
The same rule appears across the rest of this series. The framework changes, but the identity handling stays the same.
Troubleshooting
Connection stays pending?
Call verifyConnectedAccountUser after the user completes OAuth and your callback receives the authRequestId.
Tools fail with permission errors?
Re-authorize the identifier (scopes may have changed or been insufficient).
Wrong data or no tools?
Incorrect identifier resolution (must come from your server-side auth, not client input) or inactive connection for that identifier.
Tradeoffs & Limitations
What's Next
- Dive into the connected accounts guide and code samples.
- Check the specific Zendesk connector and the full AgentKit connectors catalog.
- Explore advanced patterns like bring your own connector.
- Pair this with the Mastra version of Zendesk (or any other connector) for comparison.
- Create a Scalekit account and connect your first Zendesk instance: scalekit.com