

Your Model Context Protocol (MCP) tools touch real resources: notes, tickets, files. A customer who can only read those notes will still ask their agent to edit one. If the write tool runs, login did not protect the resource. The server has to check a permission and reject the call.
mcp-use is a TypeScript framework for MCP servers and clients.
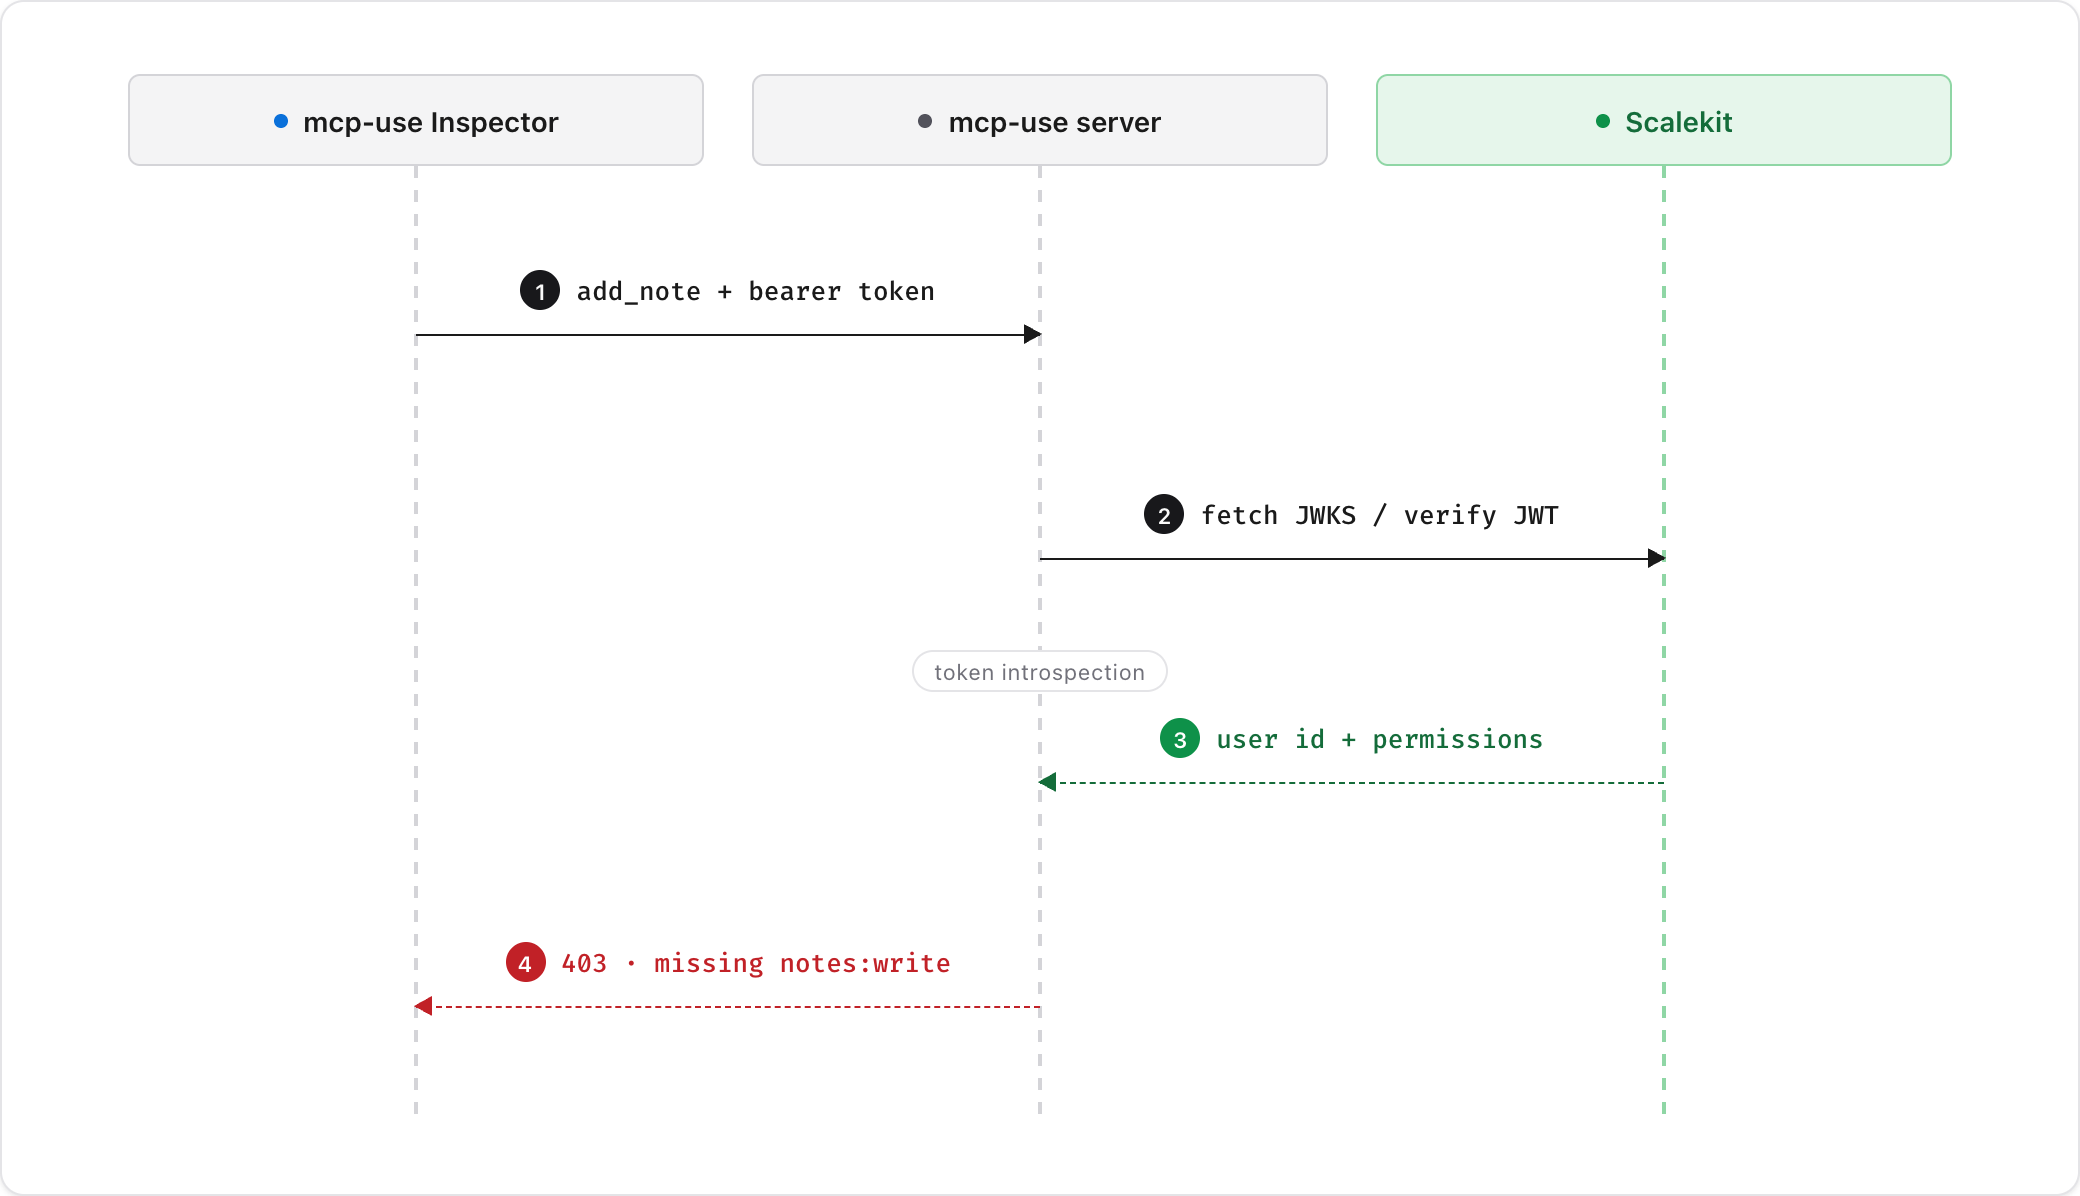
It ships first-class Open Authorization (OAuth) providers, including scalekit. scalekit is the authorization server: it signs the user in and puts their permissions on the token. mcp-use verifies that JSON Web Token (JWT). Your tool decides whether the call may proceed.
Start with the mcp-use TypeScript docs. Add login from the scalekit provider page. This page continues from that login and adds scoped permissions.
The worked example is a notes server. list_notes needs notes:read. add_note needs notes:write. Those strings are scalekit permissions, not OAuth scopes such as openid.
The next time a customer uses your MCP server from an agent, a tool they are not allowed to run is rejected. Notes are the worked example: list_notes succeeds for a read-only user, add_note fails, then succeeds after you grant notes:write. You prove that in mcp-use Inspector. The same check applies to any tool that mutates a resource.
A shared MCP URL is fine. A shared permission set is not.
The caller can be a person in Inspector or an agent acting for that person. Login names them. The tool still appears in the client. Permissions decide whether that call is allowed to run.
You deploy one MCP server, at one address, for example https://notes.example.com/mcp. Each customer adds that same address to their agent or to Inspector. They do not each get a private server.
Login tells the server which person is calling. Permissions tell the server which tools that person may run. Without the permission check, everyone who can sign in can write.
This pattern is the difference between shipping a secure MCP server and shipping one that only looks secure at first glance.
Connect an AI client once, the same way you add other MCP servers.
npx @mcp-use/inspector opens a local Inspector. npm run dev in the example repo also mounts Inspector at http://localhost:3000/mcp/inspector. Use either. The walk below uses the mounted Inspector.
Register the MCP server in scalekit before you clone the repo. More detail lives on the scalekit provider page.
Clone the example, install, and copy .env.example.
Set these three values. There is no SCALEKIT_CLIENT_ID and no SCALEKIT_CLIENT_SECRET. The resource server only verifies tokens scalekit already issued.
MCP_URL must match the scalekit Server URL exactly. Trailing slash, port, and http vs https all count.
The published scalekit provider reads MCP_USE_OAUTH_SCALEKIT_ENVIRONMENT_URL, MCP_USE_OAUTH_SCALEKIT_RESOURCE_ID, and MCP_URL when you call oauthScalekitProvider() with no arguments. This walk uses the example repo instead, which passes the values in code.
oauthScalekitProvider is how mcp-use verifies tokens. The example repo imports a local adapter and passes the three env values. The process does not call scalekit with a client secret. It checks the JWT against scalekit JWKS.
That block is already in the example index.ts. Do not replace the file. Add the notes tools next to whoami and greet.
Open Inspector. Connect to http://localhost:3000/mcp. The first call returns 401. Complete scalekit login. Call whoami.
You should see a user id, subjectType: "user", and an aud value that includes your res_….
scopes here are OAuth grants such as openid and profile. MCP server Scopes also land here. This walk does not use scopes as the tool gate. If login fails, use the troubleshooting table in the example README.
The MCP server page and the authorization page are different screens.
On Dashboard → MCP servers → your server, you already set Server URL, DCR, and CIMD. That page also has Scopes (openid, profile, or MCP tool scopes such as todo:read). Those strings land on ctx.auth.scopes. Do not use that list as the tool gate in this walk.
Create application permissions here:
mcp-use maps the token permissions claim to ctx.auth.permissions. Those strings must match the tool checks exactly.
If whoami later shows notes:read under scopes and permissions is still [], you added MCP Scopes, not Authorization permissions. Move the strings to Authorization and reconnect Inspector.
Understanding the distinction between scopes and permissions matters here. For a deeper look at how access control works across multi-tenant AI agents, the patterns translate directly to MCP tool gating.
Register both tools on the same server you created with oauthScalekitProvider. After mcp-use verifies the token, each tool handler receives a context object. The signed-in user and their permissions are on that context.
Keep notes in memory, keyed by the signed-in user id. That is enough to prove isolation.
requirePermission is the gate. It reads ctx.auth.permissions from the verified token. It does not read ctx.auth.scopes.
list_notes needs notes:read. It returns only notes for the signed-in user.
add_note needs notes:write. A read-only user hits deny here.
Do not gate these tools on ctx.auth.scopes. scopes is the OAuth grant (openid, profile, or MCP server Scopes). permissions is what this person may do. The mcp-use user context page draws that same line.
This is the same enforcement pattern used when implementing OAuth for MCP servers more broadly — the token carries structured claims and the handler validates them.
Confirm the test user has notes_reader only. Reconnect Inspector so scalekit mints a new token. Complete login. Call whoami again.
You should see permissions include notes:read and not include notes:write.
If permissions is still empty, the role is not on that user, you created MCP Scopes instead of Authorization permissions, or Inspector is holding the old token. Reconnect. Do not keep calling tools against a stale token.
This section is the proof. Stay in http://localhost:3000/mcp/inspector.
Run list_notes.
Expected result: an empty array. The user has notes:read. There are no notes yet.
Run add_note with text set to first note.
Expected result: a missing-permission error. Treat this as success. A 401 here means authentication broke. A missing-permission payload means authorization worked.
Add notes:write to the same user, or move them to notes_writer. Reconnect Inspector so the next token includes the new permission. Call add_note again with text set to first note. Then call list_notes.
The same user, on the same server, now has one deny and one allow. The new note belongs to this usr_… only.
A second browser profile that signs in as another user sees an empty list. That check is optional. The required proof is the deny, then the allow, in Inspector.
mcp-use does not invent permissions. scalekit puts them on the token. Your tool enforces them.
OAuth grants and MCP server Scopes stay on ctx.auth.scopes. Use them to understand the login. Do not use them as the tool gate.
The JWT claims used here follow the structure defined in the JSON Web Token guide for developers — understanding iss, aud, and sub claims directly informs how token verification works in practice.
DCR and CIMD are both off, or Inspector cached old authorization-server metadata. Turn at least one of DCR or CIMD on, save, and reconnect.
MCP_URL does not match the scalekit Server URL. Compare trailing slash, port, and scheme.
The tool is not checking ctx.auth.permissions, or it is checking ctx.auth.scopes instead. Fix the check. Then reconnect so you are not looking at a leftover success from an earlier token.
You added it under MCP server Scopes, or the token is old. Create it under Authorization → Permissions, assign the role, then reconnect Inspector.
You are looking at a different usr_…. A second account, or a second Inspector session, has its own note list.
Notes live in memory. A process restart wipes them. Permissions still hold after the restart. Swap the array for your store when you need durability. Keep the same userId and permission checks.
When you move beyond demos and ship to real customers, audit trails for agent auth become the next concern — every scoped action should produce a verifiable record.
For a broader look at the tradeoffs in MCP authentication and authorization: build vs. buy, that guide covers when to extend this pattern and when to reach for a managed solution.