SAML debugging handbook 2026: How to diagnose, log, and resolve SSO failures


TL;DR
- SAML failures become predictable when troubleshooting starts with a few high-signal checks: clock sync, certificate validity, ACS URL accuracy, issuer/audience matching, and signature-algorithm alignment.
- Most SAML errors map to a single XML field, which is why a structured error dictionary significantly reduces debugging time across IdP and SP teams.
- Understanding the anatomy of the SAML response is essential, as the issuer, audience, destination, NameID, timestamps, conditions, and signatures all reside in deterministic locations within the XML.
- Poor logging wastes enormous engineering time. Industry studies show that 40–60% of incident resolution time is spent just identifying the root cause. Capturing the right trust fields while redacting identity attributes significantly reduces this.
- Escalation becomes predictable when teams share the decoded XML, metadata files from both sides, and redacted structured logs; this allows support teams to reproduce and isolate failures deterministically rather than guess.
How a SAML login moves from IdP to SP
SAML authentication follows a consistent sequence: the Service Provider issues an AuthnRequest, the Identity Provider returns a signed Response, and the SP validates that Response against signature, trust parameters, routing rules, and timestamps. Debugging SAML requires understanding where these values originate and where they appear in the final XML. This blog focuses on troubleshooting, but if you want deeper details on AuthnRequest generation and flow semantics, refer to our SAML implementation guide.
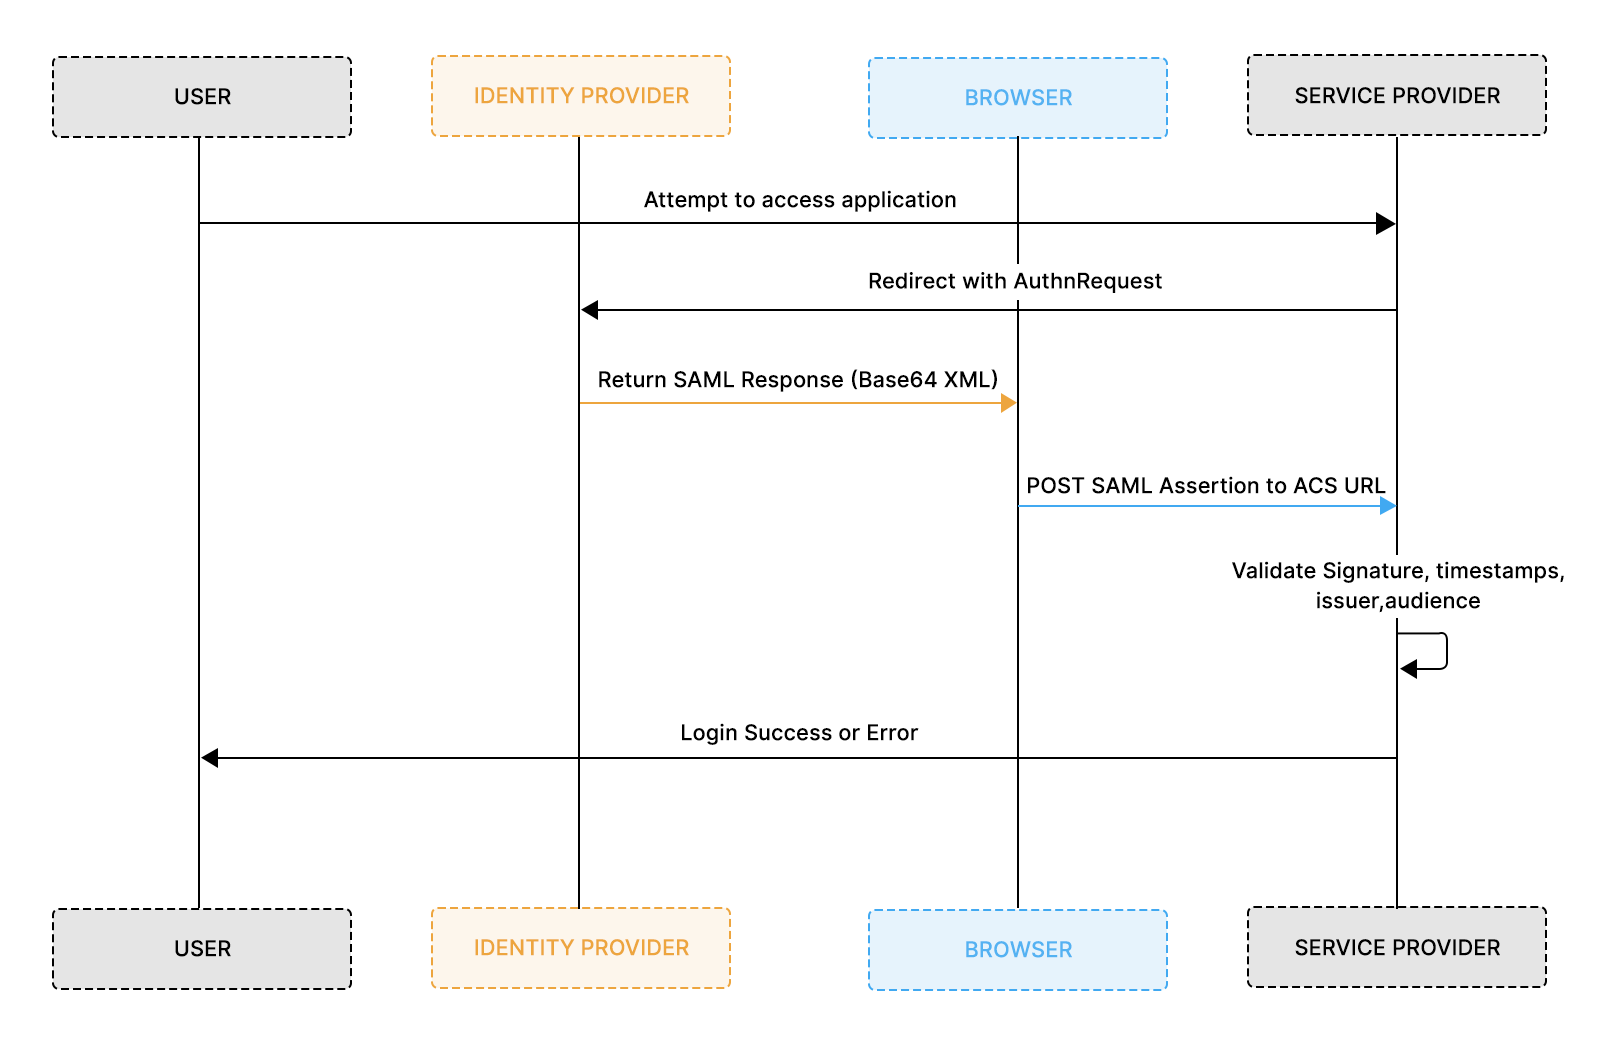
This flow provides the structural context you need to understand where failures occur within a SAML Response.
Why SAML errors break production login during enterprise SSO
SAML errors break production login because authentication relies on strict, interdependent XML fields that must align perfectly. Enterprises usually discover this during onboarding or certificate rotation, when users suddenly lose access to dashboards, internal tools, or admin panels. Even a single-character mismatch, a trailing slash in the ACS URL, a rotated certificate, or a timestamp drift can invalidate the entire Response before the system even identifies the user.
Debugging becomes slow because both IdPs and SPs return generic, ambiguous error messages.
Common examples include:
- “Invalid response” from the IdP
- “Signature validation failed” from the SP
- Multiple root causes collapsed into a single vague message
Without structured logs, engineers must manually:
- Decode Base64-encoded XML
- Pretty-print and inspect the raw Response
- Compare Issuer, Audience, and ACS URL
- Cross-check IdP metadata under pressure
This creates unnecessary friction, slows incident recovery, and leads to repeated failures during enterprise onboarding.
Teams resolve SAML issues significantly faster when they focus on the specific trust fields that control acceptance: Issuer, Audience, ACS / Destination URL, Certificate fingerprints, NotBefore / NotOnOrAfter timestamps.
These fields decide whether the SP accepts or rejects the SAML Response, and when any of them drift, authentication fails at scale.
This guide turns those brittle trust points into a predictable troubleshooting workflow complete with fast checks, an error dictionary, debugging diagrams, and structured logging formats so teams can diagnose SAML issues quickly, consistently, and with confidence.
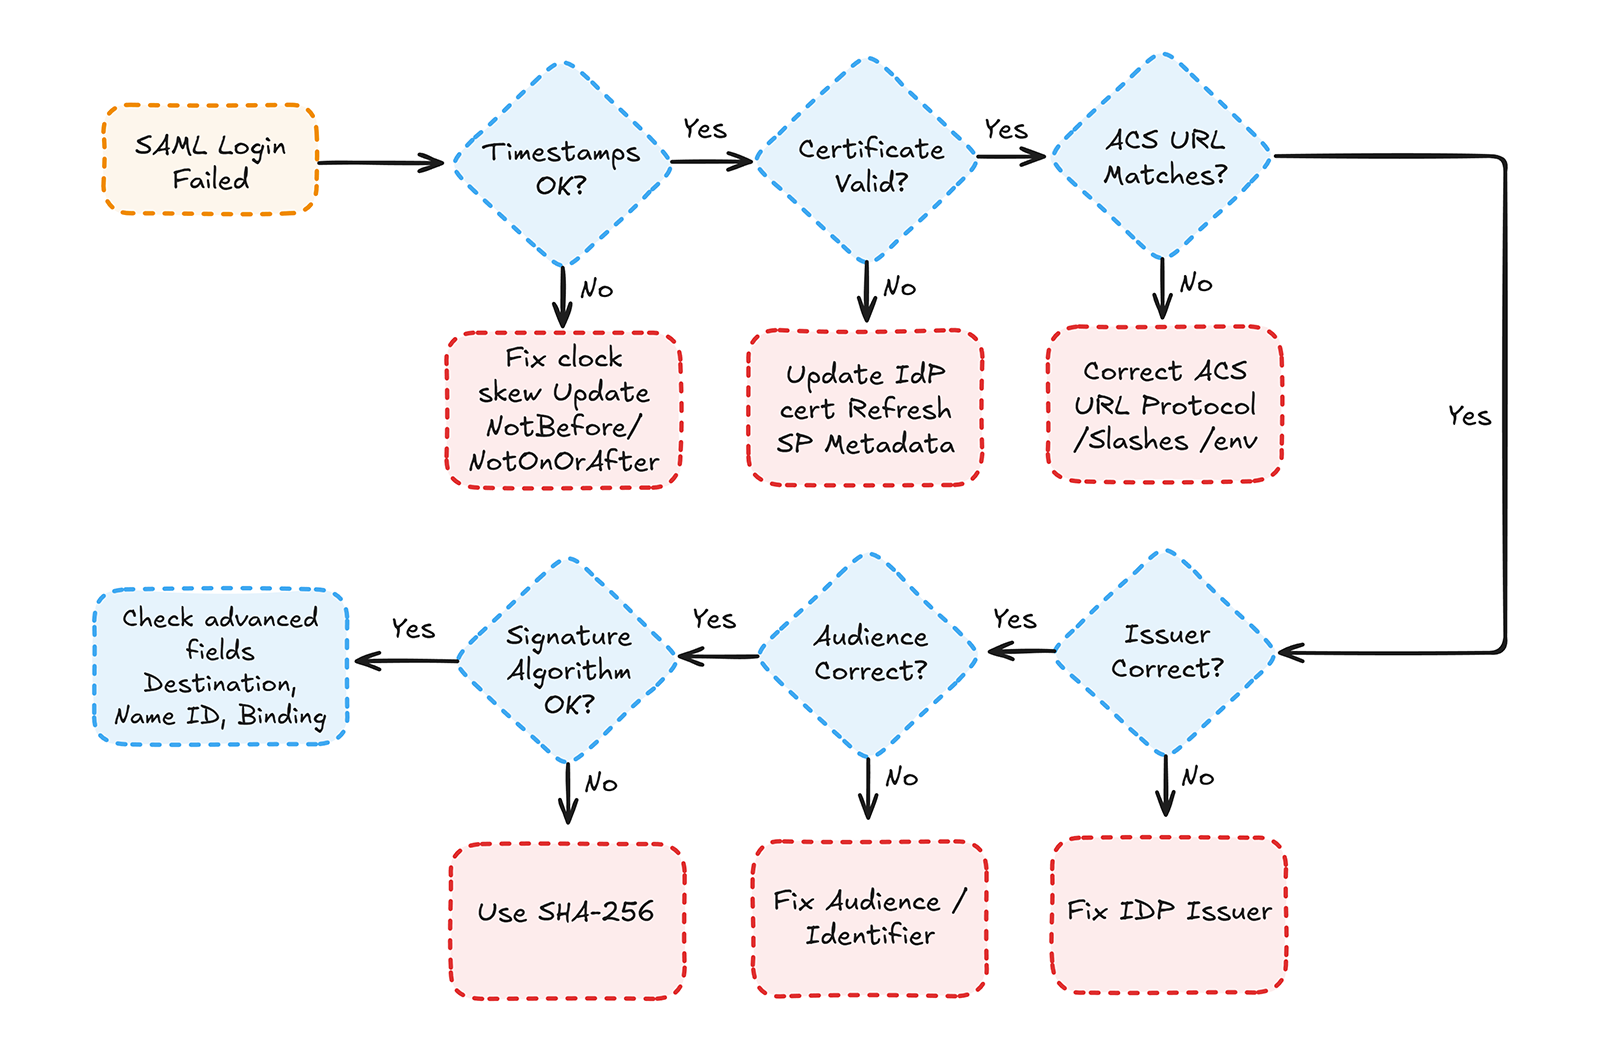
Fix this fast: The 60-Second SAML checklist
Most SAML outages are caused by a small set of mismatched fields that break trust between the Identity Provider and the Service Provider. These fields determine whether the SP accepts the incoming assertion, and they fail for predictable reasons: expired certificates, incorrect URLs, timestamp drift, or mismatched identifiers. During an active incident, checking these values first restores login functionality far faster than decoding the entire SAML assertion.
Quick validation works because these fields are easy to locate in both the IdP configuration and the decoded SAML response. Timestamps live in <Conditions>; identifiers appear in <Issuer> and <Audience>; and ACS URLs appear in the <Destination> attribute. When any one of these diverges, the entire authentication chain fails, even if everything else looks correct. These issues commonly surface during customer onboarding, metadata updates, environment switches, and certificate rotations.
The checklist below provides a priority-ordered triage sequence used across major SSO platforms. Engineers can paste it directly into runbooks or incident channels. It isolates the highest-frequency failures first, shaving minutes off every debugging cycle. Combined with the decision diagram included below, it creates a simple mental model for rapidly eliminating the most likely causes of failure.
The 60-Second SAML Checklist
1. Validate timestamps
- Has the assertion expired?
- Did the IdP issue a future-dated assertion?
- Is the server clock skew ±2 minutes or more?
Note: SAML does not mandate a specific tolerance; most IdPs default to ~5 minutes, but 2 minutes is a stricter and more secure threshold.
2. Validate the signing certificate
- Is the certificate expired?
- Did the IdP rotate keys recently?
- Does the fingerprint match SP metadata?
3. Validate the ACS URL
- Does the IdP post to the exact ACS URL you configured?
Check for:
- HTTP vs HTTPS mismatch
- Trailing slash mismatch
- Wrong environment (dev/stage/prod)
4. Validate the Issuer
- Does <Issuer> match your expected IdP EntityID?
5. Validate the Audience
- Does <Audience> exactly match your SP Audience/Identifier?
6. Validate the signature algorithm
- Is the IdP using SHA-256?
- Has the IdP changed signing policies recently?
7. Validate the Destination
- Does <Destination> exactly match your ACS URL?
Most common root causes
- Certificate expired or rotated without metadata refresh
- ACS URL mismatch (top cause during onboarding)
- Wrong Issuer or Audience
- Assertion expired due to timestamp drift
- HTTP → HTTPS mismatch
- Destination mismatch
- Wrong SAML binding (POST vs Redirect)
- IdP using stale metadata
Before we troubleshoot errors, understand where each field lives
SAML becomes far easier to debug once you know where to find the pieces that usually break. Every error in the next section maps to a specific place inside the XML Issuer, Audience, NameID, timestamps, signature, and Destination. The snippet below shows a clean, minimal SAML Response with all high-value fields highlighted through structure. Keep this close while reading the error dictionary; it will help you locate issues instantly.
Now that you know where each field sits, let’s fix every error one by one.
The SAML error dictionary
The SAML Error Dictionary is the core reference for diagnosing SSO failures in this guide. Each error entry follows a predictable structure: a short, focused summary of what the error means, the root causes that typically trigger it, and a combined “where to check + how to fix” section so teams can validate and resolve issues quickly. Wherever relevant, a Scalekit insight is added to show how the platform surfaces the exact fields involved, making the debugging experience faster and more transparent.
Every error is structured the same way:
- Concise Overview: a tight explanation of what the SP is rejecting and why.
- Root causes: the underlying configuration, trust, or timing issues that trigger the error.
- Where to check & how to fix: merged steps pointing to the exact XML fields, logs, and configuration that must be verified and corrected.
- Scalekit Insight (when applicable): a note on how the same fields appear directly in Scalekit’s logs and configuration panels.
This keeps every error explanation compact, readable, and immediately actionable, ideal for both production incident response and onboarding new enterprise IdPs.
1. Error: “ACS URL Mismatch”
This error occurs when the Identity Provider (IdP) sends the SAML Response to an ACS URL that does not exactly match the Service Provider’s (SP) configured endpoint. Because SAML validation requires character-perfect matching, including protocol, domain, path, and trailing slash, any small discrepancy causes the SP to reject the Response before the user identity is evaluated. This is a routing/configuration drift issue, not a cryptographic failure.
Root causes
- Incorrect ACS URL in IdP settings
- HTTP ↔ HTTPS mismatch
- Trailing slash differences
- Staging vs. production environment mix-ups
- Typos in callback configuration
Where to check & how to fix
Inspect the Destination="..." attribute inside the <Response> and compare it character-for-character with the ACS URL in the SP metadata.
Fix:
- IdP: Update the ACS URL exactly as documented (protocol, host, path, environment).
- SP: Confirm which ACS endpoints are active and ensure the IdP uses the correct one.
Scalekit makes this error extremely easy to diagnose: in the SSO configuration panel, it displays both the ACS URL you configured and the Destination returned by the IdP side by side, highlighting mismatches instantly. You can see this in the Authentication Logs as well. Refer to the debugging section below for where Scalekit displays these fields inside Authentication Logs.
2. Error: “Certificate Expired”
This error occurs when the IdP signs the SAML Response with an expired X.509 certificate. Since SAML trust depends on valid certificate timelines, the SP rejects the Response even if all other fields are correct. This usually happens when certificate rotation is delayed or when the SP is still using outdated metadata.
Root causes
- The signing certificate has passed its validity period
- Automatic key rollover is disabled or misconfigured
- SP is relying on stale metadata with the old certificate
- Environment mismatch between metadata versions
Where to check & how to fix
Inspect the <X509Certificate> inside the <ds:Signature> and decode it to confirm the notBefore and notAfter values.
Fix:
- IdP: Rotate the certificate, enable key rollover, and publish updated metadata.
- SP: Refresh metadata and update stored fingerprints or cached keys.
Scalekit simplifies this by displaying certificate validity and expiry directly in the Identity Provider Configuration and highlighting signature failures in Authentication Logs. You can refer to the debugging section below to see exactly where these fields appear.
3. Error: “SAML Response is Invalid”
This error occurs when the SP cannot parse the SAML Response because the decoded Base64 payload is not valid XML. This usually happens when the XML is truncated, required elements like <Response> or <Assertion> are missing, or the IdP used the wrong binding. The failure occurs before any trust or identity checks.
Root causes
- Malformed or truncated XML
- Missing <Response> or <Assertion>
- Wrong SAML binding (Redirect instead of POST)
- Middleware/WAF modifying or stripping the POST body
- Incorrect Base64 encoding
Where to check & how to fix
Decode the SAMLResponse and confirm it contains a complete <Response> element with a nested <Assertion> element. SP logs often include messages such as “malformed XML” or “unexpected root element.”
Fix:
- IdP: Send the Response via POST and ensure the XML is not altered in transit.
- SP: Allow full POST bodies at the ACS endpoint and remove middleware that rewrites or truncates payloads.
Scalekit simplifies this by showing the raw SAMLResponse, the decoded XML, and the binding used directly in Authentication Logs, making structural issues immediately obvious. The Identity Provider configuration also exposes metadata values that are helpful when incorrect apps or incorrect metadata cause malformed responses. You can refer to the debugging section below to see where Scalekit surfaces these fields.
4. Error: “SAML Assertion is Invalid”
This error appears when the SP can parse the Response but rejects the Assertion itself. The Assertion is structurally valid, but key trust fields, such as timestamps, Issuer, Audience, or NameID, do not meet the SP’s validation rules. This is a logical validation failure, not an XML parsing issue.
Root causes
- Incorrect timestamps (NotBefore, NotOnOrAfter)
- Wrong Issuer or Audience values
- Missing or incorrectly mapped NameID
- Attribute mapping issues
- Assertion modified or partially constructed
Where to check & how to fix
Inspect <Assertion> → <Conditions> for timestamp validity and verify <Issuer> and <AudienceRestriction> values. Confirm that a valid <NameID> exists under <Subject>.
Fix:
- IdP: Correct Issuer/Audience configuration, fix timestamp skew, and ensure proper NameID mapping.
- SP: Sync clocks via NTP and update expected identifiers in metadata or application config.
Scalekit makes these failures easy to diagnose by showing timestamp evaluations, Issuer/Audience comparisons, and NameID/attribute mapping inside the decoded Assertion. Attribute expectations are displayed directly in your configuration, making mismatches immediately visible. Refer to the debugging section below to see how these fields appear in Scalekit.
5. Error: “Invalid Signature” / “Signature Validation Failed”
This error occurs when the SP can read the SAML Response but cannot verify its digital signature. The XML is structurally valid, but the certificate, algorithm, or signed element does not match what the SP expects. Signature failures always indicate a trust alignment problem rather than a formatting issue.
Root causes
- Expired or rotated IdP signing certificates
- SP is using outdated metadata or the wrong certificate fingerprint
- Algorithm mismatch (e.g., IdP signing with SHA-1 while SP requires SHA-256)
- IdP signing only the Response when the SP expects the Assertion (or vice versa)
Where to check & how to fix
Inspect the <ds:Signature> block in the Response or Assertion. Verify the embedded <X509Certificate> and the SignatureMethod algorithm, and compare the fingerprint with the one configured on the SP.
Fix:
- IdP: Upload the correct signing certificate, ensure SHA-256 is used, and sign the element expected by the SP.
- SP: Refresh metadata, update certificate fingerprints, and confirm the correct signature location is being validated.
Scalekit simplifies signature debugging by highlighting certificate details, algorithm mismatches, and signature validation results directly in Authentication Logs. The Identity Provider Configuration also shows the active signing certificate, making outdated or incorrect metadata immediately visible. Refer to the debugging section below to see where these fields appear in Scalekit.
6. Error: “Issuer Mismatch”
This error occurs when the <Issuer> in the SAML Response or Assertion does not match the IdP EntityID configured by the SP. Even if signatures and timestamps are valid, the SP rejects the Assertion because it appears to come from an unknown or untrusted IdP. This typically happens due to the wrong IdP app, renamed EntityIDs, or mixing staging and production environments.
Root causes
- A wrong or outdated IdP application was selected
- IdP EntityID changed, renamed, or overwritten
- Staging IdP used with production SP (or vice-versa)
- Incorrect metadata imported into the SP
Where to check & how to fix
Check the <Issuer> value inside both the <Response> and <Assertion> and compare it to the IdP EntityID stored in SP metadata.
Fix:
- IdP: Use the correct IdP application, restore the original EntityID, and ensure environment-specific apps are correctly mapped.
- SP: Update the expected Issuer in metadata or application configuration to match the IdP’s actual EntityID.
Scalekit helps by displaying the active IdP EntityID directly in the Identity Provider Configuration and highlighting mismatched Issuer values in Authentication Logs. You can refer to the debugging section below to see exactly where these trust fields appear.
7. Error: “Audience Mismatch”
This error occurs when the <Audience> inside the Assertion does not match the SP’s configured EntityID or Audience value. The SP interprets the Assertion as issued for a different service, resulting in immediate rejection even if the rest of the Assertion is valid. This is one of the most common enterprise onboarding failures.
Root causes
- Incorrect or outdated Audience value in IdP settings
- Wrong SP application selected during IdP configuration
- Multiple SP entries are causing the IdP to send the wrong Audience
- Mixing staging and production SP identifiers
Where to check & how to fix
Inspect <AudienceRestriction> → <Audience> and compare it directly to the SP’s EntityID or Audience defined in metadata.
Fix:
- IdP: Update the Audience to match the SP’s documented EntityID exactly, including casing, formatting, and protocol.
- SP: Confirm the intended EntityID and ensure metadata and documentation use a consistent value.
Scalekit surfaces the configured SP EntityID and the Audience received inside the decoded Assertion, making mismatches easy to spot during testing. Refer to the debugging section below to see how these trust fields appear in Authentication Logs.
8. Error: “Request Expired” / “AuthnRequest Too Old”
This error occurs when the IdP processes an AuthnRequest after its valid window has expired. Even if the Assertion itself is valid, the SP rejects the Response because it no longer matches an active login attempt. This typically occurs due to delays in redirection or clock drift between the IdP and the SP.
Root causes
- Long redirects (VPN, proxies, network latency)
- Users pausing mid-login
- AuthnRequest TTL on the SP is set too low
- Time drift between IdP and SP systems
- Strict IdP-side timestamp enforcement
Where to check & how to fix
Check SP logs for the AuthnRequest timestamp and compare it with the processing time recorded by the IdP. Look for entries such as “stale request” or “AuthnRequest too old.”
Fix:
- IdP: Increase the request lifetime if supported and minimize delays in user flows.
- SP: Adjust AuthnRequest TTL and ensure system clocks sync correctly using NTP.
Scalekit helps by showing request and response timestamps together in Authentication Logs, making it easy to see when the Response exceeded the allowed window. You can refer to the debugging section below to see how these timestamps are surfaced.
9. Error: “Clock Skew Too Large”
This error occurs when the timestamps in the Assertion fall outside the acceptable tolerance relative to the SP’s system clock. Even a small drift can make the Assertion appear “not yet valid” or “already expired,” causing the SP to reject it despite otherwise correct metadata, audience, and signature.
Root causes
- IdP or SP servers not synced to NTP
- Time drift in VMs or containers
- Cloud instances waking from suspension with stale clocks
- Timezone misalignment is affecting timestamp comparisons
Where to check & how to fix
Inspect <Conditions> → NotBefore and NotOnOrAfter in the Assertion and compare them with the SP’s local system time. SP logs often include messages such as “clock skew,” “assertion expired,” or “assertion not yet valid.”
Fix:
- Both IdP and SP: Synchronize clocks using NTP, ensure containers inherit correct host time, and increase the skew tolerance window (typically 1–2 minutes) if supported.
Scalekit makes time-related failures easy to spot by displaying evaluated timestamps and highlighting “not yet valid” or “expired” conditions directly in Authentication Logs. Refer to the debugging section below to see where these evaluations appear.
10. Error: “Missing NameID”
This error occurs when the Assertion does not contain a <NameID> inside <Subject>, leaving the SP unable to identify the user. Even if the Assertion is otherwise valid, the SP cannot map the login attempt to a user account without NameID.
Root causes
- NameID mapping not configured in the IdP
- Unsupported or disabled NameID format
- Required attribute missing in the IdP directory (email/username)
- IdP policies restricting NameID release
Where to check & how to fix
Inspect the <Subject> block and confirm the <NameID> element exists and uses a format supported by the SP.
Fix:
- IdP: Enable NameID, map the correct attribute (email, username, etc.), and ensure the NameIDFormat aligns with SP requirements.
- SP: Confirm supported NameID formats and verify they match the IdP’s configuration.
Scalekit helps by showing missing or incorrectly mapped NameID values directly in the decoded Assertion and by displaying the expected attributes in your configuration. Refer to the debugging section below to see how NameID-related fields appear in Authentication Logs.
11. Error: “NameID Format Unsupported”
This error occurs when the IdP sends a <NameID> using a format the SP does not accept. Even if the NameID value is correct, the SP rejects the Assertion because the format (emailAddress, persistent, transient, etc.) doesn’t match its configured requirements.
Root causes
- IdP default NameIDFormat doesn’t match SP expectations
- SP supports only specific formats (e.g., emailAddress only)
- Outdated metadata defining allowed NameID formats
- Environment mismatches between staging/production configurations
Where to check & how to fix
Inspect <NameID Format="..."> and compare the format against the SP’s supported values in metadata or configuration.
Fix:
- IdP: Set the NameIDFormat to the one required by the SP (commonly emailAddress, transient, or persistent).
- SP: Update the configuration to accept the expected format, or broaden the supported NameID formats if possible.
Scalekit surfaces NameIDFormat mismatches by displaying the exact format returned in the Assertion and comparing it against the expected settings shown in your configuration. You can refer to the debugging section below to see where these values appear in Authentication Logs.
12. Error: “Invalid Destination”
This error occurs when the Destination attribute in the SAML Response does not exactly match the ACS URL configured on the SP. SAML requires character-for-character matching; even small differences in protocol (http vs https), trailing slashes, or mixing staging and production cause the SP to reject the Response immediately.
Root causes
- HTTP/HTTPS mismatches
- Trailing slash differences
- Staging vs. production ACS URL confusion
- Outdated or incorrect ACS URL in IdP configuration
- Typos in callback fields
Where to check & how to fix
Inspect the Destination="..." attribute in the <Response> and compare it directly to the ACS URL defined in the SP metadata.
Fix:
- IdP: Update the ACS URL exactly as documented, including protocol, casing, and path.
- SP: Confirm active ACS endpoints and ensure the IdP is configured with the correct value.
Scalekit simplifies this by showing the configured ACS URL and the Destination received from the IdP side by side in both the SSO configuration and the Authentication Logs, making routing mismatches easy to identify. Refer to the debugging section below to see where these fields appear.
13. Error: “RelayState Invalid or Missing”
This error appears when the RelayState returned by the IdP does not match the RelayState sent by the SP. Since RelayState ties the SAML Response to a specific login flow or redirect target, missing, altered, or truncated RelayState prevents the SP from correlating the Response with the original request, even if the SAML Response itself is valid.
Root causes
- Reverse proxies or load balancers stripping query parameters
- IdP not preserving RelayState during redirects
- RelayState values are too large and are being truncated
- Environment inconsistencies are altering RelayState handling
Where to check & how to fix
Compare the RelayState sent in the AuthnRequest with the RelayState returned in the Response. SP logs typically show “relaystate mismatch” or “missing relaystate” when correlation fails.
Fix:
- IdP: Enable RelayState passthrough and ensure it is returned exactly as received.
- SP: Log request/response ID pairs, avoid oversized RelayState values, and ensure proxies don’t rewrite or strip parameters.
Scalekit clearly displays the RelayState sent and the RelayState returned inside Authentication Logs, making mismatches immediately visible. Refer to the debugging section below to see how Scalekit surfaces these correlation values.
14. Error: “Unable to Decrypt Assertion”
This error occurs when the SP receives an encrypted Assertion but fails to decrypt it using its private key. The Assertion itself may be correct, but if the IDP encrypts it with the wrong SP certificate or if the SP uses an outdated or mismatched private key, decryption becomes impossible.
Root causes
- Wrong SP certificate uploaded to the IdP
- SP private key does not match the certificate used for encryption
- Stale or outdated SP metadata in the IdP
- Failed or partial key rollover leading to mismatched keypairs
Where to check & how to fix
Look for SP log messages like “decryption failed,” “key mismatch,” or “unable to decrypt assertion.” Confirm which certificate the IdP is using by checking its SAML configuration or metadata.
Fix:
- IdP: Upload the correct SP certificate and ensure encryption uses the SP’s currently active key.
- SP: Verify the loaded private key matches the public key in metadata; refresh metadata after certificate rotation.
Scalekit makes this easier by surfacing the exact SP encryption certificate, showing whether the IdP is encrypting with a stale or mismatched key, and flagging decryption failures directly in Authentication Logs. The debugging section below shows where these certificate and key details appear in Scalekit.
15. Error: “InResponseTo Mismatch”
This error occurs when the InResponseTo value in the SAML Response does not match any active AuthnRequest generated by the SP. Even if the Assertion is valid, the SP rejects it because it cannot link the Response to the correct login session.
Root causes
- Multiple simultaneous login flows
- User reloading or navigating backward during SSO
- AuthnRequest expiring before the Response returns
- RelayState refers to a request that is no longer active
- Very short Request TTL on the SP
Where to check & how to fix
Check the InResponseTo="..." value inside the <samlp:Response> and compare it with the SP’s stored Request ID. Logs often show “no active request” or “unknown InResponseTo.”
Fix:
- IdP: Never reuse or replay cached requests; always return the exact Request ID received.
- SP: Allow only one active AuthnRequest per session, tune TTL appropriately, and clean up stale or abandoned requests.
Scalekit displays the SP-generated Request ID and the IdP-returned InResponseTo side by side in Authentication Logs, making mismatches immediately obvious. The debugging section below shows where this correlation data appears.
How Scalekit helps you debug SAML failures
Most SAML issues become clear the moment you open Authentication Logs in Scalekit. Each log shows the complete authentication timeline, the IdP connection, the SAMLResponse received, the validation steps, and the exact point where the request failed. Errors such as invalid signatures, timestamp failures, issuer mismatches, incorrect ACS URL, missing RelayState, or malformed XML are displayed directly in this viewer, without requiring manual decoding or access to server logs.
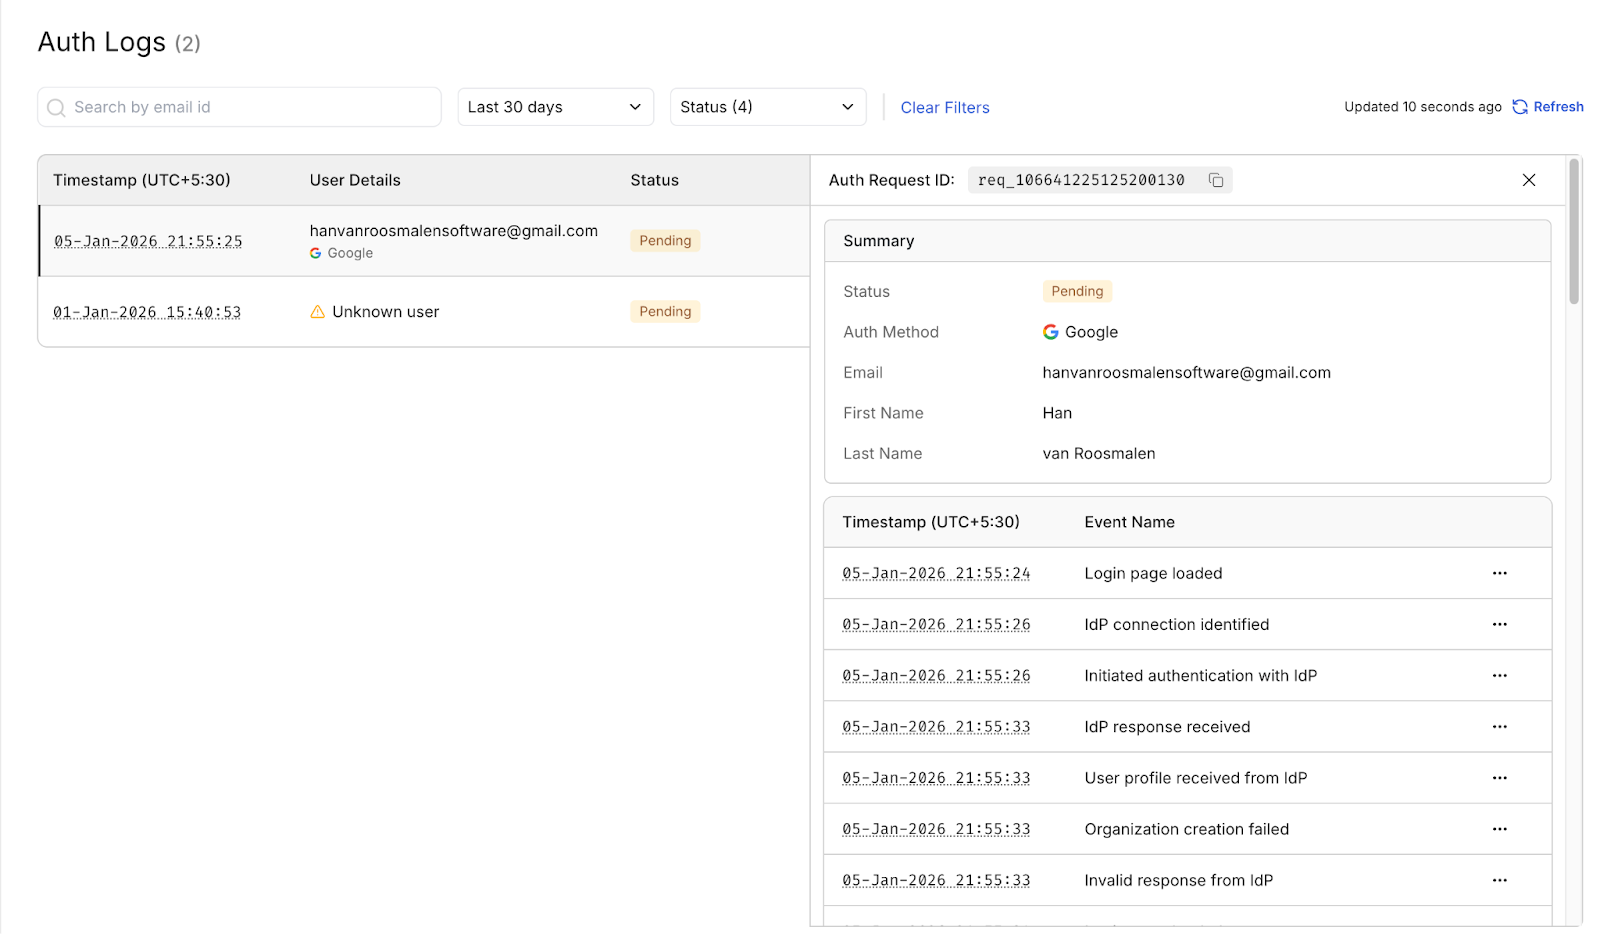
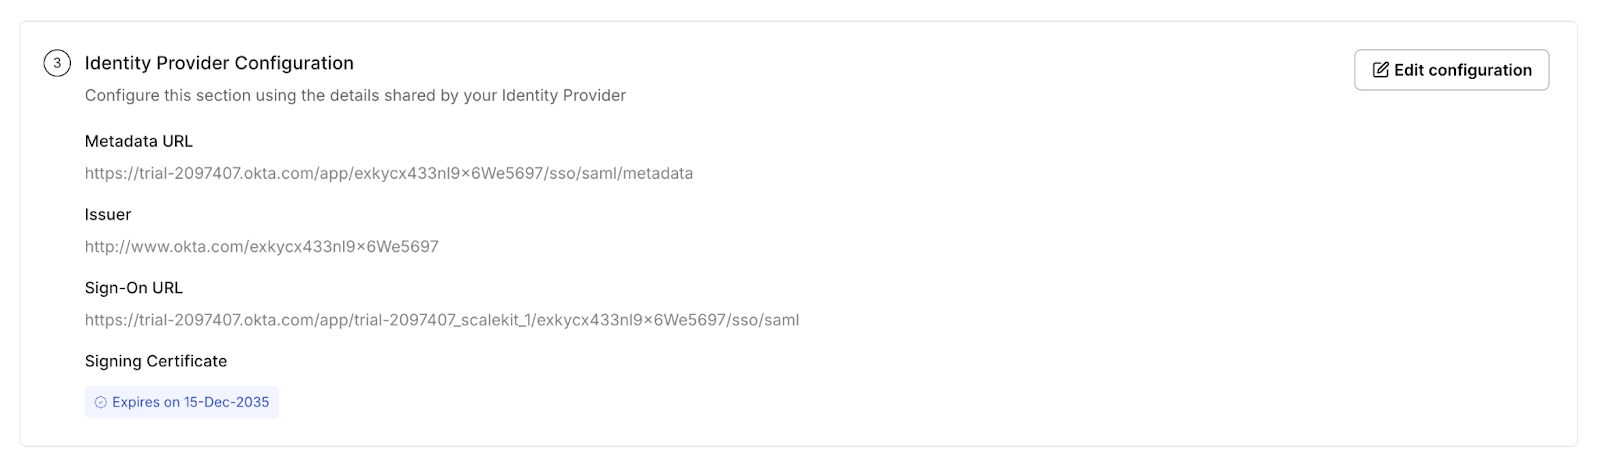
When an error relates to configuration rather than runtime, Scalekit exposes those values in the Identity Provider configuration panels. This includes the Metadata URL, Issuer, ACS/SSO URLs, and the signing certificate with its expiry. Issues such as certificate expiration, incorrect Issuer, outdated metadata, or mismatches in the ACS URL can be identified immediately in this section.
The same applies to attribute-related failures. If an Assertion is invalid because a NameID is missing or a required attribute wasn’t mapped, Scalekit’s Attribute Mapping view makes this obvious. You can see exactly which attributes the SP expects (nameid, email, firstName, etc.) and compare them with what the IdP is actually sending.

Together, the Authentication Logs and configuration panels give you everything you need to quickly diagnose SAML issues. Runtime failures surface in the logs; configuration-related problems appear in the metadata and attribute panels. This is why each error in the dictionary includes a short Scalekit Insight: the platform already exposes the specific field on which the error depends.
How to debug SAML correctly using response anatomy
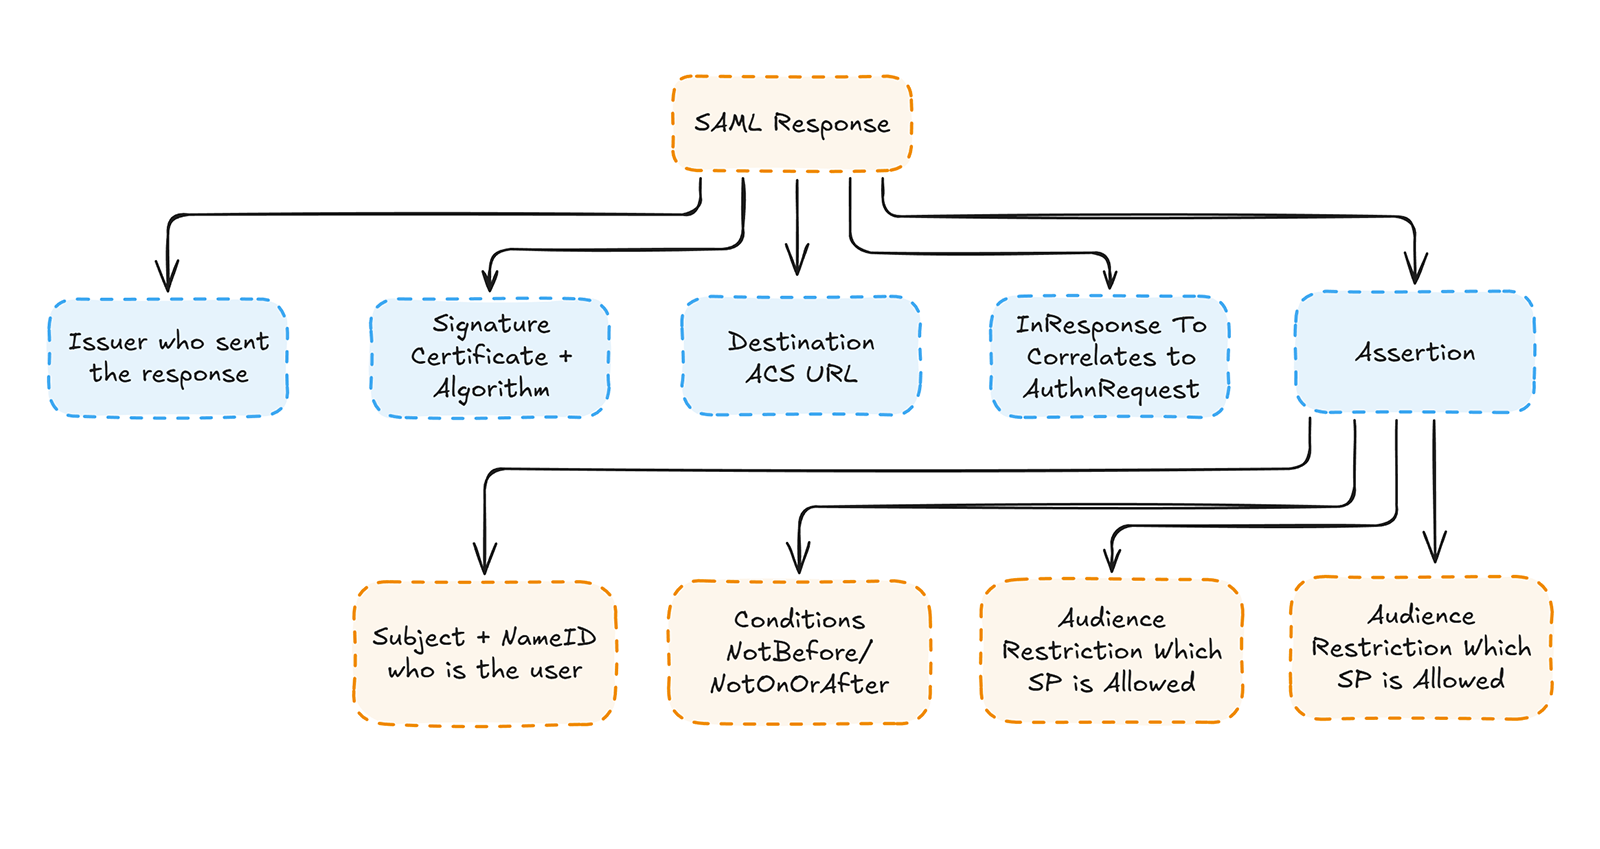
Debugging SAML becomes significantly easier when you understand where each trust-sensitive field is located in the SAML Response. Every SSO failure ultimately traces back to a mismatch in Issuer, Audience, timestamps, Destination, NameID, or signature. These fields appear in predictable locations within the SAML XML. Knowing how to navigate the structure turns debugging from guesswork into a systematic, deterministic process.
SAML Responses follow a stable, layered anatomy that separates transport-level information from user identity and trust assertions. The top-level <Response> defines routing and request correlation, while the inner <Assertion> carries identity, timestamps, and access conditions. The <Signature> block secures one or both of these layers, depending on how the IdP is configured. When engineers understand these boundaries, they can quickly isolate misconfigurations caused by certificate rotations, metadata drift, timestamp skew, or IdP template issues.
Your debugging workflow becomes simpler when you consistently inspect the same fields in the same order. This section provides a blueprint: where each component resides, how to correctly decode a SAML Response, and which XML nodes correspond to each common failure. Combined with the 60-second checklist and error dictionary, this anatomy map enables developers to confidently debug any SAML issue, including rare edge cases encountered in complex enterprise IdP setups.
SAML response anatomy diagram
How to decode a SAML response
SAML Responses are Base64-encoded by design. Identity Providers send the assertion as a Base64 string inside an HTML form POST to your ACS URL. This keeps the XML compact, safe for transport, and compatible with browser redirects.
To inspect the actual XML and debug errors, you must decode this Base64 string into a readable file.
Step 1: Decode Base64 into raw XML
This command converts the encoded blob into a proper XML file.
Step 2: Pretty-print the XML for readability
Pretty-printing fixes indentation and visibility of nested elements, making it easier to locate Issuer, Audience, timestamps, NameID, Conditions, and Signature blocks.
Step 3: Open it
This decoded file becomes your primary debugging artifact.
You will use it to match errors to fields in the SAML Response and Assertion.
What lives where
Validate signature locally
Local signature verification lets you confirm whether the SAML Response is cryptographically valid before the SP’s code, SDK, or middleware interferes. This is especially useful for debugging signature mismatches, expired certificates, incorrect metadata, or XML wrapping attacks where the IdP signs one element but the SP parses another.
What this actually does
- Loads the public certificate you expect the IdP to use
- Checks whether the <ds:Signature> block is valid
- Ensures the signed data hasn’t been modified
- Confirms that the certificate fingerprint matches your metadata
- Rejects XML wrapping (multiple <Assertion> blocks, wrong ID referencing)
How to read XMLSec1 output
Successful verification looks like:
A failed verification usually shows:
How to interpret this result
- If it fails locally, the SAML Response is already invalid.
→Your SP correctly rejects it.
→ IdP must fix its signing certificate, algorithm, or metadata. - If it passes locally but fails in your SP, then:
→ Your metadata is outdated
→ Your library is validating the wrong element
→ You may be hitting an XML wrapping edge case
→ Your SP expects assertion-signing, but IdP signs only the response
Common issues caught by local verification
- IdP rotated certificates, but SP did not update metadata
- IdP included the wrong cert in metadata
- Assertion signed, but your library expects the response to be signed (or vice versa)
- XML wrapping (malicious or misconfigured)
- SHA-1 → SHA-256 algorithm mismatch
- Corrupted signature block
Validate certificate expiry
SAML signatures fail immediately if the IdP’s signing certificate is expired or rotated without updating the SP metadata. Certificate expiry is one of the top causes of broken SSO, especially during enterprise IdP rotations, where new certificates are published but not propagated to all applications.
Check certificate expiration date
You should see something like:
Check the start date (valid-from)
If the IdP rotated keys recently, your SP may be using a cert that is not yet valid.
Example output:
Check the certificate fingerprint
This helps confirm whether the certificate in your metadata matches what the IdP actually used.
Example output:
You’ll use this fingerprint to compare against the fingerprint in your SP configuration.
Why certificate validity impacts SAML
- An expired certificate makes all signatures invalid
- A rotated certificate breaks SSO until the SP updates the metadata
- A not-yet-valid certificate causes verification failures
- A mismatch between the IdP-sent cert and the SP-stored cert always causes “invalid signature” errors
- Many IdPs publish new certificates weeks before rotation (your SP must trust both)
Error-to-field map for faster SAML debugging
Extract critical fields automatically
Manual XML scanning works for single incidents, but it becomes slow when debugging multiple SAML flows, onboarding many customers, or validating fresh IdP metadata. For teams that prefer automation, this small Python utility pulls the highest-signal fields Issuer, Audience, and NameID right out of the decoded SAML Response.
This script is especially useful when:
- You process large numbers of assertions
- You want to verify multiple customer IdP configurations quickly
- You run automated tests or CI checks on SAML responses
- You want a repeatable way to inspect core SAML trust fields
Python snippet
Example output:
What this script helps you confirm
- Issuer: Is the IdP sending the correct EntityID?
- Audience: Is the assertion intended for your SP?
- NameID: Is the user identifier present and in the right format?
These three fields alone eliminate many common errors:
- Issuer mismatch
- Audience mismatch
- Missing NameID
- Incorrect IdP configuration
- Metadata drift between IdP and SP
Safety Notes
- This script does not read attributes containing sensitive data.
- It accesses only trust-related SAML fields.
- Always run this on the decoded SAML XML (never Base64 directly).
Logging that actually helps developers fix SAML
SAML errors become harder to diagnose when logs capture the wrong fields or hide the information that actually determines trust. Most production incidents drag on because teams only log the decoded response or the error message returned by their SAML library. That information is rarely enough. The fields that matter, timestamps, identifiers, certificate fingerprints, signature algorithms, and request/response IDs, must be captured explicitly to trace failures across the identity provider and service provider.
SAML logging works best when you record high-signal fields that quickly reveal the root cause. These fields provide the context needed to distinguish between a certificate mismatch, an Issuer/Audience mismatch, a routing error, or a timestamp issue. Capturing them as structured JSON enables filtering across sessions, building dashboards, and running diff-based checks during certificate rotations or metadata refreshes. Good logs dramatically reduce time-to-resolution, especially when debugging enterprise SSO.
Effective SAML logs follow two principles: log the fields that determine trust and protect the fields that identify users. You should log the cryptographic and routing metadata, not full assertion payloads containing user data or attributes. Redaction is essential, but you can maintain utility by masking sensitive elements while preserving structure. The goal is simple: give developers enough information to understand failures without creating compliance or privacy risks.
Fields you should always log
These fields expose the root cause behind nearly every SAML failure. Log them consistently.
1. Core identifiers
Required for correlating SP ↔ IdP flows. Essential for debugging invalid InResponseTo or RelayState issues
2. Cryptographic fields
Required for signature validation, expiry checks, and cert rotations
3. Routing & trust fields
Required for diagnosing Issuer/Audience mismatches, ACS URL issues, and wrong bindings
4. Timestamp fields
Required for debugging clock skew, expired assertions, and replay attempts
5. Outcome fields
Required for summarizing the failure and powering dashboards
Together, these fields explain 90% of SAML validation failures without decoding the entire assertion.
Fields that must be redacted or masked (Protect users)
SAML Assertions often contain identity data that should never appear in plaintext logs. Always mask or redact these values to stay compliant and avoid leaking user information.
Redact or mask these fields:
- NameID (email, username, persistent identifier)
- Email addresses
- User attributes (department, role, employee ID, phone, title, etc.)
- Group memberships
- SessionIndex
- Any internal or customer-specific user identifiers
Recommended masking pattern:
Mask enough to hide PII while keeping the structure for debugging.
Fields you should never log under any circumstance
These values create a direct security risk and must never appear in logs:
- Private keys
- Decryption keys
- Full raw SAML Assertions in plaintext
- Passwords
- MFA or one-time tokens
- IdP session cookies or SSO tokens
If these leak, SSO security is compromised.
How to redact SAML fields safely
Redaction should remove sensitive values while preserving field structure, so developers can still understand the SAML flow during debugging. The simple redaction helpers below can be used to mask email addresses, persistent identifiers, NameID values, SessionIndex fields, and any user-related attributes within a SAML Assertion.
This masking approach can be extended to redact any other sensitive fields in your SAML assertions, as needed for your security or compliance requirements.
How logged fields map to SAML failures
When a SAML error occurs, each failure type points to a specific field inside the SAML Response. Logging these fields ensures that developers can identify the root cause without decoding the entire assertion or guessing which part of the XML failed. This table maps the most common validation failures to the exact fields you must capture.
These fields give developers the signal they need to pinpoint issues immediately.
Common logging mistakes that slow down SAML debugging
Many SAML incidents take far longer to resolve because critical fields are missing from logs. These are the mistakes that create blind spots during debugging:
- Logging only the Base64 blob: No visibility into which XML field is incorrect.
- Not logging timestamps: Clock skew or expiry issues become impossible to diagnose.
- Omitting certificate fingerprints: Signature failures become untraceable.
- Missing RequestID / InResponseTo: Breaks correlation between SP and IdP flows.
- Logging full NameID or attributes → Creates unnecessary privacy and compliance risks.
- Relying solely on SAML library errors → These messages are vague and inconsistent across platforms.
Logging the right fields and avoiding the wrong ones makes SAML troubleshooting more predictable and less painful.
When you need to escalate beyond internal debugging
Most SAML issues can be resolved by inspecting the XML, comparing metadata, checking timestamps, and reviewing signatures. Escalation is necessary only when the response appears structurally correct, but the IdP and SP still disagree on trust parameters such as certificates, ACS URLs, or environment-specific values. In these cases, the goal is to provide a concise but complete packet so an IdP, SP, or vendor support team can reproduce the failure without guesswork.
A useful escalation packet includes three elements:
- The decoded SAML Response,
- The IdP and SP metadata, and
- The validation fields your system logged (issuer, audience, destination, timestamps, signature details, and failure reason).
This is the minimal set required to verify whether the failure originated from metadata drift, certificate rotation, incorrect ACS routing, or a template mismatch on the IdP.
While providing these files, avoid sharing user-specific identity data such as NameID, attributes, or group memberships. Support teams need only the structural fields that determine trust, not the user profile. Likewise, never include private keys, decryption keys, cookies, MFA tokens, or HAR files with active credentials. Redacted assertion sections are acceptable as long as the trust-relevant parts remain intact.
When transferring the packet, use a secure channel: an encrypted ZIP, a time-limited link, or a provider’s secure upload form. Email and chat are not appropriate for SAML artifacts because they may contain certificates or internal identifiers.
Before escalating, determine where the issue belongs by following the validation flow already outlined: confirm the cryptographic layer, verify trust parameters, check routing values, and review timestamps. If all of these are correct, yet the failure persists, escalate with a complete diagnostic packet.
Conclusion
SAML failures feel unpredictable only when the underlying structure is unclear. Once you understand how the Response is formed, which fields determine trust, and which mismatches cause validation errors, the debugging process becomes systematic instead of trial-and-error. This guide gives a complete troubleshooting workflow: a fast triage checklist, an error dictionary, response anatomy, logging strategies, redaction rules, and a clear escalation path.
The pattern is always the same: validate signatures, validate trust parameters, validate routing, validate timestamps, and escalate only when these layers all align. With consistent logging and accurate metadata, SAML becomes a deterministic system, one where nearly every failure can be traced to a single field in the XML. This makes SSO integrations more predictable, easier to maintain, and significantly faster to diagnose in production environments.
FAQs
1. What is SAML?
SAML (Security Assertion Markup Language) is an XML-based protocol that allows an Identity Provider (IdP) to authenticate a user and send a signed Assertion to a Service Provider (SP). The SP uses fields like Issuer, Audience, Destination, timestamps, and signatures to validate the Response. If any trust field is wrong, login fails even when the XML “looks” correct.
2. Why does “Invalid SAML Response” appear even when the XML looks correct?
SPs validate multiple trust layers: signature, issuer, audience, destination, timestamps, and correlation fields. If even one of these fails, the SP rejects the Response regardless of the XML's formatting. Most cases are caused by metadata drift, outdated certificates, or incorrect ACS URLs.
3. What causes “Invalid Signature” even after updating certificates?
Signature failures usually mean the IdP rotated certificates without updating metadata, the SP cached a stale fingerprint, or the wrong XML element is being signed (Response vs Assertion). Running xmlsec1 --verify locally is the fastest way to isolate which certificate or element mismatch is causing the failure.
4. Why does SAML fail after deploying a new environment?
Environment-specific fields ACS URL, EntityID, and Audience must match exactly. These values differ across dev, staging, and production. If an IdP app points to the wrong environment, the SP rejects the Assertion instantly. This is one of the most common onboarding failures.
5. Why do I get “Assertion expired” or “NotBefore is in the future”?
This happens when the IdP and SP clocks drift or when the assertion validity window is too tight. Since SAML strictly enforces timestamps, even a small skew can make assertions appear “expired” or “not yet valid.” Sync both systems to NTP and check the NotBefore / NotOnOrAfter values in the decoded assertion.
6. Why does NameID fail to appear or match what my SP expects?
Most IdPs don’t automatically map NameID. Some omit it entirely; others default to persistent IDs instead of emails. Set the correct NameIDFormat (often emailAddress) and ensure the attribute exists in your directory and is allowed by the IdP policy.
7. Why does my IdP say login succeeded but my SP still shows an error?
This happens when the IdP’s authentication succeeds, but the SP rejects the Assertion due to mismatches in Audience, Issuer, Destination, or signature. IdPs rarely validate SP-side trust fields, so they return “success” even when the SP cannot validate the incoming Response.
8. Why does SAML break immediately after certificate rotation?
When IdPs rotate certificates, they often publish updated metadata, but SPs may still be using cached or outdated fingerprints. Until the SP refreshes metadata, signatures will fail even though the IdP is correctly using the new certificate.
9. Why does SAML work in IdP “test mode” but fail in production?
IdP test modes often use preconfigured values (Issuer, Audience, ACS URL) that match sample applications rather than your own metadata. Production flows require exact identifiers. Switching to the real environment exposes mismatches that test mode masked.