Building a LangChain agent that can call HubSpot tools is the easy part. The real challenge starts when your agent is built for a team or for customers, and each user needs to connect their own HubSpot account without you turning OAuth, token storage, and account management into a product of its own. In this post, we will build the HubSpot integration the way multi-user agents actually need it, so each user can securely bring their own account to your agent experience instead of relying on one shared credential.
Here are some real scenarios where this matters:
Sales meeting prep agent: Before every call, your agent pulls the contact's history, deal stage, and past engagement notes from HubSpot—but each rep on the team needs to see only their own pipeline, with their own permissions.
Post-meeting CRM updater: A rep pastes raw meeting notes into a chat. The agent extracts action items, updates the deal stage, logs an engagement, and creates follow-up tasks—all under that rep's HubSpot identity, not a shared bot account.
Customer-facing support agent: Your SaaS product includes an AI assistant that reads and creates tickets inside the end customer's own HubSpot portal. Each customer connects their HubSpot through your app; the agent never touches another customer's data.
Lead enrichment pipeline: On a new form submission, the agent researches the lead, enriches contact properties, scores it, and assigns it to the right owner scoped to the specific HubSpot portal where the lead came in.
If you are figuring out how to give LangChain agent HubSpot access, evaluating HubSpot tools for agents, or building HubSpot for AI agents that serve multiple users or customers, the real complexity is almost never the tool schemas themselves. It is ensuring the agent always acts with the correct user's credentials and scopes, without you building and maintaining OAuth, token storage, and refresh logic as a side product.
By the end of this tutorial
A user-facing app where someone can sign in and connect HubSpot.
A secure OAuth connection flow managed through Scalekit.
A way to store and retrieve the HubSpot connection for each user.
An agent layer that uses the connected user’s HubSpot access when calling tools.
working end-to-end example you can extend to contacts, deals, companies, engagements, and other HubSpot CRM workflows.
Who is this for
This post is for developers and teams who are building multi-user LangChain agents, either for their own organization (for example, an internal agent used by multiple people on a sales or support team) or as a product or feature that serves external customers.
You are the builder of the agent. The "multiple users" are *your* users or customers. Each of them should be able to bring their own HubSpot identity, permissions, and data into the agent you built, without you having to maintain OAuth flows, token storage, or refresh logic yourself.
Building an agent purely for your own personal use is possible with the same primitives, but it is not the primary story this post tells.
Before you start
Node.js 18+ (or Python 3.9+)
A Scalekit account with a HubSpot connection configured (one-time dashboard step)
Basic familiarity with LangChain tool calling (DynamicStructuredTool)
A HubSpot account you can use for testing
Architecture overview
When you are building a LangChain agent that serves multiple users (inside your organization or as a product for your customers), the real challenge is letting each of those users bring their own HubSpot account securely.
Scalekit provides a HubSpot connector: a set of LLM-optimized tools for common HubSpot CRM operations (managing contacts, companies, deals, tickets and tasks; batch operations with associations; logging engagements like calls, emails, notes and meetings; searching, associating, and working with custom objects and owners). The tools are already described for tool calling and Scalekit executes them against the HubSpot API using the connected user's token. Unlike rolling your own HubSpot OAuth + custom SDK wrappers in LangChain (great for single-credential or maximum flexibility) or community toolkits, for *multi-user* the schemas are rarely the problem — ensuring every tool call respects the *correct user's* identity + scopes without you owning OAuth/token/refresh as a side product is the hard part.
For multi-user agents the core requirement is the same either way: each of your users or customers must bring and authorize their own HubSpot account, and every tool call must run with that specific user's identity and permissions. Scalekit's connected accounts + identifier model lets you do this securely without building the OAuth and token plumbing yourself.
The full current list of tools for the native connector (plus required scopes such as crm.objects.contacts.read, crm.objects.deals.read, crm.objects.companies.read, and write scopes where you perform creates/updates) is in the HubSpot connector docs.
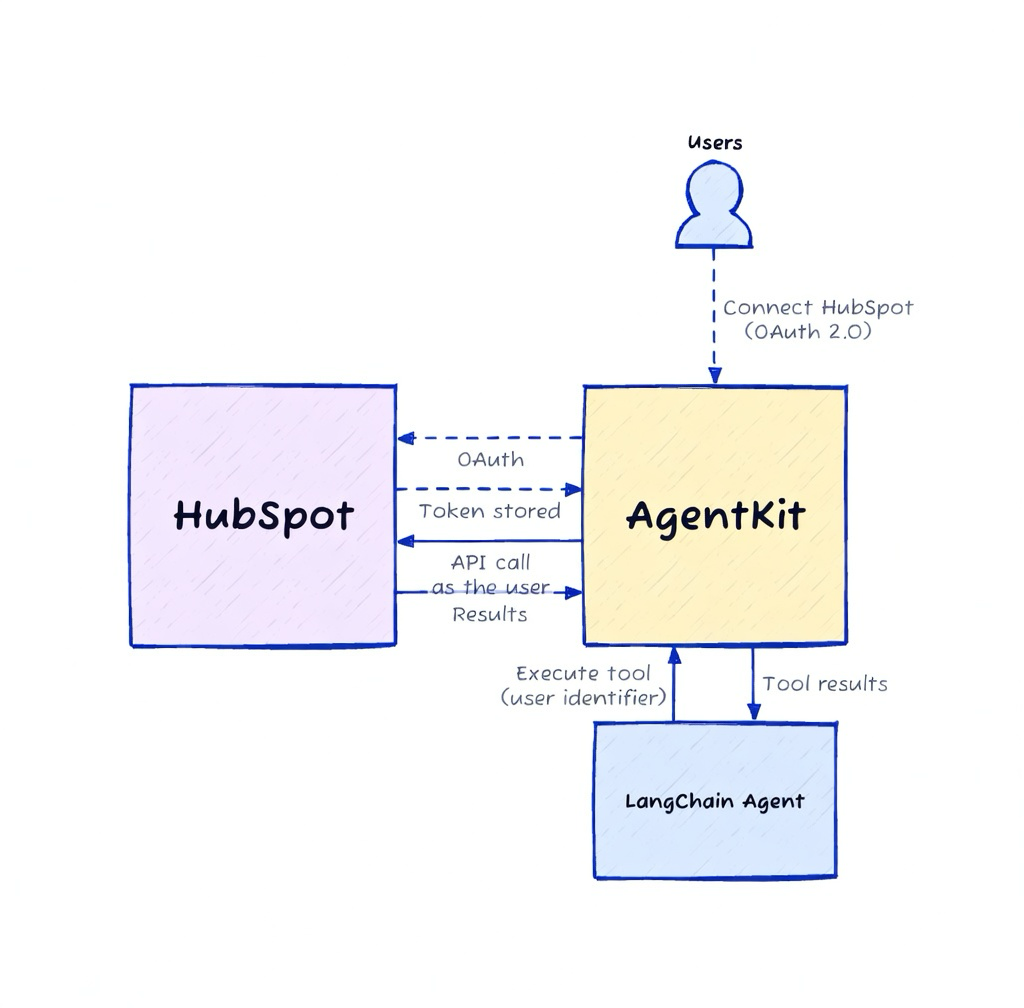
You control the mapping from your users to Scalekit identifiers. Scalekit handles the HubSpot OAuth, token vault, and refresh. Your agent only ever uses the identifier for the current user when calling tools.
The two key flows are:
Connection time: Your user connects their HubSpot through Scalekit (with proper verification that the real user completed the OAuth).
Runtime: Your agent resolves the identifier for the current user (after your own authorization check) and gets properly scoped HubSpot tools via Scalekit.
Here is the architecture as a diagram.
Step 1: Create the HubSpot app
This is a one-time setup in the Scalekit dashboard (AgentKit → Connections). You register a "hubspot" connection.
You can start with Scalekit's shared OAuth app for development and testing. For production, bring your own HubSpot OAuth App credentials so your branding appears on the consent screen.
The tools demonstrated in this post typically require scopes such as crm.objects.contacts.read, crm.objects.deals.read, crm.objects.companies.read, and write scopes where you perform creates/updates. See the exact current list and dashboard steps in the HubSpot connector docs.
Step 2: Configure Scalekit
Install the SDK:
npm install @scalekit-sdk/node
Initialize the client (use environment variables in production)
import { ScalekitClient } from '@scalekit-sdk/node';
const scalekit = new ScalekitClient(
process.env.SCALEKIT_ENVIRONMENT_URL!,
process.env.SCALEKIT_CLIENT_ID!,
process.env.SCALEKIT_CLIENT_SECRET!,
);
See the full SDK reference and environment variable names in the Scalekit docs.
Step 3: Authorize and verify user's identity
This is the secure connection flow your users go through inside your app.
You call getOrCreateConnectedAccount (or check status), then getAuthorizationLink (passing a userVerifyUrl that points back to your protected endpoint). After the user completes HubSpot OAuth, your endpoint receives an authRequestId and you call verifyConnectedAccountUser to prove the real user completed the flow.
Here is the pattern (TypeScript):
import http from 'http';
const CONNECTION_NAME = 'hubspot';
const userVerifyUrl = 'http://localhost:3456/callback'; // in production: your authenticated route
async function ensureConnectedForUser(identifier: string) {
const { connectedAccount } = await scalekit.actions.getOrCreateConnectedAccount({
connectionName: CONNECTION_NAME,
identifier,
});
if (connectedAccount?.status === 'ACTIVE') {
console.log('Already connected for this user');
return;
}
const { link } = await scalekit.actions.getAuthorizationLink({
connectionName: CONNECTION_NAME,
identifier,
userVerifyUrl,
});
console.log(`Open this link for the user to connect HubSpot: ${link}`);
// Minimal local callback for demo only.
// In production: make this an authenticated endpoint in YOUR app.
// It must verify that the logged-in user owns this identifier before calling verify.
const authRequestId = await waitForDemoCallback(3456);
await scalekit.actions.verifyConnectedAccountUser({
authRequestId,
identifier,
});
// Re-check status
const check = await scalekit.actions.getOrCreateConnectedAccount({
connectionName: CONNECTION_NAME,
identifier,
});
if (check.connectedAccount?.status !== 'ACTIVE') {
throw new Error('Connection did not become ACTIVE after verification');
}
console.log('Connection verified and ACTIVE for this user');
}
function waitForDemoCallback(port: number): Promise {
return new Promise((resolve) => {
const server = http.createServer((req, res) => {
const url = new URL(req.url ?? '/', `http://localhost:${port}`);
const authRequestId = url.searchParams.get('auth_request_id');
res.writeHead(200, { 'Content-Type': 'text/html' });
res.end('
Production note (critical): Never use a local unauthenticated callback in real code. Your userVerifyUrl must be a route protected by your normal auth. Only after you confirm the request comes from the legitimate owner of the identifier do you call verifyConnectedAccountUser. This is what prevents one user from claiming another user's connected account.
Step 4: Store and resolve the user’s connected account
After successful verification, you store the identifier in your system, associated with the user who just connected.
In a real application this would be a database row:
-- Example (your schema)
UPDATE users
SET hubspot_identifier = 'user_123'
WHERE id = 42
AND current_user_can_manage_this_account; -- your authorization check
For the demo script we use a simple in-memory map or the identifier directly, but the comments make the production requirement explicit:
// In your real app:
const userId = getCurrentUserId(req); // from your session/auth
const identifier = await db.getHubspotIdentifierForUser(userId);
// Never trust an identifier coming from the client.
// Always resolve it server-side after authenticating the request.
if (!identifier) {
throw new Error('No HubSpot connection for this user');
}
// The identifier is the secure key that lets code running in your system
// act on behalf of one of your users on HubSpot.
// Treat it like a sensitive credential: store it securely, log it minimally,
// and only use it after you have performed your own authorization check.
Step 5: Pass the user context into the agent tools
With the identifier resolved, load the tools scoped to that connected account and wrap them for LangChain.
import { DynamicStructuredTool } from '@langchain/core/tools';
import { z } from 'zod';
// Helper to turn the tool's JSON Schema into a Zod schema LangChain understands
function jsonSchemaToZodObject(jsonSchema: any): z.ZodObject {
// (full implementation in Complete Code section)
const shape: any = {};
// ...
return z.object(shape);
}
async function getHubSpotToolsForUser(identifier: string) {
const result = await scalekit.tools.listScopedTools(identifier, {
filter: { connectionNames: ['hubspot'] },
pageSize: 50,
});
return result.tools.map((t) => {
const def = t.tool.definition;
const zodSchema = jsonSchemaToZodObject(def.input_schema);
return new DynamicStructuredTool({
name: def.name,
description: def.description,
schema: zodSchema,
func: async (args) => {
const res = await scalekit.tools.executeTool({
toolName: def.name,
identifier,
params: args,
});
return JSON.stringify(res.data ?? {});
},
});
});
}
// Usage in your agent code:
const tools = await getHubSpotToolsForUser(identifier);
// Pass `tools` into your LangChain agent / ReAct / etc.
const contacts = await tools
.find((t) => t.name === 'hubspot_contacts_search')!
.invoke({ limit: 3 });
These tools are now correctly scoped to the connected user. You can give them to any LangChain agent you already have.
The exact same wrapping pattern works for every tool the HubSpot connector can return for a connected account. Scalekit's HubSpot connector gives your agent a rich, ready-to-use catalog of tools. The exact tool names (pass these to DynamicStructuredTool or scalekit.tools.executeTool) and what they do are defined in the same data source that powers the developer documentation.
Here is the current catalog (curated selection of commonly useful tools; HubSpot exposes 99 total), grouped for easy scanning:
Contacts
hubspot_contact_create — Create a new contact in HubSpot CRM. Requires an email address as the unique identifier. Supports additional properties like name, company, phone, and lifecycle stage.
The post demonstrates hubspot_contacts_search, hubspot_deals_search, and hubspot_contact_create (the same wrapping pattern works for every tool above; the complete code also shows a create that mutates test data). When you call listScopedTools for a connected account you receive the current set available to that user (in testing we saw 99 tools returned for a typical set of CRM read/write scopes such as crm.objects.contacts.*).
Important HubSpot notes for agents: HubSpot connections support public apps (recommended; modern crm.objects.* scopes) or legacy apps (use bare scope strings as-is in Scalekit Permissions). See the full table and app type guidance in the HubSpot connector docs. Most batch/update/associate tools require internal record IDs (not emails/names) — always search first (e.g. via *_search tools, take results[].id), then use the ID. A mapping of which search tool returns which ID is in the docs under "Getting resource IDs".
For the full, always-current, neatly grouped + searchable interactive list with complete parameter schemas (plus the scopes and ID guidance), see the HubSpot connector documentation. It is generated from the exact same tool definitions used here (and now includes client-side search and logical grouping for easier discovery).
Complete Code
Here is the complete, self-contained TypeScript example (Option X style). Change the IDENTIFIER (or pass via command line) to simulate different users.
/**
* Complete example: HubSpot tools for a multi-user LangChain agent with Scalekit.
*
* Run:
* SCALEKIT_ENV_URL=... \
* SCALEKIT_CLIENT_ID=... \
* SCALEKIT_CLIENT_SECRET=... \
* tsx 02-langchain-x-hubspot.ts demo-user-1
*
* Or just edit the IDENTIFIER below and run for different "users".
*
* In your real app:
* - The identifier comes from YOUR database, looked up after you authenticate
* the current request (never from the client).
* - The identifier is sensitive — it lets code you control act on the user's
* behalf on HubSpot. Store it securely.
*/
import { ScalekitClient } from '@scalekit-sdk/node';
import { DynamicStructuredTool } from '@langchain/core/tools';
import { z } from 'zod';
import http from 'http';
const scalekit = new ScalekitClient(
process.env.SCALEKIT_ENV_URL!,
process.env.SCALEKIT_CLIENT_ID!,
process.env.SCALEKIT_CLIENT_SECRET!
);
const CONNECTION_NAME = 'hubspot';
// ------------------------------------------------------------------
// 1. Helper: JSON Schema → Zod (required for LangChain DynamicStructuredTool)
// ------------------------------------------------------------------
function jsonSchemaToZodObject(jsonSchema: any): z.ZodObject {
if (!jsonSchema || jsonSchema.type !== 'object') return z.object({});
const shape: any = {};
const props = jsonSchema.properties ?? {};
const required = new Set(jsonSchema.required ?? []);
for (const [key, prop] of Object.entries(props)) {
let field: any;
const types = Array.isArray(prop.type) ? prop.type : [prop.type];
const baseType = types.find((t: string) => t !== 'null') ?? 'string';
if (baseType === 'number' || baseType === 'integer') field = z.number();
else if (baseType === 'boolean') field = z.boolean();
else if (baseType === 'object') field = jsonSchemaToZodObject(prop);
else if (baseType === 'array') field = z.array(z.any());
else field = prop.enum ? z.enum(prop.enum) : z.string();
if (prop.description) field = field.describe(prop.description);
if (types.includes('null')) field = field.nullable();
if (!required.has(key)) field = field.optional();
shape[key] = field;
}
return z.object(shape);
}
// ------------------------------------------------------------------
// 2. Ensure the connected account (with verification)
// ------------------------------------------------------------------
async function waitForDemoCallback(port: number): Promise {
return new Promise((resolve) => {
const server = http.createServer((req, res) => {
const url = new URL(req.url ?? '/', `http://localhost:${port}`);
const authRequestId = url.searchParams.get('auth_request_id');
res.writeHead(200, { 'Content-Type': 'text/html' });
res.end('
Authorization complete — return to terminal.
');
server.close();
if (authRequestId) resolve(authRequestId);
});
server.listen(port);
});
}
async function ensureConnectedForUser(identifier: string) {
const userVerifyUrl = 'http://localhost:3456/callback';
const { connectedAccount } = await scalekit.actions.getOrCreateConnectedAccount({
connectionName: CONNECTION_NAME,
identifier,
});
if (connectedAccount?.status === 'ACTIVE') {
console.log(`✓ Already ACTIVE for identifier: ${identifier}`);
return;
}
const { link } = await scalekit.actions.getAuthorizationLink({
connectionName: CONNECTION_NAME,
identifier,
userVerifyUrl,
});
console.log(`\nOpen this link to connect HubSpot for ${identifier}:\n${link}\n`);
console.log('Waiting for callback on http://localhost:3456/callback ...');
const authRequestId = await waitForDemoCallback(3456);
await scalekit.actions.verifyConnectedAccountUser({
authRequestId,
identifier,
});
// Re-check
const check = await scalekit.actions.getOrCreateConnectedAccount({
connectionName: CONNECTION_NAME,
identifier,
});
if (check.connectedAccount?.status !== 'ACTIVE') {
throw new Error('Connection did not become ACTIVE after verification');
}
console.log(`✓ Connection verified and ACTIVE for ${identifier}\n`);
}
// ------------------------------------------------------------------
// 3. Load scoped HubSpot tools and wrap for LangChain
// ------------------------------------------------------------------
async function getHubSpotToolsForUser(identifier: string) {
const result = await scalekit.tools.listScopedTools(identifier, {
filter: { connectionNames: [CONNECTION_NAME] },
pageSize: 50,
});
console.log(`Loaded ${result.tools.length} scoped HubSpot tools for this user.`);
return result.tools.map((t) => {
const def = t.tool.definition;
const zodSchema = jsonSchemaToZodObject(def.input_schema);
return new DynamicStructuredTool({
name: def.name,
description: def.description,
schema: zodSchema,
func: async (args) => {
const res = await scalekit.tools.executeTool({
toolName: def.name,
identifier,
params: args,
});
return JSON.stringify(res.data ?? {});
},
});
});
}
// ------------------------------------------------------------------
// 4. Demo
// ------------------------------------------------------------------
async function main() {
// In a real app you would look this up from your authenticated user.
// Here we allow changing it so you can demo multiple "users".
const userLabel = process.argv[2] || 'demo-user-1';
const identifier = `langchain-demo-${userLabel}`;
console.log(`\n=== Demo for your user "${userLabel}" (identifier: ${identifier}) ===\n`);
// 1. Make sure this user has a verified HubSpot connection
await ensureConnectedForUser(identifier);
// 2. Get tools scoped to this user's connected HubSpot account
const tools = await getHubSpotToolsForUser(identifier);
// 3. Example direct tool usage (in real code you would pass these to an agent)
const contactsSearch = tools.find((t) => t.name === 'hubspot_contacts_search');
if (contactsSearch) {
console.log('\nCalling hubspot_contacts_search ...');
const output = await contactsSearch.invoke({
limit: 3,
});
console.log('Contacts search response (truncated):', (output as string).slice(0, 300));
}
const dealsSearch = tools.find((t) => t.name === 'hubspot_deals_search');
if (dealsSearch) {
console.log('\nCalling hubspot_deals_search ...');
const output = await dealsSearch.invoke({
limit: 2,
});
console.log('Deals search response (truncated):', (output as string).slice(0, 200));
}
// Demonstrate a create (this will add a test contact to the connected HubSpot portal for this identifier)
const createContact = tools.find((t) => t.name === 'hubspot_contact_create');
if (createContact) {
const testEmail = `langchain-demo-${Date.now()}@example.com`;
console.log(`\nCalling hubspot_contact_create for ${testEmail} (test contact)...`);
const output = await createContact.invoke({
email: testEmail,
firstname: 'LangChain',
lastname: 'Demo',
lifecyclestage: 'lead',
});
console.log('Create contact response (truncated):', (output as string).slice(0, 200));
}
console.log('\n=== Done. Change the identifier / userLabel to simulate another user. ===\n');
}
main().catch((err) => {
console.error(err);
process.exit(1);
});
You should see output from the search tool calls against your connected HubSpot data.
Explore all connectors
Scalekit supports dozens of connectors beyond HubSpot (Gmail, Slack, Notion, Google Calendar, Linear, GitHub, etc.). The same listScopedTools + executeTool + identifier pattern works for all of them.
The same connected-account + scoped-tool approach works with:
CrewAI
AutoGen
LlamaIndex
Custom agents / raw tool calling
MCP servers
See the AgentKit documentation and the example repos in the Scalekit organization for more patterns.
Common scenarios
Internal tools for a team
Your sales or support team uses a shared agent, but each person connects their own HubSpot account. A few examples of what this enables:
Meeting prep and follow-up: Before a call, a rep asks the agent "brief me on Acme Corp." The agent pulls the company record, associated contacts, recent deal activity, and past engagement notes—all scoped to that rep's HubSpot permissions. After the meeting, the rep pastes raw notes and the agent extracts action items, updates the deal stage, logs an engagement, and creates follow-up tasks.
Pipeline health checks: A sales manager asks "which deals over $10k haven't moved in two weeks?" The agent searches deals, filters by last activity date, and surfaces stale opportunities—without exposing deals the manager shouldn't see.
Bulk data entry from unstructured sources: A rep forwards a batch of business cards or event leads. The agent creates contacts, associates them with the right company, and sets lifecycle stages—all under that rep's identity so the audit trail is clean.
Customer-facing agent product
Your SaaS product includes an AI feature that works with your customer's HubSpot data. Each customer connects their own HubSpot portal through your app.
Support ticket triage: Your product's AI assistant reads incoming tickets from the customer's HubSpot Service Hub, retrieves the customer's contact history, and suggests or auto-applies resolutions—without your system ever holding a shared credential across customers.
Campaign performance insights: A marketing platform lets each customer ask "how did my last email campaign perform?" The agent queries the customer's HubSpot marketing data and returns metrics, all scoped to that customer's portal.
CRM hygiene and enrichment: Your product periodically scans a customer's contacts for duplicates, missing fields, or stale records, and suggests cleanups—each customer's data stays isolated.
Operational patterns
Re-auth / expired connections: Call getAuthorizationLink again for the same identifier when the account is no longer active. The user re-authorizes, and the same identifier picks up where it left off.
Multiple connectors per user: A single user might connect both HubSpot and Gmail. Use the same identifier with different connectionNames filters to load tools from each connector independently.
Gradual scope expansion: Start with read-only scopes (crm.objects.contacts.read) for an MVP. Add write scopes later as you build confidence in the agent's behavior. The same connection flow works—users just see updated consent screens.
Troubleshooting
Here are answers to the most common questions and issues developers run into when wiring up per-user HubSpot (or any other connector) access for LangChain agents.
Why does my connection never become ACTIVE after the user finishes OAuth?
You probably skipped (or incorrectly called) the verification step.
After the user completes the HubSpot consent screen, Scalekit redirects their browser to the userVerifyUrl you provided, appending an auth_request_id query parameter. Your protected callback handler must:
Extract that auth_request_id.
Call verifyConnectedAccountUser({ authRequestId, identifier }) — but only after you have confirmed (via your own auth) that the current logged-in user actually owns this identifier.
Then re-check with getOrCreateConnectedAccount.
If you never call verifyConnectedAccountUser, or you call it with the wrong values, the account stays in a pending state.
Why do the tools return permission errors or empty results?
The connected account for that identifier either never received the required HubSpot scopes, or the token was later revoked / the scopes were changed inside HubSpot.
Re-authorize the same identifier by generating a fresh link with getAuthorizationLink. The user will see the current consent screen based on the scopes you configured on the "hubspot" connection in the Scalekit dashboard.
Why is the identifier "not found" or why does listScopedTools return an empty list?
Two very common causes:
The identifier you are using has no active connected account for the connection(s) you asked for.
You are accepting the identifier from the client (e.g. from req.body or localStorage) instead of resolving it server-side after authenticating the request.
Rule: The identifier is sensitive. Always look it up from your database or session after you have verified that the current caller is allowed to act as that user. Never trust an identifier supplied by the frontend.
How do I handle re-auth or expired connections?
Just call getAuthorizationLink again with the same connectionName + identifier. Scalekit will detect the existing account and let the user re-authorize (or refresh) it. The identifier stays the same.
Can one user connect multiple services (HubSpot + Gmail, etc.)?
Yes. Use the exact same identifier value but pass different connectionNames when calling listScopedTools / executeTool (or filter in the langchain helper). Each service lives as its own connected account under that identifier.
Tradeoffs & Limitations
Approach
Pros
Cons
When to use
Shared bot / service account
Simple
No per-user permissions, audit, or revocation
Prototypes only
You roll your own OAuth + vault
Full control
You now own a security product
Rarely worth it
Scalekit Connected Accounts
Fast, secure, automatic refresh, one integration for many providers