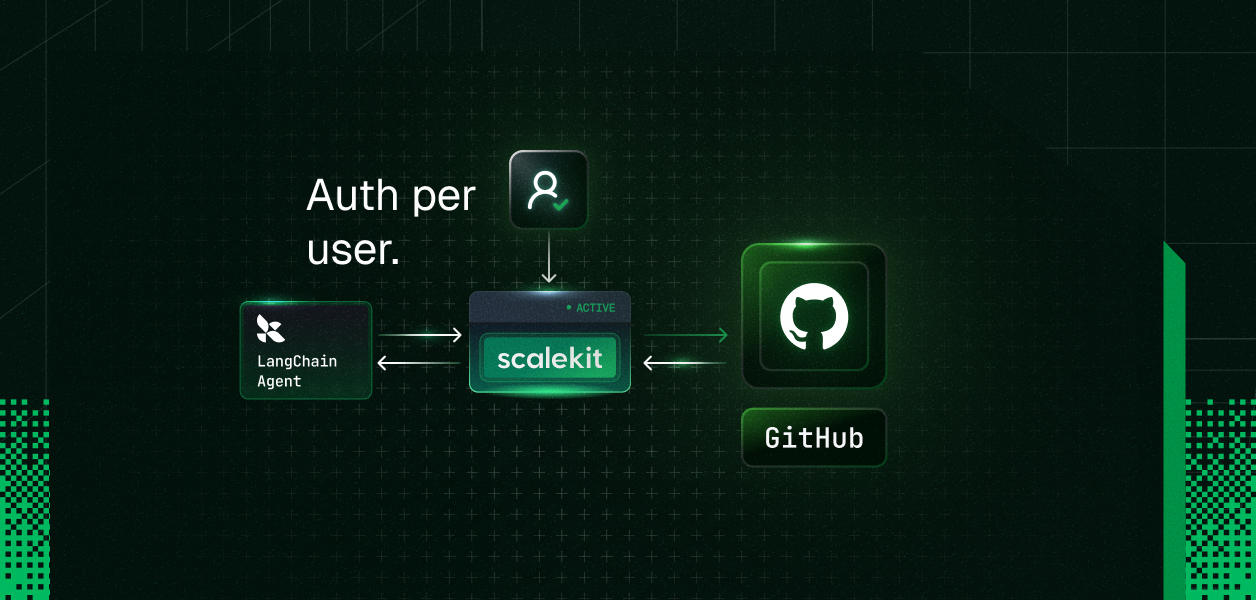
Building a LangChain agent that can call GitHub tools is the easy part. The real challenge starts when your agent is built for a team or for customers, and each user needs to connect their own GitHub account without you turning OAuth, token storage, and account management into a product of its own. In this post, we will build the GitHub integration the way multi-user agents actually need it, so each user can securely bring their own account to your agent experience instead of relying on one shared credential.
Two common agentic use cases built around GitHub are internal team agents and customer-facing product agents.
An internal agent used by multiple engineers (on a sales, support, or platform team) lets each person ask the agent to list their pull requests, search code, or create issues - executed with that specific user's GitHub permissions and identity.
A customer-facing agent (for example, in a SaaS support or devtool product) can create issues or manage workflows inside the end customer's own repositories, but only after the customer has connected their GitHub account through your app.
If you are figuring out how to give LangChain agent GitHub access, evaluating GitHub tools for agents, or building GitHub for AI agents that serve multiple users or customers, the real complexity is almost never the tool schemas themselves. It is ensuring the agent always acts with the correct user's credentials and scopes - without you building and maintaining OAuth, token storage, and refresh logic as a side product.
By the end of this tutorial
A user-facing app where someone can sign in and connect GitHub.
A secure OAuth connection flow managed through Scalekit.
A way to store and retrieve the GitHub connection for each user.
An agent layer that uses the connected user's GitHub access when calling tools.
A working end-to-end example you can extend to issues, pull requests, repositories, and other GitHub workflows.
Who is this for
This post is for developers and teams who are building multi-user LangChain agents - either for their own organization (for example, an internal agent used by multiple people on a sales or support team) or as a product or feature that serves external customers.
You are the builder of the agent. The "multiple users" are your users or customers. Each of them should be able to bring their own GitHub identity, permissions, and data into the agent you built, without you having to maintain OAuth flows, token storage, or refresh logic yourself.
Building an agent purely for your own personal use is possible with the same primitives, but it is not the primary story this post tells.
Architecture overview
When you are building a LangChain agent that serves multiple users (inside your organization or as a product for your customers), the real challenge is letting each of those users bring their own GitHub account securely.
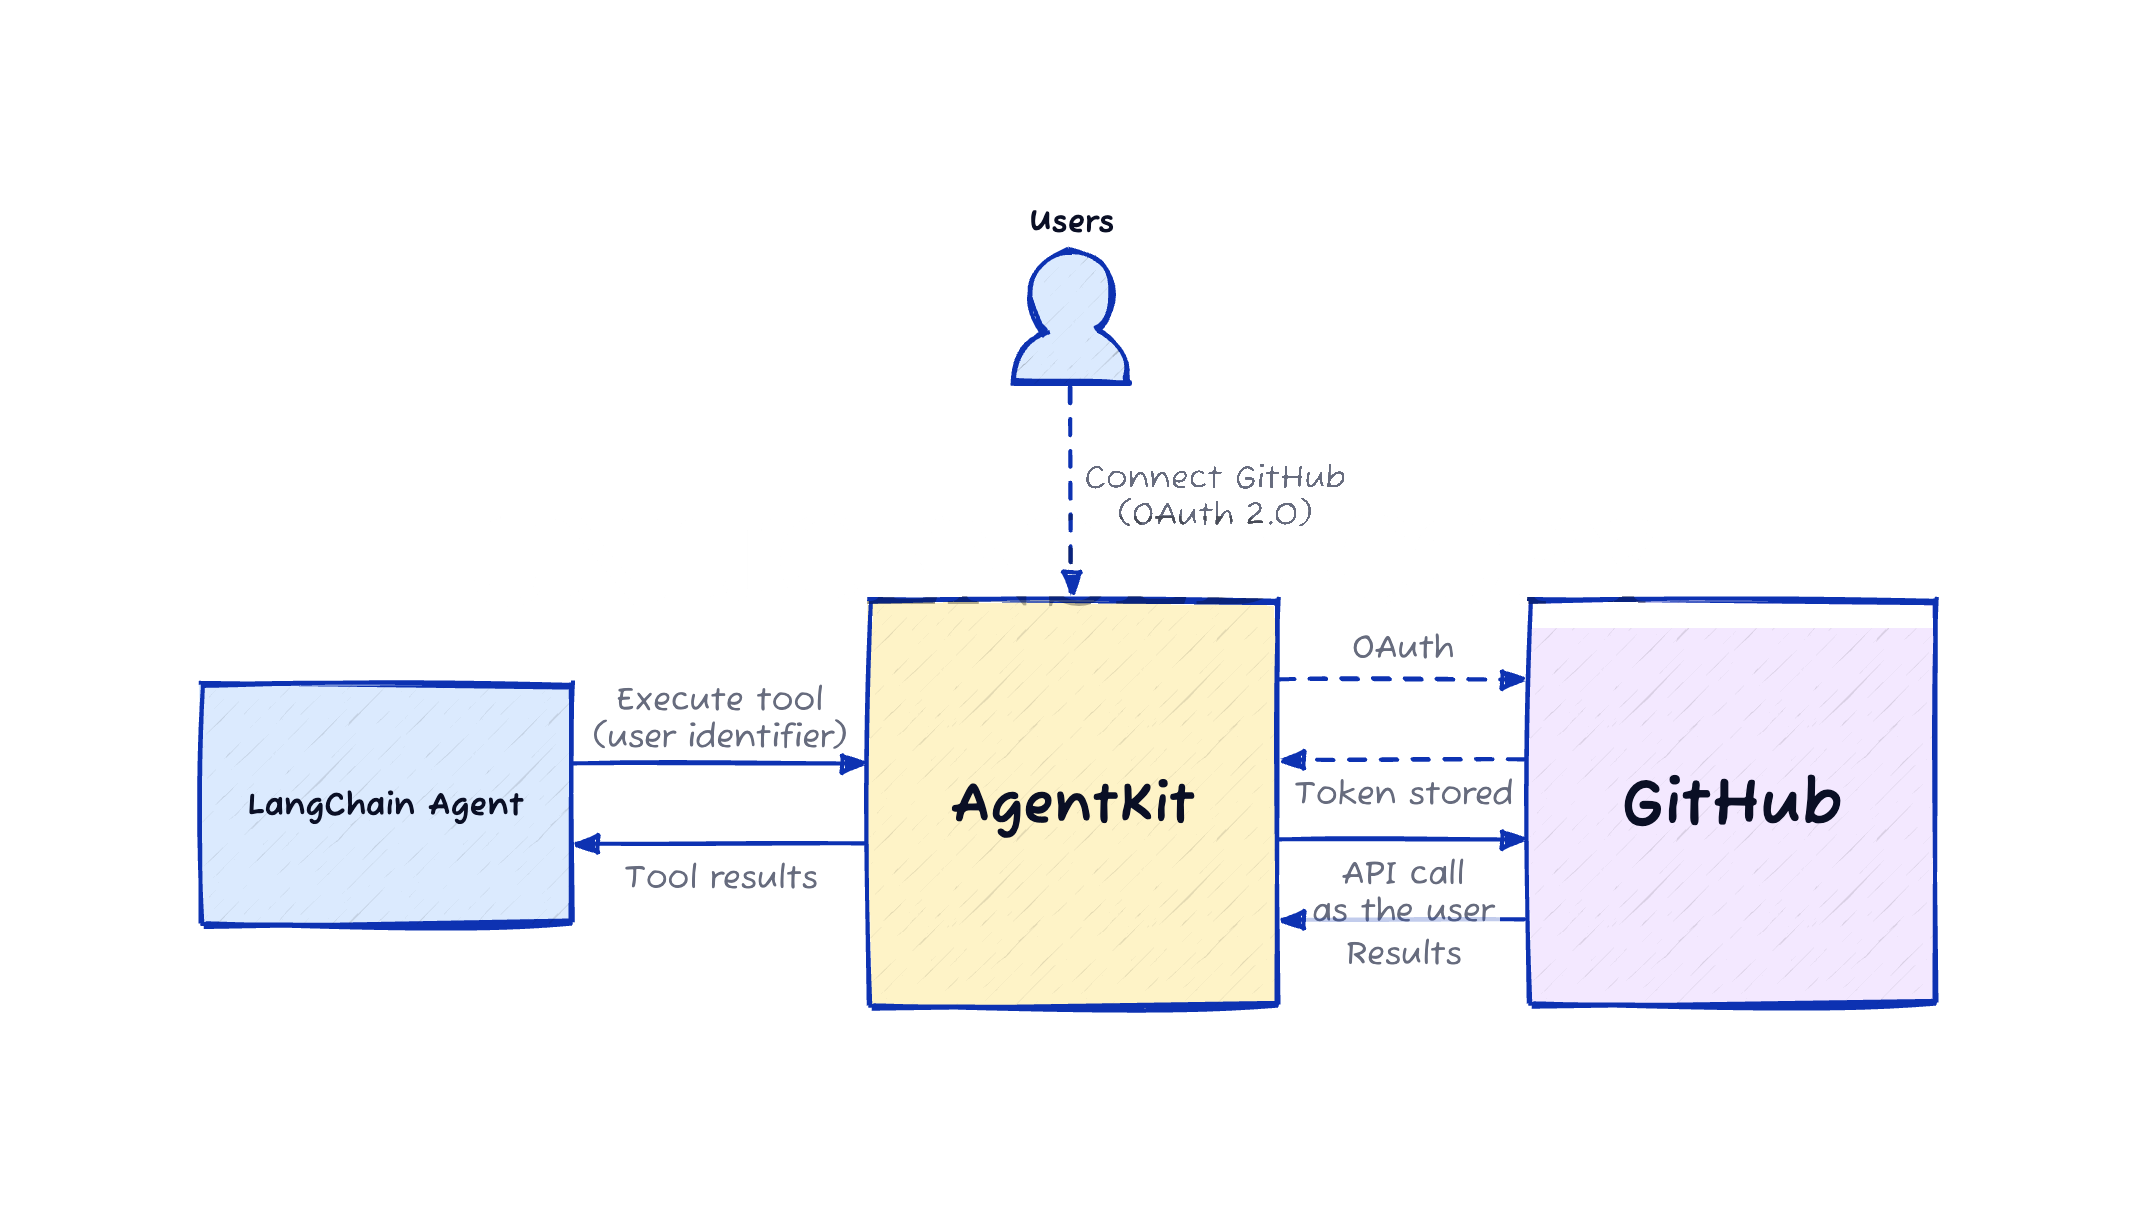
When your LangChain agent needs to invoke GitHub tools, Scalekit gives you two supported paths, both with per-user auth and token handling built in:
Both options work. The choice of which tool set your LangChain agent uses is up to you. This article demonstrates the Scalekit native GitHub connector (not the GitHub MCP connector).
For multi-user agents the core requirement is the same either way: each of your users or customers must bring and authorize their own GitHub account, and every tool call must run with that specific user's identity and permissions. Scalekit's connected accounts + identifier model lets you do this securely without building the OAuth and token plumbing yourself.
The full current list of tools for the native connector (plus required scopes such as repo and read:org) is in the GitHub connector docs. The MCP connector is documented separately at GitHub MCP connector docs.
You control the mapping from your users to Scalekit identifiers. Scalekit handles the GitHub OAuth, token vault, and refresh. Your agent only ever uses the identifier for the current user when calling tools.
The two key flows are:
Connection time: Your user connects their GitHub through Scalekit (with proper verification that the real user completed the OAuth).
Runtime: Your agent resolves the identifier for the current user (after your own authorization check) and gets properly scoped GitHub tools via Scalekit.
Key point: The identifier is the secure key that lets your code act as one of your users. Store it securely in your own system and always authorize before using it.
Before you start
Node.js 18+ (or Python 3.9+)
A Scalekit account with a GitHub connection configured (one-time dashboard step)
Basic familiarity with LangChain tool calling (DynamicStructuredTool)
A GitHub account you can use for testing
Full prerequisites, SDK install commands, and the one-time GitHub connection setup live in the Scalekit AgentKit docs.
Step 1: Create the GitHub app
This is a one-time setup in the Scalekit dashboard (AgentKit → Connections). You register a "github" connection.
You can start with Scalekit's shared OAuth app for development and testing. For production, bring your own GitHub OAuth App credentials so your branding appears on the consent screen.
The tools demonstrated in this post typically require scopes such as repo and read:org. See the exact current list and dashboard steps in the GitHub connector docs.
Step 2: Configure Scalekit
Install the SDK:
npm install @scalekit-sdk/node
Initialize the client (use environment variables in production)
import { ScalekitClient } from '@scalekit-sdk/node';
const scalekit = new ScalekitClient(
process.env.SCALEKIT_ENVIRONMENT_URL!,
process.env.SCALEKIT_CLIENT_ID!,
process.env.SCALEKIT_CLIENT_SECRET!,
);
See the full SDK reference and environment variable names in the Scalekit docs.
Step 3: Authorize and verify user's identity
This is the secure connection flow your users go through inside your app.
You call getOrCreateConnectedAccount (or check status), then getAuthorizationLink (passing a userVerifyUrl that points back to your protected endpoint). After the user completes GitHub OAuth, your endpoint receives an authRequestId and you call verifyConnectedAccountUser to prove the real user completed the flow.
Here is the pattern (TypeScript):
import http from 'http';
const CONNECTION_NAME = 'github';
const userVerifyUrl = 'http://localhost:3456/callback'; // in production: your authenticated route
async function ensureConnectedForUser(identifier: string) {
const { connectedAccount } = await scalekit.actions.getOrCreateConnectedAccount({
connectionName: CONNECTION_NAME,
identifier,
userVerifyUrl,
});
if (connectedAccount?.status === 'ACTIVE') {
console.log('Already connected for this user');
return;
}
const { link } = await scalekit.actions.getAuthorizationLink({
connectionName: CONNECTION_NAME,
identifier,
userVerifyUrl,
});
console.log(`Open this link for the user to connect GitHub: ${link}`);
// Minimal local callback for demo only.
// In production: make this an authenticated endpoint in YOUR app.
// It must verify that the logged-in user owns this identifier before calling verify.
const authRequestId = await waitForDemoCallback(3456);
await scalekit.actions.verifyConnectedAccountUser({ authRequestId, identifier });
// Re-check status
const check = await scalekit.actions.getOrCreateConnectedAccount({
connectionName: CONNECTION_NAME,
identifier,
userVerifyUrl,
});
if (check.connectedAccount?.status !== 'ACTIVE') {
throw new Error('Connection did not become active after verification');
}
console.log('Connection verified and active for this user');
}
function waitForDemoCallback(port: number): Promise {
return new Promise((resolve) => {
const server = http.createServer((req, res) => {
const url = new URL(req.url ?? '/', `http://localhost:${port}`);
const authRequestId = url.searchParams.get('auth_request_id');
res.writeHead(200, { 'Content-Type': 'text/html' });
res.end('
Production note (critical): Never use a local unauthenticated callback in real code. Your userVerifyUrl must be a route protected by your normal auth. Only after you confirm the request comes from the legitimate owner of the identifier do you call verifyConnectedAccountUser. This is what prevents one user from claiming another user's connected account.
Step 4: Store and resolve the user's connected account
After successful verification, you store the identifier in your system, associated with the user who just connected.
In a real application this would be a database row:
-- Example (your schema)
UPDATE users
SET github_identifier = 'user_123'
WHERE id = 42
AND current_user_can_manage_this_account; -- your authorization check
For the demo script we use a simple in-memory map or the identifier directly, but the comments make the production requirement explicit:
// In your real app:
const userId = getCurrentUserId(req); // from your session/auth
const identifier = await db.getGithubIdentifierForUser(userId);
// Never trust an identifier coming from the client.
// Always resolve it server-side after authenticating the request.
if (!identifier) {
throw new Error('No GitHub connection for this user');
}
// The identifier is the secure key that lets code running in your system
// act on behalf of one of your users on GitHub.
// Treat it like a sensitive credential: store it securely, log it minimally,
// and only use it after you have performed your own authorization check.
Step 5: Pass the user context into the agent tools
With the identifier resolved, load the tools scoped to that connected account and wrap them for LangChain.
import { DynamicStructuredTool } from '@langchain/core/tools';
import { z } from 'zod';
function jsonSchemaToZodObject(jsonSchema: any): z.ZodObject {
const shape: any = {};
// ... (see Complete Code section for the full version)
return z.object(shape);
}
async function getGitHubToolsForUser(identifier: string) {
const result = await scalekit.tools.listScopedTools(identifier, {
filter: { connectionNames: ['github'] },
pageSize: 50,
});
return result.tools.map((t) => {
const def = t.tool.definition;
const zodSchema = jsonSchemaToZodObject(def.input_schema);
return new DynamicStructuredTool({
name: def.name,
description: def.description,
schema: zodSchema,
func: async (args) => {
const res = await scalekit.tools.executeTool({
toolName: def.name,
identifier,
params: args,
});
return JSON.stringify(res.data ?? res);
},
});
});
}
const tools = await getGitHubToolsForUser(identifier);
const prs = await tools
.find((t) => t.name === 'github_pull_requests_list')!
.invoke({ owner: 'scalekit-inc', repo: 'scalekit-sdk-node', per_page: 3 });
The exact same wrapping pattern works for every tool the GitHub connector can return for a connected account. Scalekit's GitHub connector gives your agent a rich, ready-to-use catalog of tools. The exact tool names (pass these to DynamicStructuredTool or scalekit.tools.executeTool) and what they do are defined in the same data source that powers the developer documentation.
Here is the current catalog, grouped for easy scanning:
Branches
github_branch_create - Create a new branch in a GitHub repository. Requires the SHA of the commit to branch from (typically the HEAD of main).
github_branch_get - Get details of a specific branch in a GitHub repository. Returns the branch name, latest commit SHA, and protection status.
github_branches_list - List all branches in a GitHub repository. Returns branch names, commit SHAs, and protection status. Supports pagination.
Files & Contents
github_file_contents_get - Get the contents of a file or directory from a GitHub repository. Returns Base64 encoded content for files.
github_file_create_update - Create a new file or update an existing file in a GitHub repository. Content must be Base64 encoded. Requires SHA when updating existing files.
Issues
github_issue_create - Create a new issue in a repository. Requires push access to set assignees, milestones, and labels.
github_issues_list - List issues in a repository. Both issues and pull requests are returned as issues in the GitHub API.
Pull Requests
github_pull_request_create - Create a new pull request in a repository. Requires write access to the head branch.
github_pull_requests_list - List pull requests in a repository with optional filtering by state, head, and base branches.
Repositories
github_public_repos_list - List public repositories for a specified user. Does not require authentication.
github_repo_get - Get detailed information about a GitHub repository including metadata, settings, and statistics.
github_user_repos_list - List repositories for the authenticated user. Requires authentication.
The post demonstrates github_issues_list and github_pull_requests_list (the same wrapping pattern works for every tool above). When you call listScopedTools for a connected account you receive the current set available to that user (in testing we saw 13 tools returned for a typical repo + read:org connection).
For the full, always-current, neatly grouped + searchable interactive list with complete parameter schemas, see the GitHub connector documentation. It is generated from the exact same tool definitions used here (and now includes client-side search and logical grouping for easier discovery).
Complete Code
Here is the complete, self-contained TypeScript example (Option X style). Change the IDENTIFIER (or pass via command line) to simulate different users.
/**
* Complete example: GitHub tools for a multi-user LangChain agent with Scalekit.
*
* Run:
* SCALEKIT_ENVIRONMENT_URL=... \
* SCALEKIT_CLIENT_ID=... \
* SCALEKIT_CLIENT_SECRET=... \
* tsx 01-langchain-x-github.ts demo-user-1
*
* Or just edit the IDENTIFIER below and run for different "users".
*
* In your real app:
* - The identifier comes from YOUR database, looked up after you authenticate
* the current request (never from the client).
* - The identifier is sensitive - it lets code you control act on the user's
* behalf on GitHub. Store it securely.
*/
import { ScalekitClient } from '@scalekit-sdk/node';
import { DynamicStructuredTool } from '@langchain/core/tools';
import { z } from 'zod';
import http from 'http';
const scalekit = new ScalekitClient(
process.env.SCALEKIT_ENVIRONMENT_URL!,
process.env.SCALEKIT_CLIENT_ID!,
process.env.SCALEKIT_CLIENT_SECRET!,
);
const CONNECTION_NAME = 'github';
// ------------------------------------------------------------------
// 1. Helper: JSON Schema → Zod (required for LangChain DynamicStructuredTool)
// ------------------------------------------------------------------
function jsonSchemaToZodObject(jsonSchema: any): z.ZodObject {
if (!jsonSchema || jsonSchema.type !== 'object') return z.object({});
const shape: any = {};
const props = jsonSchema.properties ?? {};
const required = new Set(jsonSchema.required ?? []);
for (const [key, prop] of Object.entries(props)) {
let field: any;
const types = Array.isArray(prop.type) ? prop.type : [prop.type];
const baseType = types.find((t: string) => t !== 'null') ?? 'string';
if (baseType === 'number' || baseType === 'integer') field = z.number();
else if (baseType === 'boolean') field = z.boolean();
else if (baseType === 'object') field = jsonSchemaToZodObject(prop);
else if (baseType === 'array') field = z.array(z.any());
else field = prop.enum ? z.enum(prop.enum) : z.string();
if (prop.description) field = field.describe(prop.description);
if (types.includes('null')) field = field.nullable();
if (!required.has(key)) field = field.optional();
shape[key] = field;
}
return z.object(shape);
}
// ------------------------------------------------------------------
// 2. Ensure the connected account (with verification)
// ------------------------------------------------------------------
async function waitForDemoCallback(port: number): Promise {
return new Promise((resolve) => {
const server = http.createServer((req, res) => {
const url = new URL(req.url ?? '/', `http://localhost:${port}`);
const authRequestId = url.searchParams.get('auth_request_id');
res.writeHead(200, { 'Content-Type': 'text/html' });
res.end('
Authorization complete - return to terminal.
');
server.close();
if (authRequestId) resolve(authRequestId);
});
server.listen(port);
});
}
async function ensureConnectedForUser(identifier: string) {
const userVerifyUrl = 'http://localhost:3456/callback';
const { connectedAccount } = await scalekit.actions.getOrCreateConnectedAccount({
connectionName: CONNECTION_NAME,
identifier,
userVerifyUrl,
});
if (connectedAccount?.status === 'ACTIVE') {
console.log(`✓ Already ACTIVE for identifier: ${identifier}`);
return;
}
const { link } = await scalekit.actions.getAuthorizationLink({
connectionName: CONNECTION_NAME,
identifier,
userVerifyUrl,
});
console.log(`\nOpen this link to connect GitHub for ${identifier}:\n${link}\n`);
console.log('Waiting for callback on http://localhost:3456/callback ...');
const authRequestId = await waitForDemoCallback(3456);
await scalekit.actions.verifyConnectedAccountUser({ authRequestId, identifier });
// Re-check
const check = await scalekit.actions.getOrCreateConnectedAccount({
connectionName: CONNECTION_NAME,
identifier,
userVerifyUrl,
});
if (check.connectedAccount?.status !== 'ACTIVE') {
throw new Error('Connection did not become ACTIVE after verification');
}
console.log(`✓ Connection verified and ACTIVE for ${identifier}\n`);
}
// ------------------------------------------------------------------
// 3. Load scoped GitHub tools and wrap for LangChain
// ------------------------------------------------------------------
async function getGitHubToolsForUser(identifier: string) {
const result = await scalekit.tools.listScopedTools(identifier, {
filter: { connectionNames: [CONNECTION_NAME] },
pageSize: 50,
});
console.log(`Loaded ${result.tools.length} scoped GitHub tools for this user.`);
return result.tools.map((t) => {
const def = t.tool.definition;
const zodSchema = jsonSchemaToZodObject(def.input_schema);
return new DynamicStructuredTool({
name: def.name,
description: def.description,
schema: zodSchema,
func: async (args) => {
const res = await scalekit.tools.executeTool({
toolName: def.name,
identifier,
params: args,
});
return JSON.stringify(res.data ?? res);
},
});
});
}
// ------------------------------------------------------------------
// 4. Demo
// ------------------------------------------------------------------
async function main() {
// In a real app you would look this up from your authenticated user.
// Here we allow changing it so you can demo multiple "users".
const userLabel = process.argv[2] || 'demo-user-1';
const identifier = `langchain-demo-${userLabel}`;
console.log(`\n=== Demo for your user "${userLabel}" (identifier: ${identifier}) ===\n`);
// 1. Make sure this user has a verified GitHub connection
await ensureConnectedForUser(identifier);
// 2. Get tools scoped to this user's connected GitHub account
const tools = await getGitHubToolsForUser(identifier);
// 3. Example direct tool usage (in real code you would pass these to an agent)
const prTool = tools.find((t) => t.name === 'github_pull_requests_list');
if (prTool) {
console.log('\nCalling github_pull_requests_list for scalekit-inc/scalekit-sdk-node ...');
const output = await prTool.invoke({
owner: 'scalekit-inc',
repo: 'scalekit-sdk-node',
per_page: 3,
});
const parsed = JSON.parse(output as string);
if (Array.isArray(parsed)) {
console.log(`Got ${parsed.length} PR(s). First title: "${parsed[0]?.title}"`);
} else {
console.log('Response:', JSON.stringify(parsed).slice(0, 300));
}
}
const issuesTool = tools.find((t) => t.name === 'github_issues_list');
if (issuesTool) {
console.log('\nCalling github_issues_list ...');
const output = await issuesTool.invoke({
owner: 'scalekit-inc',
repo: 'scalekit-sdk-node',
state: 'open',
per_page: 2,
});
console.log('Issues response (truncated):', (output as string).slice(0, 200));
}
console.log('\n=== Done. Change the identifier / userLabel to simulate another user. ===\n');
}
main().catch((err) => {
console.error(err);
process.exit(1);
});
Explore all connectors
Scalekit supports dozens of connectors beyond GitHub (Gmail, Slack, Notion, Google Calendar, Linear, etc.). The same listScopedTools + executeTool + identifier pattern works for all of them.
The same connected-account + scoped-tool approach works with:
CrewAI
AutoGen
LlamaIndex
Custom agents / raw tool calling
MCP servers
See the AgentKit documentation and the example repos in the Scalekit organization for more patterns.
Common scenarios
Internal tools for a team: Your sales or support team members connect their own GitHub so the agent can create issues or summarize PRs on their behalf.
Customer-facing agent product: Your users connect their GitHub inside your SaaS; your agent then acts with the permissions of the user who triggered the request.
Re-auth / expired connections: Call getAuthorizationLink again for the same identifier when the account is no longer active.
Multiple connectors per user: Use different identifiers or the same identifier with different connectionNames filters.
Troubleshooting
Why is my connection not becoming ACTIVE after verification?
verifyConnectedAccountUser was not called, or was called with the wrong authRequestId or identifier. Make sure your callback route actually receives the auth_request_id query parameter and that you call verifyConnectedAccountUser with it before re-checking status.
Why is my tool returning permission errors or empty results?
The connected account does not have the required scopes, or the GitHub token has been revoked or scopes changed on GitHub. Ask the user to re-connect by generating a new authorization link for the same identifier. Check the scopes configured on the GitHub connection in the Scalekit dashboard.
Why is my identifier not found or my tools list empty?
You are using an identifier that has no active connected account for the requested connection, or you forgot to pass the identifier when calling listScopedTools or executeTool. Always resolve the identifier from your own authenticated user context. Never let the client dictate which identifier to use.
Tradeoffs & Limitations
Approach
Pros
Cons
When to use
Shared bot PAT
Simple
No per-user permissions, audit, or revocation
Prototypes only
You roll your own OAuth + vault
Full control
You now own a security product
Rarely worth it
Scalekit Connected Accounts
Fast, secure, automatic refresh, one integration for many providers