Add enterprise SSO on top of your Auth0 setup

.png)

TL;DR
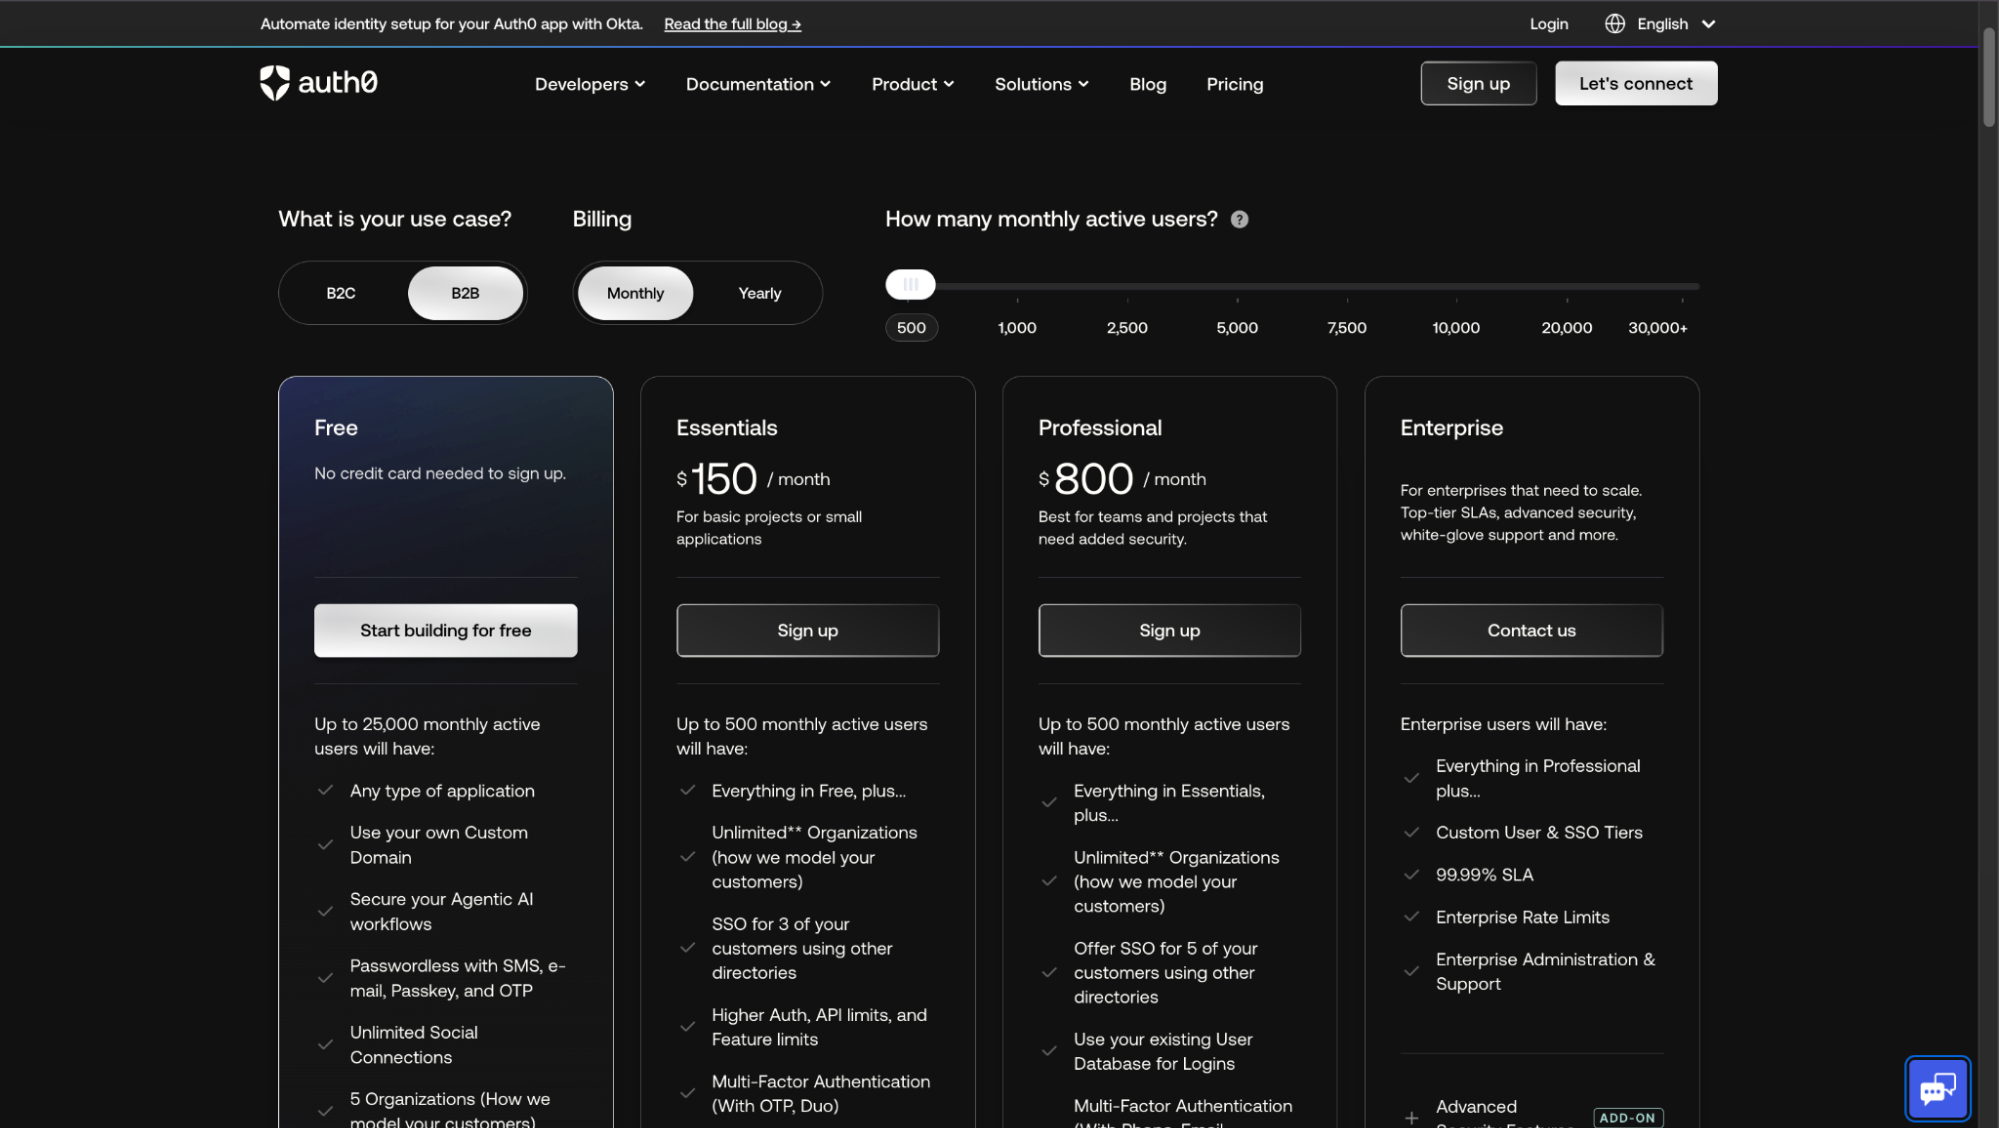
- Auth0 supports up to 25,000 Monthly Active Users (MAUs) on its Free tier, but enterprise SSO is available only on paid B2B plans, making SSO a separate scaling factor from usage.
- Auth0’s self-service B2B plans cap enterprise SSO connections (commonly ~3 on Essentials and ~5 on Professional), so each new SSO-enabled customer can trigger plan upgrades.
- In B2B SaaS, enterprise SSO is typically configured per customer using individual SAML or OIDC enterprise connections inside Auth0.
- As enterprise adoption grows, identity shifts from an internal feature to shared infrastructure, creating an architectural inflection point.
- Introducing Scalekit as an upstream identity layer allows teams to maintain a single OIDC trust with Auth0, while isolating customer-specific IdP configuration outside the Auth0 tenant.
An enterprise deal is nearing closure when a security questionnaire arrives. Buried in the requirements is a familiar question: “Do you support SAML-based SSO with Okta or Microsoft Entra ID?”
Your product already uses Auth0, and authentication works reliably. But enterprise SSO introduces a different layer of complexity: external identity providers, customer IT administrators, certificate management, and configuration that persists long after the first integration.
What sounds like a small addition quickly becomes an architectural decision. Should enterprise identity live entirely inside your authentication provider, or does it require a dedicated enterprise layer as adoption grows?
This article examines how Auth0 enterprise SSO works, how pricing and configuration scale, and the options available at this inflection point, including a dedicated enterprise identity layer, such as Scalekit, on top of Auth0. If you’re facing your first enterprise SSO requirement, this is where identity strategy really matters.
How enterprise SSO first appears in B2B SaaS
Enterprise SSO rarely begins as a planned product initiative. In most B2B SaaS teams, it appears late in a sales cycle as an external requirement: a security questionnaire mandates SAML, procurement insists on Okta or Microsoft Entra ID, or legal pauses rollout until centralized authentication is confirmed. By the time engineering is involved, authentication already works, and SSO is framed as a small extension rather than a structural change.
That framing is misleading. SSO introduces external identity providers, long-lived configuration, and customer IT teams directly into the authentication flow. Once enabled for one enterprise customer, it quickly becomes an expectation for others, often with different providers and policies. What appears to be a one-time integration starts behaving like a repeatable capability that must scale.
This marks the point where identity begins to change shape. Authentication stops being a purely internal concern and starts to resemble shared infrastructure. Once the first enterprise SSO request is accepted, the focus shifts from why SSO is required to how it is implemented. In Auth0, that shift exposes a specific architectural model that governs how enterprise SSO is configured and scaled.
How Auth0 handles SSO for B2B SaaS
Auth0 implements enterprise SSO through a construct called Enterprise Connections. Each enterprise customer is configured as a distinct SAML or OIDC connection inside your Auth0 tenant, representing that customer’s identity provider, such as Okta or Microsoft Entra ID. There is no global “enable SSO” switch. Every customer integration is created, configured, and maintained individually.
In a B2B setup, these enterprise connections are typically used alongside Auth0 Organizations. The connection is attached to your application and then selectively enabled for a specific organization, allowing only users from that customer’s IdP to authenticate into the corresponding tenant or workspace. From Auth0’s perspective, all of this configuration lives at the tenant level and is owned entirely by your team.
This design works well in terms of correctness and security, but it has important implications. Each new enterprise customer adds new configuration surface area: certificates, metadata, attribute mappings, and connection-to-application bindings. Nothing is reused automatically, and nothing is customer-managed by default.
Recommended Reading: Scalekit vs Auth0
The core building blocks involved
At a high level, enterprise SSO in Auth0 consists of:
- Enterprise Connections (SAML or OIDC), one per customer
- External Identity Providers, owned by customer IT teams
- Auth0 Applications, which users ultimately log into
- Auth0 Organizations, used to scope access in B2B products
These pieces combine to form a per-customer SSO setup that is technically isolated but operationally centralized.
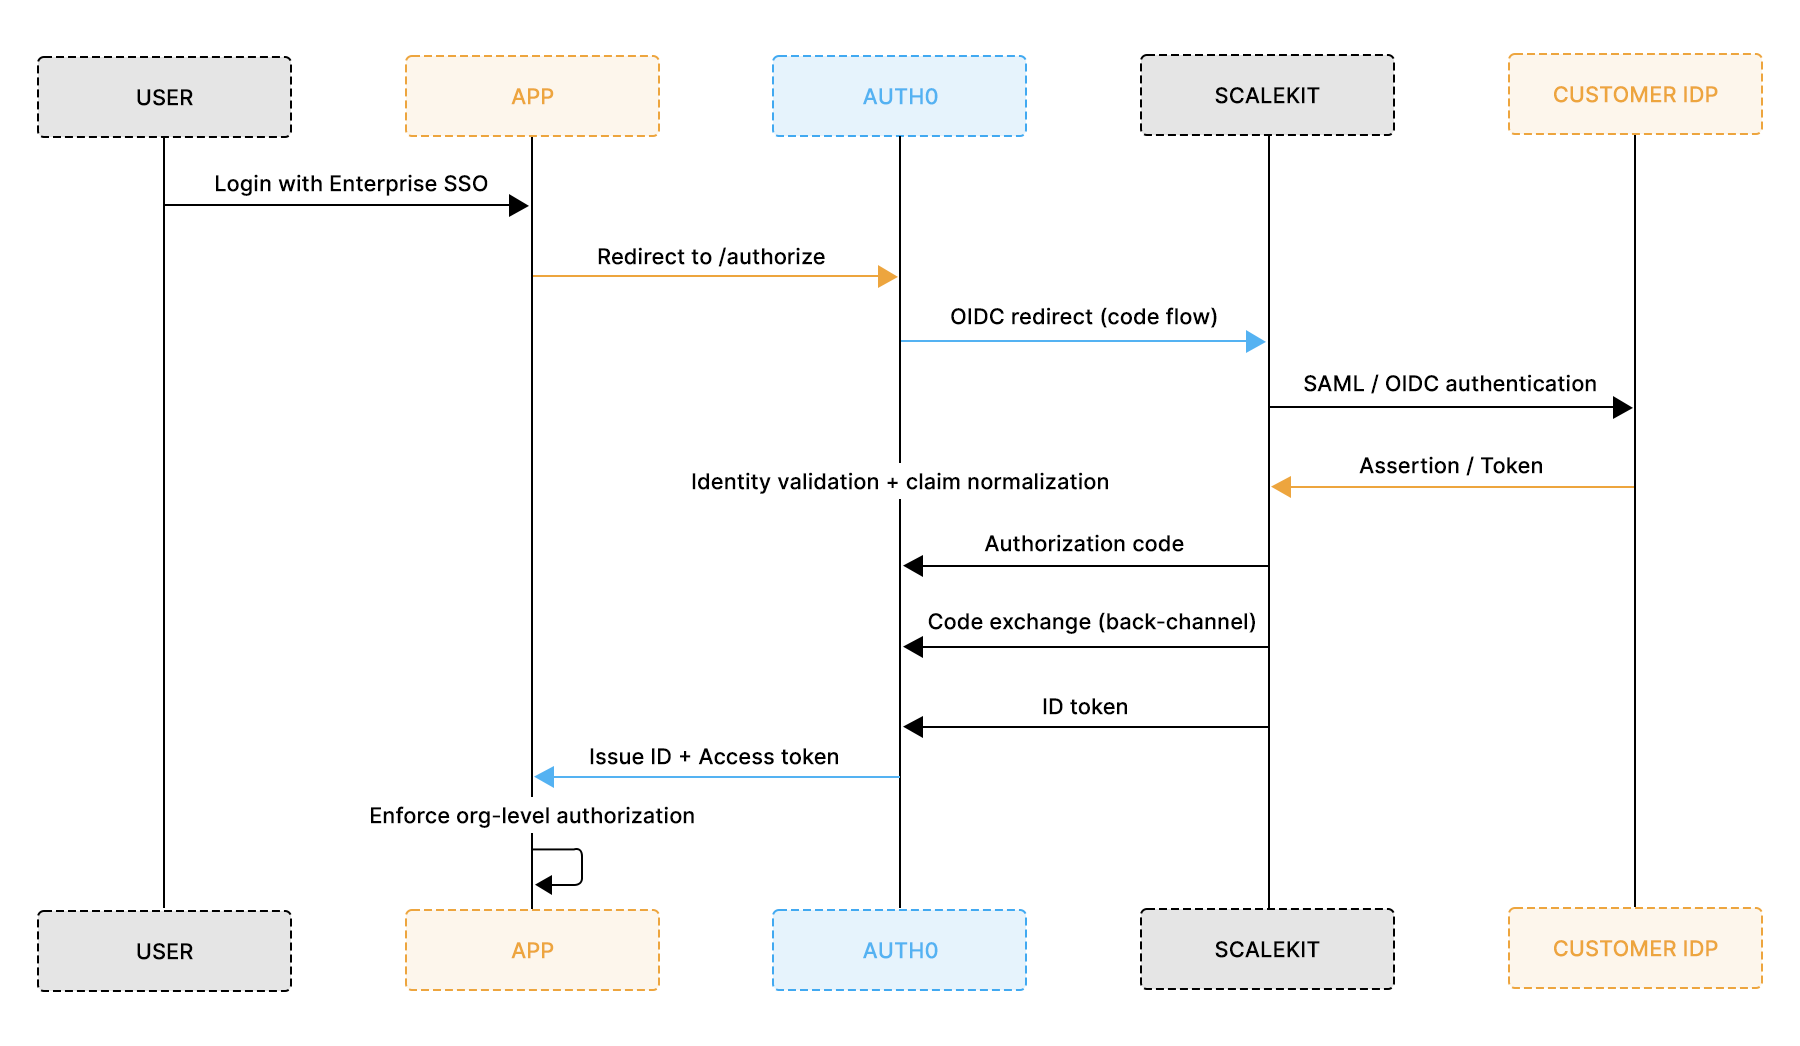
The architecture below illustrates how these components interact in a typical B2B setup:

What matters here is where responsibility lives. Auth0 handles authentication, but all enterprise-specific setup is managed in your Auth0 tenant.
When does Auth0 SSO pricing become a scaling constraint?
Auth0’s enterprise SSO pricing is tied to enterprise connections, not to the number of users who log in. Each SAML or OIDC connection you create for a customer contributes to cost, regardless of whether that customer has ten users or ten thousand. This detail is easy to miss when adding the first SSO integration, because the initial setup feels inexpensive and manageable.
The pricing model starts to matter as soon as SSO is no longer a one-off request. In a B2B SaaS product selling to multiple enterprise customers, each new customer typically requires a dedicated enterprise connection. That means pricing grows linearly with the number of SSO customers, not with usage or revenue generated by those customers.
This is where teams begin to feel tension between sales, engineering, and finance. SSO is often promised early to close deals, but its long-term cost profile is rarely revisited once production customers depend on it.
Recommended Reading: Auth0 for B2B SaaS
How costs grow as enterprise SSO adoption increases
A simplified scenario illustrates the pattern most teams run into:
The important takeaway is not the exact numbers, but the shape of the curve. Each additional customer adds both cost and configuration overhead, even if their usage is low.
Step-by-step: Adding enterprise SSO to an Auth0 B2B application
Adding enterprise SSO in Auth0 spans connections, applications, and organizations. In a typical B2B SaaS setup, this means placing an existing multi-tenant product application already using Auth0 for authentication behind a customer-managed identity provider.
This walkthrough shows how to enable SSO for a single enterprise customer in a shared Auth0 application, allowing users from that customer’s IdP (such as Okta or Microsoft Entra ID) to authenticate to their workspace without affecting other tenants. While each step is simple in isolation, together they define how enterprise SSO scales operationally.
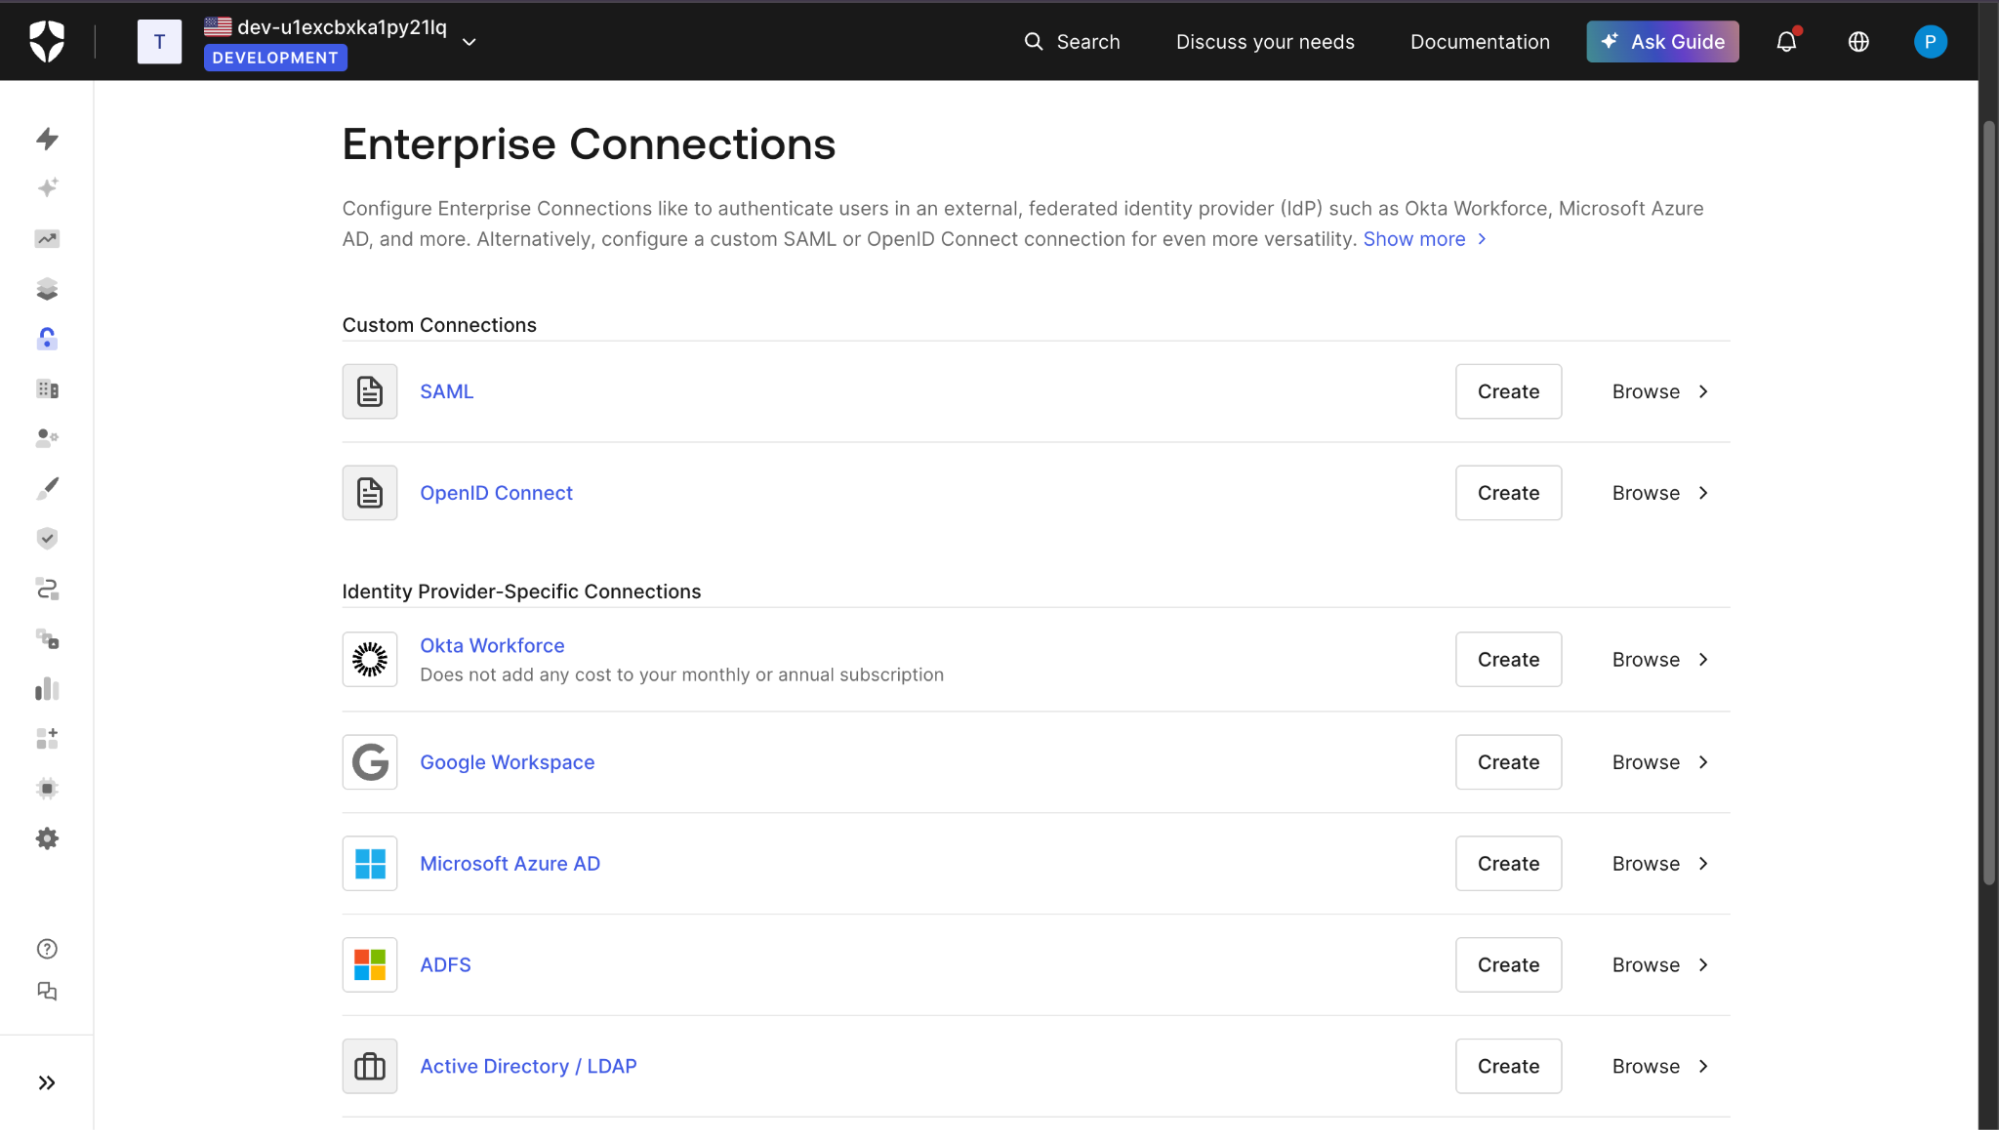
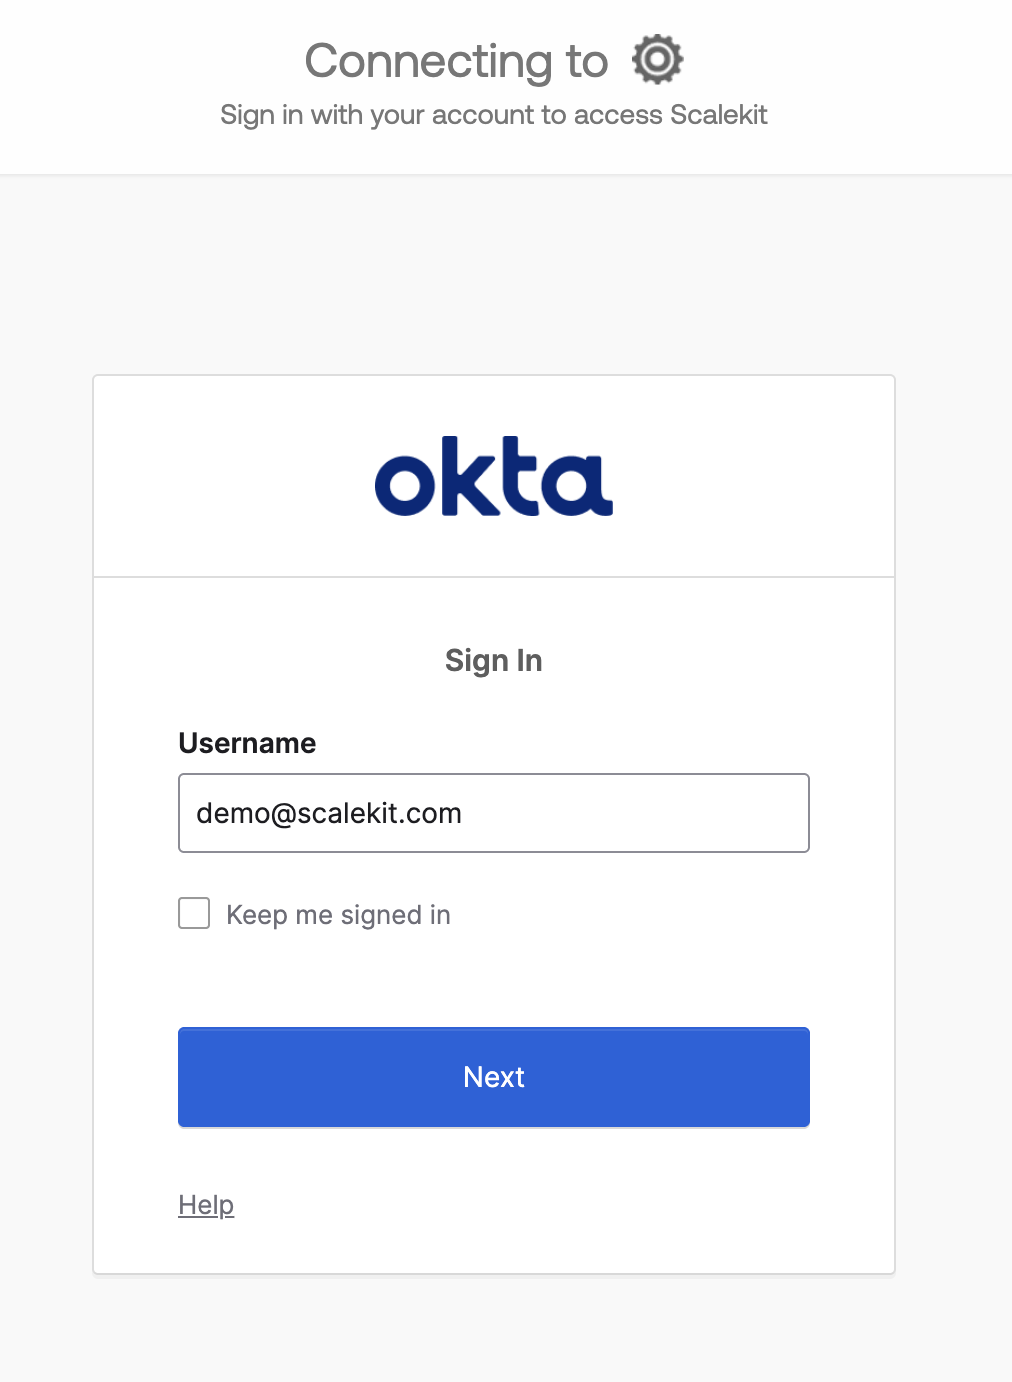
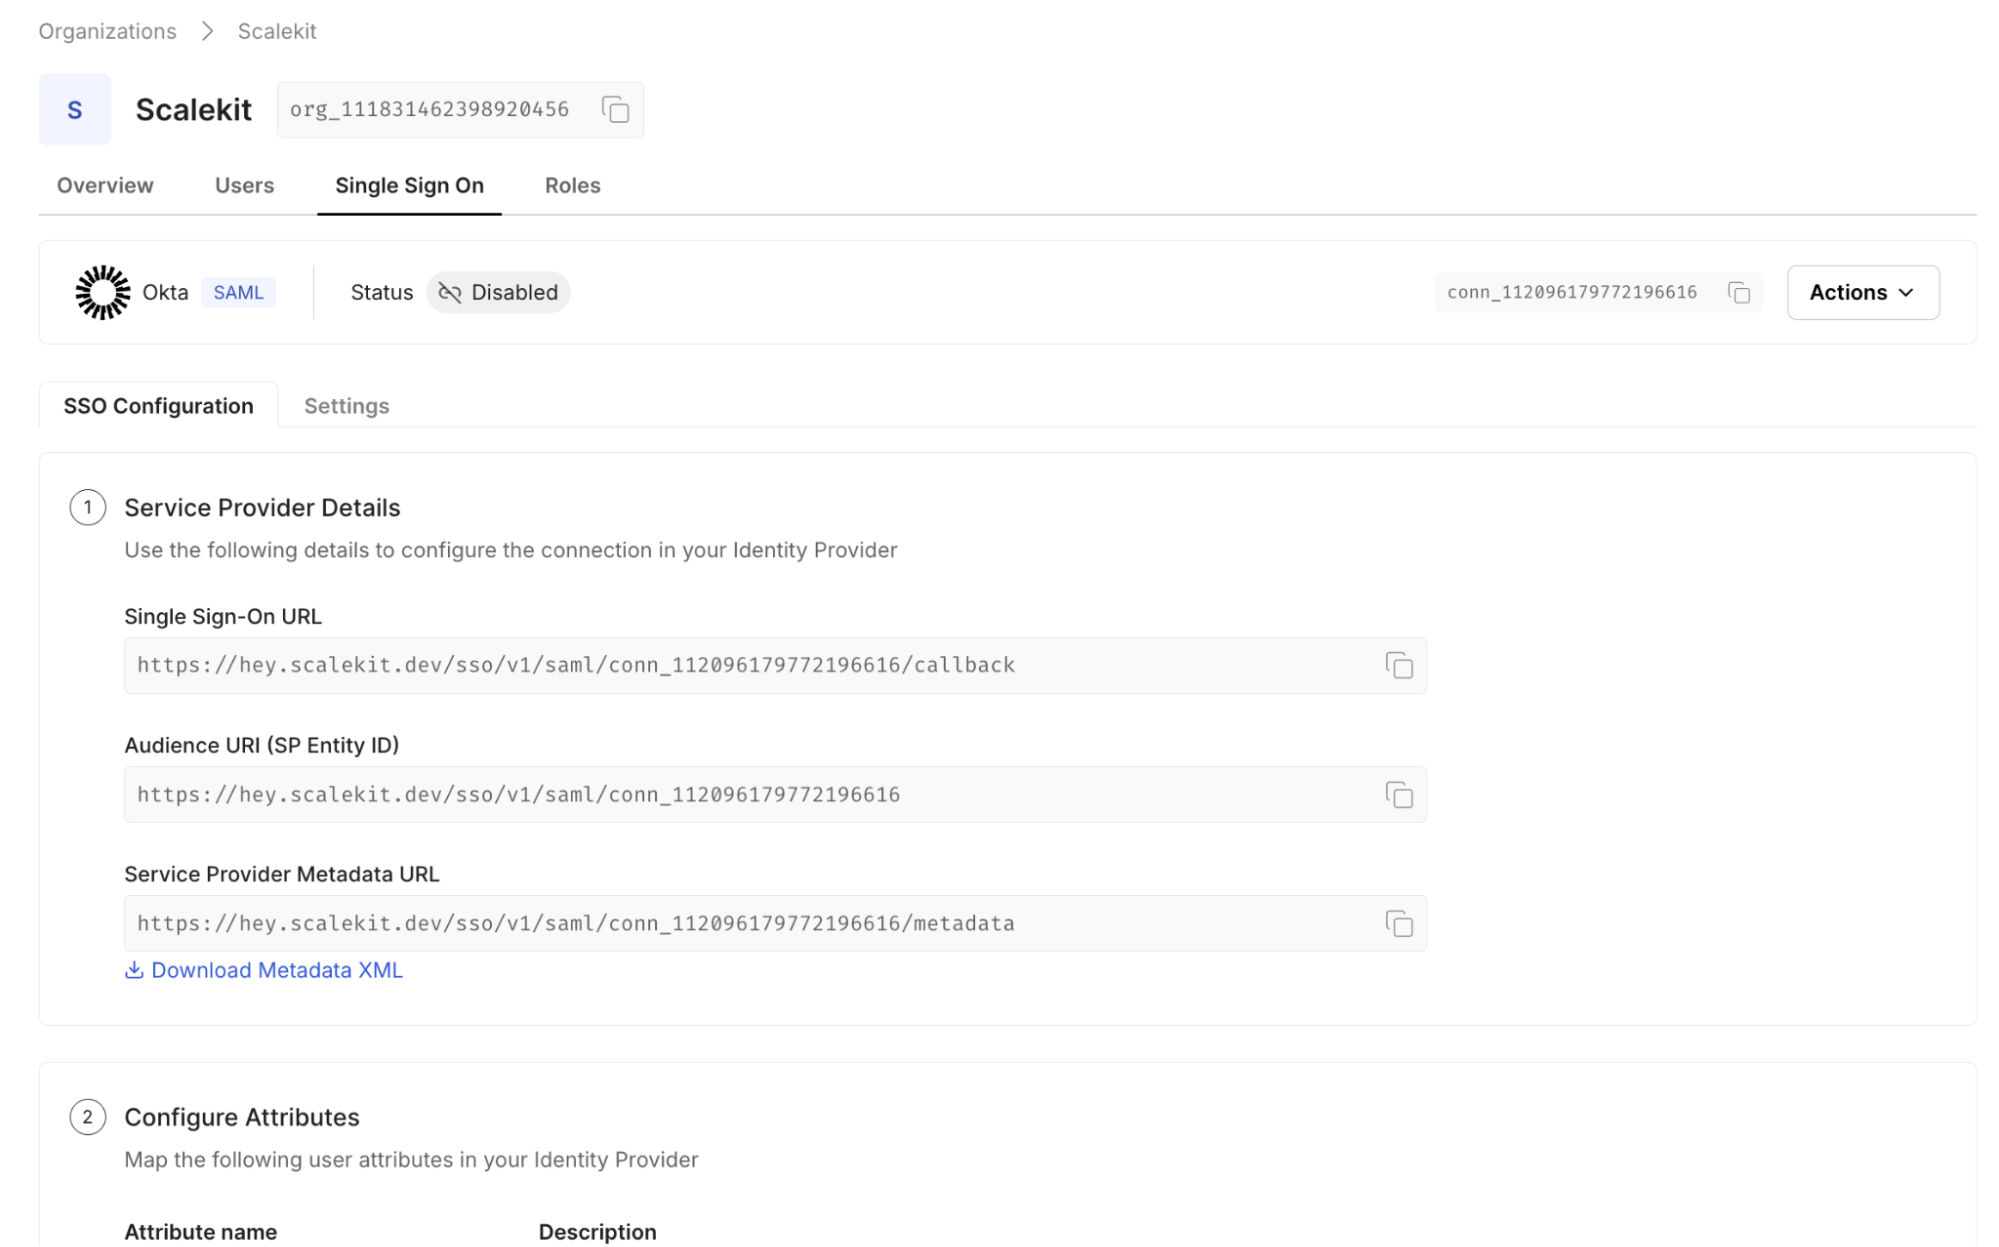
Step 1: Create an enterprise connection for the customer
The process starts by creating a new Enterprise Connection in the Auth0 dashboard. This connection represents one customer’s identity provider and is configured using either SAML or OIDC. During this step, your team exchanges metadata with the customer’s IT administrators, configures certificates, and defines basic protocol settings.
Each enterprise customer typically maps to exactly one connection. There is no built-in reuse across customers, even if they use the same IdP.
In Auth0, we can Configure Enterprise Connections to authenticate users with an external federated identity provider (IdP), such as Okta Workforce, Microsoft Azure AD, and more. Alternatively, configure a custom SAML or OpenID Connect connection for even more versatility.
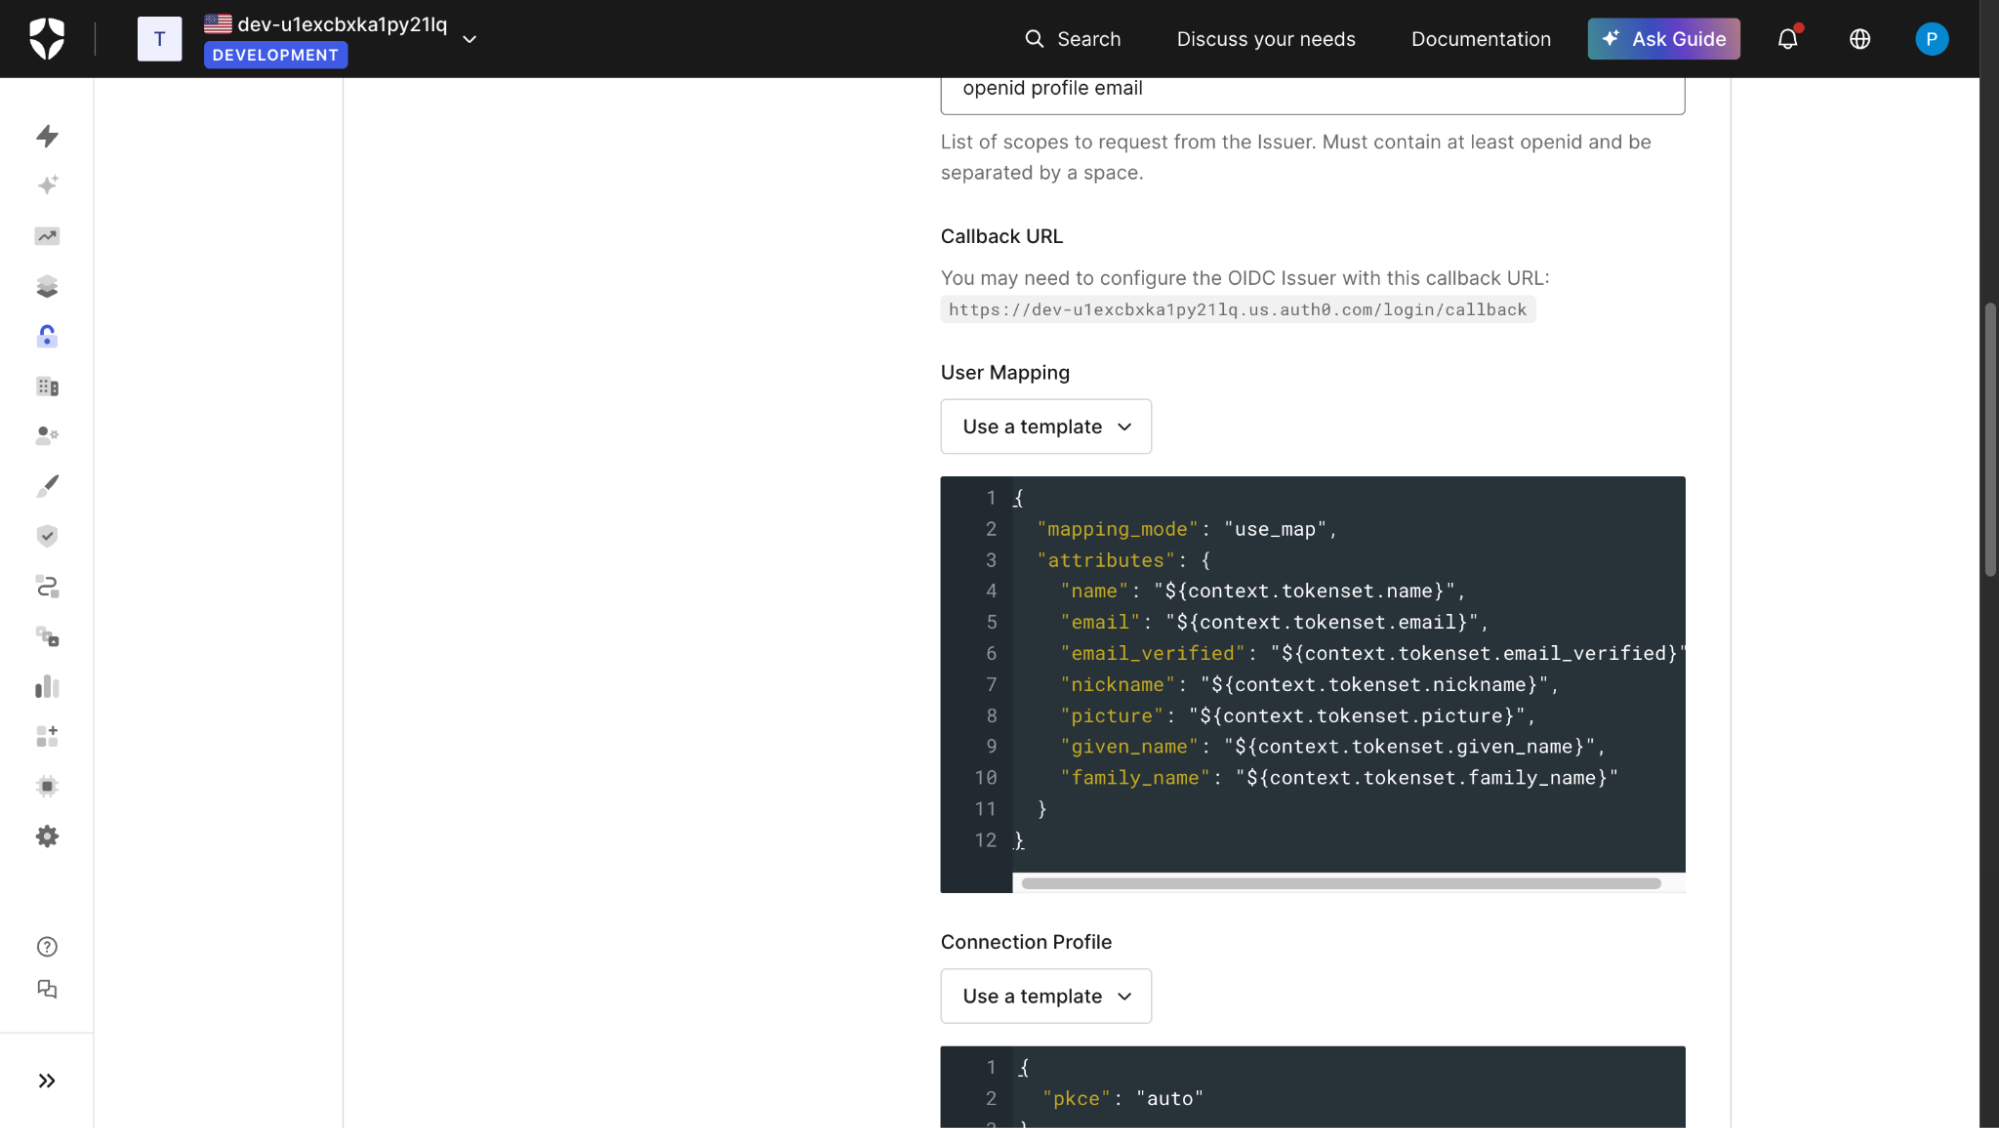
Step 2: Map identity provider attributes to user profiles
Once the connection is created, attributes from the customer’s IdP must be mapped into Auth0 user fields. This usually includes email, name, and a stable external identifier, but often expands to role or group-related claims.
Attribute mapping is configured per connection. Differences in how customers structure their IdP claims often require custom handling, even when using the same protocol. Below, the user mapping is mapped to an OIDC connection.
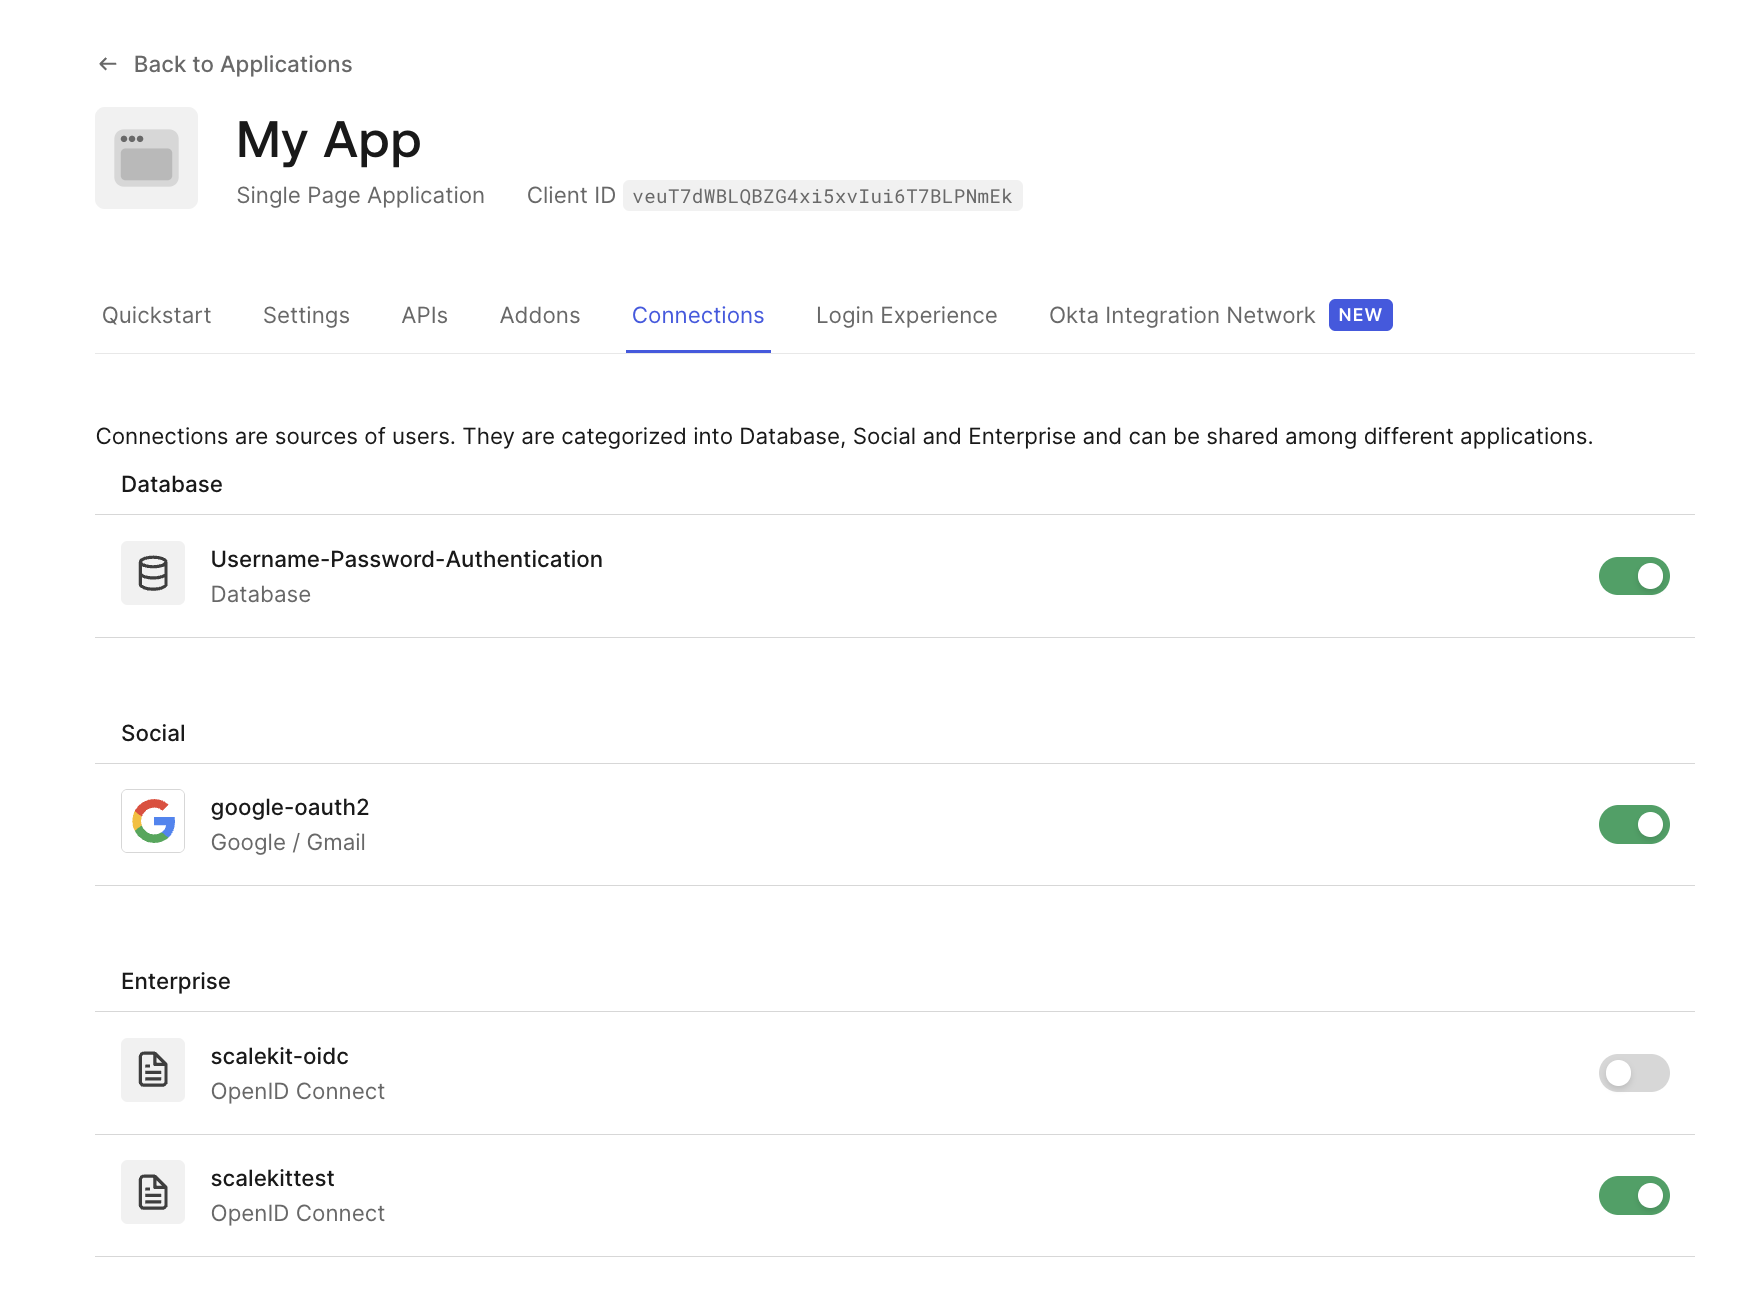
Step 3: Attach the connection to your application
After configuration, the enterprise connection must be explicitly enabled for the Auth0 application that represents your B2B product. Without this step, the connection exists but cannot be used for login.
This binding is another manual operation and must be repeated for every application that should support that customer’s SSO flow.
Step 4: Enable the connection for a specific organization
In B2B setups using Auth0 Organizations, the enterprise connection is typically scoped to a single organization. This ensures that only users from the customer’s IdP can authenticate into the correct tenant, workspace, or account.
At this point, SSO is logically wired to the customer’s environment, but ownership remains entirely on your side.

Step 5: Test and validate the enterprise login flow
Testing enterprise SSO involves validating the full redirect and claim lifecycle:
- Trigger login using the enterprise connection:
/api/auth/login?connection=your-connection-name
- Confirm successful redirection to the customer’s IdP.
- After authentication, inspect the authenticated user object in your application to validate:
- Email claim
- Stable external identifier
- Organization binding
- Role or group mappings
- Use Auth0 Logs to troubleshoot mapping, certificate, or assertion issues.
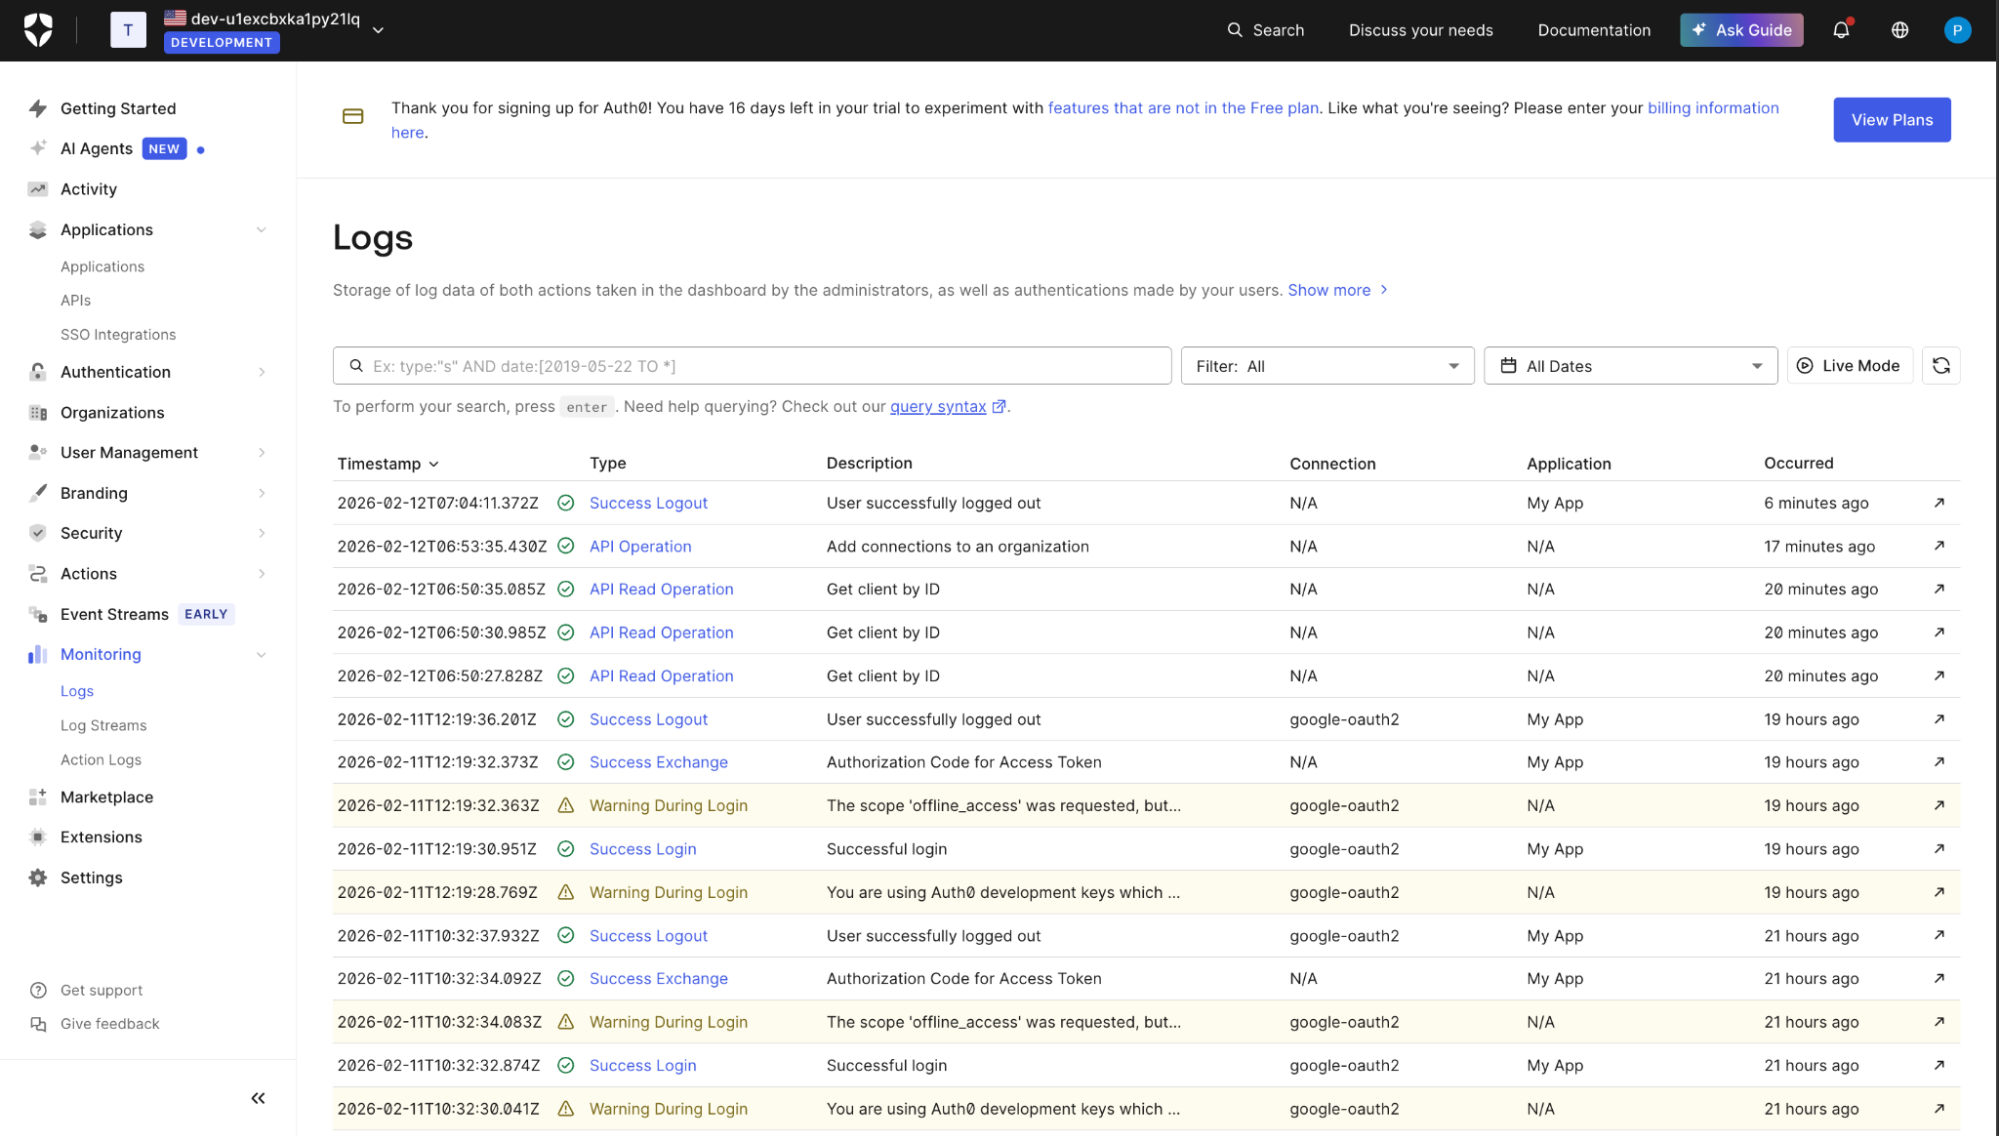
A successful test confirms that identity is correctly issued by the customer’s IdP, validated by Auth0, and consumable by your application.
In the next section, we’ll look at where this model breaks down for B2B products and why per-customer SSO within a single Auth0 tenant quickly stops feeling first-class.
The B2B mismatch that shows up quickly
Per-customer SSO inside Auth0 works, but it does not feel first-class for B2B products. The hands-on steps make this clear: every enterprise customer requires a new connection, new mappings, and new bindings, all managed inside a single Auth0 tenant. From a system perspective, customers are isolated. From an operational perspective, everything accumulates in one place.
The ownership model is where the friction becomes visible. Customer IT teams expect to manage their own SSO configuration, rotate certificates, and validate domains. In practice, those responsibilities remain with your team because all enterprise connections live inside Auth0. What should be a customer-admin workflow turns into internal support work, often involving engineers rather than administrators.
As the number of enterprise customers grows, this mismatch compounds. Scaling SSO means scaling configuration, cost, and ongoing maintenance simultaneously. Auth0 continues to do what it is designed to do: authenticate users, but enterprise identity is starting to feel like a separate concern that does not fit cleanly within a tenant-centric model.
What are your options at the enterprise SSO inflection point
Once SSO is no longer a one-off request, teams are forced to make a deliberate choice. The hands-on steps and pricing model make it clear that something has to give: cost, ownership, or architecture. In practice, B2B SaaS teams converge on one of three paths.
Option 1: Stay fully on Auth0 for enterprise SSO
This option keeps all enterprise SSO configuration inside Auth0, exactly as shown in the hands-on section. Each customer remains mapped to a dedicated enterprise connection managed by your team.
When this works
- You have a small number of enterprise customers
- SSO is limited to high-tier plans
- Your team can absorb ongoing configuration and support work
Tradeoffs
- Cost grows linearly with customers
- Configuration remains tenant-centric
- Customer IT teams depend on your team for changes
This approach is common early on and often correct in the short term. It becomes harder to justify as SSO adoption increases.
Option 2: Migrate off Auth0 entirely
Some teams decide that enterprise identity should not live in Auth0 at all. They replace Auth0 with a different system or build their own identity stack to regain control over SSO, provisioning, and enterprise workflows.
When this works
- You have a dedicated identity or platform team
- Enterprise identity is core to your product
- You can afford a high-effort transition
Tradeoffs
- Significant migration risk
- Rebuilding authentication, sessions, MFA, and security controls
- Long time to value
Option 3: Use Scalekit for enterprise SSO on top of Auth0
This option keeps Auth0 as the system of record for user authentication while introducing Scalekit as a dedicated enterprise identity layer. Instead of configuring a new Auth0 enterprise connection for every customer, enterprise SSO is terminated in Scalekit, and Auth0 trusts Scalekit as an upstream identity provider.
The architectural shift is subtle but important. Auth0 continues to issue tokens, manage sessions, and enforce authentication policies. Scalekit becomes responsible for customer-facing SSO configuration, IdP variability, and enterprise-specific identity workflows.
How enterprise SSO is configured with Scalekit
With Scalekit in place, enterprise SSO setup moves out of your Auth0 tenant and into a customer-scoped configuration model. Unlike Auth0 Enterprise Connections, which are created per customer inside your tenant, Scalekit centralizes the upstream trust and isolates enterprise variability outside your core authentication layer.
The setup consists of two phases:
- A one-time integration between Scalekit and Auth0
- A repeatable per-customer IdP configuration inside Scalekit
Step 1: Establish a single trust between Scalekit and Auth0.
This step is performed once for your entire application.
Auth0 is configured to trust Scalekit as an external OIDC identity provider. This creates a single upstream connection that Auth0 will use for all enterprise SSO traffic.
- Create an OIDC connection in Auth0 that points to the Scalekit Issuer URL, Authorization endpoint, Token endpoint, JWKS URI, Client ID, and secret from Scalekit
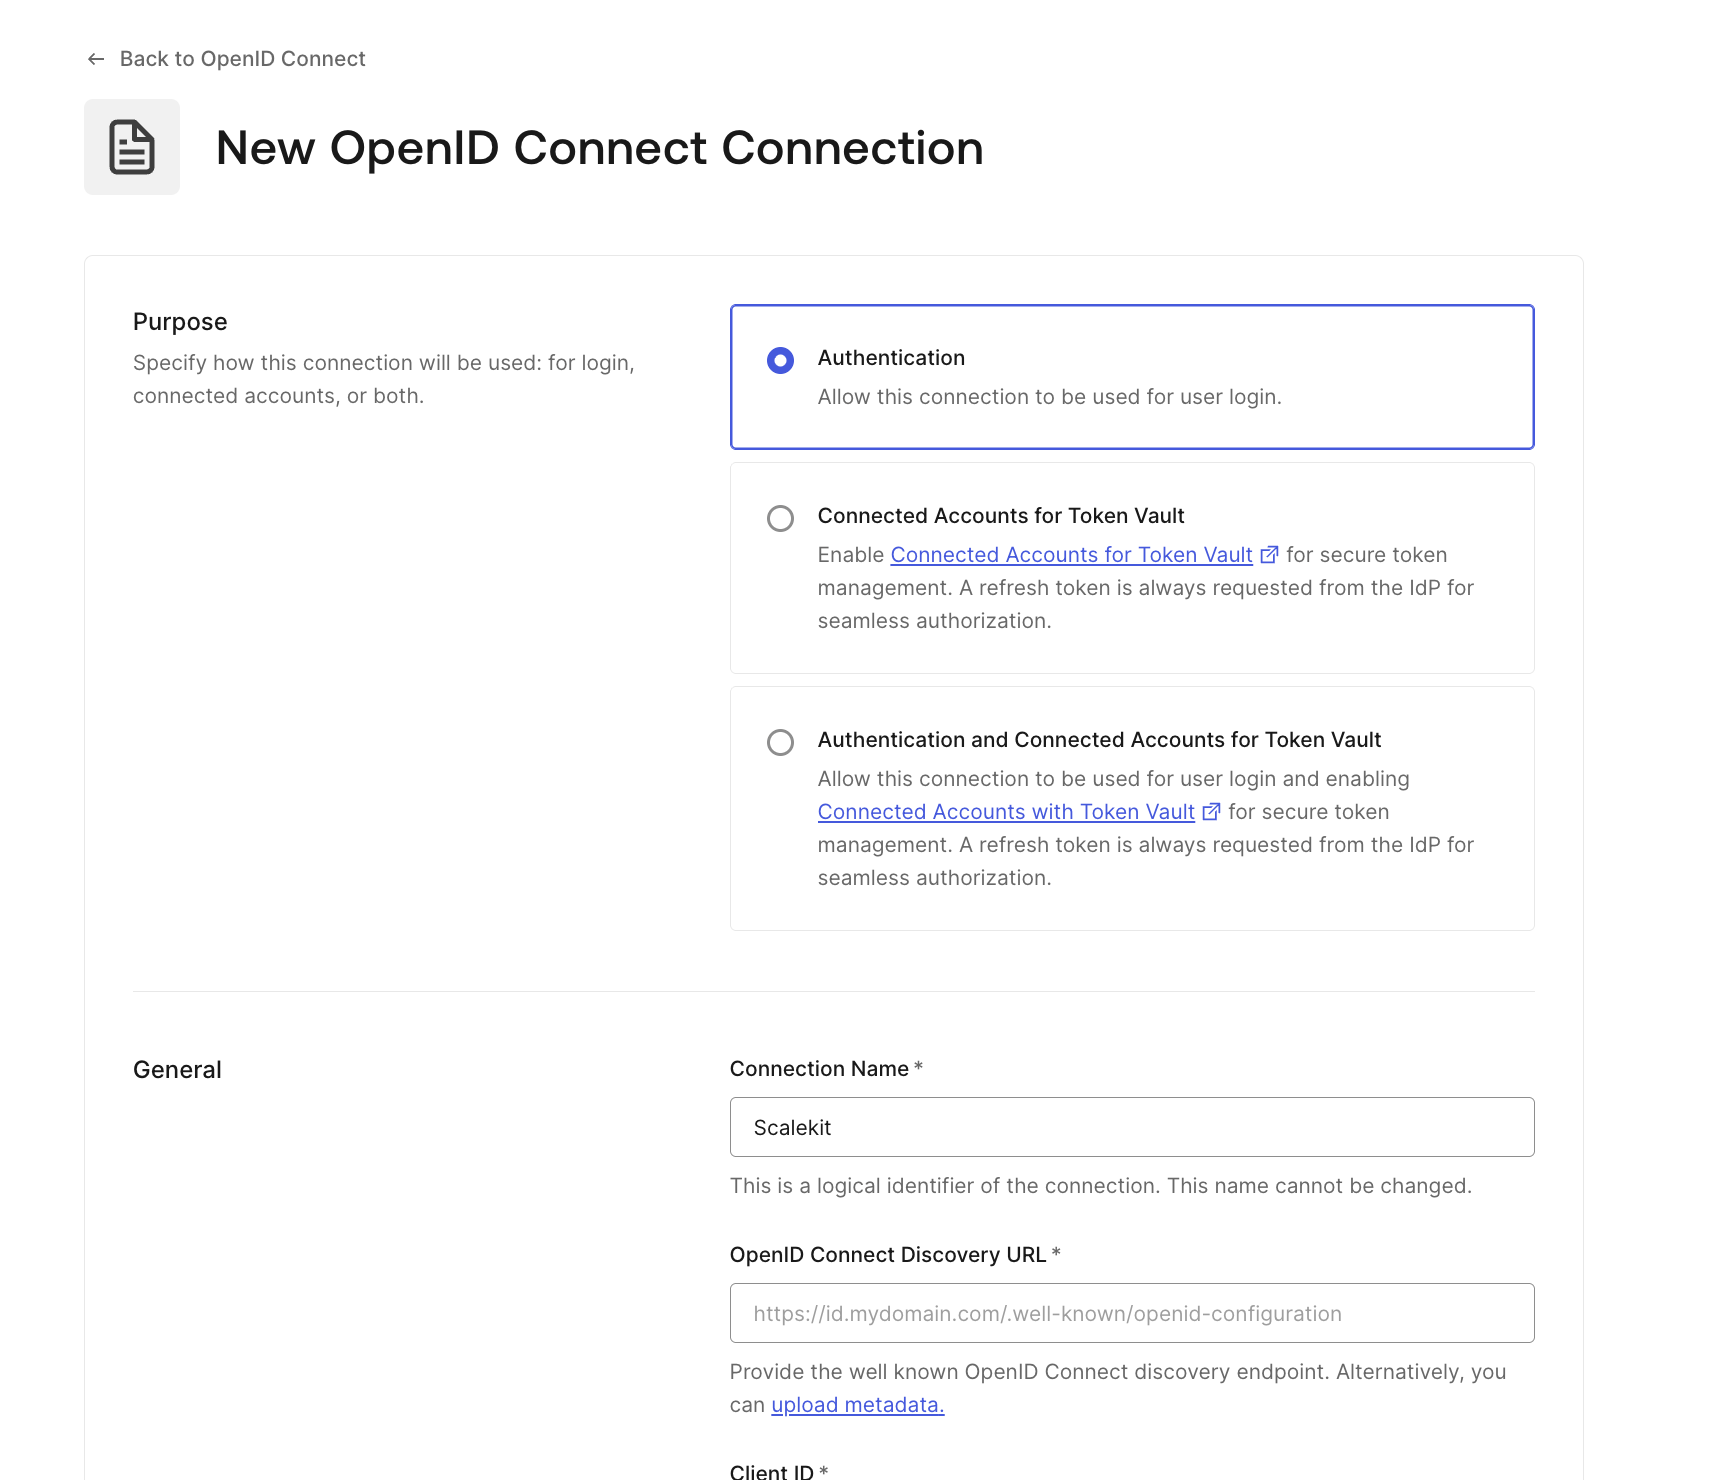
- Enable this connection for your Auth0 application.
After this step, Auth0 no longer requires a separate enterprise connection for each customer. All enterprise traffic will flow through this single OIDC trust
Step 2: Create a Customer-Specific IdP in Scalekit
For each enterprise customer, a new Identity Provider is created inside Scalekit.
This IdP represents the customer’s:
- Okta tenant
- Microsoft Entra ID
- ADFS
- Or other SAML/OIDC provider
Unlike Auth0 Enterprise Connections, these IdPs are isolated to the specific customer account within Scalekit, not to your Auth0 tenant.

Step 3: Enable Customer Self-Service Configuration
Enterprise customers configure their IdP directly within the Scalekit interface.
This typically includes:
- Uploading SAML metadata
- Providing OIDC client credentials
- Managing certificates
- Associating verified domains
- Defining attribute mappings
Certificate rotation and claim updates occur inside Scalekit, without requiring access to your Auth0 tenant.
This shifts ownership of enterprise identity configuration from your engineering team to customer IT administrators.
Step 4: Test and validate the end-to-end login
Once a customer IdP is configured in Scalekit, validation happens entirely through your existing Auth0 login flow.
1. Trigger login using the Scalekit connection
Your application must explicitly initiate login using the Scalekit-backed Auth0 connection:
/api/auth/login?connection=scalekit-oidc
In a Next.js app using @auth0/nextjs-auth0, this can be a simple login button:
No per-customer code changes are required. All enterprise routing logic happens inside Scalekit.
2. Confirm redirect to the customer’s IdP
The expected redirect chain is: App > Auth0 > Scalekit > Customer IdP
If correctly configured:
- Auth0 redirects to Scalekit (OIDC)
- Scalekit redirects to the correct customer IdP
- Authentication completes
- User returns to Auth0
- Auth0 issues tokens to your app
At no point does your application directly communicate with the enterprise IdP.
3. Validate identity claims in your application
After login succeeds, inspect the user object returned by Auth0 in Auth0 Logs.
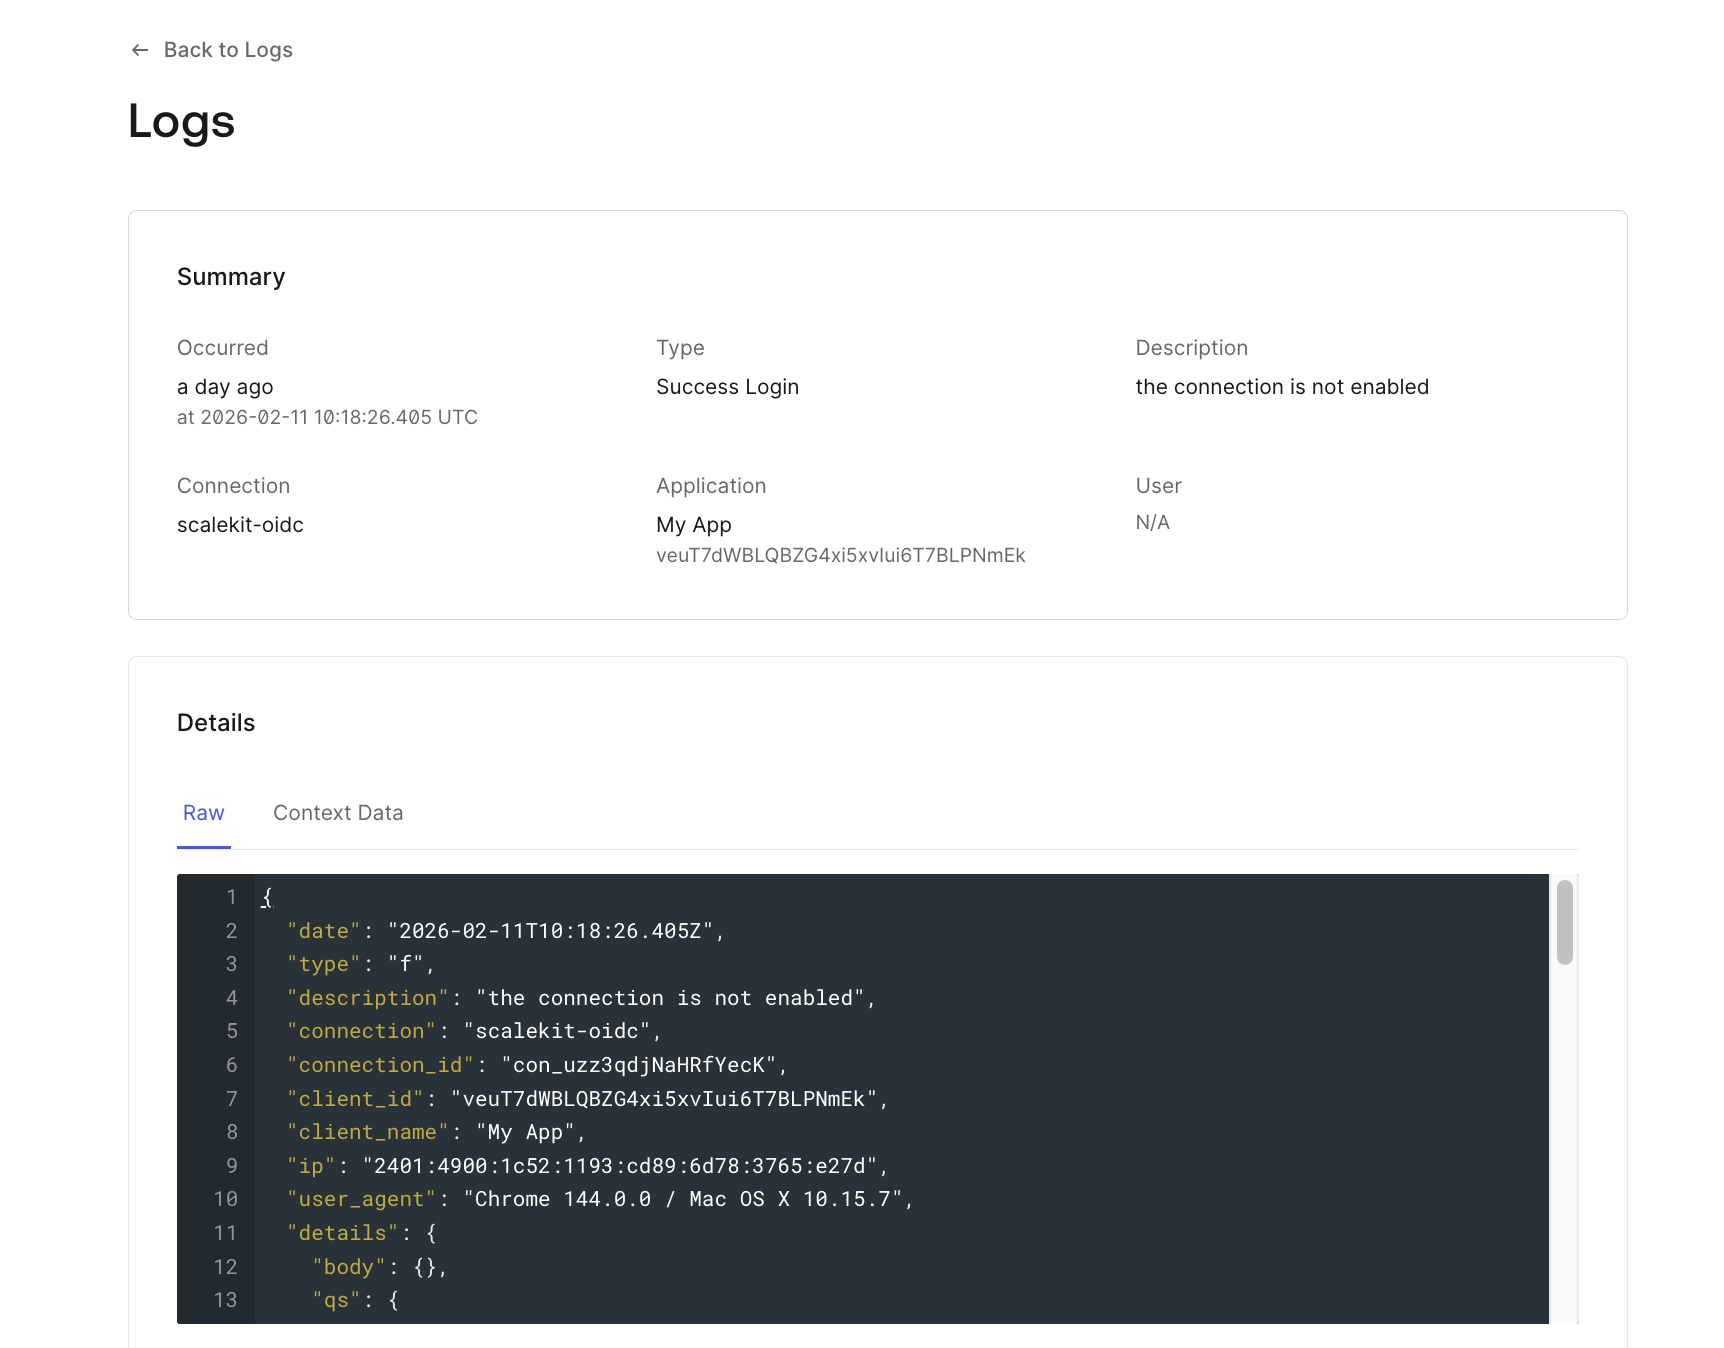
Confirm:
- Email matches the enterprise user
- Sub reflects Scalekit-backed identity
- org_id exists if using Organizations
- Custom claims (roles/groups) are mapped correctly
4. Confirm no new Auth0 connections were created
This is the architectural validation step.
Even after onboarding multiple enterprise customers:
- Auth0 still shows only ONE upstream OIDC connection (Scalekit)
- No additional enterprise connections appear in the tenant
- No per-customer configuration accumulates in Auth0
From Auth0’s perspective, nothing changes per customer.
It continues to issue tokens as usual, trusting Scalekit as the single upstream identity provider.
What changes with this approach
Using Scalekit on top of Auth0 changes enterprise SSO from a tenant-scaling model to an isolation model:
- Enterprise IdPs scale inside Scalekit, not inside Auth0
- Auth0 maintains a single upstream OIDC connection
- Customer IT teams own the IdP configuration
- Engineering teams no longer manage per-customer SAML/OIDC connections
Auth0 remains your authentication engine.
Scalekit becomes your enterprise identity layer.
Why SSO is never the last enterprise identity request
Enterprise SSO is rarely the end of the conversation. It is usually the first visible requirement that exposes deeper expectations around identity, access, and control. Once a customer trusts your product to integrate with their identity provider, follow-up requests tend to arrive quickly and predictably.
Common next asks include:
- SCIM provisioning for automated user lifecycle management
- Domain enforcement to control who can authenticate
- Audit logs for compliance and security reviews
- Organization-level access controls beyond basic roles
Each of these requirements builds on the same foundation as SSO: external identity systems, customer-owned configuration, and long-lived trust relationships. Teams that treat SSO as a one-off feature often find themselves repeatedly stretching their authentication system to take on responsibilities it was not designed to handle.
This is why the SSO decision matters more than it initially appears. Whether you keep everything inside Auth0, migrate away, or introduce a dedicated enterprise identity layer, the choice determines how easily your product can meet future enterprise expectations without constant rework.
Recommended Reading: Build vs. buy: How to approach SSO for your SaaS app
Conclusion
Enterprise SSO rarely stays a one-time integration. On Auth0, each enterprise customer typically adds a new SAML or OIDC connection, along with configuration and ongoing operational ownership inside your tenant. That model works early on, but as adoption grows, pricing and management scale alongside it. What begins as a feature starts behaving like infrastructure.
At that point, the question shifts from “Do we support SSO?” to “Where should enterprise identity live?” You can continue scaling connections inside Auth0, migrate to a different stack, or introduce a dedicated enterprise identity layer while keeping Auth0 as your authentication engine. The right choice depends on how central enterprise identity is to your product and how quickly you expect enterprise demand to grow.
If you’re evaluating your first enterprise SSO request, start by estimating how many enterprise customers you expect to support and how much configuration you’re willing to manage inside your Auth0 tenant. That forward-looking view will make the architectural decision clearer before SSO becomes a constraint.
FAQ
1. How does Auth0 enterprise SSO pricing work?
Auth0 enterprise SSO pricing is typically tied to enterprise connections rather than active users. Each SAML or OIDC connection created for a customer contributes to the cost. As the number of enterprise customers increases, pricing scales with the number of connections, not just usage.
2. Does each enterprise customer require a separate Auth0 connection?
In most B2B SaaS implementations, yes. Each enterprise customer’s IdP (Okta, Microsoft Entra ID, ADFS, etc.) is configured as a separate Enterprise Connection within your Auth0 tenant. This results in per-customer configuration and management.
3. Can enterprise SSO be self-managed by customers in Auth0?
Not directly. Enterprise connections are configured and owned inside your Auth0 tenant. While customers provide metadata and certificates, your team typically manages the configuration, updates, and troubleshooting.
4. What changes when using Scalekit on top of Auth0?
When introducing Scalekit as an enterprise identity layer:
Auth0 maintains a single upstream OIDC trust.
Customer-specific IdPs are configured inside Scalekit.
Enterprise configuration no longer accumulates inside your Auth0 tenant.
Customer IT teams can manage SSO in a more isolated workflow.
Auth0 continues to handle authentication, token issuance, and session management.
5. When should a team consider adding an enterprise identity layer?
Teams typically reconsider their architecture whenEnterprise SSO becomes a common requirement.
Connection count and operational overhead grow.
Customer IT teams request more control.
Additional features like SCIM, domain enforcement, and audit logs are required.
At that stage, enterprise identity begins behaving like infrastructure rather than a feature.
6. Is enterprise SSO the final enterprise requirement?
Rarely, Enterprise customers often follow SSO with:
SCIM provisioning
Domain verification
Audit logging
Organization-level access controls
SSO is usually the first visible signal that the identity architecture must scale to meet enterprise expectations.
7. How does Auth0 define an “Enterprise Connection”?
In Auth0, an Enterprise Connection represents a federated trust with an external identity provider using SAML or OpenID Connect. Each connection encapsulates provider-specific configuration such as metadata, certificates, attribute mappings, and protocol settings, and is managed at the tenant level.
8. Are Enterprise Connections shared across customers?
No. Enterprise Connections are configured per identity provider and are not automatically reusable across customers. Even if multiple customers use the same IdP type (for example, Okta), each customer typically requires a distinct connection with separate configuration and credentials.
9. Do Enterprise Connections affect application-level access control?
Yes. Enterprise Connections must be explicitly enabled for one or more Auth0 applications and are often scoped to specific Organizations. This determines which users from an external IdP can authenticate into which customer workspace or tenant within the B2B application.
10. How does Scalekit change the operational model for Enterprise SSO?
With Scalekit, Auth0 maintains a single upstream OIDC integration, while customer-specific SAML or OIDC providers are configured and isolated within Scalekit. This shifts enterprise-specific configuration away from the Auth0 tenant, reducing the per-customer operational surface area.


