

Enterprise SaaS growth eventually reaches a point where simple email-password signups stop working. As deals move upmarket, procurement and IT teams join the evaluation process, and their first requirement is almost always the same: “Does your product support SSO with Okta, Azure AD, or Google Workspace?” Identity shifts from a minor implementation detail to a core enterprise readiness feature.
Customers now demand centralized access control. Enterprise IT teams want strict MFA enforcement, user lifecycle automation, access logs, and alignment with their internal security policies. A traditional login form cannot support these requirements. SaaS teams must integrate with many identity providers while delivering a consistent user experience, making OpenID Connect (OIDC) a foundational capability rather than a bolt-on protocol.
This guide explains OIDC from the perspective of a SaaS product preparing for its first enterprise customer. We focus on what OIDC is, how it differs from OAuth, how authentication flows work, and how SSO fits into a multi-tenant architecture. Along the way, we show how tokens, claims, redirects, and provisioning connect in real deployments, backed by diagrams, examples, and working code.
This foundation is why enterprise SaaS teams increasingly depend on OIDC to centralize access, enforce MFA, handle user lifecycle events, and offer trusted authentication across identity providers.
A simple identity model helps SaaS teams avoid confusion when implementing enterprise SSO for the first time. Many developers begin with OAuth tutorials designed for social logins, which do not match the security expectations of enterprise identity providers. Without a clear mental model, teams struggle to understand responsibilities, tokens, and data flow.
Enterprise SSO shifts authentication from your SaaS application to the customer’s identity provider. The identity provider, whether Okta, Azure AD, Ping, or Google Workspace, handles MFA, security checks, password policies, and conditional access. Your application no longer verifies credentials. It only verifies the outcome of authentication by returning a signed token.
This shift improves both security and customer control. Organizations can enforce their own MFA rules, manage onboarding and offboarding from a central directory, and maintain audit visibility across applications. Your product becomes a consumer of verified identity rather than an issuer of credentials.
Tokens serve as the source of truth in OIDC authentication because they represent the identity provider’s final decision about the user's identity. Instead of validating passwords or implementing your own MFA logic, your SaaS application receives a signed ID token that confirms the user’s identity. This shifts trust from your own login system to the customer’s identity provider.
An ID token packages a user's identity in a secure, verifiable format. After authentication, the identity provider issues an ID token containing structured claims such as email, name, groups, and issuer information. Your application does not check credentials; it only verifies that this token is valid, correctly signed, and intended for your app.
This model aligns with enterprise expectations for distributed authentication. Customer IT teams retain full control over identity, MFA, and access rules, while your application gains a standardized, predictable way to verify users across multiple identity providers.
OIDC standardizes metadata, token formats, and login flows across all identity providers. Without this consistency, SaaS products that integrate with Okta, Azure AD, Google Workspace, Ping, or OneLogin would require separate logic for each provider. OIDC removes this complexity through predictable behavior across systems.
The protocol defines a common structure for redirect-based authentication. Every OIDC provider exposes an authorization endpoint for login, a token endpoint for code exchange, and a JWKS endpoint for public signing keys. This predictable contract allows your application to authenticate users consistently regardless of which provider a customer uses.
This consistency makes OIDC essential for scalable multi-tenant SaaS. Instead of maintaining custom integrations for each customer’s identity system, your application implements OIDC once and supports all providers through configuration. This reduces engineering effort, simplifies onboarding, and ensures reliable behavior as your product expands into enterprise markets.
OIDC provides a standardized way for SaaS applications to verify user identity issued by external identity providers such as Okta, Azure AD, and Google Workspace. It enables two systems that do not control each other to securely share identity information. Enterprise customers want employees to authenticate using their own identity provider, and SaaS applications need a consistent, trusted way to validate that authentication. OIDC solves this by defining how identity is transmitted, how tokens are issued, and how applications should verify them.
OIDC builds on top of OAuth 2.0 by adding a structured identity layer. OAuth 2.0 focuses on authorization, deciding what a client is allowed to access, while OIDC focuses on authentication, establishing who the user is.
This distinction matters in enterprise SSO, where organizations depend on MFA, conditional access, and identity governance. OIDC introduces ID tokens, standardized authentication claims, discovery metadata, and (optionally) the UserInfo endpoint.
Most B2B SaaS implementations rely primarily on ID token claims and do not need to call the UserInfo endpoint unless additional profile details are required. OIDC therefore provides a predictable, verifiable identity layer built on top of OAuth 2.0’s authorization framework.
In simple terms:
An OIDC provider authenticates users and issues signed tokens that your application can trust. It enforces security policies such as MFA, session rules, and password requirements, and handles all user-facing authentication steps. The SaaS product receives the final result as a validated ID token and does not interact with passwords or local credential checks.
Core responsibilities include:
The ID token represents the user's verified identity, as issued by the customer’s identity provider. It contains trusted claims such as email addresses, names, tenant identifiers, groups, and roles, and serves as the source of truth for determining who the user is in your application. Because ID tokens are signed and short-lived, they provide secure, structured identity without requiring your product to store passwords or manually validate users.
ID tokens help by:
OIDC introduces standard components that unify authentication across identity providers. These components eliminate the need for custom integrations with each provider and ensure consistent login behavior across providers.
OIDC adds:
These elements allow SaaS products to support multiple enterprise customers with different identity providers while maintaining a single, consistent implementation. This predictability reduces support overhead, accelerates onboarding, and strengthens overall security.
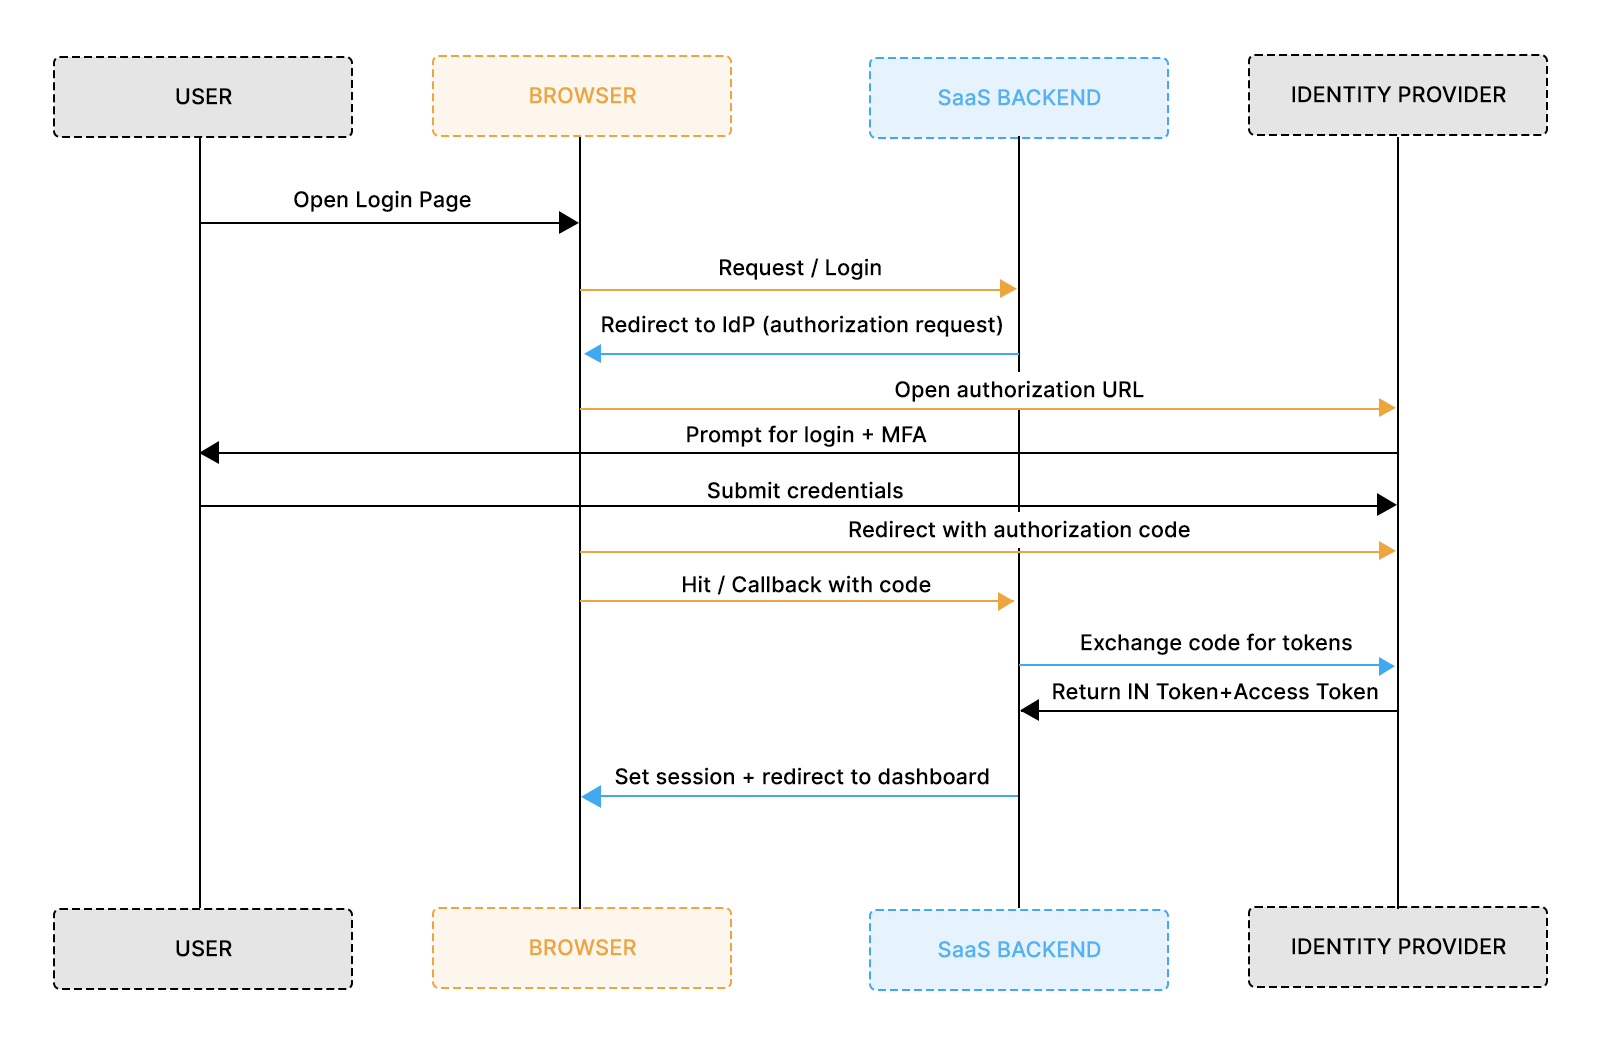
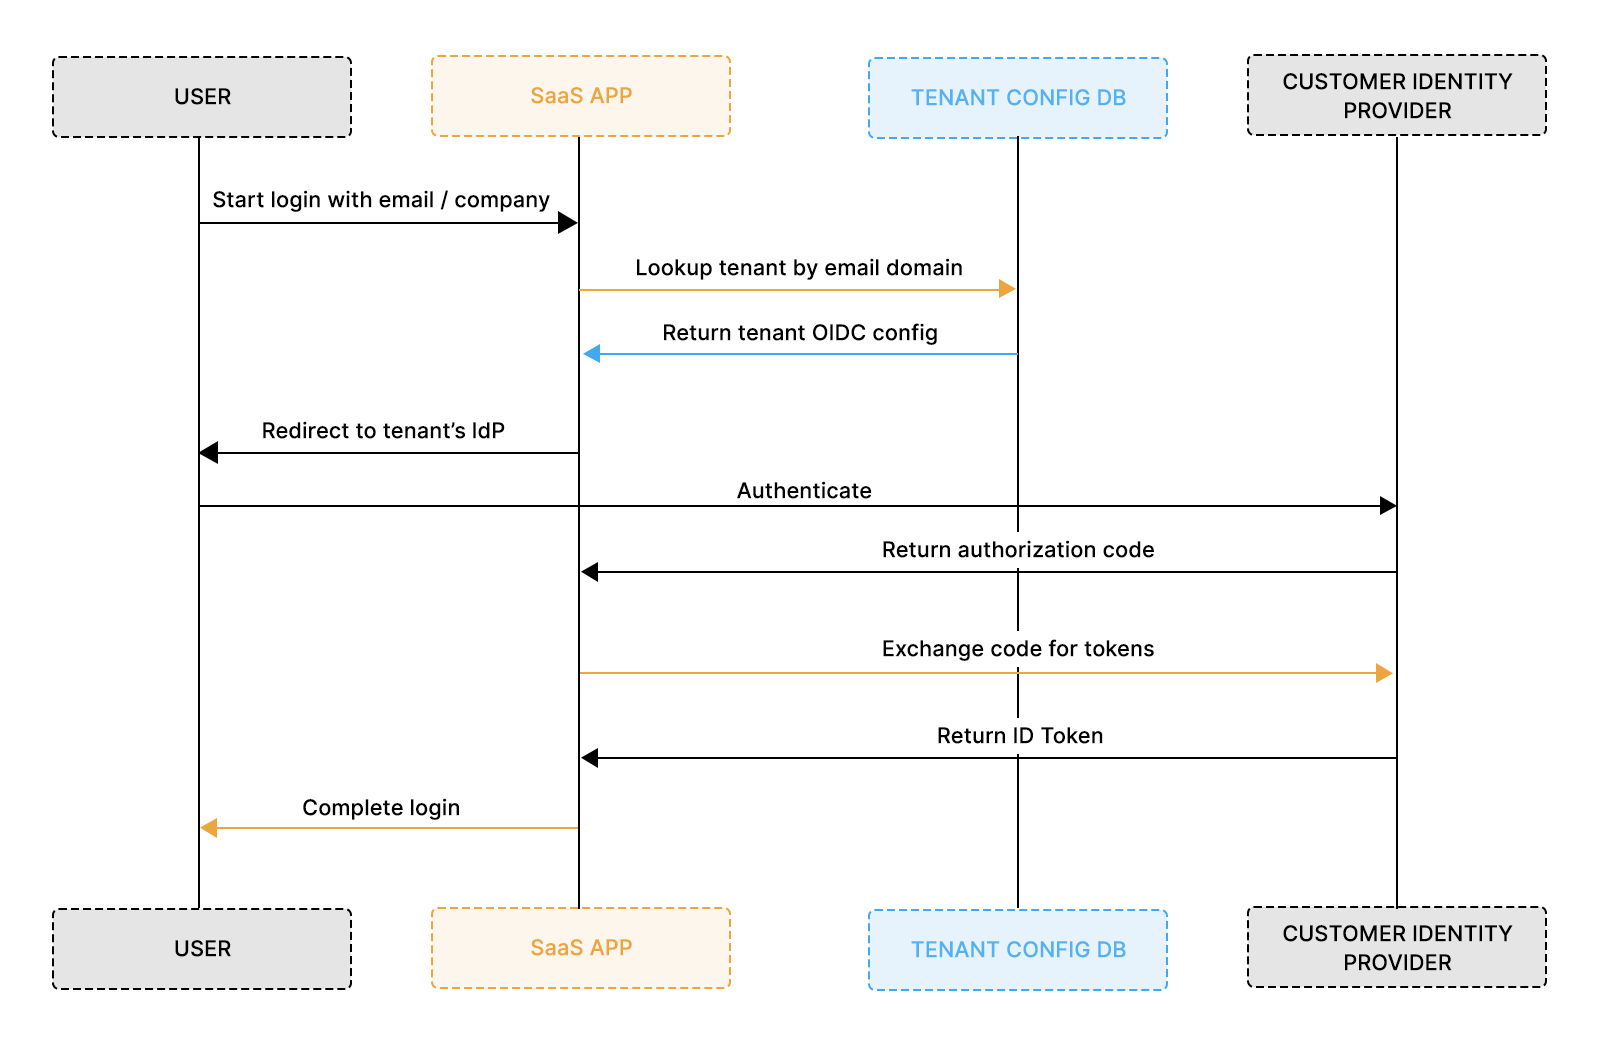
The Authorization Code Flow is the primary OIDC flow used in B2B SaaS applications because it keeps sensitive tokens away from the browser and moves all token handling to secure backend channels. Enterprise identity providers prefer this flow because it supports MFA, conditional access rules, device trust, and organizational policies without exposing credentials to frontend environments. For SaaS teams, it creates predictable behavior across providers and simplifies compliance with enterprise expectations.
The Authorization Code Flow follows a structured redirect sequence. Your application sends the user to the identity provider’s authorization endpoint, where the identity provider authenticates the user and enforces security controls. Once authentication succeeds, the provider redirects back with a short-lived authorization code. Your backend exchanges this code for tokens, including the ID token, which becomes the trusted identity source inside your application. This model keeps authentication secure, reduces exposure in the browser, and aligns with modern enterprise security practices.
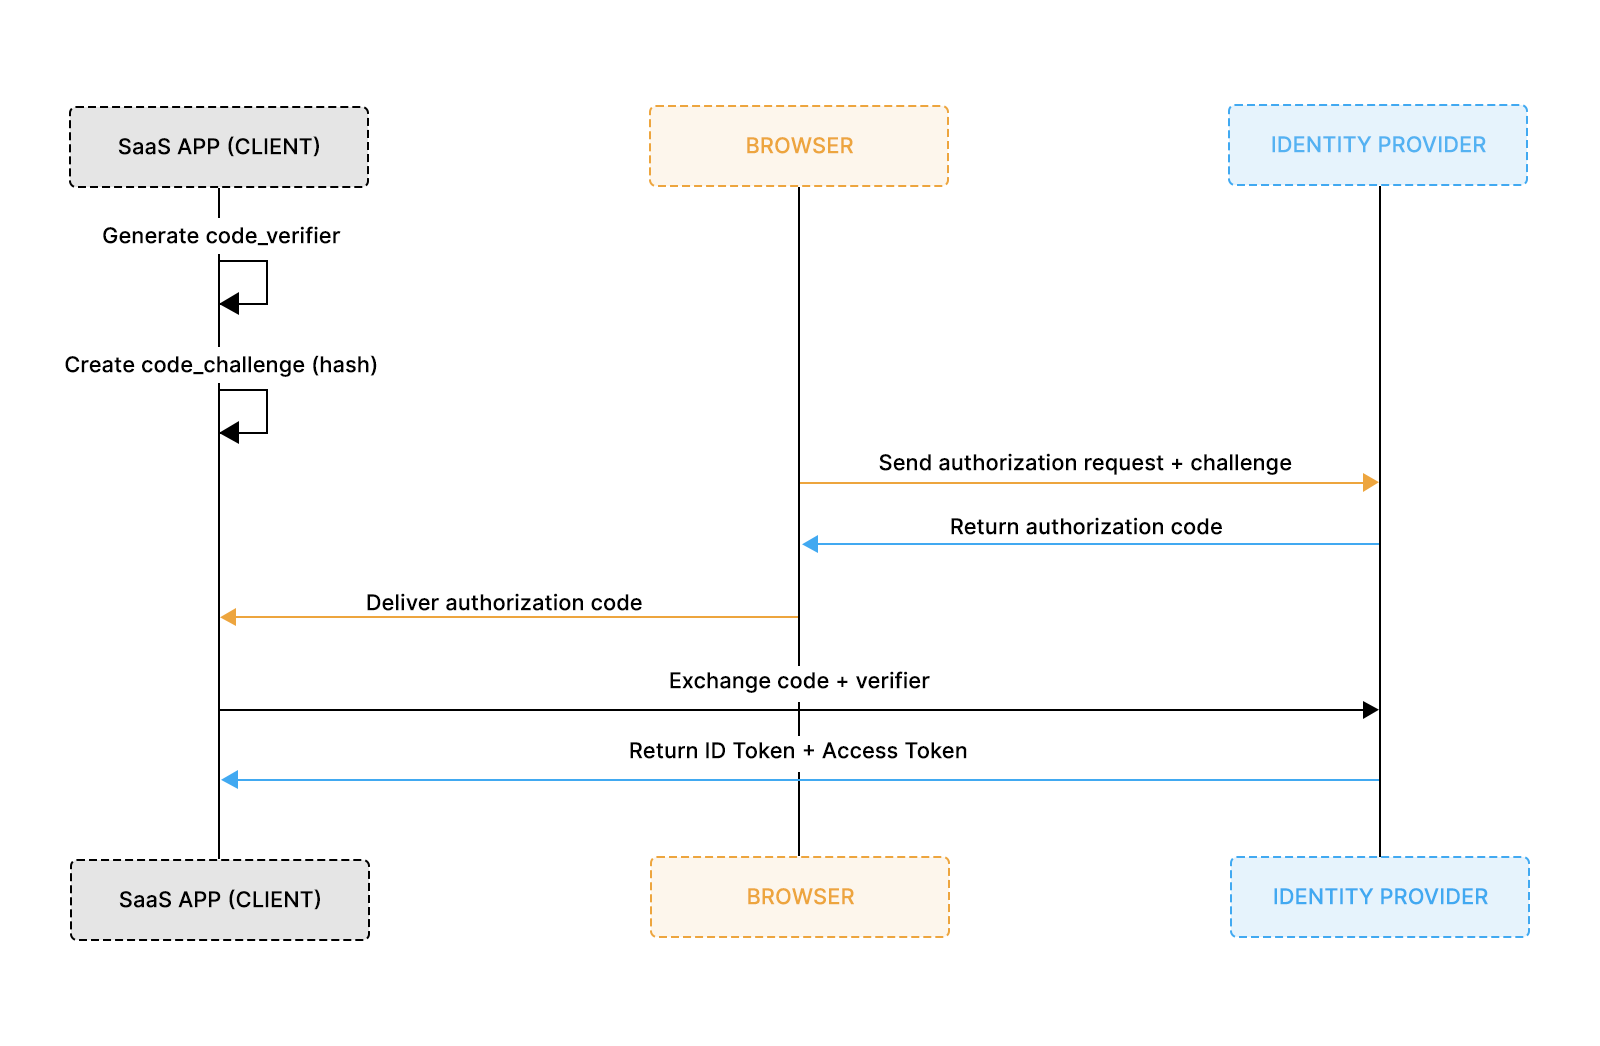
PKCE extends the Authorization Code Flow by preventing attackers from intercepting and reusing authorization codes. It became essential as SaaS products began authenticating users across browsers, SPAs, mobile apps, and desktop client environments where client secrets can’t be safely stored.
Enterprise identity providers such as Okta, Azure AD, Google, and Ping now expect PKCE for all browser-initiated authentication, even when the backend handles token exchange.
Why PKCE is required in real SaaS environments
How PKCE strengthens the flow
What PKCE adds on top of the Authorization Code Flow
Why is this needed for SaaS
PKCE eliminates the need for client secrets in browser-initiated flows and prevents the injection or reuse of authorization codes. It also aligns your SaaS product with identity provider expectations, MFA workflows, and enterprise security policies.
This lays the foundation for the code implementation in the Google Cloud setup section, where PKCE is already fully integrated into the login and callback routes.
PKCE requires only a few additions to the Authorization Code Flow, but those additions must be implemented precisely. The example implementation shown earlier already demonstrates the correct approach, so this section highlights the requirements for a secure PKCE flow.
The earlier code sample already includes:
These elements ensure the Authorization Code Flow is secure and aligned with modern enterprise expectations.
Setting up OIDC becomes easier to understand when you configure a real identity provider. Google Cloud provides a clean example that mirrors how customers set up SSO in Okta, Azure AD, or Ping. These steps show how redirect URIs, client IDs, scopes, and discovery metadata all come together in practice.
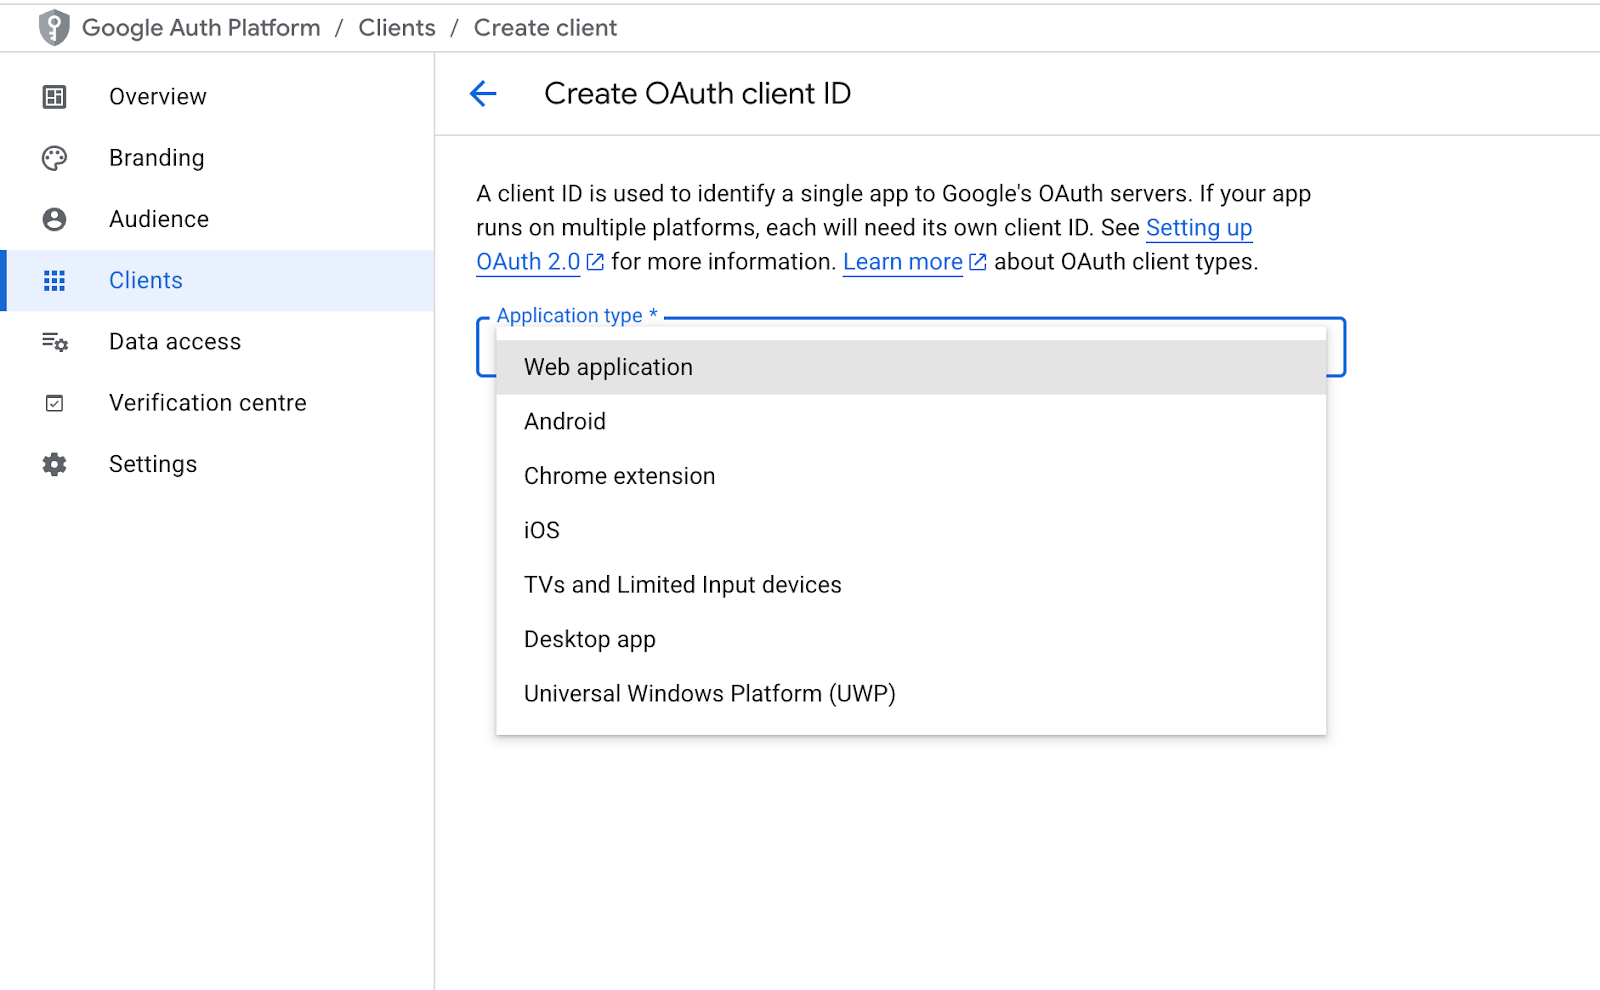
Open the Google Cloud Console and create/select a project for OIDC authentication.

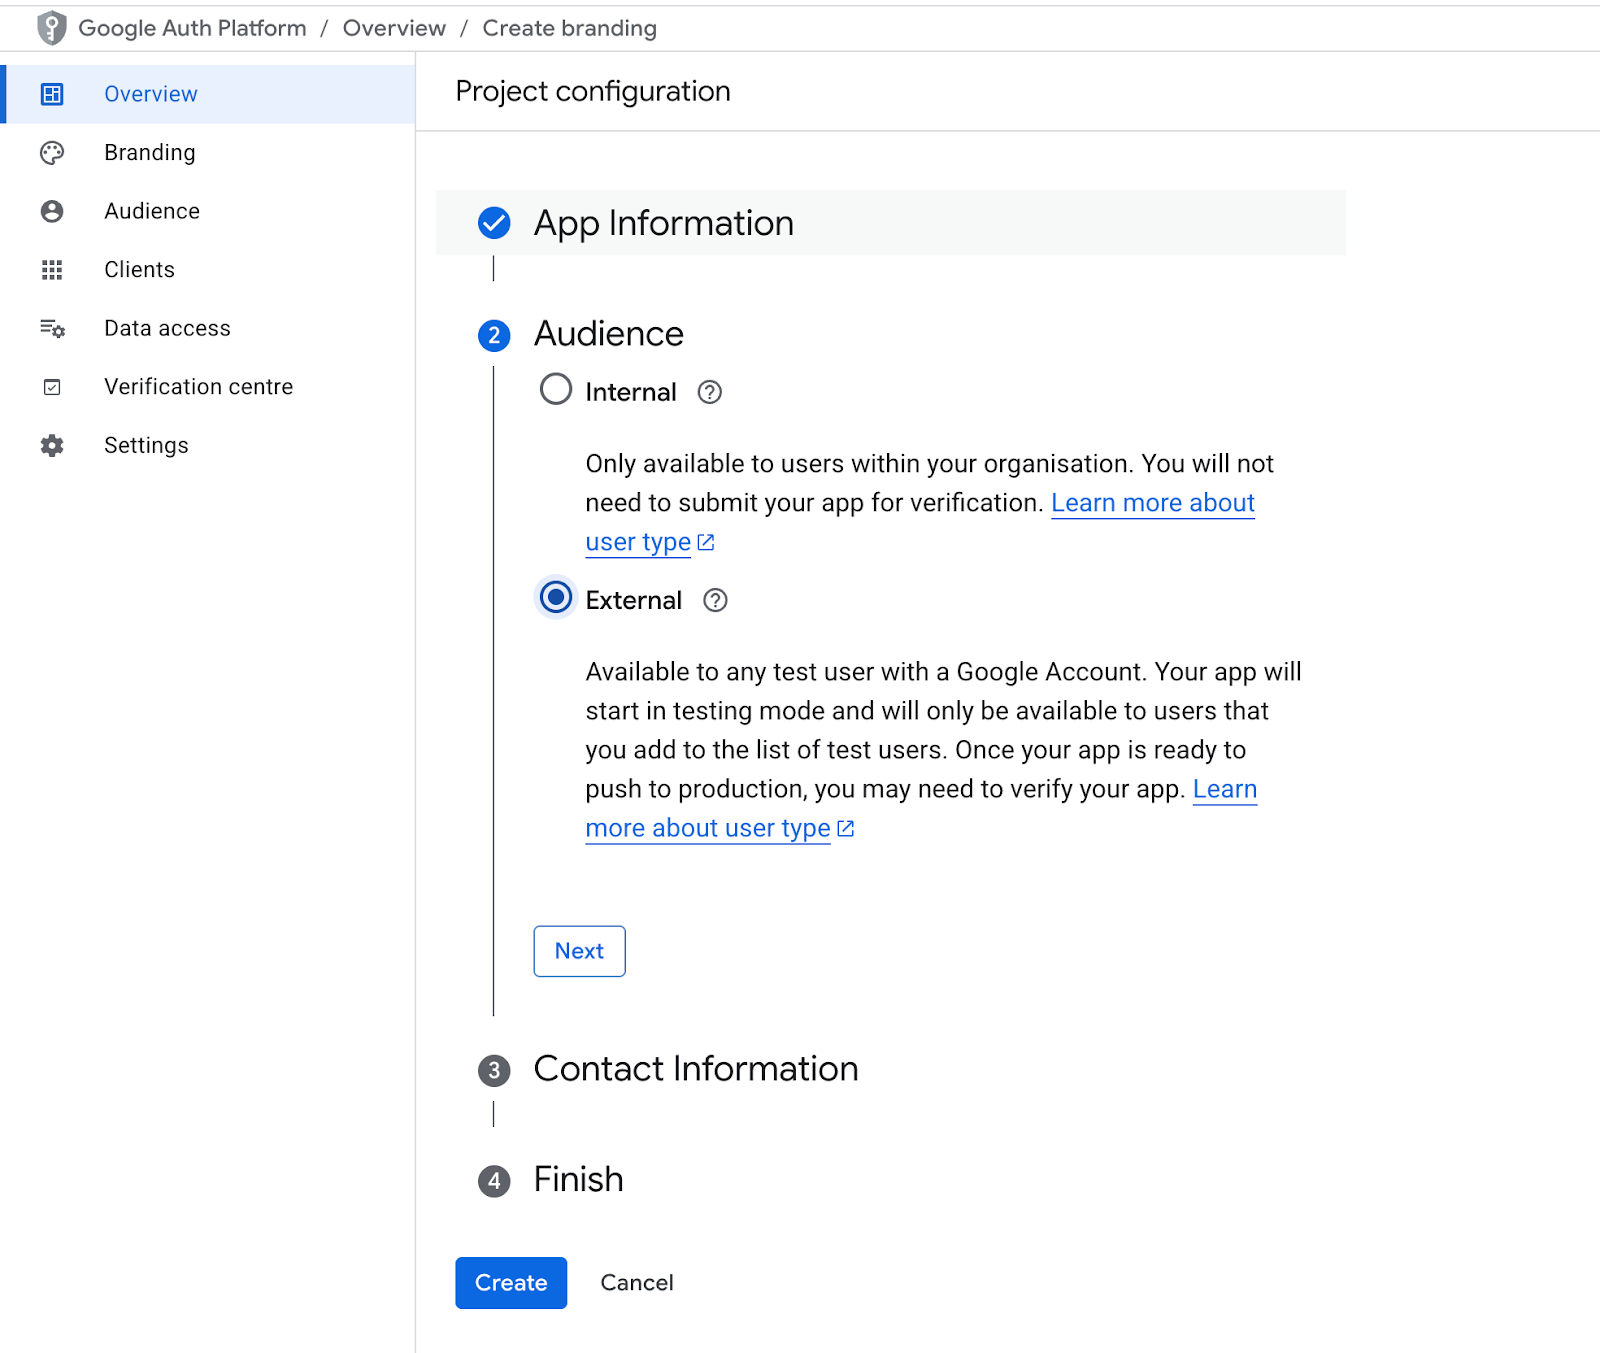
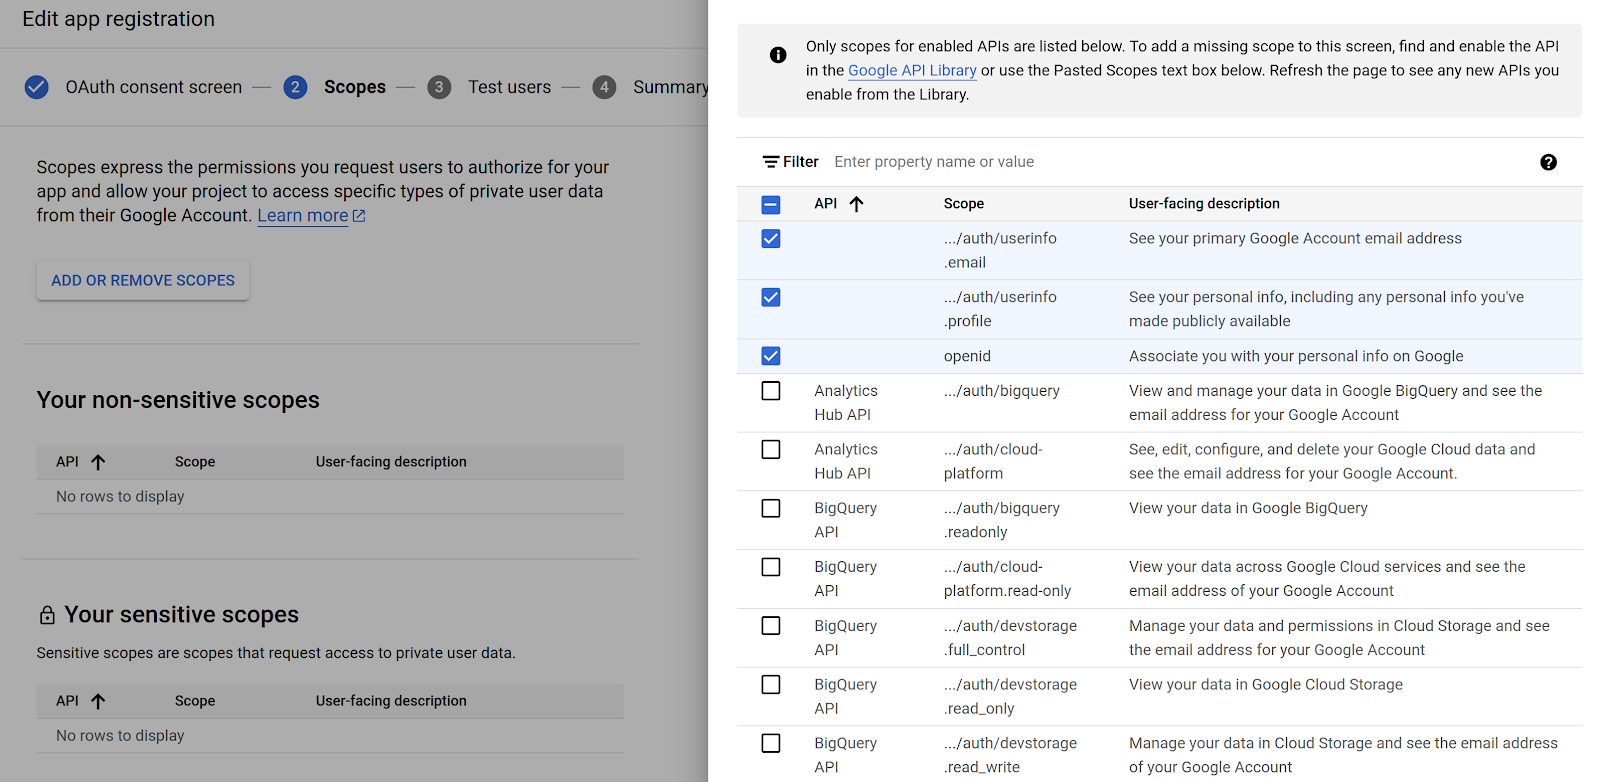
Before you can use OIDC, Google requires you to configure the OAuth consent screen.
Create the OAuth 2.0 Client that your Flask app will use.
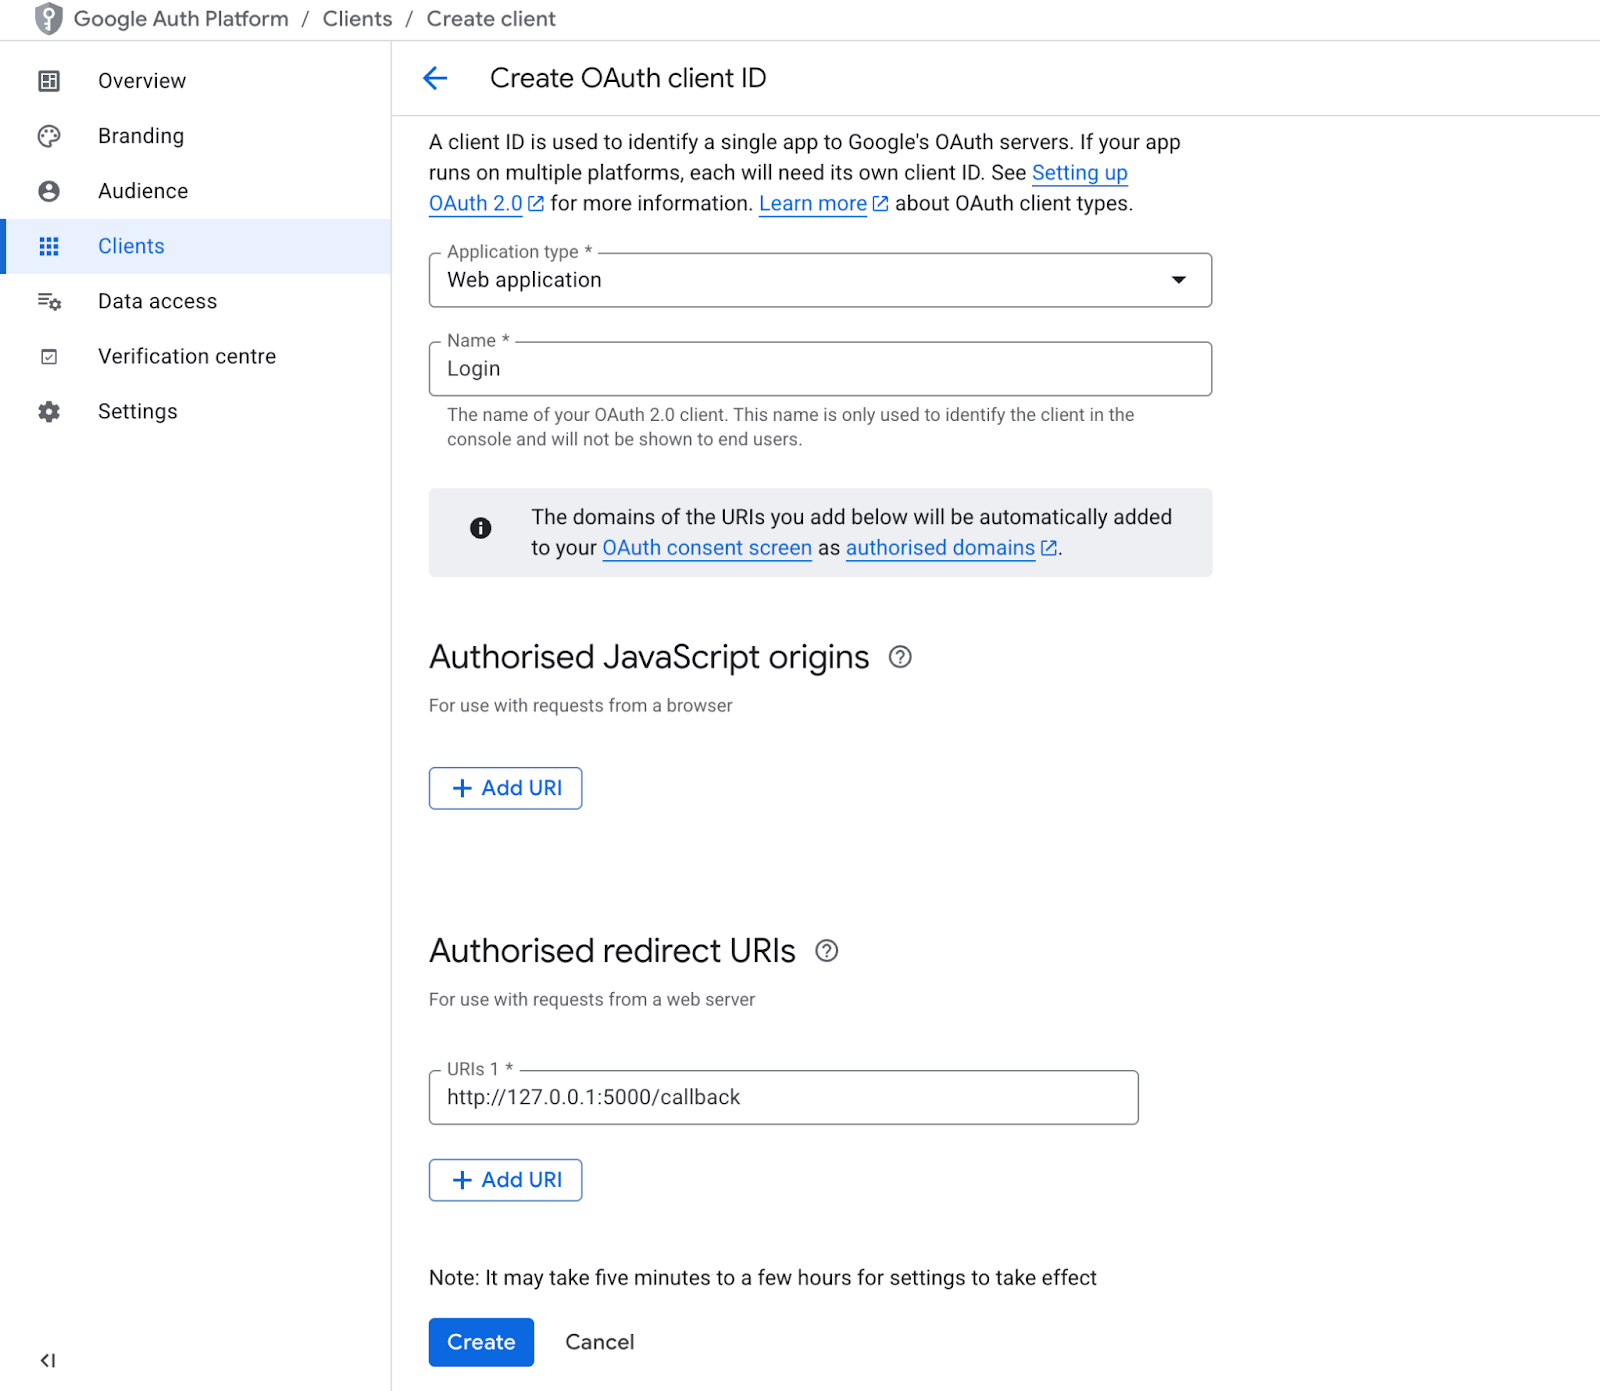
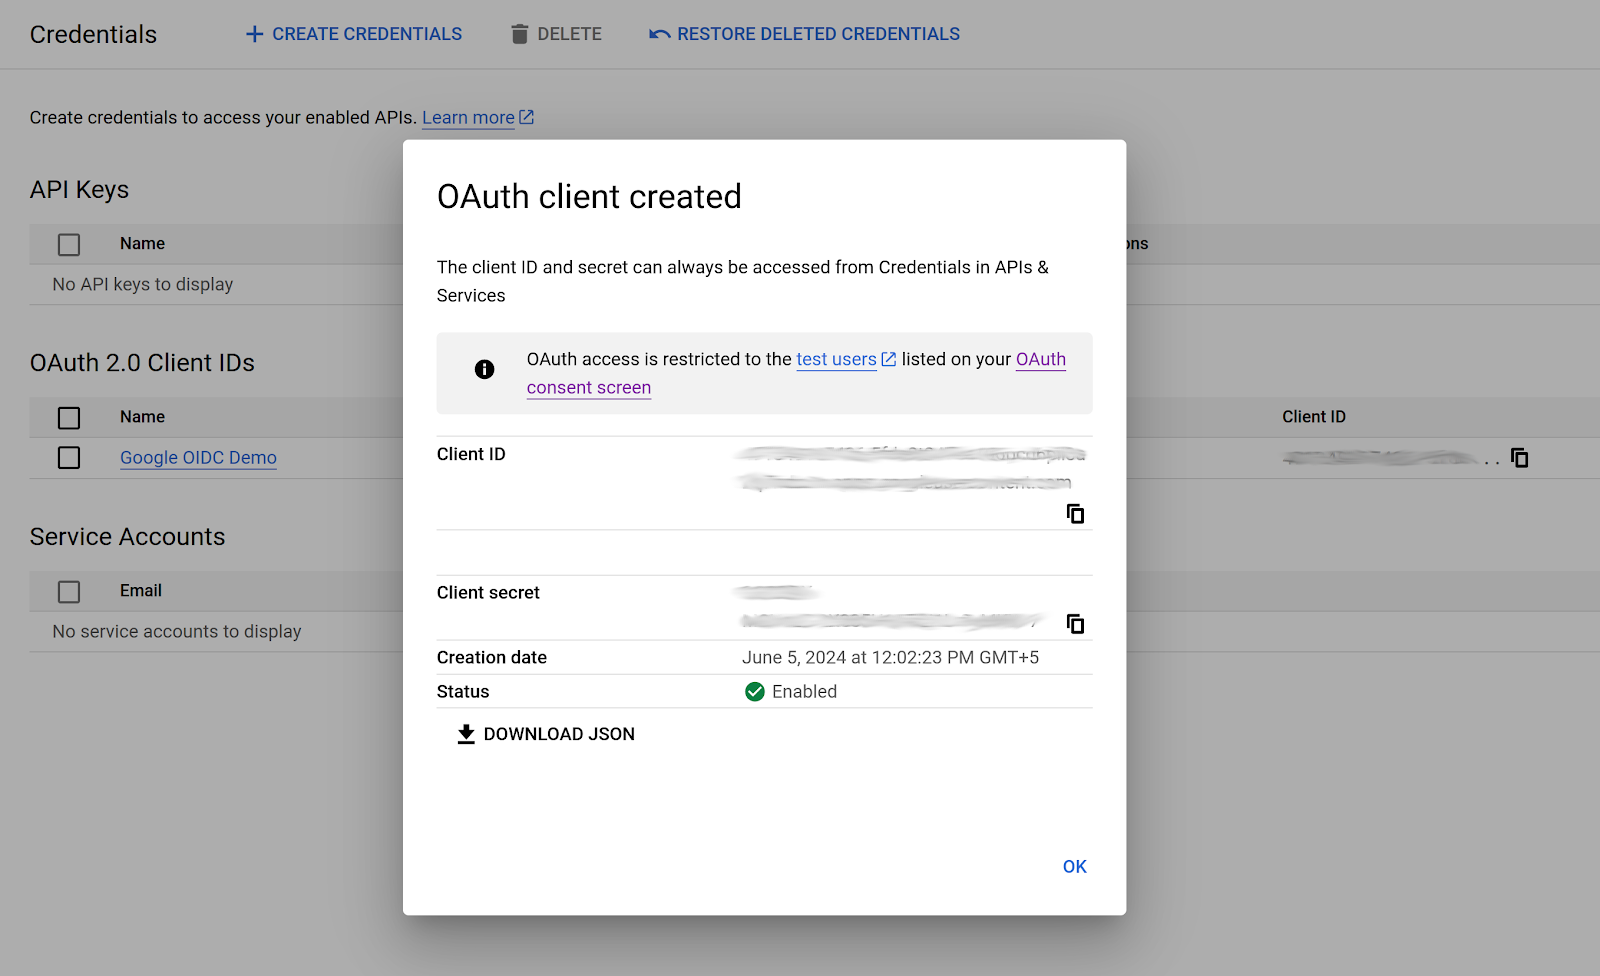
Once you save this, it will show you the Client ID and the Client secret that you’ll use to configure your application.
Install required packages:
Create a main.py file:
This prepares discovery, token fetching, and secure session handling.
This route prepares the authorization request, applies PKCE, and redirects the user to Google’s login page.
This verifies the ID token using JWKS and establishes a trusted login session.
This endpoint returns the authenticated user’s claims, including email, name, picture, etc.
Visit:
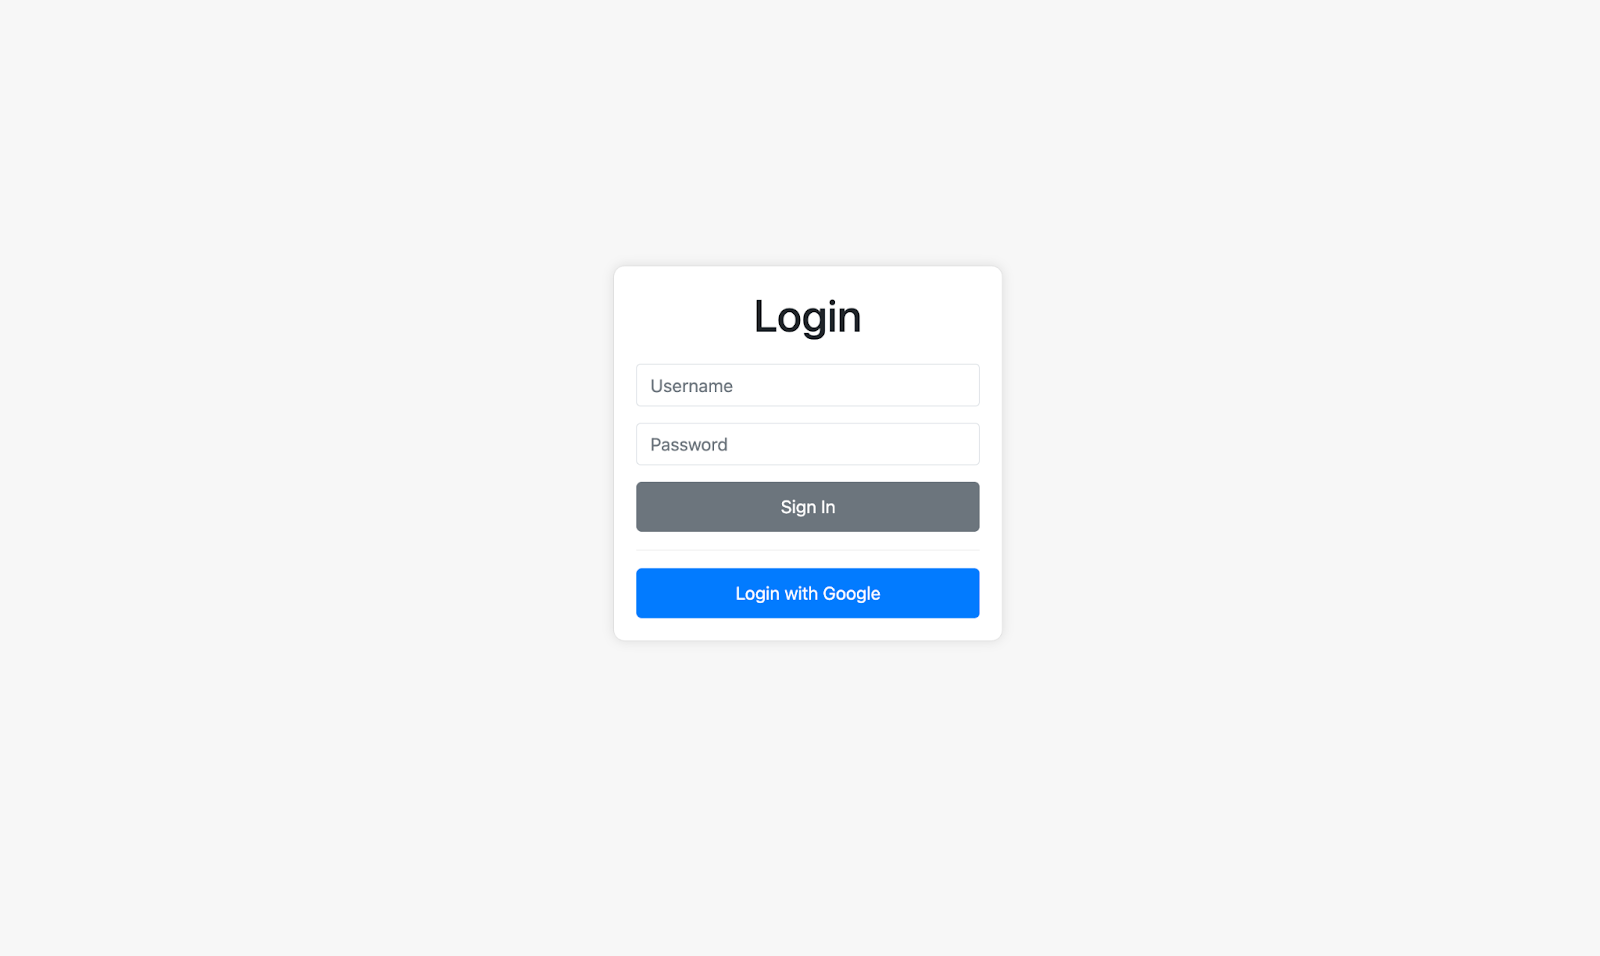
To test Google OIDC, click the “Login With Google” button. It will take you to Google’s login screen, where you can log in using your Google account. Notice the name of our client that we provided earlier, “Scalekit”.
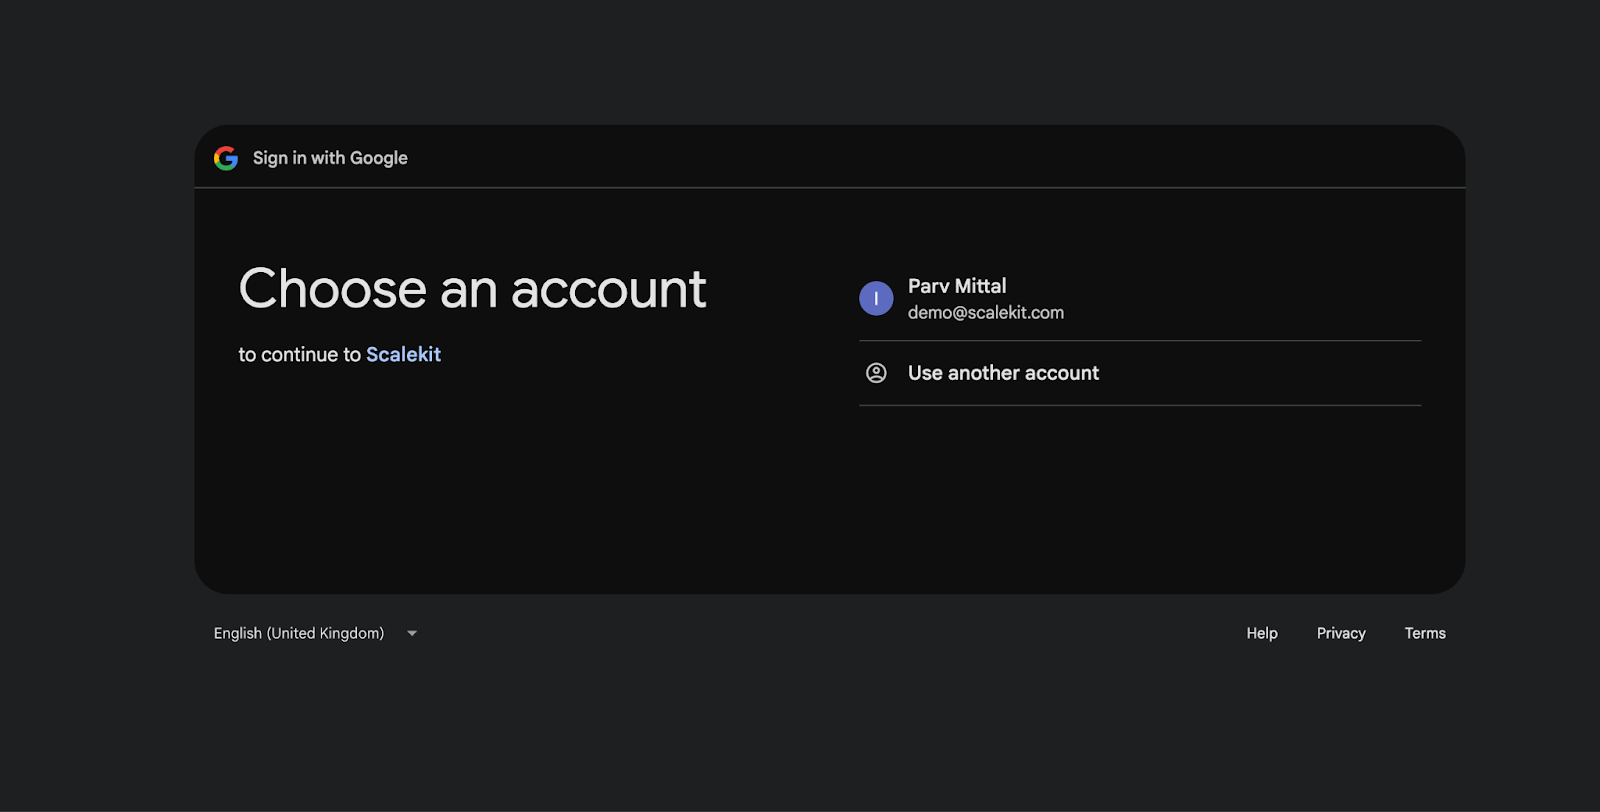
After providing your credentials, you will see the consent screen we created in the first step.
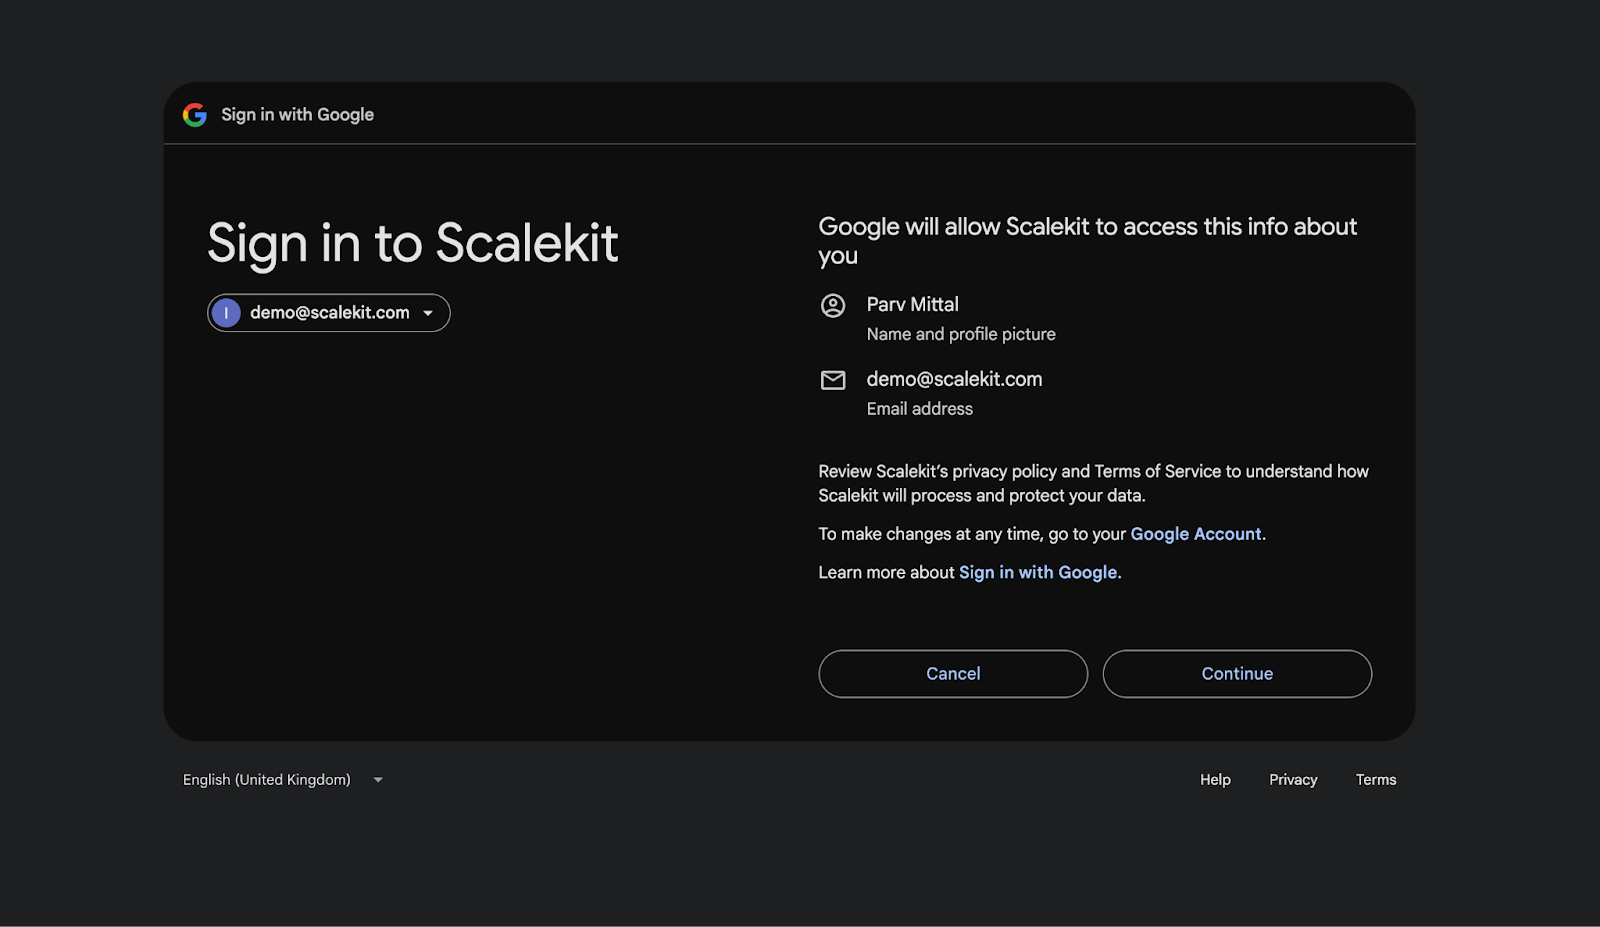
Clicking “Continue” will process the request and allow the user to log in to our web app. The response will include the requested details, as per the scope.
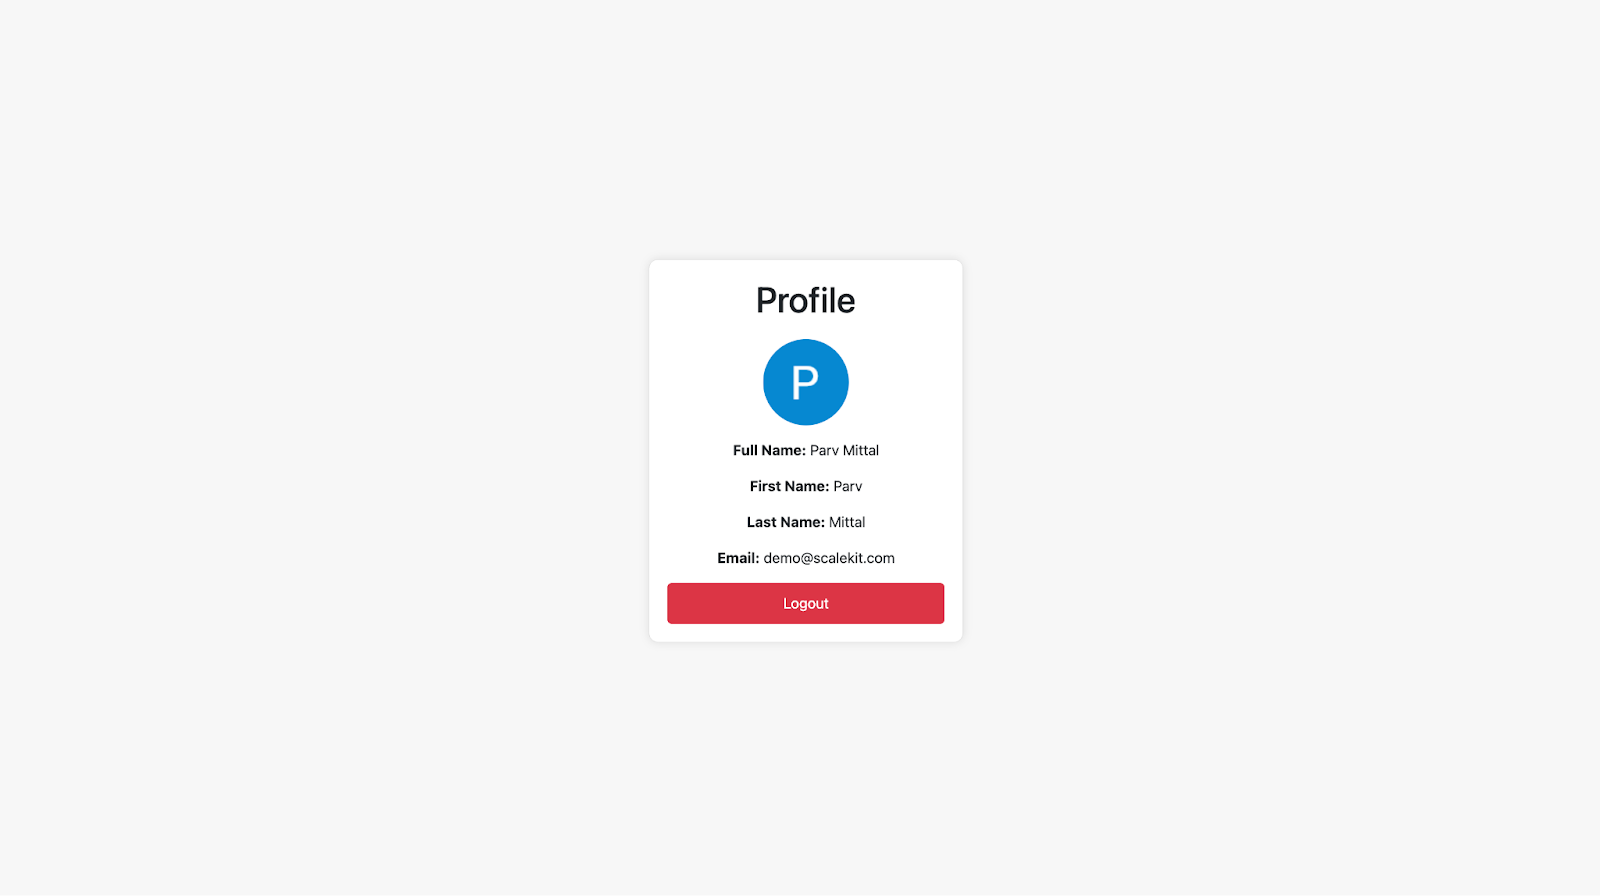
After a successful login, you can see the Profile Picture, Full Name, First Name, Last Name, and Email.
That’s how you configure Google OIDC for a web application. You can replicate this for any other web or mobile application.
The implementation shown above already includes several improvements that make OIDC authentication more secure, more predictable, and more compatible with enterprise identity providers. These enhancements go beyond a minimal example and align the flow with modern best practices.
After the identity provider redirects back with an authorization code, your backend exchanges that code for tokens. This step ensures that sensitive tokens never pass through the browser and that authentication remains secure.
The callback route shown earlier:
These steps align the example with real SaaS production requirements and ensure that token processing is fully secure.
A solid understanding of PKCE and the Authorization Code Flow sets the foundation for more advanced identity patterns. Before we move on to multi-tenant SSO, it’s important to understand how these pieces fit together in a real SaaS environment.
Multi-tenant SSO builds on the exact mechanisms you’ve seen so far, but with tenant-specific issuers, keys, endpoints, and claim formats. Understanding the flow at a single-tenant level makes it much easier to scale identity across multiple enterprise customers.
This prepares us for the next step: routing users to the correct identity provider and supporting tenant-specific metadata.
Multi-tenant SaaS products must support customers who each bring their own identity provider. One company may use Okta, another Azure AD, another Google Workspace, and each provider uses different issuer URLs, endpoints, and signing keys. A single global OIDC configuration cannot support this diversity. Instead, authentication must adapt dynamically based on the tenant initiating the login.
This ensures every customer’s authentication behaves exactly as their security policies require.
Tenant routing determines which identity provider a user should be redirected to before authentication. A SaaS product may route based on:
Routing ensures users see the correct login screen and prevents cross-tenant confusion.
The Authorization Code Flow stays the same, but the endpoints used during the redirect must be selected per tenant. Each enterprise customer has a unique issuer, authorization endpoint, token endpoint, and JWKS URL, so the redirect cannot use a single global configuration.
A multi-tenant SaaS product must load OIDC settings dynamically instead of using a single global configuration. Before generating the authorization redirect, the application needs to determine which tenant is logging in and fetch that tenant’s identity provider metadata.
These changes allow the same OIDC flow to work across all customers while maintaining per-tenant authentication.
Every enterprise customer brings a different identity setup Okta, Azure AD, Google Workspace, Ping, OneLogin, and each of them exposes unique issuer URLs, endpoints, keys, and credentials. A single global OIDC configuration cannot support this diversity.
Storing OIDC settings per tenant ensures:
Most SaaS products store these values in a tenant configuration table that is loaded before the login redirect.
Typical per-tenant fields include:
This separation is what makes multi-tenant SSO reliable and safe.
Multi-tenant OIDC dramatically reduces friction during enterprise onboarding because each customer can use their own identity provider without requiring custom engineering. When the system automatically loads tenant-specific issuer URLs, endpoints, and credentials, SSO becomes a predictable, repeatable setup for every new account.
This approach also improves reliability. Each tenant’s configuration remains isolated, so one customer’s misconfiguration cannot affect another’s login flow. IT teams appreciate this separation because it ensures their own MFA rules, group policies, and conditional access settings apply correctly.
Enterprise onboarding benefits include:
Multi-tenant awareness is what makes SSO “just work” as your SaaS product scales across multiple enterprise customers.
Once tenant-aware routing and configuration are in place, the next layer handles user attributes returned via OIDC. Enterprise identity providers send structured data emails, groups, roles, and department fields inside ID tokens or through the UserInfo endpoint. Your application must interpret these fields consistently across tenants.
While OIDC standardizes a small set of core claims (sub, email, name), group and role claims are not standardized across identity providers. Azure AD may send a groups claim containing UUIDs, Okta may return human-readable group names, and Google Workspace often relies on custom attributes instead of standard group fields. Because each IdP formats these attributes differently, an internal normalization layer is essential to avoid incorrect role assignments or inconsistent permissions.
Before implementing claim mapping, ensure:
This sets the foundation for role mapping, RBAC, and lifecycle automation in the next stages.
Once authentication succeeds, claims become the source of truth for who the user is and what they can access. Identity providers supply structured attributes, such as email, name, groups, roles, tenant markers, and your application must interpret them predictably across tenants.
Different IdPs expose claims in different formats, so the SaaS app must normalize these values before applying permissions. This prevents situations where a user logs in but lands in the wrong role or fails to join the correct workspace.
Common standard OIDC claims:
Common enterprise-specific claims:
To use these safely, applications typically:
This approach gives your product predictable permission behavior across Okta, Azure AD, Google Workspace, and other providers, regardless of how they structure claims.
As soon as enterprise customers onboard larger teams, they expect user accounts to be created, updated, and deactivated without manual work. OIDC only handles login; it doesn’t manage lifecycle. That’s where Just-In-Time provisioning (JIT) and SCIM provisioning come in. Together, they keep your user records synchronized with the customer’s directory.
JIT provisioning handles the moment a user logs in. If the user doesn’t exist, you create them. If they already exist, you update their details using claims from the ID token. This requires no pre-provisioning and works well for smaller teams or first-time logins.
JIT provisioning supports:
But JIT isn’t enough for large enterprises. When someone leaves the company, they may never log in again, so JIT never deactivates their account. Enterprises need deterministic offboarding; this is why SCIM becomes essential.
SCIM allows the identity provider to push lifecycle events directly to your app.
SCIM supports:
In practice, OIDC handles authentication, while SCIM maintains the directory state. Together, they eliminate manual user management and align your SaaS product with enterprise identity workflows.
Logout in an enterprise SSO setup happens at two layers: your application session and the customer’s identity provider session. Clearing only the app session isn’t enough; users expect the IdP session to end as well, especially when MFA or shared devices are involved.
Your app first clears its local session (cookies or server state), then redirects the user to the IdP’s logout endpoint. Some providers support a post-logout redirect back to your product; others simply end the session, leaving it to you to display the next screen.
Typical IdP logout URLs:
Larger enterprise environments also rely on back-channel logout, where the IdP notifies your backend that the user logged out elsewhere, another device, another application, or an admin-driven session reset. This allows your system to silently end active sessions without a user-initiated redirect.
Session management must also account for short-lived ID tokens, refresh tokens (if used), and your own session lifetime rules. Enterprise IdPs enforce strict expiration windows, so your application needs predictable handling for:
A clean logout and session policy makes SSO behavior feel consistent and avoids the confusing “still logged in” state that often frustrates enterprise users.
Most SSO issues in enterprise onboarding trace back to a small set of configuration mistakes, such as incorrect redirect URIs, incorrect issuers, rotated certificates, or missing claims. Because every customer brings their own IdP and security policies, the same code can behave differently across tenants. A structured debugging approach keeps onboarding predictable and prevents back-and-forth with IT teams.
Identity providers expose errors inconsistently. Okta offers clear admin logs, Azure AD returns AADSTS codes that must be looked up, and Google Workspace provides simpler but limited messages. Your application should log enough context at each step so your team can quickly pinpoint issues, even when IdP messages are vague.
Common failure categories include:
To streamline onboarding, capture key details during login and callback: token exchange errors, JWKS fetch failures, mismatched issuers, and missing claims. A small checklist for customers to correctly redirect URIs, assign users in the IdP, enable scopes, and correct issuer settings resolves a large share of setup problems before they reach engineering.
A predictable troubleshooting workflow dramatically reduces support load and keeps SSO integrations smooth across tenants, IdPs, and environments.
As your SaaS product lands larger accounts, customers expect to configure SSO themselves rather than wait for engineering or support. A well-designed self-serve flow lets admins paste their IdP metadata, validate endpoints, test the connection, and activate SSO instantly. This reduces onboarding time and removes the guesswork typically involved in enterprise SSO setup.
A strong setup flow guides admins through each required field with practical context: issuer URL, client ID, client secret, JWKS URI, and logout endpoint. Even small UI details, such as sample values, inline instructions, and links to Okta/Azure documentation, dramatically reduce configuration errors.
A reliable self-serve SSO flow should offer:
To support this in your code, static global config must be replaced with tenant-specific settings stored in your database. The app then uses these fields to build authorization requests and validate tokens for each tenant.
A self-serve experience turns SSO into a predictable, low-touch onboarding step, something enterprise customers expect and sales teams appreciate.
Enterprise customers evaluate authentication rigor before approving any SaaS vendor. Weak token validation, loose redirect rules, or poorly handled sessions quickly become blockers during security reviews. Hardening your OIDC integration ensures your product passes SOC2/ISO audits and aligns with enterprise security expectations.
Strong token validation prevents impersonation and token tampering. Your app must verify signatures using JWKS keys, check issuer and audience fields, and reject expired or malformed tokens. Redirect handling matters as well; every callback must match exactly, and state parameters must be validated to prevent code injection attacks.
A secure OIDC implementation typically includes:
Identity providers rotate signing keys, so JWKS caching must be short-lived and refreshed automatically on signature failures. Login endpoints should be rate-limited, and tenants in regulated industries may require IP allowlists or automated monitoring of suspicious login patterns.
Audit-friendly logs help enterprise teams trace authentication activity without exposing sensitive tokens or PII. These logs support SOC2, ISO27001, and GDPR requirements while giving customers visibility into access events.
A hardened implementation not only improves security, but it also increases trust during procurement and supports smoother enterprise onboarding.
As your SaaS product onboards more enterprise customers, login traffic spreads across many identity providers, each with its own issuer, discovery document, JWKS keys, and regional endpoints. Without scaling patterns in place, SSO becomes slow, inconsistent, or prone to outages triggered by external IdP delays. A scalable OIDC layer keeps authentication fast and reliable, even under heavy load.
Caching plays a major role. Discovery documents and JWKS keys should not be fetched on every login; short-lived caching reduces latency and avoids rate limits from Okta, Azure AD, or Google. Each tenant must have its own cache entry so their configurations never overwrite one another.
Reliable scaling patterns include:
Larger SaaS deployments often parallelize token validation or shift signature checks to worker pools or API gateways. Horizontal scaling and multi-region deployments ensure login flows remain responsive even during traffic spikes or IdP latency.
With these patterns in place, OIDC authentication remains fast, resilient, and predictable across every tenant, even as your enterprise footprint grows.
A reliable OIDC foundation requires consistency across authentication, tenant isolation, claims, lifecycle automation, logout, and performance. These short, scannable sections help teams evaluate their implementation without overwhelming detail.
OIDC protocol practices:
Use the Authorization Code Flow with PKCE, validate ID tokens using JWKS, enforce issuer and audience checks, and require HTTPS everywhere. Redirect URIs should match exactly, and the state must be verified on each callback to avoid injection risks.
Multi-tenant requirements:
Store OIDC configuration per tenant, including issuer, endpoints, and credentials. Route login based on domain or workspace, and keep validation scoped to the correct tenant so customer configurations never overlap.
Claim and role handling:
Normalize claims into a consistent internal user model so roles, groups, and profile details behave predictably across Okta, Azure AD, Google Workspace, Ping, and others. Allow tenants to define their own mapping rules to support varied directory structures.
Provisioning (JIT + SCIM):
Use JIT provisioning to create or update users at login, and enable SCIM for large customers to automate creation, updates, and deactivation. Combining both ensures the user directory stays synced without manual effort.
Logout + session practices:
Clear application sessions securely, redirect users to the identity provider’s logout endpoint when available, and use secure, HttpOnly cookies. Sessions should have reasonable lifetimes, and your app should refresh identity state regularly for safety.
Performance and reliability:
Cache discovery documents and JWKS keys with short TTLs, add timeouts and retries for IdP calls, and use circuit breakers to avoid cascading failures. Keep session storage stateless and scale the login endpoints horizontally to handle enterprise traffic patterns.
This checklist provides your team with a concise, high-clarity reference for delivering secure, scalable SSO across all tenants and identity providers.
A strong identity layer is essential for any SaaS product moving into the enterprise market. OIDC provides the authentication backbone that allows customers to bring their own identity provider while keeping your login flow predictable and secure. With tenant-specific routing, proper token validation, claim normalization, and lifecycle automation through JIT and SCIM, your product can support diverse identity setups without adding operational complexity.
As your customer base grows, these patterns help maintain clean separation between tenants, reduce support overhead, and ensure consistent SSO behavior across Okta, Azure AD, Google Workspace, Ping, and others. Adding secure logout handling, short session lifetimes, and resilient caching keeps SSO reliable even under high traffic or when the identity provider is delayed.
With these foundations in place, teams can explore deeper identity features: MFA policy alignment, conditional access, multi-IdP routing, session federation, audit analytics, and advanced SCIM workflows. These capabilities move your SaaS product from “supports SSO” to “enterprise-grade identity,” strengthening trust with IT teams and accelerating onboarding for larger customers.
ScaleKit delivers a full enterprise identity and authentication stack designed for B2B SaaS. It supports OIDC and SAML single sign-on with major identity providers, automates SCIM provisioning for user lifecycle management, and provides native org-first user and role management for multi-tenant environments.
ScaleKit offers a self-serve admin portal where enterprise customers can enter and validate their identity provider metadata (issuer URL, client credentials, JWKS URI, etc.), test the connection, and enable SSO without engineering involvement.
OIDC standardizes web authentication by delegating identity verification to external providers (Okta, Azure AD, Google Workspace). This enables secure single sign-on across tenants, consistent MFA policy enforcement, and predictable token handling. Password systems alone can’t meet enterprise expectations for security, access control, or identity federation.
OIDC handles authentication (verifying the user's identity), while SCIM manages provisioning (creating, updating, and deactivating user accounts). OIDC gets users logged in; SCIM keeps their accounts aligned with directory systems over time.
Yes. ScaleKit supports SCIM-based provisioning, automatically syncing user accounts, roles, and group memberships from corporate directories (such as Okta, Azure AD, or Google Workspace) into your SaaS application without manual intervention.


