


If your Node.js app is selling into enterprises, there’s one thing you’ll hear again and again: “Does it support SSO?”
Single Sign On (SSO) is more than a security feature, it’s a deal-breaker for most enterprise buyers. But integrating SSO across different identity providers like Okta, Microsoft Entra ID, OneLogin, or Ping Identity? That’s where things get complicated.
In this guide, you’ll learn how to set up SSO in a Node.js + React app using Scalekit, a platform that handles the heavy lifting across protocols like SAML, OAuth, and OIDC. We’ll walk through the integration step-by-step, from setting up your first login flow to supporting multiple IdPs in production. Let’s dive in.
Stackly’s authentication struggles
Let’s talk about Stackly, a fictitious fast-growing SaaS company that recently started landing enterprise deals.
That’s when the SSO headaches began.
Every new customer brought a different Identity Provider: Okta, OneLogin, Entra ID, even a few on legacy Active Directory. Supporting each one meant writing custom SSO logic, debugging protocol quirks, and chasing token issues in production.
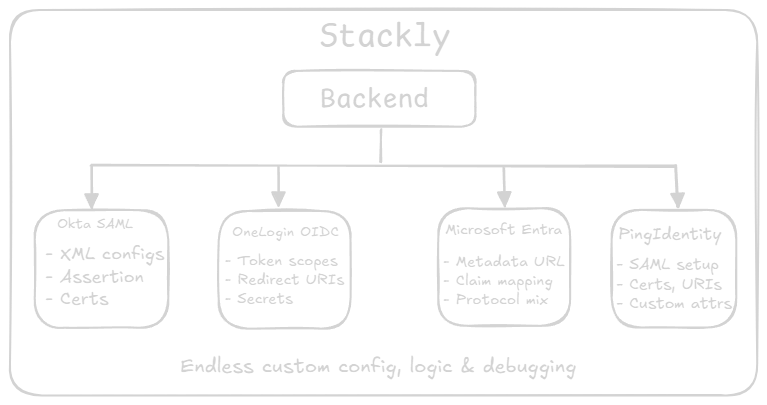
Things got messy fast:
SSO became a blocker, not a value add.
That’s when they switched to Scalekit. With a single integration, they could support multiple IdPs through one clean interface. No more juggling protocol details. No more rewriting flows. Just a working login button, for every customer.
For enterprises, SSO isn’t optional, it’s the expectation. It’s how IT teams keep user access secure without handing out passwords for every tool under the sun.
From the user's side? It’s seamless. One login, access to everything.
From your side as a developer? It’s… not that simple.
Supporting enterprise SSO means dealing with:
It’s all doable but not without cost. You end up building auth flows instead of product features.
That’s where Scalekit steps in. It standardizes the auth experience across IdPs, so you don’t have to reinvent the wheel every time a new customer shows up with a different setup.
Scalekit gives you a clean way to support SSO without juggling protocols or vendor-specific hacks.
It sits between your app and the Identity Provider, handles the authentication handshake, and gives you a user profile on successful login. That’s it.
Here’s what you get out of the box:
It’s built to get you up and running fast - without sacrificing the flexibility you need when supporting enterprise customers.
“Scalekit takes the pain out of enterprise SSO. The documentation is thorough and easy to follow, and their support team stays proactive, helping us get things done without unnecessary delays. The pricing is transparent, which makes budgeting and forecasting much simpler compared to other solutions like Auth0 and WorkOS in the market.”
— Review on G2
Before you dive into code, you’ll need to connect your customer’s Identity Provider (IdP) to Scalekit. This is usually a one-time setup per enterprise client and once it’s done, the rest of the flow stays the same.
Here’s how it works for the most common IdPs:
What you’ll need to plug into Scalekit:
Add to Scalekit:
.gif)
Same thing here:
💡 Pro tip: You don’t need to set this up for every IdP from the start. Use Scalekit’s Test IdP while developing and plug in real ones once your flow is solid.
Once your IdPs are hooked up in Scalekit, wiring the backend is refreshingly simple. All you need is the SDK, a couple of routes, and your SSO flow is good to go.
To install Scalekit SDK inside your backend project, run:
This gives you access to helper methods like getAuthorizationUrl() and authenticateWithCode() that handle most of the heavy lifting.
Scalekit will give you the credentials you need after setting up your environment in the dashboard. Create a .env file in your backend and add:
These will be used when initializing the SDK.
Create a route in your backend to initiate the login flow. This is where your app redirects the user to begin the SSO process:
📝 Optional: You can pass in organizationId, connectionId, or loginHint depending on how you want to route users.
Once a user logs in via their IdP, they’ll be sent back to your app with a code. Use it to get the user’s profile:
🔐 This is where you’d typically drop in your JWT-based session logic, more on that in the next section.
Once your login and callback routes are working, you can validate the entire flow using Scalekit’s IdP Simulator, no need to connect a real IdP just yet.
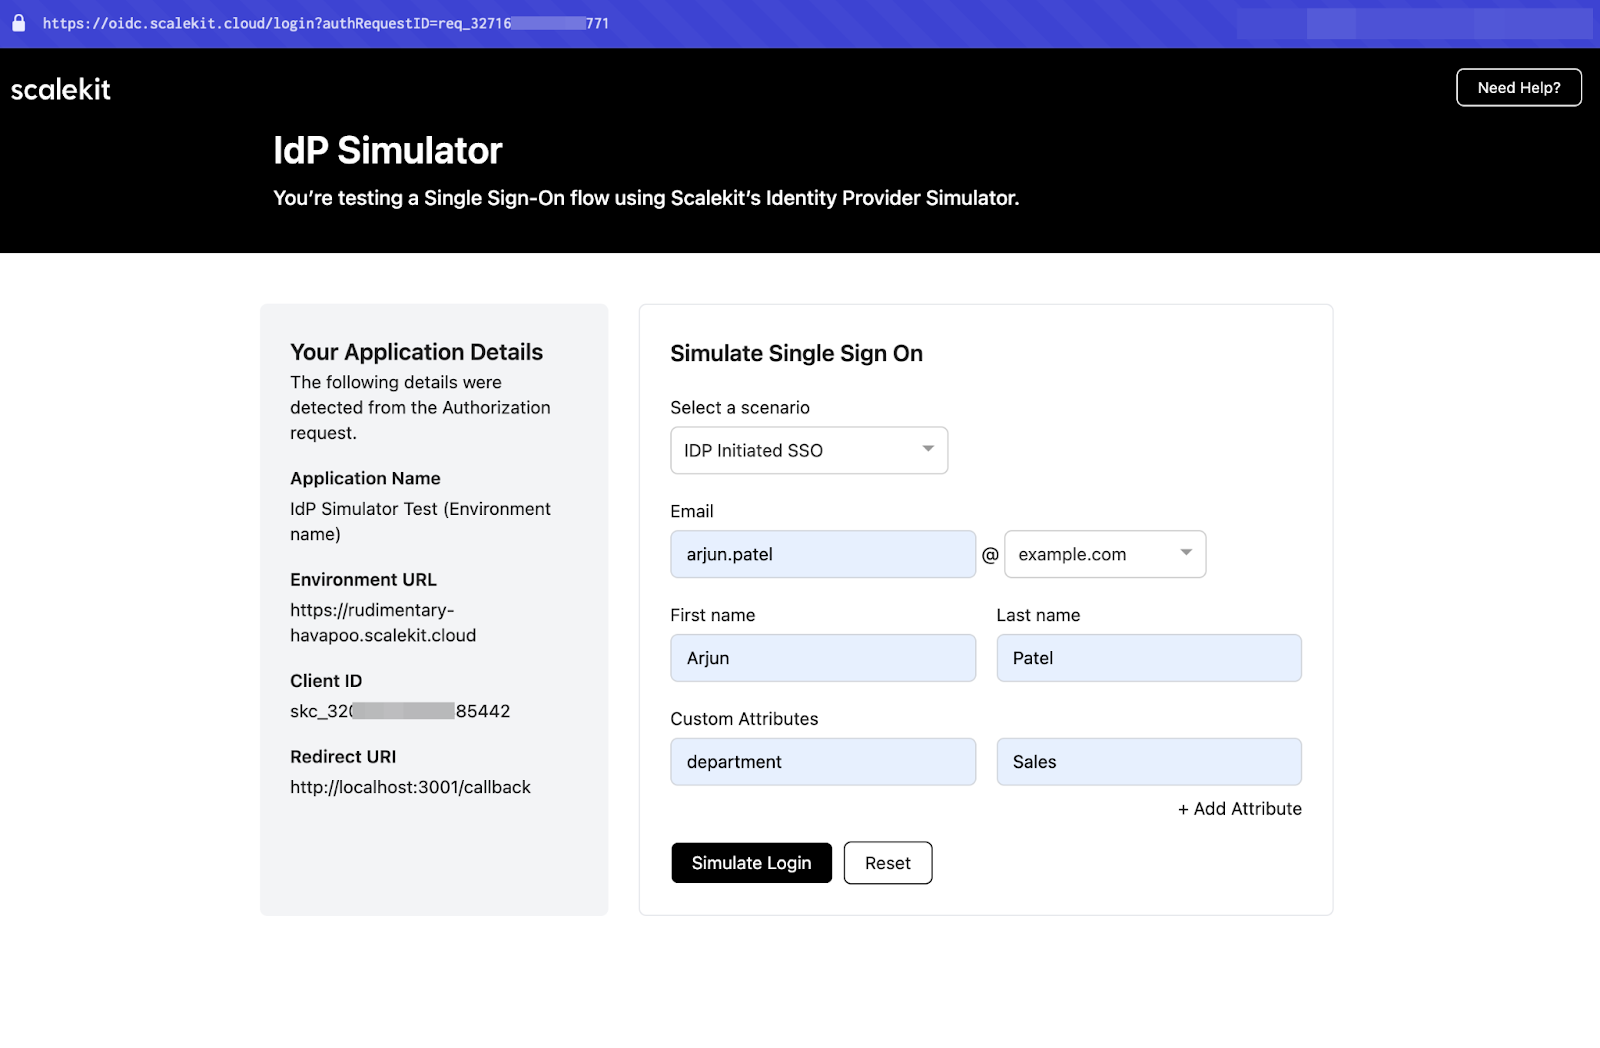
Just use a test domain like user@example.org, and Scalekit will simulate a login through its internal IdP. This is perfect for:
This helps you iterate quickly without needing admin access to Okta, Entra ID, or OneLogin during development.
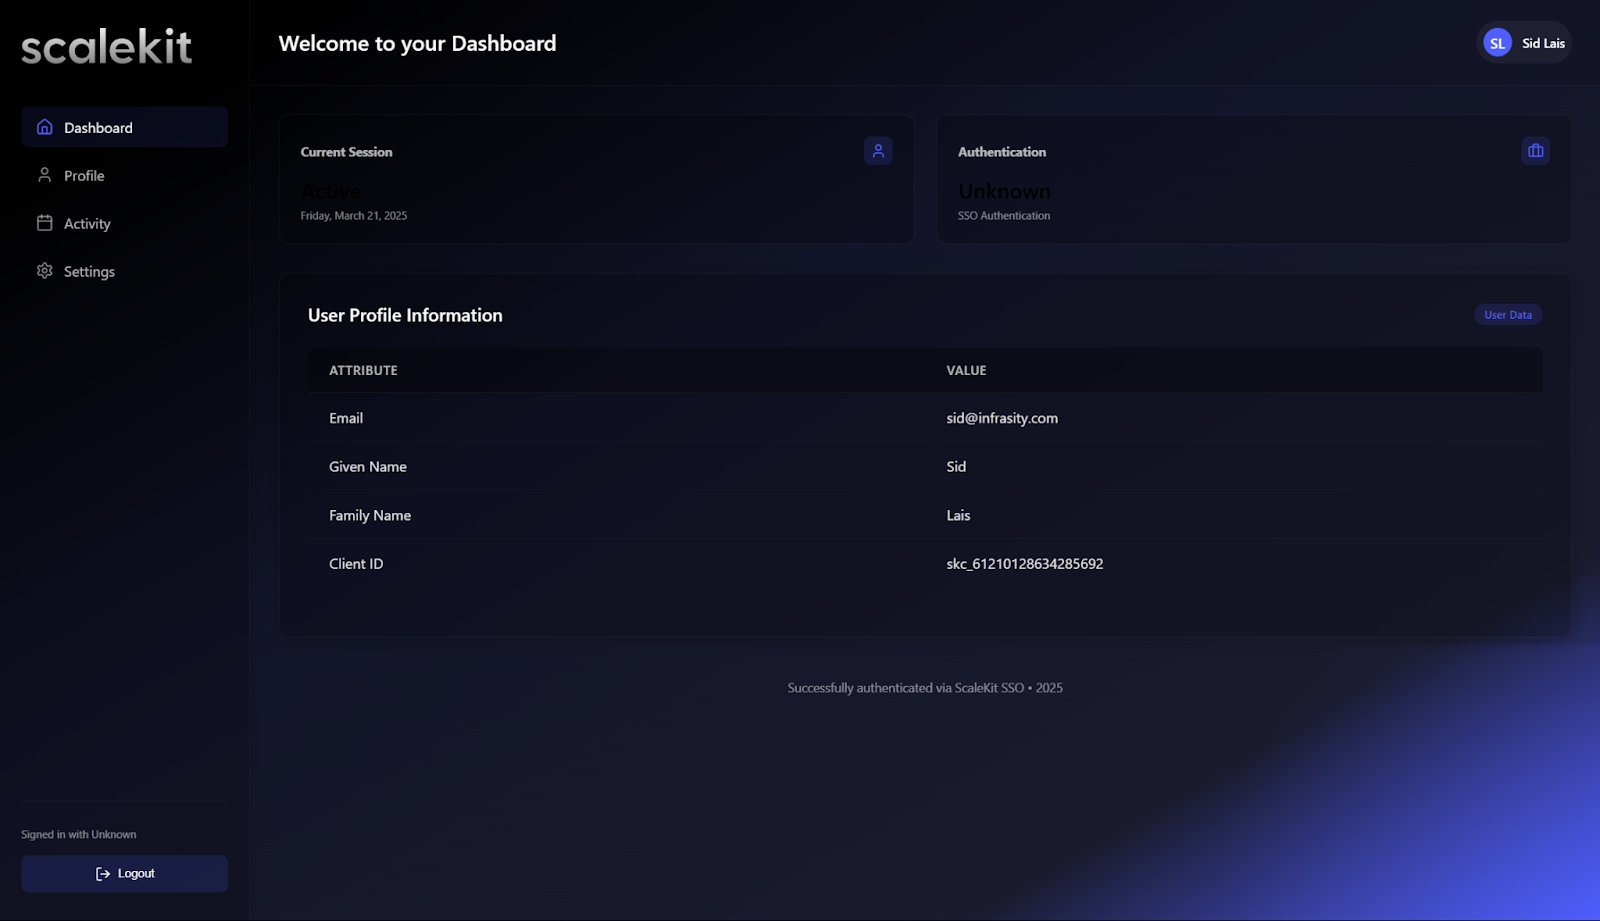
After a user signs in via Scalekit, your app gets their verified identity. Now it’s your turn to keep them logged in. The cleanest way to do that in a Node.js app? JWT-based session handling.
Let’s walk through how to set that up.
Once you get the user profile from Scalekit, generate a signed token to maintain their session:
After receiving the user profile from Scalekit, issue a token and store it in an HTTP-only cookie:
Every request to protected endpoints should validate the token:
Now, any protected routes will require a valid session token before granting access:
Want to keep sessions going without forcing logins?
Use a refresh token flow:
Best practices for secure session management
Even with everything set up, SSO can sometimes throw curveballs. Here are a few things that commonly go wrong, and how to get past them quickly:
Adding Single Sign-On to a Node.js app doesn’t have to mean fighting with SAML flows or hard-coding IdP configs for every client. Scalekit gives you a cleaner path, one integration that works across multiple IdPs, with way less boilerplate.
You’ve seen how to connect IdPs, route users through a secure login flow, and manage sessions using JWTs. And whether your customer uses Okta, Microsoft Entra ID, or Ping Identity, it’s the same setup on your side.
That’s the real power here: consistency. No reinventing the wheel every time a new enterprise knocks on your door.
Ready to simplify SSO in your Node.js stack? Start building with Scalekit today.
It lets you test your SSO flow without connecting to a real Identity Provider. Great for validating redirects, callback handling, and session logic before going live.
No manual SAML, OAuth, or OIDC setup. Scalekit gives you a single API that works across IdPs, so you spend less time wiring things together and more time shipping features.
You configure the IdP once in the Scalekit dashboard. From there, Scalekit handles routing, connection, and protocol translation automatically, no per-client custom logic needed.
Yes. You can support enterprise logins (Okta, Entra ID, OneLogin) and social auth (Google, GitHub, etc.) in the same flow.
Yes. Just swap your current login flow with Scalekit’s SDK, test it using the IdP simulator, and connect your existing IdPs via the dashboard.
Selling your Node.js app to enterprises? SSO is non‑negotiable, but building bespoke SAML/OIDC flows for each customer quickly becomes a maintenance nightmare . Sign up for a free Scalekit account to support Okta, Microsoft Entra ID, OneLogin and Ping Identity through a single SDK—no protocol soup or vendor‑specific hacks required . Have questions or want help tailoring your SSO integration? Book time with our SSO experts for hands‑on guidance.


