

Every engineering team eventually faces that moment when their Slack support channel becomes both indispensable and unmanageable. It starts slow: someone reports a bug in #product-support, another flags a customer escalation, and someone else drops a screenshot of a failing build. Within hours, the channel becomes a mix of bug reports, customer issues, deployment logs, and random "Is anyone looking at this?" messages. Important problems scroll out of sight before anyone can triage them. The same issues get reported twice. And the engineers who should be fixing things spend half their time trying to remember what’s already being tracked in GitHub or Zendesk.
For teams that live in Slack, this creates a serious operational gap. Slack is great for visibility and speed, but it’s terrible for accountability and follow-through. Messages don’t turn into structured tasks unless someone manually copies them into another system, an error-prone process that rarely keeps up with the pace of real work, especially when managing complex tasks that involve multiple systems and steps.
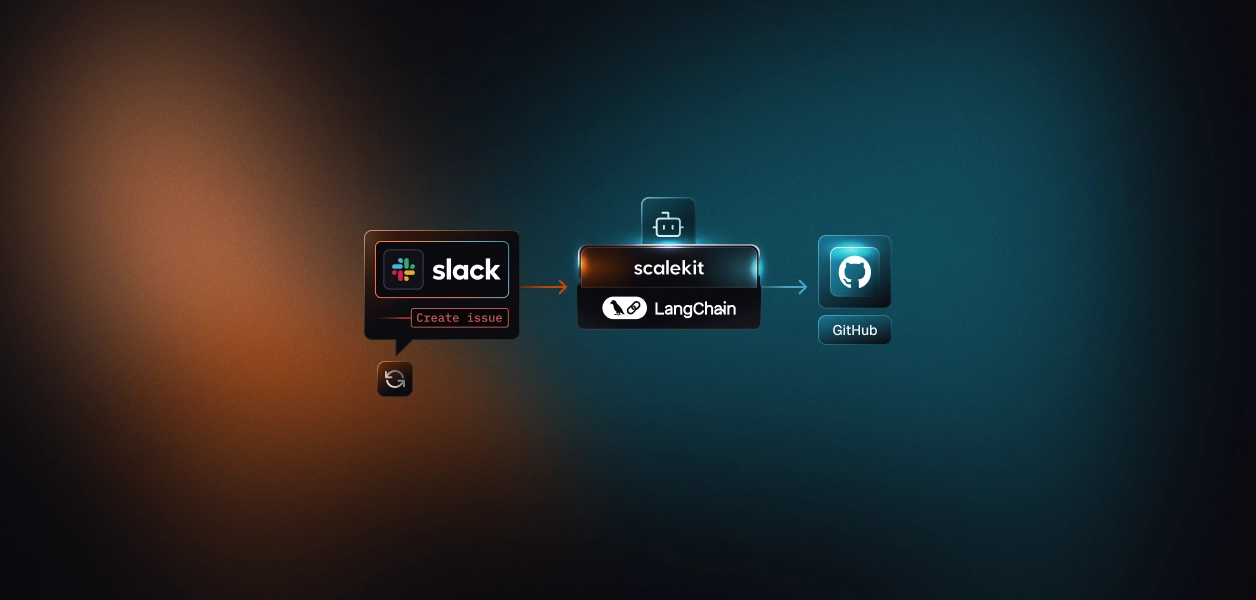
That’s the precise gap the Slack triage agent aims to close. Instead of asking engineers to act as human routers between Slack and their tracking tools, the agent listens directly to messages in chosen channels, classifies what’s actionable, and automatically creates GitHub issues (or Zendesk tickets) through Scalekit’s Agent Actions platform. It then posts a clear confirmation back to Slack, ensuring that every important message becomes a traceable task without manual intervention. The agent is designed to dynamically accomplish tasks that would otherwise require manual intervention, streamlining the process and reducing human error.
By the end of this write-up, you’ll see exactly how this works, from setting up OAuth connections for Slack and GitHub in Scalekit to building a LangGraph-based routing workflow to safely posting confirmations back into Slack. More importantly, you’ll learn the architectural reasoning behind this design: how offloading authentication and action execution to Scalekit simplifies security, reduces API maintenance, and prepares your app for agentic workflows that can scale far beyond a single triage loop. While simple workflows can handle basic triage, more complex scenarios—such as multi-agent systems or advanced automation—require tools to manage the increased complexity.
If you’ve ever built an integration-heavy app, you already know the pain points. The moment your system needs to talk to multiple third-party platforms, posting messages to Slack, creating GitHub issues, or syncing tickets with Zendesk, you suddenly inherit three recurring problems:
Most of us have written this code at least once. It works fine at first, until it doesn’t. Tokens expire silently. Scopes drift. Provider APIs change without warning. What began as a “simple integration” becomes a maintenance treadmill of refresh logic, credential storage, and patchwork retry code.
That’s the layer Scalekit Agent Action removes entirely. Instead of baking OAuth and credential management into your own app, you register your application once inside Scalekit. From that point forward, Scalekit owns the full authorization lifecycle for every provider your users connect to.
When a user links their Slack or GitHub account, Scalekit:
From your perspective, you never see a token again. You simply call a tool by name, referencing the user through a stable identifier, usually their Slack user ID or email, and Scalekit executes the underlying API call on their behalf, under the correct credentials and scopes.
Once those accounts are connected, Scalekit exposes a standardized catalog of prebuilt tools, secure wrappers around each provider’s API. These tools abstract the messy details (auth, retries, error shapes) into a single, consistent function call.
For example, instead of juggling Slack’s SDK and GitHub’s REST client, you just call:
No tokens, no endpoints, no retry loops. Scalekit handles all of that for you.
Common tools include:
Each is typed, pre-authorized, and provider-agnostic.
Now layer LangGraph on top of that tool system. LangGraph enables you to represent logic as a graph of decisions and actions, comprising nodes that can evaluate input, route tasks, and dynamically call tools. The combination unlocks “tool calling”: your workflow or agent can choose which Scalekit tool to use, when to use it, and what parameters to send, all based on real message context.
That means no more rigid if provider == "slack": blocks. Your agent interprets intent (“file this bug”) and automatically invokes github_issue_create. It can even confirm the outcome with slack_send_message, without your code ever handling authentication, SDK differences, or retry behavior.
In the Slack triage agent, this model simplifies the core loop dramatically:
Every real-world action, OAuth, token refresh, retries, rate-limit safety, lives inside Scalekit. The agent just decides what to do and when.
This design keeps your workflow code lean, auditable, and future-proof. What used to be hundreds of lines of brittle integration logic becomes a handful of clear, declarative steps. Scalekit turns provider APIs into composable building blocks your agents can use safely, no matter whether you’re running a small script or a large-scale automated workflow.
At its core, the Slack triage agent runs a simple, predictable loop: Slack sends messages → LangGraph decides what to do → Scalekit performs the action → Slack receives a confirmation. Everything else, authentication, retries, or state tracking, exists to make that loop safe and repeatable in production.
Slack: The signal layer
Slack is both the entry point and the feedback surface. Messages in specific channels act as triggers for the triage process. Instead of running as a full Slack bot, the agent polls messages through Scalekit’s pre-built tools, such as slack_fetch_conversation_history and slack_send_message. This avoids managing webhooks, event subscriptions, and rate limits manually. Scalekit handles those safely under the hood while your code remains stateless.
LangGraph: The workflow brain
LangGraph defines the logic that links events to actions. Each node in the graph performs one job: parse, classify, route, or confirm, and passes structured state forward. These nodes act as building blocks for more complex workflows, allowing modular construction and easy customization. The result is a workflow that’s transparent and easy to extend: you can later drop in an LLM-based classifier or add new routes like Jira or Notion without changing the rest of the flow.
Scalekit: The execution backbone
Scalekit handles everything that touches external systems. It completes OAuth handshakes for Slack, GitHub, and Zendesk, stores tokens securely, refreshes them automatically, and exposes pre-authorized “Agent Actions” such as github_issue_create. Each call is retried and logged, so your code never handles credentials or raw API clients. Tool usage is managed and orchestrated by Scalekit, enabling agents to dynamically invoke tools and perform complex tasks efficiently.
This separation of responsibilities is what keeps the Slack triage agent secure and maintainable. Scalekit acts as the control plane for authentication and execution; your code only orchestrates logic. With these trust boundaries in place, we can now move to the practical foundation, configuring the Scalekit client, validating environment variables, and mapping users.
When passing state forward, using structured output (such as JSON or markdown) ensures that data is easily parsed and integrated by downstream components.
Before the agent can triage anything, it needs a foundation that’s consistent, secure, and predictable. This step initializes a single Scalekit client, loads configuration from environment variables, validates that everything is set correctly, and establishes a simple mapping between Slack users and the Scalekit identifiers under which their actions run.
Configuration and state can also be extended to support long term memory and long term persistent memory, enabling tracking of conversation history or system state across sessions by storing and retrieving data externally.
The goal: make the setup explicit so production surprises never happen later.
Environment variables keep configuration portable and secrets out of source control. A small validation layer makes sure you never start the app with missing credentials or invalid settings.
What this does:
Each Slack message includes a user ID. The agent must know which Scalekit identity to act as when calling external tools. A simple JSON mapping keeps this clear and versioned.
Example mapping file
Why this matters:
This mapping defines the identity context under which Scalekit executes. It allows per-user auditability; every GitHub issue or Slack message action can be traced back to the connected identity that triggered it.
All Scalekit interactions go through one client instance. It authenticates with your app’s credentials and exposes the actions interface for executing tools.
Adding a retry wrapper
APIs sometimes fail transiently. Instead of adding manual retry logic everywhere, use a shared helper:
How this helps:
A quick configuration summary on startup prevents silent misconfigurations and helps verify that credentials are loaded correctly.
Tip: Only log non-sensitive fields; never print client secrets or tokens.
At this stage, the agent:
Next, we’ll register providers and complete OAuth authorization for Slack and GitHub, so the agent can start fetching messages and creating issues.
Before your agent can fetch Slack messages or create GitHub issues, the users behind those actions must authorize Scalekit to act on their behalf.
This part shows how to register those provider apps correctly and how to expose two small Flask routes that complete the OAuth handshake safely, no tokens touch your code or database.
You no longer need to create a custom Slack app manually. Scalekit already provides a verified Slack app that handles OAuth, scopes, and token management for you.
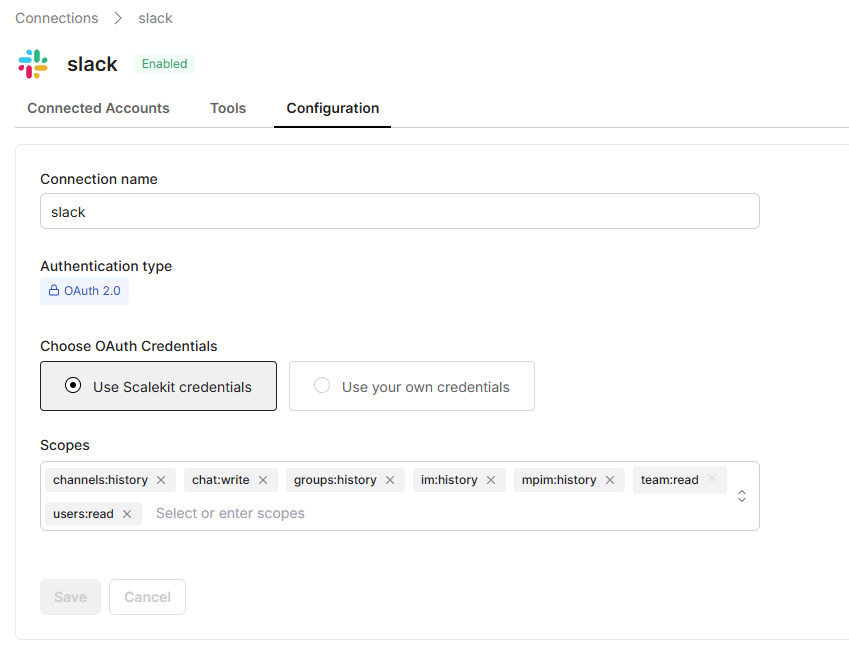
Open your Scalekit dashboard and navigate to Connections →Create Connection and select Slack. Here’s what you’ll see:
This tells Scalekit to use its managed Slack application instead of requiring your own client ID and secret.
These scopes allow the agent to:
After saving the configuration, simply authorize Slack by logging in with your workspace account when prompted in the browser. Scalekit completes the OAuth handshake, stores tokens securely, and exposes tools like slack_fetch_conversation_history and slack_send_message, fully authenticated for your connected account.
No Client ID, no Secret, and no custom Slack app creation required, Scalekit’s managed credentials and hosted Slack app handle it all automatically.
GitHub can be authorized as either an OAuth App or a GitHub App.
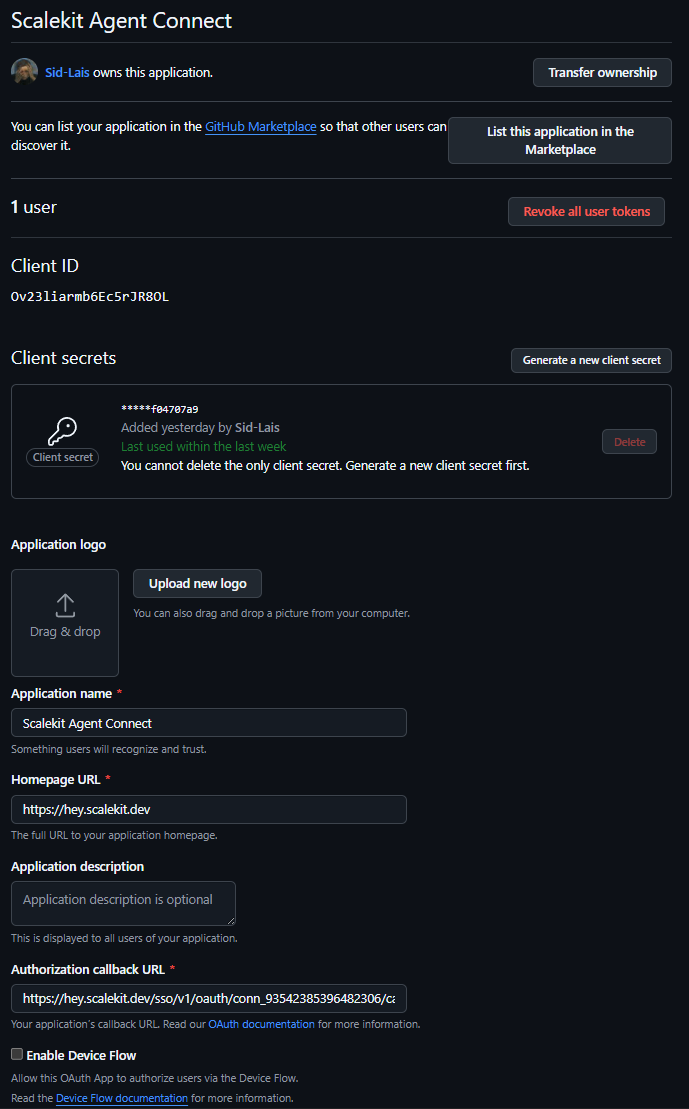
Either way, paste the credentials into Scalekit’s GitHub connector. After that, Scalekit will mint and refresh tokens per connected user.
Your agent now needs a way to trigger Scalekit’s OAuth flow. It does this by exposing /auth/init and /auth/callback routes. The user visits /auth/init, which generates a Scalekit authorization URL; Scalekit handles the provider UI and redirects back to /auth/callback.
Usage example
Open these URLs in your browser (replacing with your Slack user ID):
Scalekit handles OAuth, refresh cycles, and securely stores the resulting tokens.
Before polling Slack, confirm that all required connections exist and are ACTIVE. This saves time debugging "empty fetch" errors later.
Run this once after completing OAuth; all statuses should read ACTIVE.
At this point, the agent can:
No raw tokens ever enter your code. Scalekit fully owns OAuth, token refresh, and rate-limit safety. Your Python layer only handles business logic.
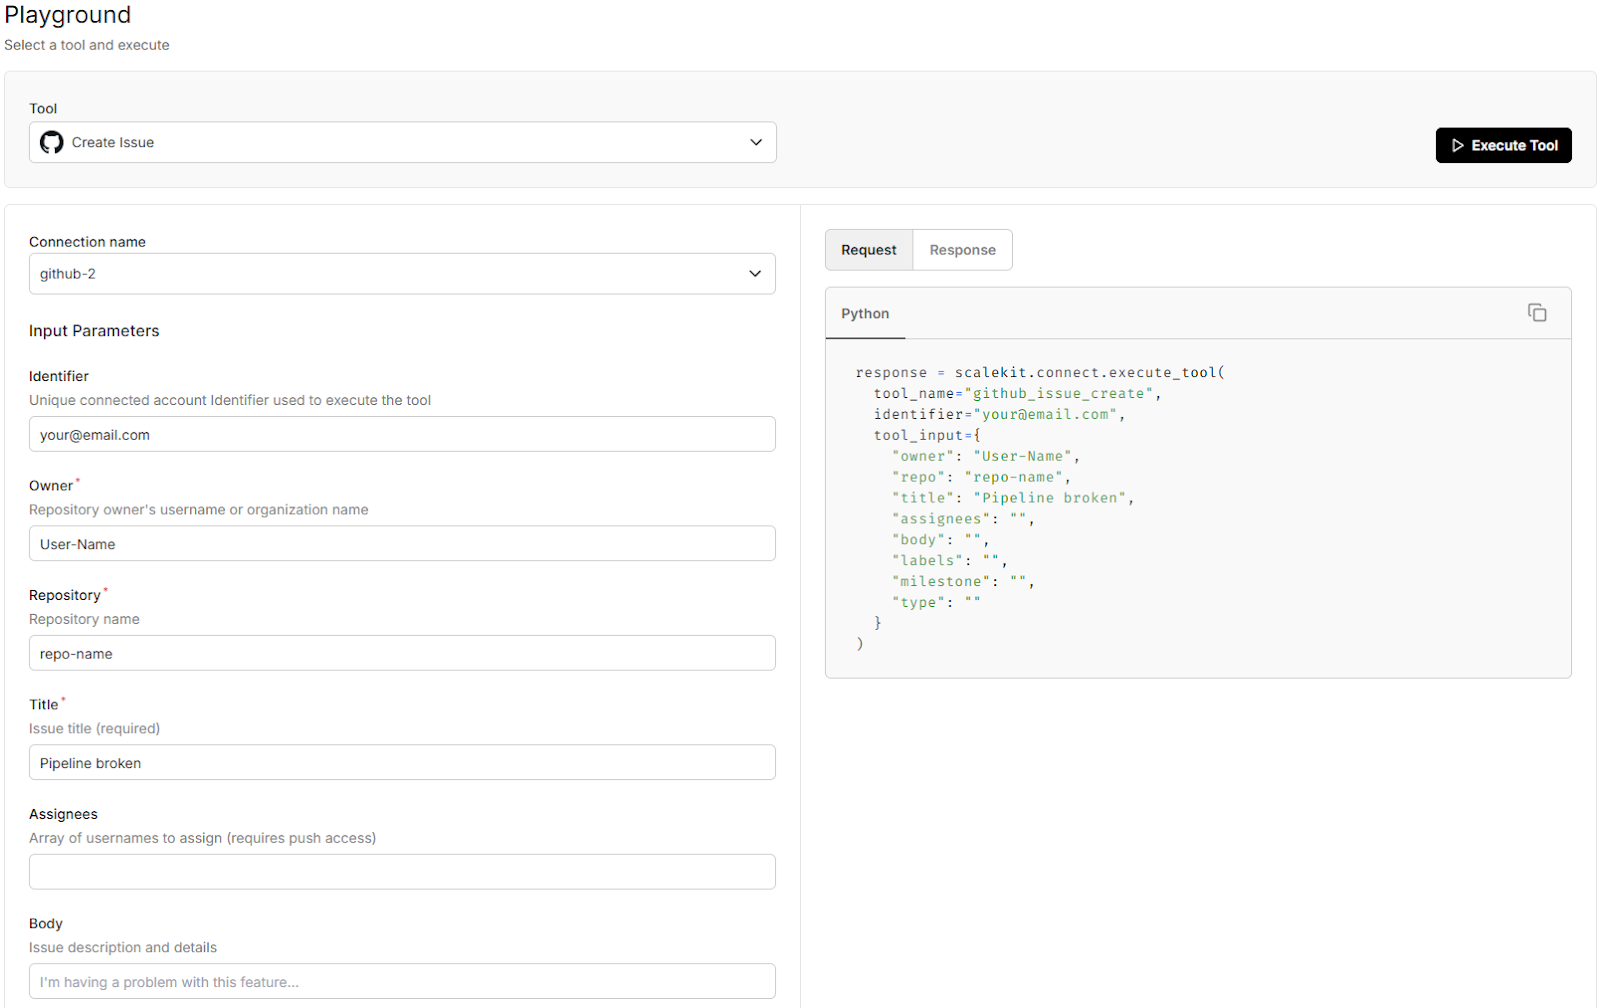
You can even use the playground in your Scalekit dashboard to test the connection without writing any code. Simply configure it with your Slack/GitHub details, then test the connection live.
Now that authentication is fully delegated and verified, the next step is to start listening.
In the next section, we’ll implement the polling loop that uses these connections: fetching Slack messages, managing poll boundaries safely, and filtering duplicates before routing them to GitHub or Zendesk.
Once the polling loop is running reliably, every cycle yields a clean stream of new Slack messages, potential bug reports, support requests, or noise. The next challenge is deciding what each message means and what to do about it. Prompt engineering is crucial here, as designing effective classification and routing logic ensures that messages are accurately interpreted and directed to the appropriate workflow.
This is the heart of the Slack triage agent: turning unstructured Slack chatter into structured, traceable actions. The system reads a message, classifies it, potentially using specialized prompts to improve routing accuracy, decides which tool to call, executes the action, and posts a visible confirmation back in Slack so nothing silently disappears into the void. The workflow can include intermediate steps such as normalization and confirmation to ensure accuracy at each stage. The routing logic can also be extended to handle specialized followup tasks, enabling more complex and multi-stage workflows.
Rather than starting with an LLM or complex model, we’ll begin with an explicit keyword-based classifier. It’s transparent, reviewable in code, and easy to adjust without redeploying.
This function returns one of three values: "github", "zendesk", or "ignore". By defining GITHUB_KEYWORDS and ZENDESK_KEYWORDS in settings.py, operators can tune the routing behavior live, without touching the agent’s code.
In a real incident flow, this means Slack messages like “bug: checkout page 500s on submit” are automatically routed to GitHub, while “customer reports missing invoice” goes to Zendesk. Everything else is safely ignored.
Once the classifier decides, the agent needs to perform the action. This is where Scalekit’s Agent Actions layer shines, you call one unified API, and it handles the rest: OAuth, tokens, retries, rate limits, and provider APIs.
Here, the agent doesn’t touch GitHub or Slack APIs directly; it simply asks Scalekit to perform github_issue_create or slack_send_message on behalf of a user.
Each execute_tool() call returns a simple result dict:
That uniform shape makes error handling predictable across all tools.
Now that classification and action execution are ready, we wire them into a single coordinator function. This is the layer that glues intent ("What should happen?") to outcome ("Did it happen?"), while ensuring every result is visible inside Slack.
Why this pattern works:
Slack message payloads can contain thread replies, bot messages, or edits. To keep the triage logic predictable, we normalize the message shape before routing.
This ensures that the downstream logic receives only clean, human-authored messages with stable fields.
Finally, we connect everything.
The polling layer (built earlier) yields unseen Slack messages; the triage layer decides what to do with each; and Scalekit executes the result.
This is where the system becomes observable: Every time a developer posts a message like “bug: login page crashes on submit”, new GitHub issue is created instantly, and a confirmation reply appears in the same Slack thread with the issue link.
This design makes the system reliable in production, but also ready to grow. Here’s how you can take it further:
Scalekit’s strength is that every new integration, whether Gmail, Drive, or Jira, follows the same pattern: one connected account, one secure tool call. At this point, the Slack Triage Agent is functionally complete and production-ready in its simplest form.
Next, we’ll take the same workflow, Parse → Classify → Route → Execute → Confirm, and express it visually through LangGraph, making the flow easier to reason about, test, and extend for more agentic behavior.
By this point, we have a complete Slack Triage Agent that polls Slack, classifies messages, and acts through Scalekit. It works well, but the control flow still resides within procedural loops. Adding new routes or debugging state transitions involves manually tracing function calls.
This is where LangGraph changes the game. It turns that invisible control flow into a graph of nodes, each responsible for one clear step in the workflow: Parse → Classify → Execute → Confirm.
LangGraph enables the construction of agent systems for workflow orchestration, allowing you to coordinate multiple agents or tools within a unified architecture.
You can visualize it, extend it, or even replace parts (like classification) with LLM nodes later, without touching the rest of the logic. The same modular and extensible architecture can be leveraged to build sophisticated agent systems, supporting both simple and complex multi-agent workflows with robustness and ease of creation. For a deeper understanding of complementary technologies in identity management like SCIM vs SSO, explore how they differ and work together.
Each node in the graph can encapsulate specific agent capabilities, enabling the agent to handle diverse tasks and make decisions about which tools or actions to invoke at each step.
The earlier Python loop implicitly encoded a sequence of steps. LangGraph makes that sequence explicit. Each node is a function that mutates shared state, and edges define how data moves through the workflow. That structure gives you:
In short, LangGraph makes your automation not just functional, but observable and extensible.
Instead of polling, this version uses Slack’s Events API. Slack sends each message event to your /slack/events webhook, which simply normalizes the payload and hands it off to the LangGraph workflow.
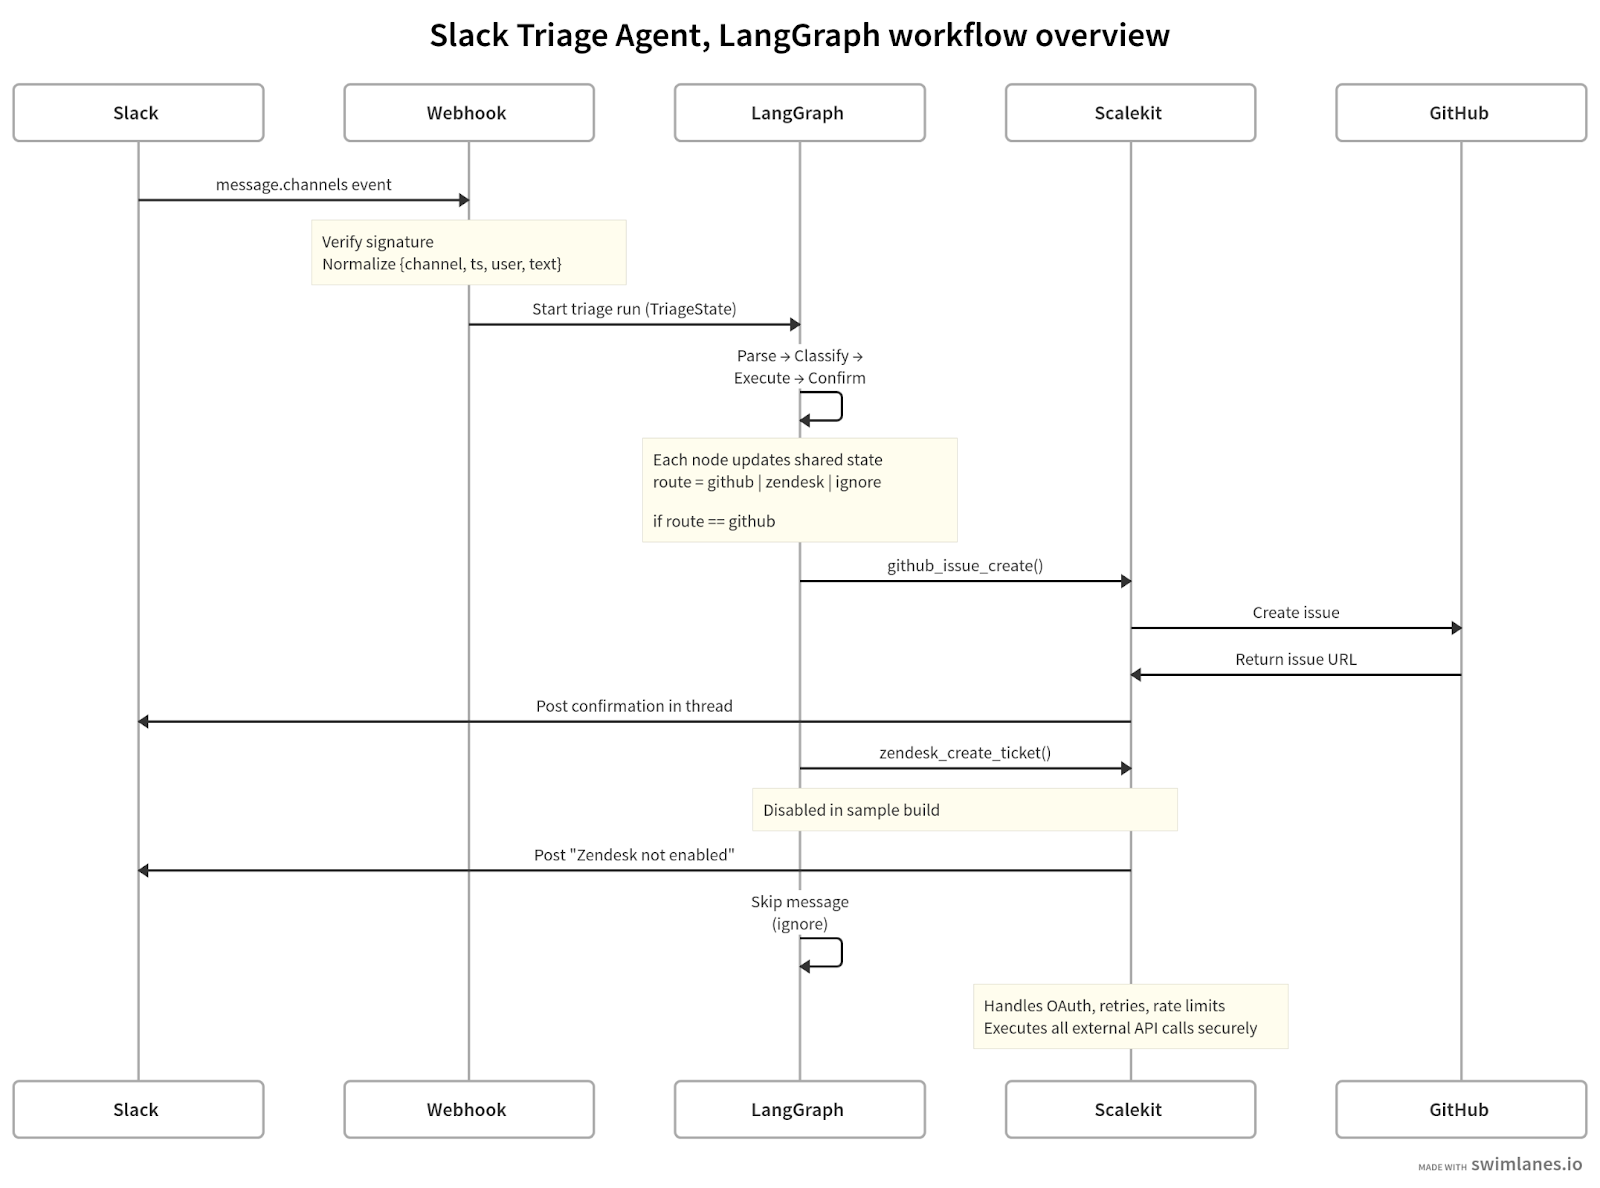
The diagram illustrates how the Slack Events API passes message data into the LangGraph workflow, which executes the triage logic as a sequence of nodes: Parse, Classify, Execute, and Confirm.
Within this graph, the tool node is responsible for executing specific actions based on the agent's decision-making logic. Each node mutates the shared state and decides the next edge. Scalekit handles all external calls securely and posts results back to Slack.
This makes the flow explicit, auditable, and ready for future extensions like LLM-based classification or new connectors, or parallel execution of multiple nodes to improve scalability.
Every message moves through the same four nodes, each manipulating a shared state dictionary that holds message metadata and routing decisions.
1. parse_node – cleans and normalizes text.
2. classify_node – checks for keywords and decides the route.
3. execute_node – calls the right Scalekit tool (github_issue_create, etc.).
4. confirm_node – posts a result back to Slack.
Here’s how that logic looks conceptually:
Each node focuses on one thing, with no shared side effects and no direct API calls. Scalekit executes them safely using connected accounts. Outputs from the workflow include handling and evaluating llm responses, allowing for iterative improvement and quality assessment.
Instead of chaining functions manually, we declare the graph once:
When a new Slack message arrives, the webhook simply invokes:
That’s it, the workflow begins, transitions through each node, and posts the confirmation back to Slack. For efficiency, independent subtasks can run in parallel across multiple nodes, allowing the system to process complex tasks faster.
Running multiple nodes in parallel can also provide multiple perspectives on the same input, increasing output diversity and confidence. When multiple agents or nodes are involved, their outputs can be aggregated programmatically to produce a more accurate or comprehensive result.
With LangGraph, your triage loop isn’t just automated, it’s auditable, testable, and future-proof.
What began as a simple Slack → GitHub bridge is now a modular agent that can grow into a full workflow engine, ready to plug into LLM reasoning or multi-channel routing whenever your team needs it, delivering measurable value through clear, quantifiable improvements in your processes.
Even with a simple design, operational issues tend to show up at the edges, such as missed messages, duplicate confirmations, or empty polls. The good news: because the Slack Triage Agent is modular and stateless, almost every problem maps cleanly to one configuration or connection issue.
Statelessness, combined with predefined code paths, helps ensure predictable operation and makes troubleshooting more straightforward. For effective troubleshooting, it is important to establish clear evaluation criteria so that issues can be measured and resolved systematically.
Use this quick reference to debug without chasing ghosts:
Even though this is a lightweight sample, it follows the same principles you’d want in production-grade agents:
In summary, agents autonomy makes them suitable for production environments with minimal oversight, as they can potentially operate independently and reliably for extended periods.
Every strong engineering system starts with a messy, human problem. In this case, it was the endless scroll of Slack messages, bug reports, customer pings, and deployment alerts all competing for attention. The Slack Triage Agent turned that noise into structure.
Throughout this walkthrough, we built an agent that listens to specific Slack channels, classifies messages by intent, and converts actionable ones into GitHub issues using Scalekit’s pre-authorized tools. It then confirms those actions within Slack threads. Scalekit quietly handled everything that usually slows engineers down, OAuth handshakes, token refreshes, rate limits, retries, so our code could stay focused purely on logic and flow.
With overlap windows, per-channel deduplication, and explicit routing, the result is a system that’s both transparent and dependable. What once relied on memory and manual copying now happens automatically, leaving your #product-support channel readable, responsive, and accountable.
By layering LangGraph on top of Scalekit, the workflow becomes not just functional but visible and extensible. Each node, Parse, Classify, Execute, and Confirm, can evolve independently. You can plug in an LLM-based classifier, enable Zendesk routing, or add new nodes for tagging, escalation, or incident summaries without rewriting the core loop. Generative AI underpins the workflow's intelligence, enabling advanced reasoning and orchestration across these nodes.
This agent is intentionally simple, but it establishes the foundation for agentic systems that can grow safely. For many straightforward applications, a single agent is sufficient to create an effective workflow:
For developers ready to go further, explore the Scalekit Agent Actions documentation. It’s the connective tissue between agent frameworks like LangGraph and real-world APIs. Then, clone the sample app, authorize Slack and GitHub through Scalekit, and post a message like: "Bug: checkout button crashes on submit".
Within seconds, a GitHub issue will appear, automatically tracked, logged, and confirmed.
This small triage agent isn’t just about Slack automation. It’s a glimpse of what agentic workflows look like when they’re built on secure, modular foundations powered by generative AI. A world where building effective agents for real-world automation means every important message becomes a structured task, handled, logged, and resolved, without anyone needing to ask, “Is anyone looking at this?”
How does Scalekit handle token refresh and scope changes across multiple providers?
Scalekit maintains a unified OAuth lifecycle for each connected account. It stores encrypted access and refresh tokens, automatically refreshes them before expiry, and version-tracks scopes. When a provider like Slack or GitHub adds or changes scopes, Scalekit surfaces a reauthorization event through its API, no code changes or manual refresh logic required in your app.
Can I invoke Scalekit tools directly from LangGraph or another agent framework?
Yes. Scalekit tools conform to the standard LangChain and LangGraph tool schemas. You can load them dynamically with actions.langchain.get_tools() or wrap them in a LangGraph node to allow your agent to select and execute the right tool autonomously. This enables true tool-calling workflows without managing credentials or SDKs manually.
Why use polling instead of Slack’s Events API?
Polling through Scalekit simplifies deployment, with no public webhooks, signatures, or verification endpoints. For small- to mid-scale triage loops, it’s often more reliable and debuggable. If you need near real-time response or high message volume, you can later switch to Slack Events API while keeping the same routing and action layers intact.
How does the agent ensure message idempotency during retries or restarts?
The agent tracks each message’s ts (timestamp) per channel in a processed_ts set. Combined with per-channel last_oldest offsets and an overlap window (POLL_OVERLAP_SECONDS), this guarantees that every message is processed exactly once, even if network retries or boundary conditions occur.
Could this architecture support multi-tenant or per-team isolation?
Yes. You can separate users or teams by namespace: maintain independent user_mapping.json files, set different ALLOWED_CHANNELS per deployment, and use distinct Scalekit identifiers per tenant. Since Scalekit scopes credentials per connected account, no tokens or permissions ever leak across workspaces, making the setup safe for multi-team environments. In such architectures, a central LLM can manage workflow orchestration by delegating and synthesizing tasks among multiple worker LLMs.