
.png)

Enterprise SSO in B2B SaaS rarely begins as an architectural discussion. It usually starts with a sales requirement: “We need SAML support.” If you are using AWS Cognito, enabling SAML federation in a user pool can seem straightforward at first. The complexity lies not in the first enterprise integration, but in the second and third, when tenant routing, IdP lifecycle management, and onboarding workflows begin to extend beyond configuration.
This is where Cognito SSO stops being a feature toggle and becomes an architectural decision.
A common breaking point occurs when a SaaS company signs its first large enterprise customer. The customer requires SSO through their corporate identity provider, but access must be managed at the organization level: employees inherit access automatically, contractors authenticate through a separate IdP, and user access must be revoked immediately when someone is disabled in the enterprise directory. What initially appears to be a standard Cognito SAML setup quickly goes beyond “logging users in.”
Cognito can authenticate the user, but it does not model the enterprise as a first-class entity with its own identity rules, lifecycle, and security controls. Session validity, provisioning, and deprovisioning are now managed by an external organization, while enforcement still occurs within a user-centric application. At this point, SSO becomes the mechanism through which the enterprise asserts authority over identity and access, turning Cognito SSO from a configuration task into an architectural decision.
Enterprise SSO is typically introduced during a formal security evaluation, not product experimentation. Security teams at financial institutions, healthcare providers, and large SaaS buyers do not evaluate SSO as a feature enhancement. They evaluate it as a risk control. During review, they will ask:
These questions are not edge cases. They are standard checkpoints in enterprise procurement processes.
From a business perspective, SSO implementation directly affects:
If onboarding requires manual Cognito configuration, certificate exchange via email, and application-layer routing changes, identity becomes a bottleneck in your go-to-market. At that stage, authentication architecture is no longer an implementation detail. It is revenue infrastructure.
This is where the earlier revenue and security pressures become operational reality: the architecture decisions made for the first enterprise are immediately tested by the second.
The first enterprise integration almost always feels manageable. With AWS Cognito SSO, enabling a SAML IdP connection inside a user pool can feel straightforward. You configure metadata, map attributes, validate a login flow, and ship. The system works. The deal closes. The team moves on.
The second enterprise is where the architectural reality emerges. The second customer often uses a different IdP, different attribute naming conventions, and a different onboarding expectation. They may require domain-based login routing. They may expect separate branding or login entry points. They may require provisioning shortly after SSO is enabled. What felt like a simple federation configuration now becomes a coordination problem across tenants.
At this point, your application must answer structural questions:
These are not Cognito configuration questions. They are architecture questions.
Single-tenant SSO assumes a single identity provider and a single trust boundary.
Multi-tenant SSO introduces a routing and orchestration layer that is absent in simpler systems. Instead of a direct relationship between your application and a single IdP, you now have multiple trust relationships that must be selected dynamically based on organizational context.
This directly extends the previous discussion: once identity is treated as shared infrastructure rather than a simple feature, routing and orchestration become architectural requirements rather than implementation details.
A simplified comparison illustrates the difference:
The additional steps introduce new responsibilities:
Cognito provides federation primitives. It does not provide tenant-aware orchestration out of the box. That distinction becomes critical when implementing cognito sso multi tenant environments for B2B SaaS.
Enterprise SSO introduces operational complexity that grows non-linearly.
Every new enterprise adds:
If identity logic is embedded directly inside your application layer, the system gradually accumulates implicit coupling between authentication, tenant resolution, and authorization logic. Over time, small conditional statements evolve into fragile routing systems that are difficult to reason about and even harder to debug.
As outlined earlier, this is the inflection point at which incremental complexity becomes unmanageable within application code and requires a platform-level design decision.
This is the moment when platform engineers recognize that identity has crossed a boundary. It is no longer a feature. It is shared infrastructure.
Understanding this shift is the foundation for making sane decisions about Enterprise SSO Cognito implementations in B2B environments.
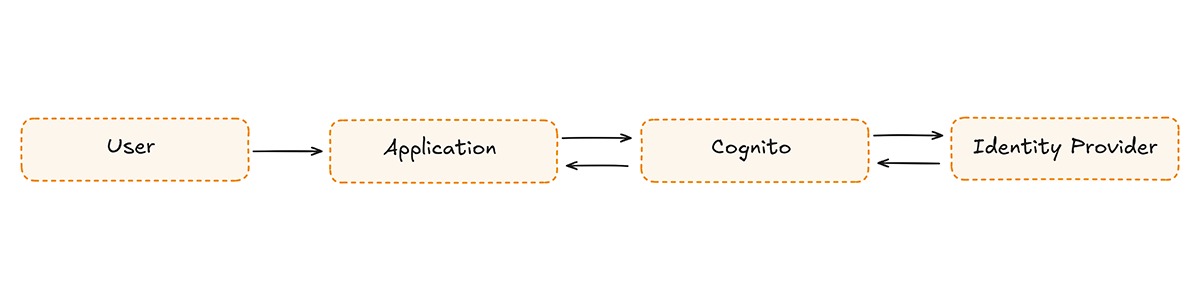
Amazon Cognito is AWS’s managed authentication and user directory service, designed to handle user sign-in, token issuance, and federation at scale. It provides secure federation capabilities but does not support tenant-aware SSO orchestration.
Many teams evaluating AWS Cognito SSO assume it behaves like a complete enterprise identity layer. In practice, Cognito is designed as an authentication service that supports federation into a user pool. It validates SAML or OIDC assertions, issues signed JWT tokens, and integrates tightly with AWS infrastructure. It does not introduce an organization abstraction or manage tenant-specific SSO workflows.
Understanding this boundary early prevents architecture from expanding unintentionally.
Cognito supports SAML 2.0 and OIDC identity providers at the user pool level. You can configure multiple enterprise IdPs, map external attributes, use the Hosted UI for login, and issue ID, Access, and Refresh tokens to your application.
At a protocol level, Cognito handles:
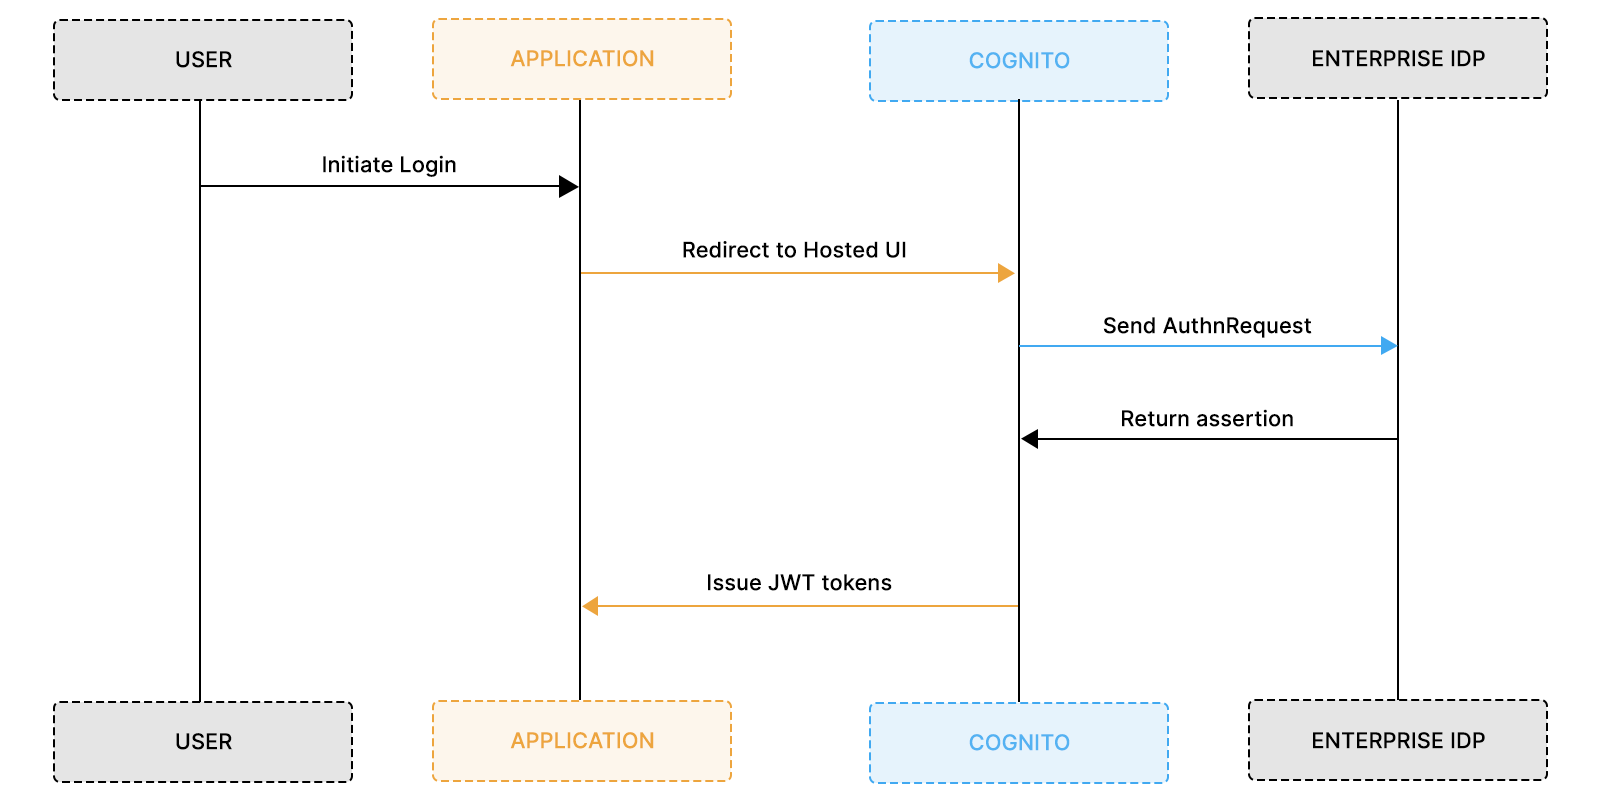
The standard federation flow looks like this:
For a single-enterprise or low-complexity SaaS product, this architecture is clean and sufficient.
The abstraction boundary, however, stops at the user pool.
Identity providers are attached to the pool. Branding is scoped to the pool. App clients connect to the pool. Tokens are issued from the pool. Cognito does not introduce a built-in “organization” entity above users.
In B2B SaaS, that missing abstraction becomes visible as the enterprise count grows.
Enterprise SSO in B2B environments requires routing and configuration isolation.
Cognito does not perform native home realm discovery. While it supports specifying an identity_provider parameter during login, the system does not determine which provider applies to a given user. The logic that maps user@acme.com to the Acme IdP must exist outside of Cognito. That routing layer must parse domains, resolve tenants, select the correct IdP, and construct the appropriate redirect.
As enterprises increase, this external logic expands to include:
Additionally, Cognito’s Hosted UI is scoped at the pool level. The login experience is shared across tenants within that pool. Organization-specific login entry points, domain-based flows, and tenant-scoped onboarding typically require additional abstraction outside of Cognito.
This boundary reflects design intent rather than limitation.
Cognito was built to be:
Cognito was not built to be:
When teams extend Cognito beyond that boundary, orchestration logic begins to leak into the application layer. That leakage is where complexity accumulates.
Cognito SSO becomes complex when tenant orchestration logic moves into your application layer.
Most teams do not start with a flawed architecture. They start with a working one. The first enterprise integration succeeds. The second introduces small conditional logic. The third requires additional routing. Over time, identity logic spreads across services until authentication is no longer centralized; it is distributed.
This section describes how that drift typically happens.
Multi-tenant SSO requires determining which identity provider applies to a given user.
Because Cognito does not natively support tenant-aware routing, most teams implement domain-based resolution in their backends. A common pattern looks like this:
At first glance, this is reasonable.
The complexity appears when:
Now, routing logic must handle edge cases. That logic is rarely isolated. It lives inside controllers, middleware, or API handlers. Over time, authentication becomes coupled to tenant resolution in ways that are difficult to untangle.
This is the first layer of architectural friction in cognito sso multi tenant environments.
Cognito supports Lambda triggers for customization.
Teams often use triggers to:
These triggers solve immediate needs. They also introduce distributed identity logic. Now parts of your authentication system exist in:
Debugging becomes multi-surface. A login failure may originate from:
The more enterprise customers you onboard, the more conditional logic accumulates. SSO starts feeling brittle.
Enterprise SSO requires ongoing configuration management. Each new customer typically requires:
If this workflow requires engineering time for every new enterprise, your authentication system becomes a bottleneck. Sales cycles depend on developer availability. Identity configuration becomes a recurring operational task.
At this stage, SSO and provisioning (often SCIM) begin to intertwine. User creation logic, group mapping, and org assignment start depending on SAML attributes. Small changes in enterprise configuration ripple through your internal systems.
This is where teams recognize that identity has evolved into shared infrastructure.
Recommended Reading: AWS Cognito Alternatives for B2B SaaS
Across many B2B SaaS teams, the progression looks similar:
Nothing is fundamentally broken. The system still works. The cost is hidden in operational overhead and cognitive load.
The underlying issue is architectural scope. Cognito handles authentication well. It does not manage tenant-aware orchestration. When orchestration is implemented piecemeal across the application layer, complexity accumulates gradually rather than all at once.
This is the moment where teams step back and evaluate architectural options. This transitions perfectly into:
When Cognito SSO begins to stretch under multi-tenant demands, teams typically converge on one of three architectural patterns.
These patterns are not right or wrong. They represent increasing levels of orchestration ownership. The decision is less about tools and more about where tenant logic lives in your system.
The difference between the paths is simple:
Where does organization-aware SSO orchestration happen?
The first path keeps all federation configuration inside a single Cognito user pool and pushes routing logic into the application.
In this model, multiple enterprise IdPs are configured directly in Cognito. The application determines which IdP to use by mapping email domains or organization identifiers, then redirects the user to Cognito with the appropriate provider parameter. Lambda triggers handle attribute mapping and token customization.
This approach works well in the early stages of enterprise development. The cognitive load is manageable when you have one or two SAML connections. Onboarding is manual but infrequent. The architecture feels centralized because Cognito remains the visible identity boundary.
The friction appears gradually. Routing logic grows in the application. IdP configuration becomes operational overhead. Identity decisions start leaking into business logic. Nothing breaks immediately, but complexity accumulates. This path optimizes for simplicity today, not scale tomorrow.
The second path introduces a dedicated internal routing service.
Instead of embedding tenant resolution inside application controllers, teams create a small service responsible for domain lookup, IdP resolution, and login orchestration. Cognito remains the authentication system and token issuer, but routing becomes explicit infrastructure.
The flow becomes:
The routing service performs three core actions:
A minimal implementation may look straightforward at first glance, but as enterprise count increases and edge cases accumulate, the routing logic rarely remains simple for long.
Example:
Architecturally, this is cleaner than Path 1. Tenant awareness is separated from business logic. Organization metadata is centralized. Onboarding can be partially automated.
However, this path shifts responsibility. The team now owns:
Over time, the routing layer becomes an internal identity platform. That may be intentional for companies with strong platform teams. It also introduces long-term maintenance costs and security ownership. This path optimizes for control.
The third path separates tenant orchestration from authentication entirely. Instead of building the routing and IdP lifecycle system internally, teams introduce a B2B SSO layer that models organizations and manages enterprise federation. Cognito remains the system of record for users and token issuance.
In this model:
This separation creates clearer boundaries. Authentication remains stable. Tenant orchestration evolves independently. Enterprise onboarding no longer requires big changes to application code.
Platform Like Scalekit operate in this layer, but the architectural idea matters more than the specific implementation. The principle is the separation of concerns. This path optimizes for scale and operational clarity.
Instead of scattered pros and cons, the differences are clearer in one view:
The core question is not which path is “best.”
The real question is:
How much tenant-aware identity infrastructure do you want to own?
Once the enterprise count increases and onboarding becomes recurring work, that question becomes unavoidable.
A scalable B2B SSO architecture separates tenant orchestration from authentication. In multi-tenant SaaS, organizations own SSO relationships. Users belong to organizations. Tokens belong to an authentication authority. When these responsibilities blur, routing logic leaks into application code, and identity configuration becomes operational overhead. When these responsibilities are cleanly separated, enterprise onboarding becomes configuration rather than engineering.
When Cognito is used strictly as the authentication authority, and Scalekit handles tenant-aware SSO orchestration, for example, resolving user@acme.com to the correct enterprise IdP, validating that tenant’s SAML assertion, normalizing identity attributes, and federating the authenticated user into Cognito.
The boundary between concerns becomes explicit. Cognito remains the system of record for users and token issuance, while Scalekit operates as the organization-level SSO control plane. The application continues trusting Cognito-issued JWTs without modification. The shift is not about replacing Cognito. The shift is about introducing a tenant-aware layer on top of it.
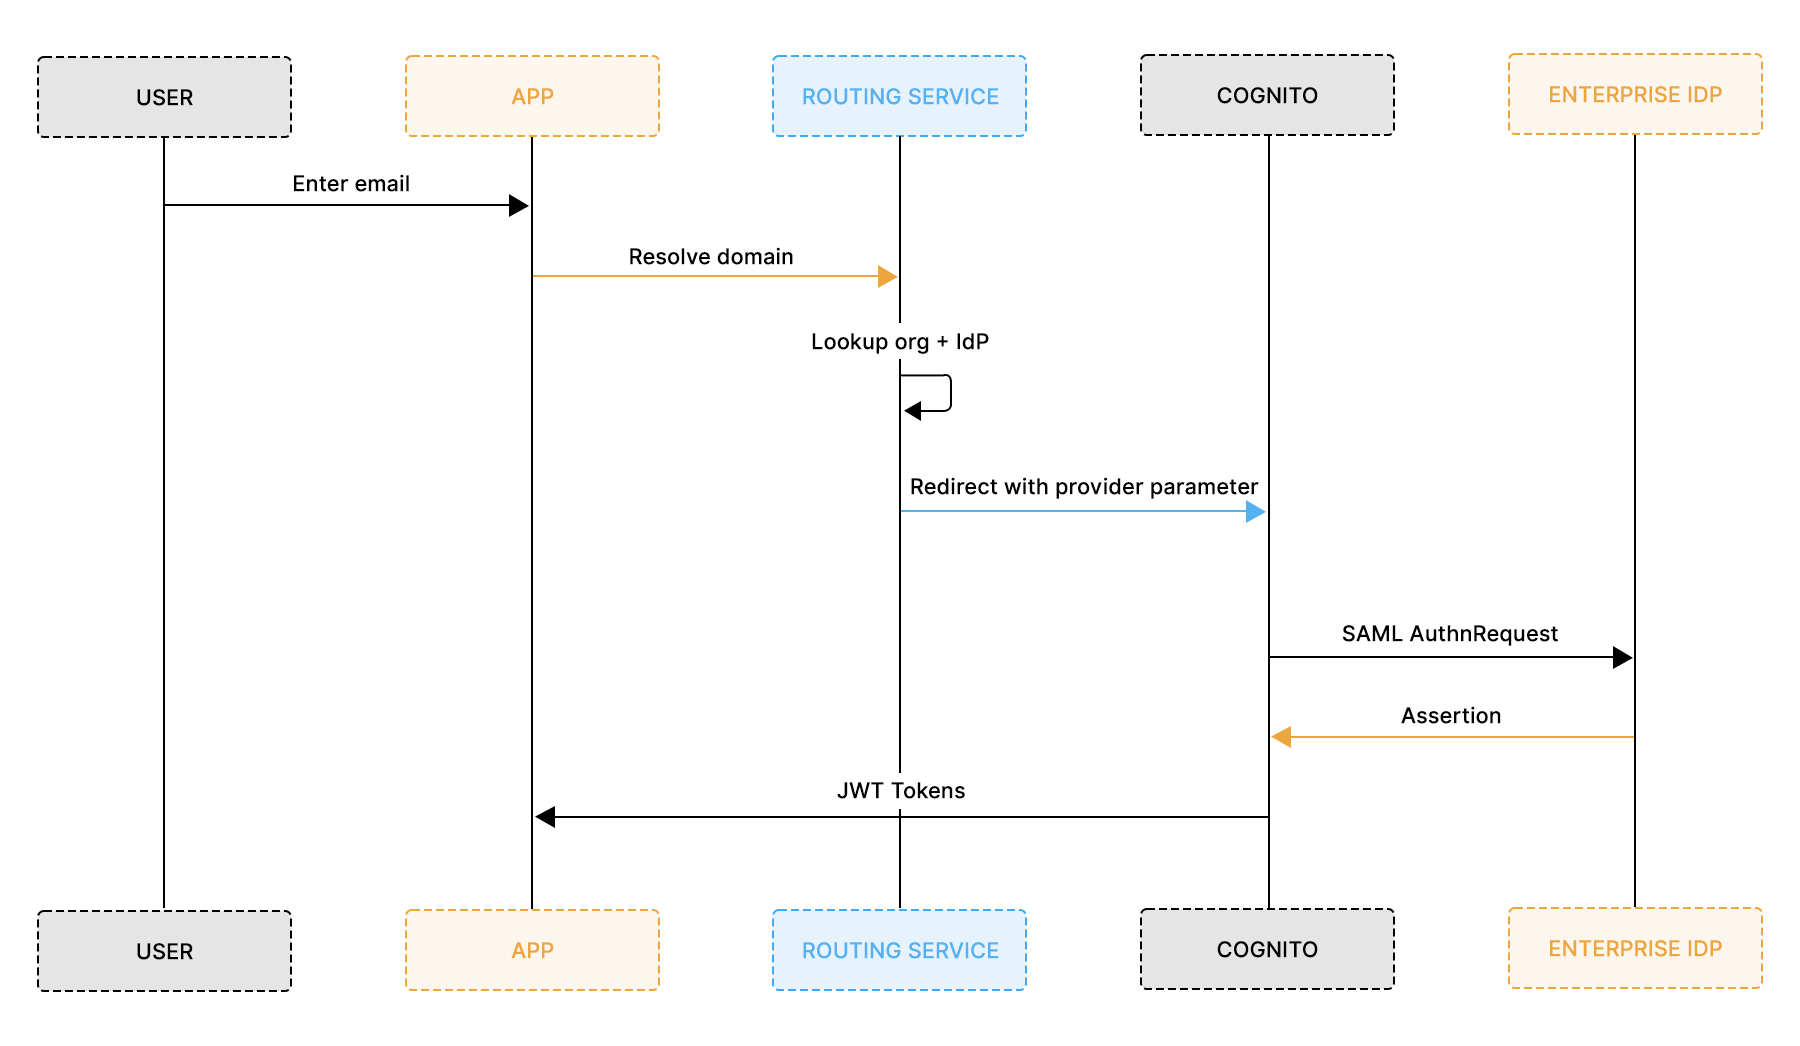
Instead of forcing Cognito to manage tenant routing, the system becomes explicitly layered. The high-level authentication sequence looks like this:

Scalekit handles organization-level concerns, including IdP connections, domain routing, SAML validation, and the metadata lifecycle. Cognito handles user authentication, token issuance, and session management. The application consumes Cognito tokens without needing to understand tenant routing rules. Each system does one job.
Enterprise SSO relationships belong to organizations, not users. In many early Cognito SSO implementations, organization context is inferred at runtime from email domains. That approach works temporarily but introduces fragile coupling between identity and business logic. In the layered model, organization resolution happens before Cognito issues tokens.
The second model eliminates domain parsing in controllers and reduces reliance on conditional routing scattered across services. Organization context becomes an explicit part of identity rather than an inferred attribute. This shift reduces cognitive load across the system.
A layered SSO architecture should not introduce token confusion.
In this pattern, Cognito remains the only token issuer trusted by the application. Scalekit validates SAML assertions and federates into Cognito via OIDC. Cognito then issues ID and Access tokens exactly as it would in any other flow.
From the application’s perspective, nothing changes:
The difference is invisible to downstream services. Tenant orchestration is now externalized, but authentication remains centralized.
That clarity preserves existing infrastructure investments while reducing identity complexity.
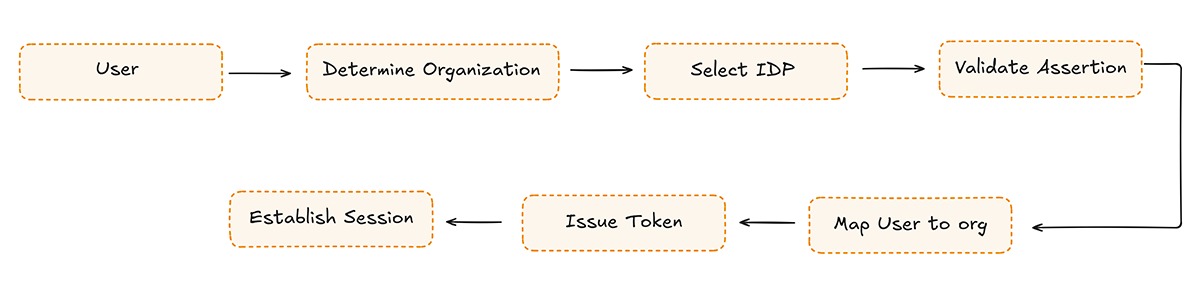
Once the architectural boundary is clear, implementation becomes predictable. Consider a SaaS company onboarding Acme Corp, an enterprise customer that requires SAML SSO through their corporate IdP in Okta. The application already uses AWS Cognito for authentication and token issuance. The goal is not to replace Cognito, but to introduce tenant-aware orchestration without rewriting the authentication layer.
The objective is straightforward: allow Scalekit to manage enterprise-specific federation while Cognito continues issuing the JWTs your application already trusts.
The integration consists of three controlled steps:
Each step is isolated. None requires invasive application changes.
Enterprise configuration lives entirely at the organization layer.
For each enterprise customer, you:
I. Create an organization in Scalekit
Each enterprise customer is modeled as an organization. This establishes the SaaS-side identity boundary.

II. Configure the Enterprise IdP (Okta, Azure AD, etc.)
Enterprise SSO requires configuration inside the customer’s identity provider. That metadata is then shared back with you. This exchange establishes mutual trust.

III. Upload Enterprise Metadata to Scalekit
Once the customer provides the metadata, upload it to the organization, validate the certificate, confirm attribute mappings, and enable SSO.
At this stage, Scalekit can validate SAML assertions for that organization.

IV. Associate Verified Domains
Domain association enables routing. By linking domains to an organization:
This enables tenant-aware login.

At this stage, Scalekit becomes the system responsible for:
The application is not yet involved. No routing logic is added to controllers. No Cognito configuration changes per enterprise.
Enterprise onboarding becomes a declarative configuration rather than a series of code changes.
Cognito remains the only token issuer your application trusts. Instead of configuring each enterprise IdP directly inside Cognito, you configure a single OIDC provider that represents Scalekit. Cognito delegates enterprise authentication upstream while retaining responsibility for token issuance and session management.
This keeps Cognito stable while enterprise federation evolves independently.
Inside your Cognito User Pool:
I. First, navigate to Add sign-in with social Provider and add Identity Provider.

II. Select OpenID Connect
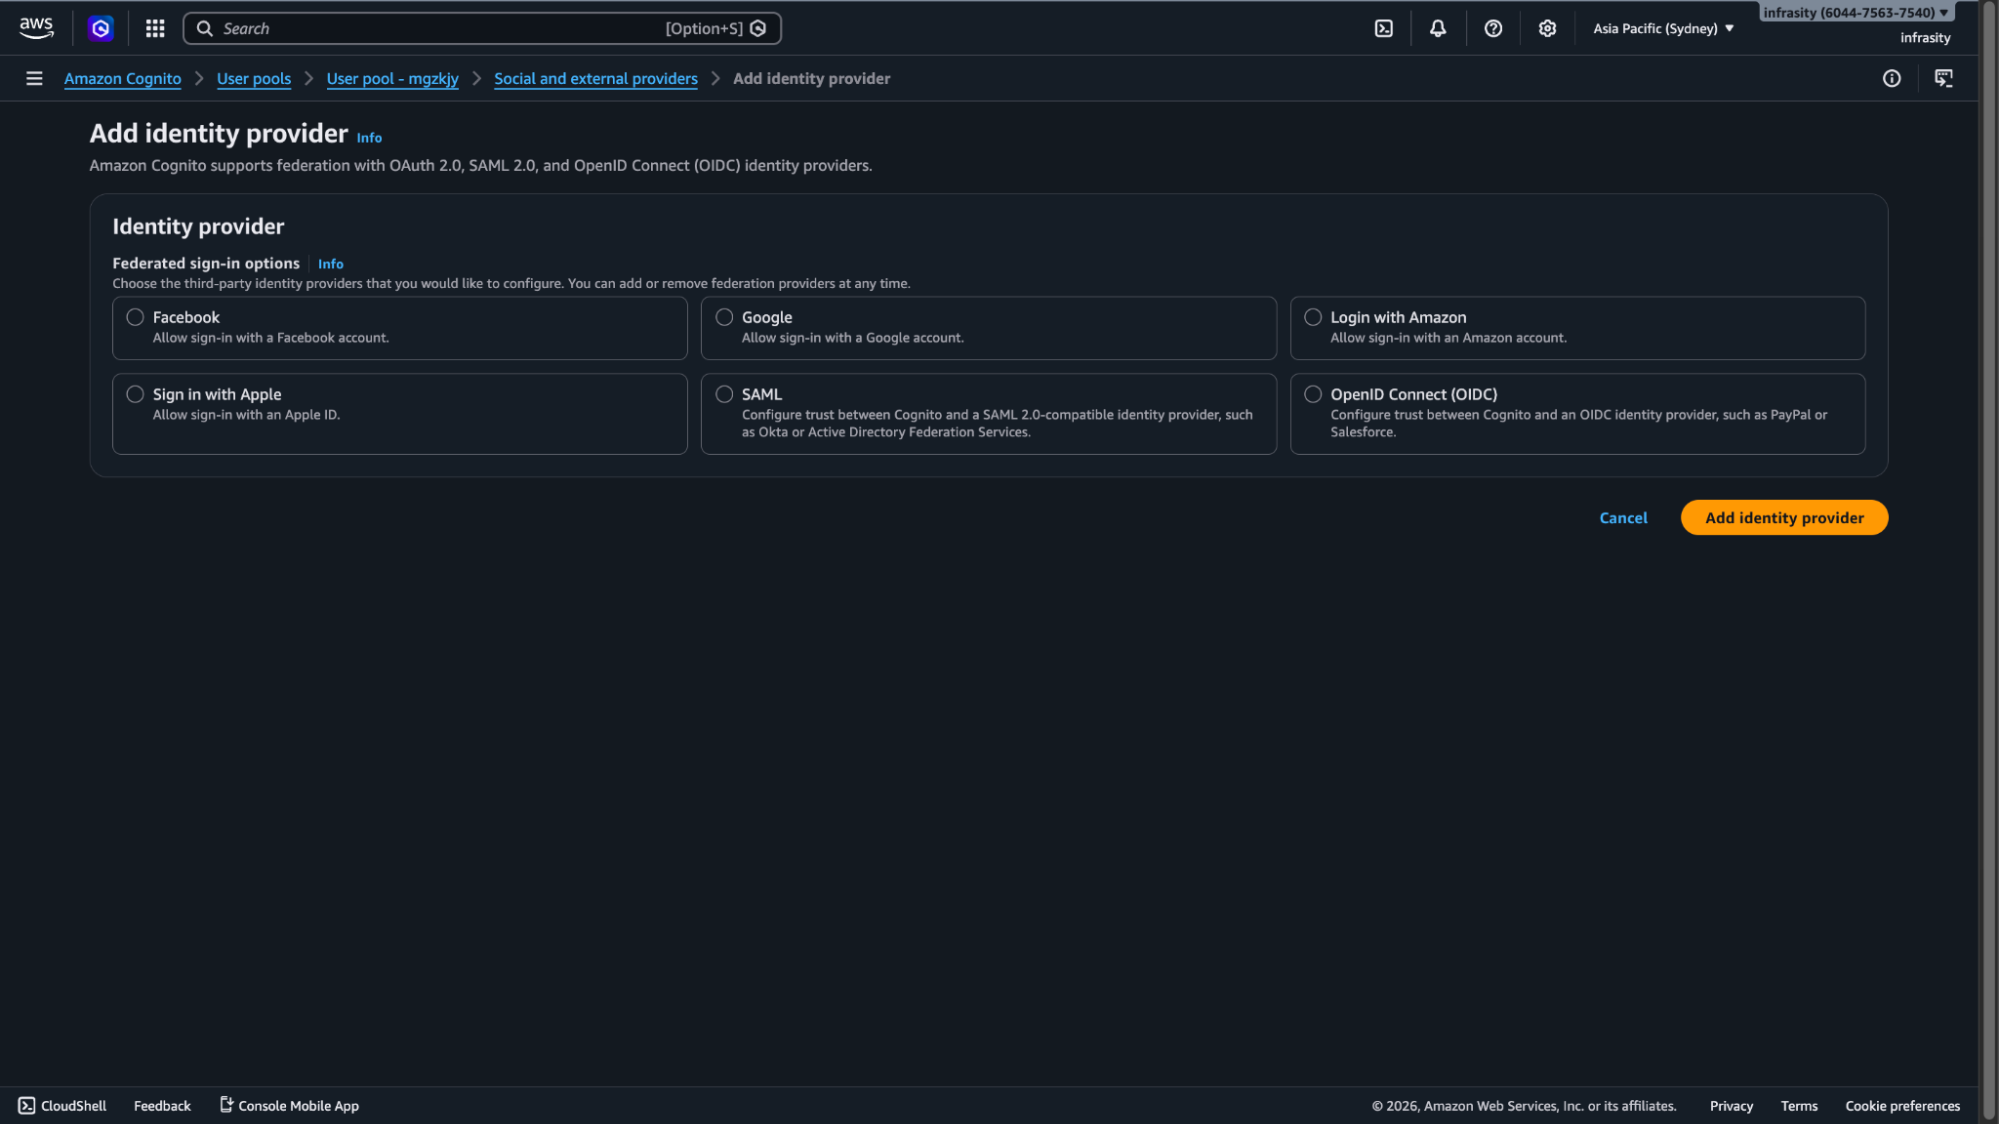
III. Configure Scalekit’s Issuer URL, Client ID, Client Secret, Authorization endpoint, Token endpoint

Cognito now treats Scalekit as a federated identity provider. Enterprise SAML assertions will never be stored in Cognito. They are validated upstream.
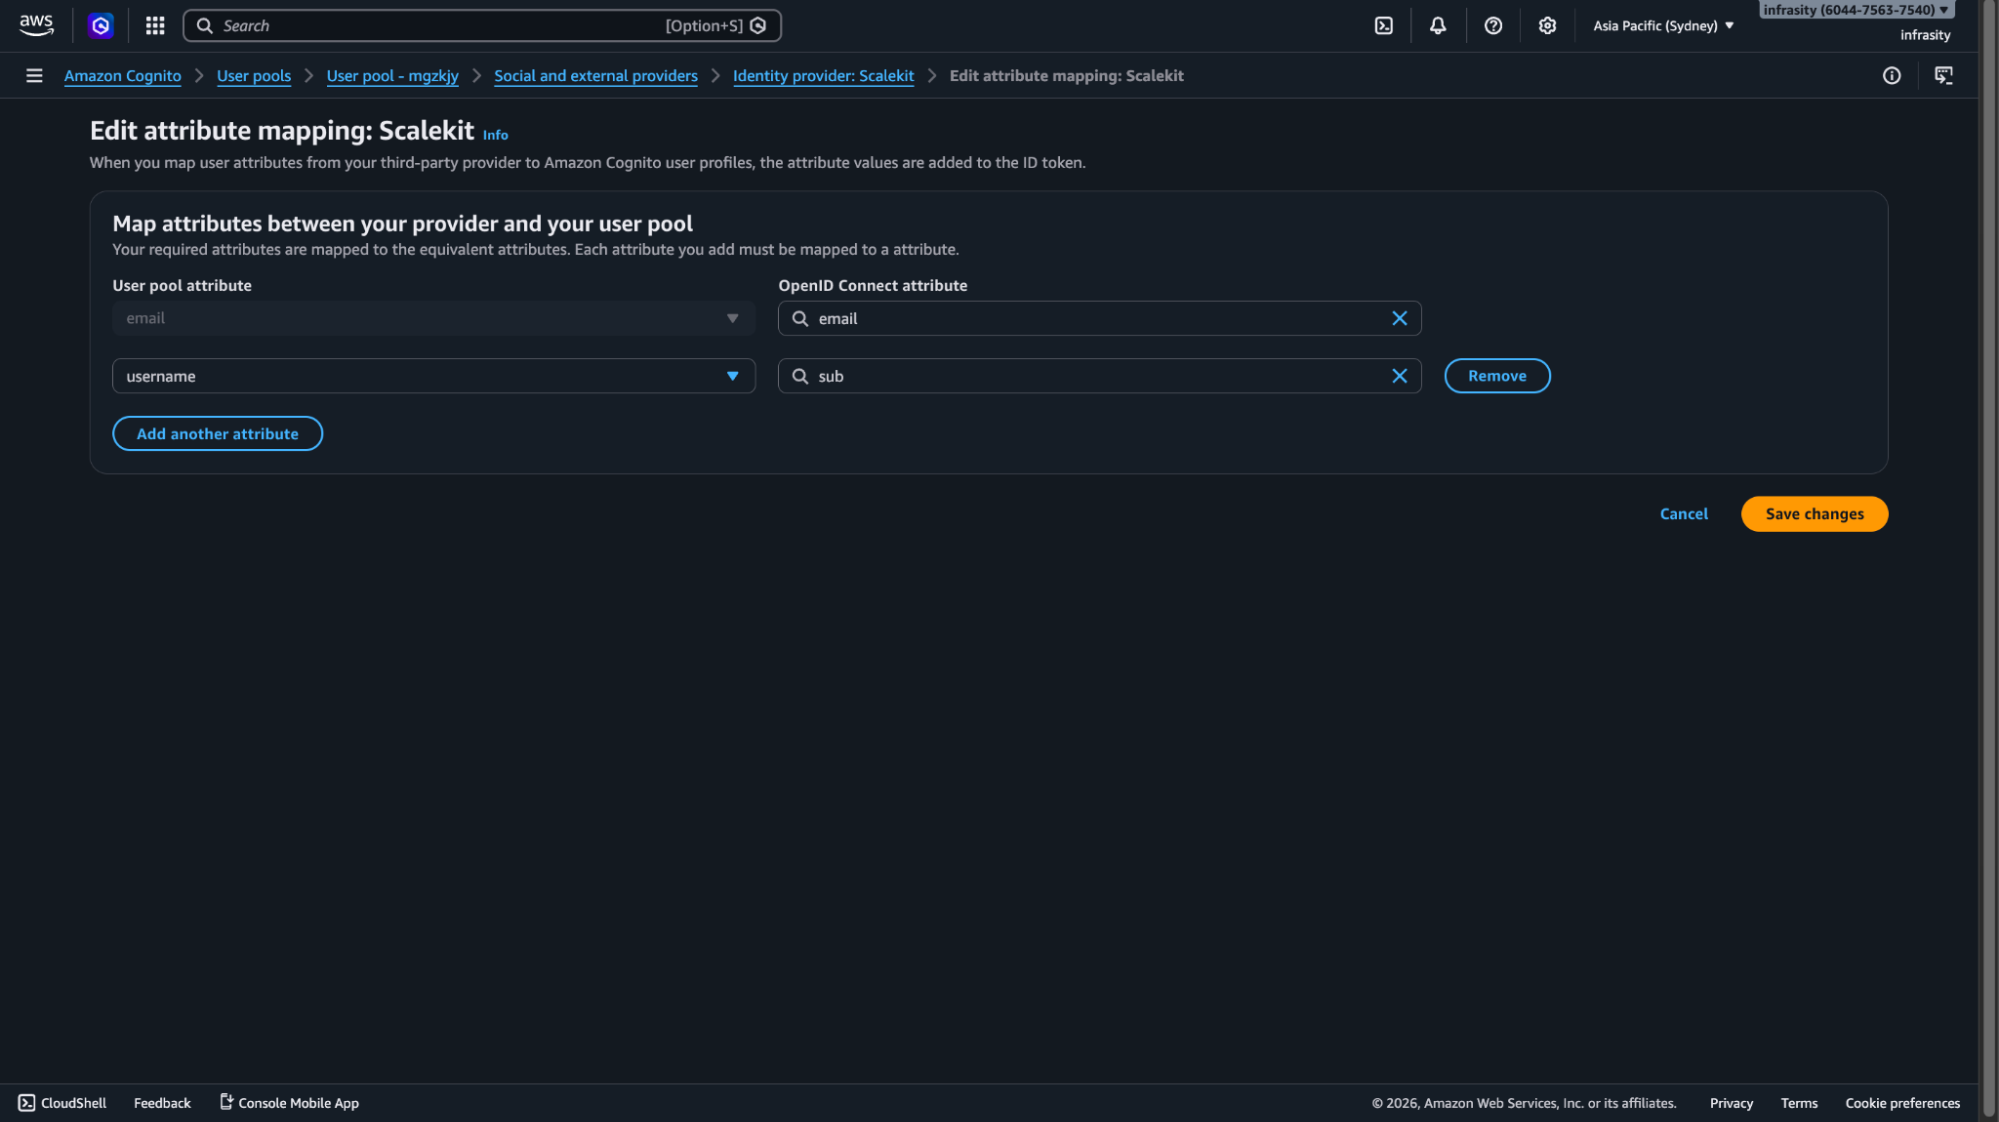
Map normalized identity attributes from Scalekit into Cognito user attributes. This ensures that the organizational context is preserved in the issued JWT.
Update your App Client configuration in AWS Cognito user pool:
Cognito now supports authentication through Scalekit via the Hosted UI.
The application’s responsibility is intentionally minimal. It completes the OAuth exchange and establishes a session using Cognito-issued tokens. Tenant routing does not exist in the application layer.
A minimal backend handler might look like this:
No domain parsing occurs here. No tenant resolution logic executes. The organization context is already embedded in the authenticated identity claims issued by Cognito.
Your existing infrastructure continues functioning normally:
Nothing downstream is aware of the orchestration layer.
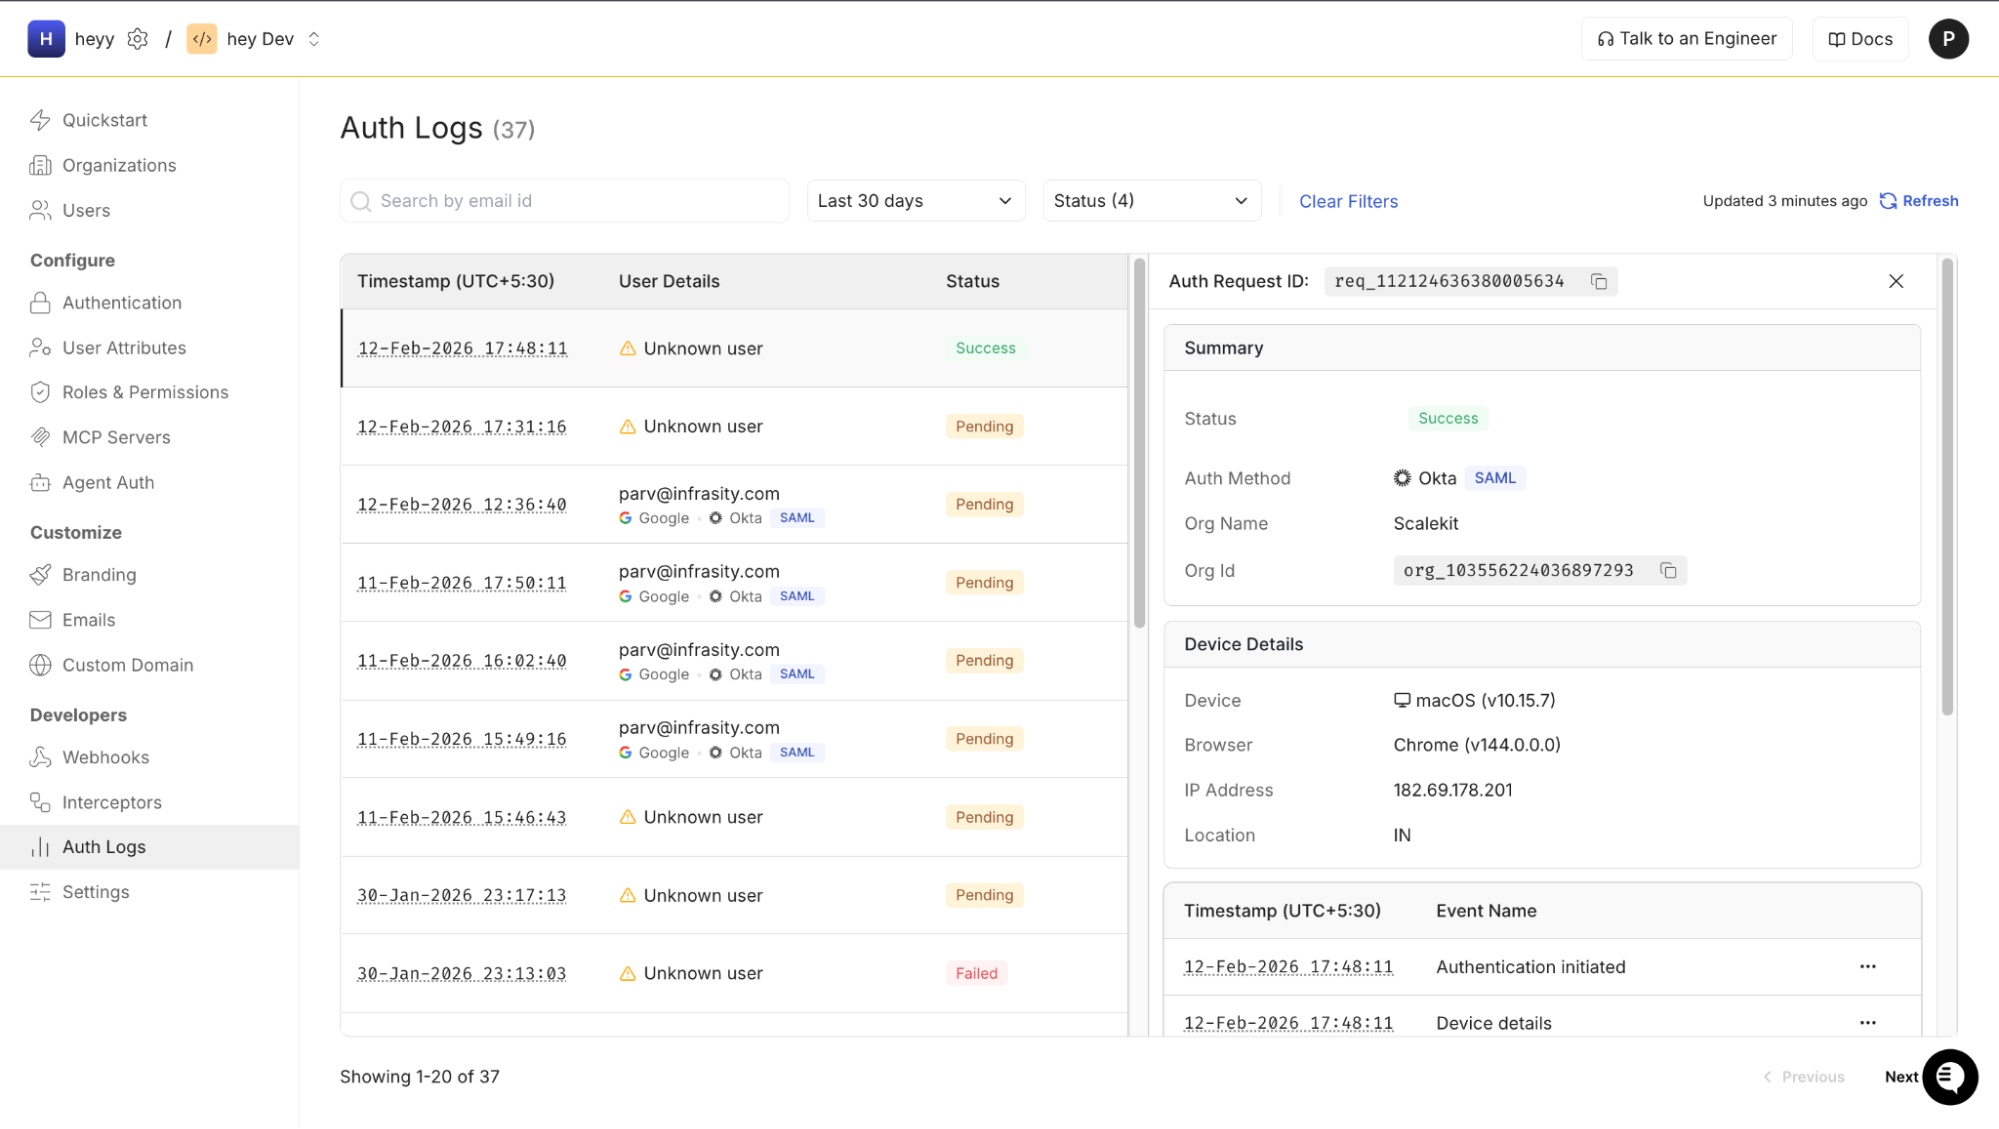
Enterprise SSO failures are rarely obvious. A failed login may originate from certificate mismatches, attribute mapping inconsistencies, clock skew, or incorrect audience configuration. When orchestration is externalized, visibility becomes critical.
Scalekit provides structured authentication logs that surface:
This reduces multi-surface debugging across Cognito, Lambda, and application logs.
During onboarding, testing before the enterprise IdP is fully configured is equally important. An IdP emulator allows teams to:
Testing at the orchestration layer prevents incomplete enterprise configurations from reaching Cognito and destabilizing authentication.
Operational tooling is not an enhancement. In multi-tenant enterprise SSO systems, this is required.

The advantage of separating tenant orchestration from authentication is not theoretical. It becomes visible in day-to-day operations.
In early enterprise stages, identity complexity hides inside edge cases. A failed login here. A misconfigured attribute there. A support ticket that requires checking Cognito logs and Lambda traces. As the enterprise count increases, those small costs compound. The layered model reduces that compounding effect by containing identity complexity within clear boundaries.
The benefit is not fewer redirects. The benefit is operational predictability.
In pure Cognito setups, onboarding a new enterprise often involves multiple areas: user pool configuration, application routing logic, attribute mapping, and test environments. Each new IdP connection feels slightly different. Even when documented, the process requires careful coordination.
With a tenant-aware SSO layer, onboarding becomes isolated. A new organization is created, metadata is uploaded, domains are verified, and federation is tested — all without modifying application code. The authentication layer remains stable. The application does not accumulate conditional routing logic.
This shift turns SSO onboarding into a repeatable operational workflow instead of an engineering task. Over time, that difference compounds.
Identity failures are difficult to debug when responsibilities overlap.
In tightly coupled systems, it is often unclear whether a login issue originates from domain routing, SAML assertion validation, attribute mapping, token issuance, or application authorization logic. When orchestration lives in the application layer, identity bugs ripple across services.
A layered model clarifies responsibility:
Clear boundaries reduce diagnostic ambiguity. Fewer engineers need to understand the entire authentication chain to resolve issues. That containment reduces cognitive load across teams.
For growing B2B companies, cognitive load is often the real bottleneck to scaling.
Enterprise SSO rarely stays static. After SAML comes SCIM. After SCIM comes API-based agents. After that come organization-scoped access policies, delegated administration, or audit requirements. Each new requirement increases the identity surface area.
When tenant orchestration and authentication are tightly coupled, every new feature touches multiple layers. When responsibilities are separated, new capabilities attach to the appropriate boundary.
The architecture grows in width, not in entanglement.
That distinction determines whether identity feels like infrastructure or like accumulated workaround logic.
The most practical advantage of this approach is preservation. Cognito remains the token issuer. Existing JWT validation, API Gateway integrations, and authorization middleware remain untouched. Infrastructure-as-code definitions for user pools stay stable. Teams do not rewrite authentication; they refine orchestration.
That stability matters in production systems. Authentication layers are security-critical. Minimizing churn at that boundary reduces risk. The layered model allows identity complexity to evolve without destabilizing authentication.
Cognito remains a strong choice when enterprise SSO is occasional and predictable, and when onboarding new customers does not require repeated engineering intervention. If routing logic is limited and identity workflows remain contained, keeping federation inside Cognito is often the simplest and most pragmatic approach.
The architectural shift becomes necessary when enterprise growth changes how identity works operationally. When onboarding requires code changes, routing logic spreads across services, and debugging spans multiple layers, authentication and tenant orchestration have become intertwined. At that point, the question is no longer whether Cognito supports SSO, but where organization-level orchestration should live within the system.
Cognito was designed to authenticate users and issue tokens reliably at scale, whereas enterprise SSO is fundamentally an organization's concern that involves routing, metadata lifecycle management, and tenant isolation. When those responsibilities are separated cleanly, identity scales predictably as enterprise count grows. When they blur, complexity accumulates in ways that are difficult to reverse.
This architecture makes sense when identity begins to behave less like configuration and more like infrastructure.
Yes, Amazon Cognito supports SAML and OIDC federation within a user pool. You can configure enterprise identity providers such as Okta or Azure AD directly in Cognito. However, Cognito does not provide native tenant-aware routing or organization-level orchestration, both of which are important in multi-tenant B2B SaaS environments.
Cognito configures identity providers at the user pool level, not at the organization level. In multi-tenant environments, this requires application-side logic for domain resolution, IdP routing, and tenant isolation. As the enterprise count grows, the routing logic often spreads across services, making it difficult to maintain.
Scalekit acts as a tenant-aware SSO orchestration layer. It manages organization-level IdP connections, domain routing, SAML validation, and metadata lifecycle. Cognito remains the authentication authority and token issuer, while Scalekit handles enterprise-specific federation logic.
Scalekit is an identity provider from Cognito’s perspective because Cognito trusts it as an OIDC provider. However, Scalekit is not the enterprise’s identity provider. The enterprise IdP (such as Okta or Azure AD) still performs corporate authentication, while Scalekit orchestrates and validates that federation.
At runtime, the application redirects users to Cognito. Cognito delegates authentication to Scalekit via OIDC. Scalekit performs tenant-aware routing and validates enterprise SAML assertions. Once validated, Scalekit federates back to Cognito, which issues signed JWT tokens that the application trusts.
Configuring all enterprise IdPs directly inside Cognito works for small numbers of tenants, but it centralizes tenant orchestration within the user pool. As the enterprise count grows, onboarding, routing logic, and IdP lifecycle management become operational overhead. Externalizing tenant orchestration reduces coupling between enterprise configuration and authentication.
No. Scalekit does not replace Cognito. Cognito remains the authentication system of record, issuing ID and access tokens for your application. Scalekit operates upstream as an orchestration layer that manages tenant-aware SSO and federates into Cognito.
Separating tenant orchestration from authentication allows provisioning features such as SCIM to attach to the organization layer without modifying the core authentication system. When Scalekit manages organization-level identity configuration, SCIM provisioning and SSO flows remain structurally aligned rather than intertwined.
Teams should consider introducing a tenant-aware SSO layer when enterprise onboarding requires repeated engineering work, routing logic spreads across services, identity debugging becomes cross-cutting, or sales cycles depend on rapid SSO enablement. At that stage, identity has transitioned from configuration to infrastructure.
It adds an additional federation layer but reduces long-term architectural complexity. Scalekit centralizes tenant routing and IDP management, allowing Cognito to focus on token issuance and session management. In multi-tenant B2B systems, this separation typically simplifies operations rather than complicates them.


