Passwordless authentication with SvelteKit and Scalekit


TL;DR:
- Form action-driven flow: SvelteKit's +page.server.ts actions encapsulate all phases (idle → sending → sent → verifying → authenticated → error boundary handling→ error) so Svelte components remain declarative and progressively enhanced. The unidirectional flow ensures predictable state transitions and makes debugging easier.
- Server-first security: Scalekit issues and validates OTPs/magic links with expiry, origin enforcement, and replay protection; secrets never leave the server (.server.ts files).
- Reusable building blocks: AuthEmailForm.svelte and verification endpoints (+server.ts) use SvelteKit's native form handling and data loading, handling retries, expired links, and redirects without ad-hoc glue code.
- Hooks & layout data: Sessions are set in secure, httpOnly cookies, loaded in the root +layout.server.ts, and synced into Svelte stores for consistent state across client and server.
- Resilient UX: Explicit loading states via $app/forms, built-in error handling, rate-limit feedback, and route-based code splitting keep the authentication flow fast, fault-tolerant, and user-friendly.
The growing demand for passwordless authentication in modern web development
In modern web applications, security and user experience are both crucial when it comes to authentication. Imagine a user accesses your site, enters their email, and receives a magic link: No passwords, no messy forms. They click the link and gain instant access. This frictionless experience is the essence of passwordless authentication.
For experienced developers, the challenge goes beyond just enabling passwordless login. Building a secure and scalable system in server-side rendered (SSR) applications, like those built with SvelteKit, introduces complexities around form handling, session management, and state synchronization between the client and server. Passwordless authentication, especially when incorporating features like magic links or OTPs, requires a careful balance between security and seamless UX.
SvelteKit, with its focus on SSR, file-based routing, and load functions, provides the perfect framework for tackling this challenge. By leveraging form actions, server endpoints, and hooks, you can architect a modern, scalable passwordless authentication system that’s easy to maintain and integrates smoothly with Svelte's reactive core.
In this guide, we’ll walk through how to implement passwordless authentication in a SvelteKit app using the Scalekit SDK. You’ll learn how to handle everything from authentication logic with form actions to session management, route protection, and performance optimizations, all while maintaining a clean separation between frontend and backend.
Problem: Challenges in implementing passwordless authentication in SSR apps
While password-based authentication has long been the standard, it’s fraught with security risks, usability issues, and unnecessary complexity. Passwordless authentication, using one-time passcodes (OTPs) or magic links, offers a cleaner, more secure alternative, significantly improving both security and user experience by eliminating the need for passwords.
However, integrating passwordless authentication into SSR applications like SvelteKit introduces specific challenges that require careful handling:
State management and hydration: In an SSR application, maintaining state consistency between the server-rendered page and the client-side application is crucial. Managing authentication state, such as session tokens or user details, requires synchronization across both environments, ensuring there’s no mismatch or delay in rendering after the first paint.
Security considerations: Ensuring a secure passwordless flow in SSR apps demands strict management of session cookies (e.g., JWTs), token expiration, and validation mechanisms. Additionally, route protection is vital, ensuring only authenticated users can access sensitive areas of the app.
SSR specifics (Session handling and redirects): SSR apps face unique challenges in managing user sessions and redirects. The state must be fully hydrated on the initial page load, and routing must be handled efficiently to avoid flickers or broken experiences when transitioning from server-rendered to client-rendered content.
Building a passwordless authentication system that effectively addresses these challenges requires a deep understanding of both the authentication flow and the nuances of SSR in SvelteKit. In the following sections, we’ll explore how SvelteKit, combined with Scalekit, provides a robust solution to these challenges.
Solution: Clean separation using form actions and server endpoints
To build a scalable and maintainable passwordless authentication system in SvelteKit, we need to ensure a clean separation between the client-side and server-side logic. This can be achieved by leveraging stores for managing authentication state, form actions, and server endpoints for backend integration, as well as hooks for protecting routes.
Svelte stores for authentication state: Svelte's built-in stores provide a clean and reusable way to manage global state. By creating a user store, we can centralize the authentication state, allowing components to access authentication data across the entire application reactively.
SvelteKit form actions and endpoints for backend operations: SvelteKit’s server-side functionality allows us to create form actions (+page.server.ts) and API endpoints (+server.ts) that interact with the backend. These routes handle key authentication actions, such as sending OTPs or magic links and verifying them. All cryptographic operations and sensitive token handling must remain on the server — never in client-facing code. This is enforced by putting all SDK initializations in .server.ts files or within src/lib/server, ensuring secrets never leak into .svelte or public files. As a best practice, teams should lint or audit codebases to verify that environment variables, API keys, and session tokens are not exposed to the client.
Hooks for route protection: To secure protected routes (e.g., user dashboards), we use SvelteKit’s hooks.server.ts file. The handle hook intercepts navigation before the page is rendered, ensuring that only authenticated users can access protected pages. If no session is found, users are redirected to the login page.
By utilizing stores, server-side logic, and hooks, we ensure a clean separation of concerns, maintainability, and security. The frontend focuses on managing the user interface and state, while the backend handles sensitive authentication operations.
Implementation: Full-stack SvelteKit authentication with Scalekit
In the opening scenario, we painted a picture of a frictionless user experience. Now, let's take a deeper look at how we can build this end-to-end passwordless authentication system in SvelteKit using Scalekit.
For this implementation, we’re leveraging Scalekit’s API, Svelte's reactivity with stores, and SvelteKit’s server-side logic to integrate the backend. Each piece of the architecture plays a crucial role in building a clean, maintainable, and secure solution that supports modern web development practices.
Setting up the project
To get started, let’s set up your SvelteKit project with Scalekit.
1. Clone or create a new SvelteKit project: If you don’t already have a SvelteKit project, you can create one from scratch.
2. Install dependencies: Next, you’ll need to install the necessary dependencies. We just need the Scalekit SDK and jose for session management.
3. Install Scalekit SDK: To communicate with the Scalekit API, install the Scalekit SDK and jose.
After installing, create a file to initialize and configure the SDK. This must be in a .server.ts file or a directory like src/lib/server to prevent it from being exposed to the client.
Explanation:
The creation of the Scalekit client (new Scalekit(...)) is a synchronous operation and does not require await. All methods invoked on the client, such as sendPasswordlessEmail or verifyPasswordlessEmail, are asynchronous and return promises.
4. Set up environment variables: Create a .env file in the root of your project to store your Scalekit credentials.
Make sure to update the values with your actual Scalekit credentials.
Pro-tip: Maintain proper entropy and rotation schedule for JWT_SECRET. Note that the server should handle token invalidation if a 'logout all sessions' feature is required.
5. Project folder structure: Here's a look at how your SvelteKit folder structure should be organized:
sveltekit-passwordless-auth/
├─ .env # Environment variables
├─ svelte.config.js # SvelteKit configuration
├─ src/
│ ├─ app.html
│ ├─ hooks.server.ts # Global route protection hook
│ ├─ lib/
│ │ ├─ server/
│ │ │ └─ scalekit.ts # Server-only Scalekit SDK init
│ │ └─ stores/
│ │ └─ auth.ts # Writable store for auth state
│ ├─ routes/
│ │ ├─ +layout.server.ts # Root layout loader for session
│ │ ├─ +layout.svelte # Root layout to hydrate store
│ │ ├─ login/
│ │ │ ├─ +page.svelte # Login form page
│ │ │ └─ +page.server.ts# Form actions to send link/OTP
│ │ ├─ dashboard/
│ │ │ └─ +page.svelte # Protected dashboard page
│ │ └─ passwordless/
│ │ ├─ code/
│ │ │ └─ +page.svelte # (Optional) OTP entry page
│ │ └─ verify/
│ │ └─ +server.ts # Endpoint to verify magic link (GET) and OTP (POST)
└─ package.json
This structure keeps the app modular and clean, with clear separations between components, server logic, and API routes.
Notes and best practices
- hooks.server.ts: Be careful when adding external introspection (such as checking a token blacklist in a database) inside this hook. Since it runs on every request, this can introduce performance penalties. For production, you may also need more granular access controls, such as roles or scopes, not just a simple check for a user object.
- verify/+server.ts: This endpoint calls Scalekit to verify tokens. In this guide, we use Scalekit API v1.0.0 (OAS 2.0). Also note that Scalekit enforces same-browser checks: if the user opens the magic link on a different device or browser, verification will fail by design.
6. Run the project: Now that your environment is set up, you can run the development server:
npm run dev
Open your browser and go to http://localhost:5173 to view the application.
How this implementation works
- User submits their email via a form on src/routes/login/+page.svelte.
- The <form> posts to a form action in src/routes/login/+page.server.ts.
- The server-side action communicates with Scalekit to send either a magic link or OTP.
- User clicks the magic link, which directs them to src/routes/passwordless/verify/+server.ts.
- The backend endpoint verifies the magic link token with Scalekit.
- A session is created (using JWT stored as a secure httpOnly cookie) and the user is redirected.
- Protected pages (like /dashboard) are checked by the src/hooks.server.ts file, ensuring only authenticated users can access them.
This structure sets up a passwordless authentication system that relies on Scalekit’s APIs, while leveraging SvelteKit’s powerful server-side features for a seamless user experience. Let’s break down how we can make this happen.
1. Svelte stores for authentication logic and state
Svelte stores allow us to manage global state in a modular, reusable way. We'll create a simple store to hold the user's data on the client side.
Explanation: This writable store is the single source of truth for the user's authentication status on the client. Components can subscribe to it to reactively update the UI.
Note: This pattern is intended explicitly for SSR-synced state, such as the authenticated user or session. It ensures the client store stays in sync with server-side session data during hydration. For client-only UI state, like theme preference, color mode, or sidebar toggles, use separate stores that are not tied to server-side state.
2. SvelteKit form actions for backend integration
Now that we’ve set up the store, we need the backend to handle requests and communicate with Scalekit. SvelteKit's form actions are perfect for this.
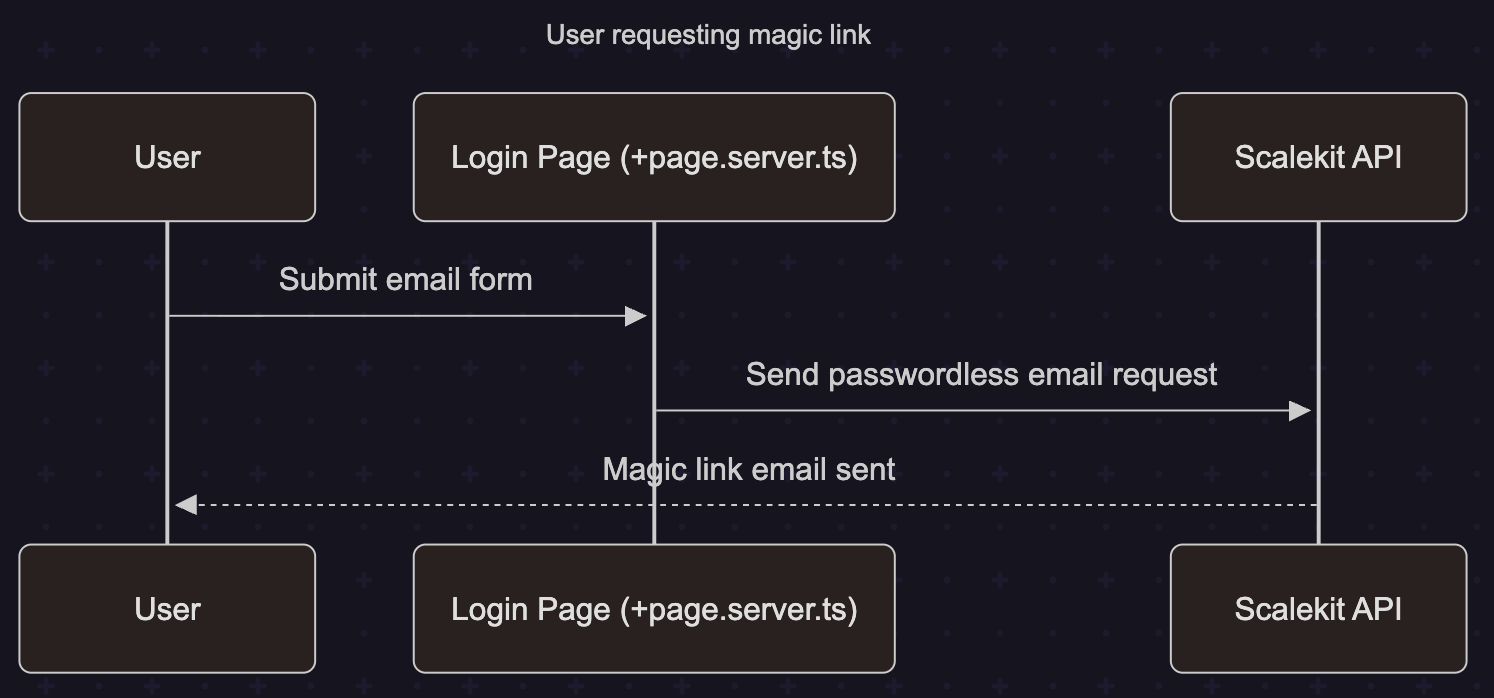
Flow explanation: The flow begins when the user types their email and submits the login form. The form action in +page.server.ts processes this and securely calls the Scalekit API. Scalekit then sends a passwordless magic link to the user’s inbox. This keeps sensitive logic server-side and provides a frictionless starting point for authentication.
Explanation:
The Svelte page submits a form that is automatically handled by the default action in its corresponding .server.ts file. The server-side logic calls the Scalekit SDK. All sensitive data remains on the server. use:enhance provides a smooth, client-side navigation experience without a full page reload.
The {#if form?.error} conditional block displays errors returned from the form action. These are typically user-facing validation or flow errors (e.g., missing email, too many requests). It’s important to note that SvelteKit also supports top-level +error.svelte files, which catch uncaught errors anywhere in the SSR context.
Best practice is to clearly distinguish between user errors (4xx) that should be surfaced in the form itself, and infrastructure or server-side issues (5xx/429) that should be routed through +error.svelte for a consistent error page.
Expired or invalid IDs: If the client caches auth_request_id (for example, in localStorage) and the user comes back later, the ID may be expired. Scalekit enforces expiration and request binding, so you must handle the case where an old or mismatched auth_request_id is rejected. Show a clear message and prompt the user to request a new link or code.
Do not rely solely on client flags: A simple “user is logging in” flag on the client is brittle across tabs, refreshes, and mobile handoffs. Prefer a short server-side check or retry window to decide whether to reuse a pending auth_request_id or to start a fresh one.
Recommended handling: Treat auth_request_id as short-lived. On verify errors, check for “expired or invalid request” and restart the flow by calling the send endpoint again. Avoid silent reuse of cached IDs without a server confirmation.
3. Verify user identity (Magic link or OTP verification)
Once the user receives the magic link, they need to verify it. We handle this in a dedicated server endpoint.
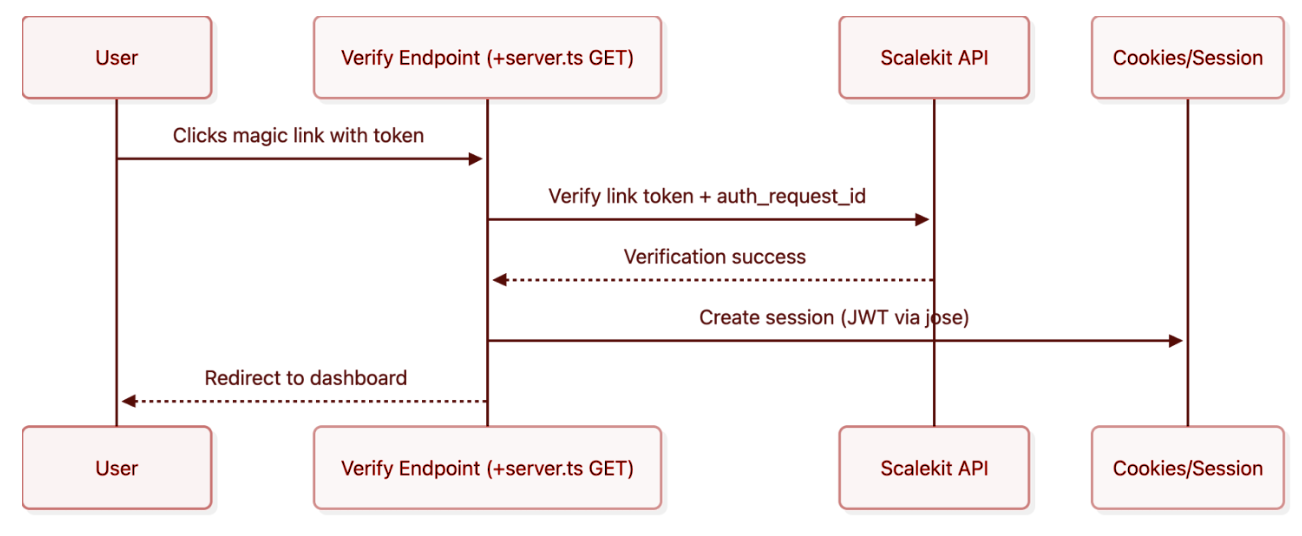
Flow explanation: When the user clicks the magic link, the request is routed to a +server.ts GET endpoint. This endpoint receives the token and the auth_request_id, validates them with Scalekit, and if successful, creates a JWT session using jose. Finally, the server sets a secure cookie and redirects the user to the dashboard. This guarantees that only validated sessions can reach protected content.
Explanation:
This endpoint verifies either the magic link token (GET) or the OTP code (POST) via Scalekit’s API. After successful verification, it creates a JWT session using jose and stores it in a secure, httpOnly cookie before redirecting (GET) or returning success (POST).
4. Hooks for route protection
To protect pages, we use a hook that checks for a valid session on every request to a protected area.
At the API/endpoint verification (verify/+server.ts).Where SvelteKit’s +page.server.ts and server-only logic are described.
Flow explanation: Every request to a protected route like /dashboard is intercepted by hooks.server.ts. The hook checks for the presence and validity of the session cookie. If the cookie is valid, it attaches the user to event.locals and allows the page to render. If not, the user is redirected back to /login. This ensures secure access control at the framework level.
At the API/endpoint verification step (verify/+server.ts), this guide uses Scalekit API v1.0.0 (OAS 2.0). Scalekit also supports same-browser enforcement: if a magic link is opened on a different device or browser, verification will fail unless the policy is relaxed. All cryptographic operations and sensitive token handling must remain on the server. Ensure SDK initializations live only in .server.ts files, never in .svelte or client code. As a safeguard, teams should run linters or static checks to prevent accidental import of secrets into public bundles.
Explanation:
This handle function runs on every request. It verifies the session cookie with jose, attaches the user data to event.locals for use in other server code, and redirects unauthorized users away from protected routes.
5. SSR and hydration considerations
SvelteKit is SSR-friendly. To make the session available to the client, we pass it from the server to the client via the root layout's load function.
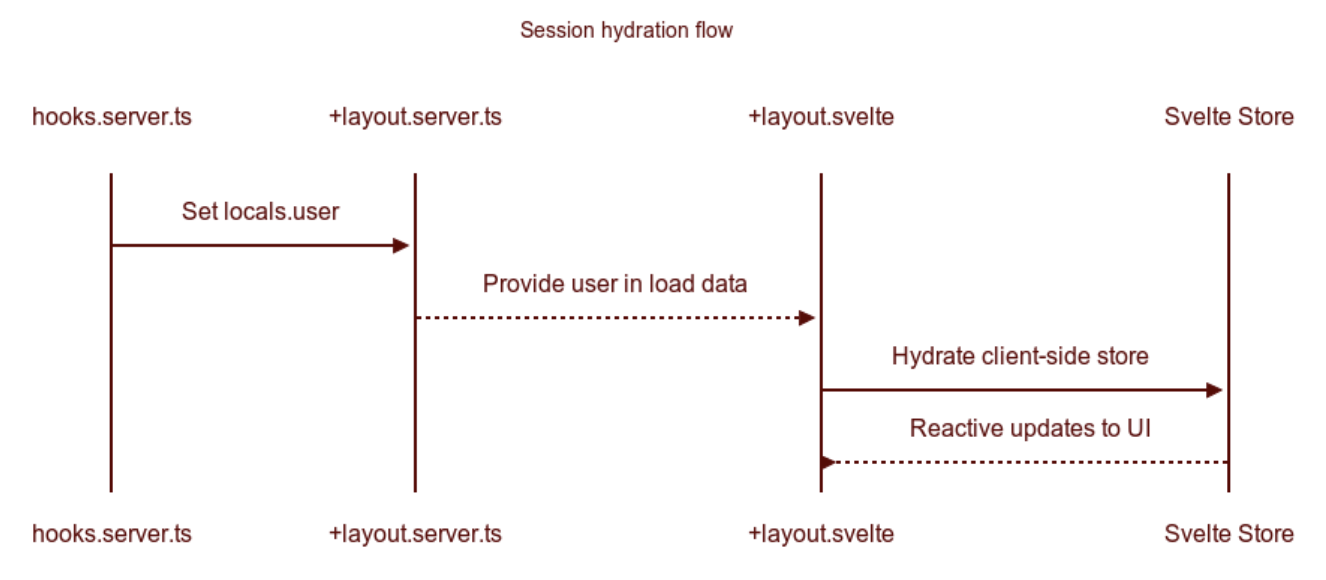
Flow explanation: After authentication, the user data stored in event.locals is passed through +layout.server.ts and into +layout.svelte. The layout hydrates the Svelte store with the authenticated user, ensuring the frontend UI reacts to the session state immediately. This keeps the server and client in sync without extra API requests.
Explanation:
The root load function runs on the server for every request, passing locals.user as data. The root layout component receives this data and updates our client-side user store, seamlessly hydrating the session state.
Wrapping it all up
By using Scalekit’s APIs to manage passwordless authentication and combining them with SvelteKit’s SSR capabilities, we’ve built a secure, scalable authentication system. The flow is seamless, and the architecture is designed to handle real-world scenarios efficiently:
- Magic link or OTP: Scalekit handles the heavy lifting of generating and verifying links or OTPs.
- Seamless state management: Svelte stores, hydrated by server load functions, ensure that the frontend is always in sync with the backend.
- Protected routes: Hooks ensure that users can only access authenticated areas of the app.
This solution brings to life the story we started with: A user enters their email, receives a magic link, and instantly gains access. No passwords. Just seamless authentication.
Error handling with SvelteKit
When building a production-grade authentication system, error handling isn’t just about catching exceptions; it’s about crafting a smooth and resilient user experience even when things go wrong. Authentication systems often face a variety of failure points, including expired magic links, invalid OTPs, rate limiting, and network issues. Without proper error handling, users could be left with confusing error messages or, worse, broken functionality.
SvelteKit provides a powerful, file-based error handling system. By creating a +error.svelte file in your routes, you can gracefully catch and handle errors. For form-specific issues, actions return a fail state that can be displayed directly in the UI.

Flow explanation: If verification fails (For example, due to an expired token or invalid OTP), the server throws an error. Instead of crashing, SvelteKit automatically renders a custom +error.svelte component. This gives the user a friendly, informative message about what went wrong and what to do next, preserving trust and usability in the flow.
Example: Setting up error boundaries
SvelteKit handles unexpected errors by rendering a root +error.svelte page, which you can customize.
Explanation:
Global error handling: This component captures any uncaught errors from load functions or server endpoints, ensuring the app doesn’t break unexpectedly.
Custom error components: You can place +error.svelte files inside specific route directories for more granular error pages.
Example: Handling errors in the authentication flow
In the passwordless authentication flow, common errors could occur when the magic link expires or is invalid, the user has exceeded OTP attempts, or there are network failures. The frontend must respond appropriately. Here’s how we handle errors during the magic link verification process on the server:
Explanation:
Graceful error handling: By using try...catch around the API call, we can handle errors like expired magic links and use SvelteKit's error helper to render the appropriate error page.
User feedback: This flow ensures the user gets immediate and clear feedback without breaking the application.
1. Handling rate limiting and retry logic
A common issue with passwordless authentication is rate limiting. If a user requests too many magic links in a short period, the backend should reject the request. We can implement this logic in our form action.
Here’s an example of how to handle rate-limited requests:
Explanation:
This action enforces rate limiting feedback: if Scalekit responds with HTTP 429, the user sees a clear message and must wait before trying again.
- Expired IDs: If an auth_request_id is cached and reused after expiry, Scalekit will reject it. Always handle expired/invalid IDs gracefully and prompt the user to restart the flow.
- Client flags are brittle: Relying only on a client-side “logging in” flag can break across multiple tabs or devices. Use server checks or enforce retry windows to ensure consistent behavior.
2. Backend error handling
Handling errors server-side is critical. If a user provides an invalid OTP, we should catch that and respond appropriately.
Explanation:
Detailed error responses: When an invalid token is provided, the server catches the error and throws a clear, user-friendly error page.
Consistent error handling: By using the error helper with specific status codes and messages, the backend communicates effectively to the user.
Why it matters
Proper error handling ensures that the user isn’t left in the dark when something goes wrong. Instead of a blank screen or a cryptic error message, users receive clear instructions on what happened and how they can fix it. This is particularly important in authentication flows, where users expect a smooth and intuitive process. By leveraging SvelteKit's built-in error handling, we can create a resilient passwordless system that’s secure, user-friendly, and adaptable.
Performance optimization and caching
When implementing passwordless authentication, performance is critical, primarily when relying on external services like Scalekit. Latency can cause delays, and inefficient requests can lead to unnecessary load. Here, we’ll look at optimization strategies for a seamless experience.
1. Minimizing unnecessary network requests
A key optimization is reducing the number of server requests. If a user is already in the process of logging in, we shouldn't trigger another request.
Explanation:
Duplicate request prevention: The use:enhance callback allows us to set a submitting flag, which disables the button to prevent users from triggering multiple requests.
User feedback: The submitting state provides a better user experience by clearly indicating that the request is in progress.
2. Caching authentication responses
Passwordless auth involves multiple API requests, which can introduce latency. Caching can reduce redundant calls and improve performance. A common strategy is to cache data on the server or in the browser's localStorage. Here's an example of caching the request ID in localStorage:
Explanation:
Local storage caching: By storing the auth_request_id in localStorage from the form action's result, we can persist it across page reloads.
Reduced redundant calls: If the UI flow allows, this cached ID could be used to avoid making a new "send" request, reducing calls to the backend and Scalekit.
3. Optimizing the hydration process in SSR
A challenge in SSR apps is ensuring proper page hydration without delays or content mismatches. SvelteKit's load functions are designed for this. We need to ensure session data is hydrated efficiently.
(Uses the +layout.server.ts and +layout.svelte pattern shown earlier.)
Explanation:
Efficient hydration: This pattern ensures session data is hydrated from the cookie via the server load function without needing extra client-side API requests. The session is available immediately on page load, improving perceived performance.
4. Network error handling and request timeout
Handling network failures gracefully is another key performance consideration. We can use a simple timeout for feedback if a form action takes too long:
Explanation:
Timeout feedback: This provides user feedback if the form submission takes too long, preventing the app from feeling unresponsive.
5. Lazy loading for performance
While passwordless auth is critical, not all parts of the app need to be loaded upfront. SvelteKit automatically code-splits based on routes, which reduces the initial load time and improves performance by loading code only when needed.
Explanation:
Lazy loading: SvelteKit's router handles lazy loading by default. When a user navigates to /login, only the JavaScript for that page is loaded. This reduces the initial bundle size and improves page load time.
Conclusion: Scalable, secure, and seamless passwordless authentication system
By integrating Scalekit with SvelteKit, we've created a robust, full-stack passwordless authentication system that leverages modern web development principles like SSR, form actions, and stores. This architecture not only enhances security by eliminating passwords but also ensures a seamless, frictionless user experience, essential for today’s web applications.
In the process, we:
- Utilized Scalekit’s API to manage OTP and magic link flows securely.
- Leveraged SvelteKit’s SSR capabilities to ensure fast, hydrated sessions and seamless server-client synchronization.
- Optimized performance through built-in code splitting, efficient data loading, and proper error handling, ensuring minimal latency and maximum responsiveness.
This system addresses the core challenges of building a passwordless authentication flow in SSR applications, from securing sensitive data with JWTs to managing session state across client-server boundaries. With the clear separation of concerns provided by SvelteKit's form actions, server endpoints, and hooks, this solution is scalable, maintainable, and production-ready.
FAQ
How does Scalekit ensure secure OTP and magic link generation for passwordless authentication?
Scalekit uses advanced cryptographic techniques to generate time-sensitive one-time passcodes (OTPs) and magic links. The OTPs are securely hashed and stored server-side, while magic links are signed with a unique token to prevent tampering. Scalekit supports expiration, rate-limiting, and "same-browser" enforcement, ensuring the integrity and security of passwordless flows.
What is the role of Scalekit’s auth_request_id in the passwordless authentication flow?
The auth_request_id is a unique identifier generated by Scalekit when initiating the passwordless flow. It ensures that subsequent verification requests are tied to the original authentication session. This ID allows secure and stateful verification, preventing attacks such as link replay and mismatched token validations.
How can I optimize SSR performance in a SvelteKit application?
To optimize SSR performance, ensure your load functions are efficient, as they can block rendering. Use SvelteKit's streaming capabilities to send content to the user as it becomes ready. Implement caching strategies on your server endpoints using HTTP headers. SvelteKit's automatic code-splitting per route already minimizes the JavaScript loaded on the client.
How do I handle JWT expiration and session management in a scalable manner in SvelteKit?
For scalable session management, implement JWT token rotation and refresh tokens. Store the JWT securely as an httpOnly cookie. Your hooks.server.ts file is the central place to check for expired sessions and can trigger a token refresh flow if implemented. Use the hook to redirect users to the login page when their session is invalid.
What strategies can I employ to ensure consistent state management across SSR and client-side SvelteKit applications?
Leverage Svelte stores for centralized state management. Use the root +layout.server.ts to read session data from secure cookies on the server and pass it to the root +layout.svelte, which then hydrates the client-side store. This official SvelteKit pattern ensures data is synchronized between the server and client seamlessly.