Passwordless authentication with Next.js


TL;DR:
- Full branding control: Scalekit’s headless approach lets you design every pixel of the login form and emails without vendor UI constraints.
- Zero migration risk: Works on top of your existing user store, avoiding data moves or risky re-platforming.
- Server-native security: All sensitive steps run server-side with App Router best practices, same-browser enforcement, and OTP limits.
- Reliable UX: Magic link + OTP fallback ensures logins succeed even if links expire, break, or are opened on another device.
- Operational flexibility: Expiry times, rate limits, and enforcement rules are dashboard-configurable without code changes.
Why a custom auth flow became a nightmare
Passwordless login sounds simple, but for many teams building with Next.js 15, it becomes the most complex part of the stack. A hypothetical mid-size SaaS company learned this when they rebuilt their product to go fully server-centric, Server Components for rendering, Server Actions for mutations, and Middleware at the edge for route protection. The shift improved performance and maintainability, but authentication became a wall they couldn’t get past. They required a magic link sign-in with OTP fallback, complete branding control, and no migration from their existing user table.
Their first attempt with their current client SDK failed because Server Actions can’t safely issue tokens or store secrets in the browser, and the App Router expects all verification to happen server-side. Security demands made it even harder: short-lived tokens to prevent leaks, same-browser enforcement to block phishing, strict rate limits to stop brute-forcing, and no hosted login page to break the seamless app experience.
Auth0 and Clerk offered quick starts with prebuilt UIs that could be integrated quickly, but their default patterns were opinionated toward client-side components, adding extra hydration. While both support headless and App Router–friendly flows using middleware and server-first patterns, adopting those approaches still required deeper customization. Rolling their own meant implementing token generation, email delivery, link verification, session cookies, and abuse-prevention logic from scratch, a significant lift for a “click link to sign in” feature.
This guide walks through the server-native alternative that solved their problem. You’ll see how to build a production-ready magic link + OTP authentication system in Next.js 15 using Scalekit, without giving up your UI or moving your user data. Step by step, we’ll go from dashboard configuration to production deployment, keeping secrets server-side, enforcing security from the edge, and delivering a branded passwordless experience that feels like a natural part of your product.
Headless magic link auth with Scalekit solves these problems
For the SaaS team in our scenario, the answer wasn’t another UI-heavy vendor; it was a headless authentication layer they could integrate directly into their existing Next.js 15 stack. That’s where Scalekit came in.
Passwordless authentication replaces the traditional password with a one-time credential, usually a magic link or code, sent to the user’s email or phone. Instead of remembering a password, the user proves account ownership by clicking the link or entering the code. This eliminates weak and reused passwords, removes password reset flows, and shrinks the attack surface. It also fits perfectly with server-first architectures like App Router, where all verification and secret handling can stay on the server, far from the browser.
Scalekit delivers this model without asking you to migrate your identity system. Whether your user store is in Firebase, Supabase, Postgres, or a custom database, Scalekit layers passwordless login on top, managing token lifecycles, email delivery, OTP fallback, and abuse prevention from a central dashboard. In practice, the flow comes down to three secure, server-safe API calls:
- sendPasswordlessEmail() – Sends a branded magic link and/or OTP code to the user’s email address, starting the login flow.
- resendPasswordlessEmail() – Generates and sends a new magic link or OTP if the previous one expired, was blocked, or failed delivery.
- verifyPasswordlessEmail() – Validates the magic link token or OTP code, confirms the request’s authenticity, and returns the verified user identity.
These calls map cleanly to Next.js 15 primitives: Server Actions trigger email sends without exposing credentials, Route Handlers verify tokens and set sessions, and Middleware enforces authentication at the edge. All security settings, link expiration, OTP retry limits, and same-browser enforcement live in the Scalekit dashboard, so the team can adjust policy without shipping code changes. Their login form stayed exactly as they designed it, their emails carried their own branding, and their users never had to interact with a vendor-branded UI.
By switching to Scalekit, the SaaS team kept the experience seamless for their users while solving every blocker that had been slowing development. In the next section, we’ll walk through how to set up this same architecture in your own Next.js 15 project, starting with project scaffolding and secure Scalekit configuration.
Step-by-step: Building magic link login in Next.js 15 with Scalekit
1) Project setup and secure Scalekit configuration
Before writing any code, start in the Scalekit dashboard and enable passwordless authentication for your environment.
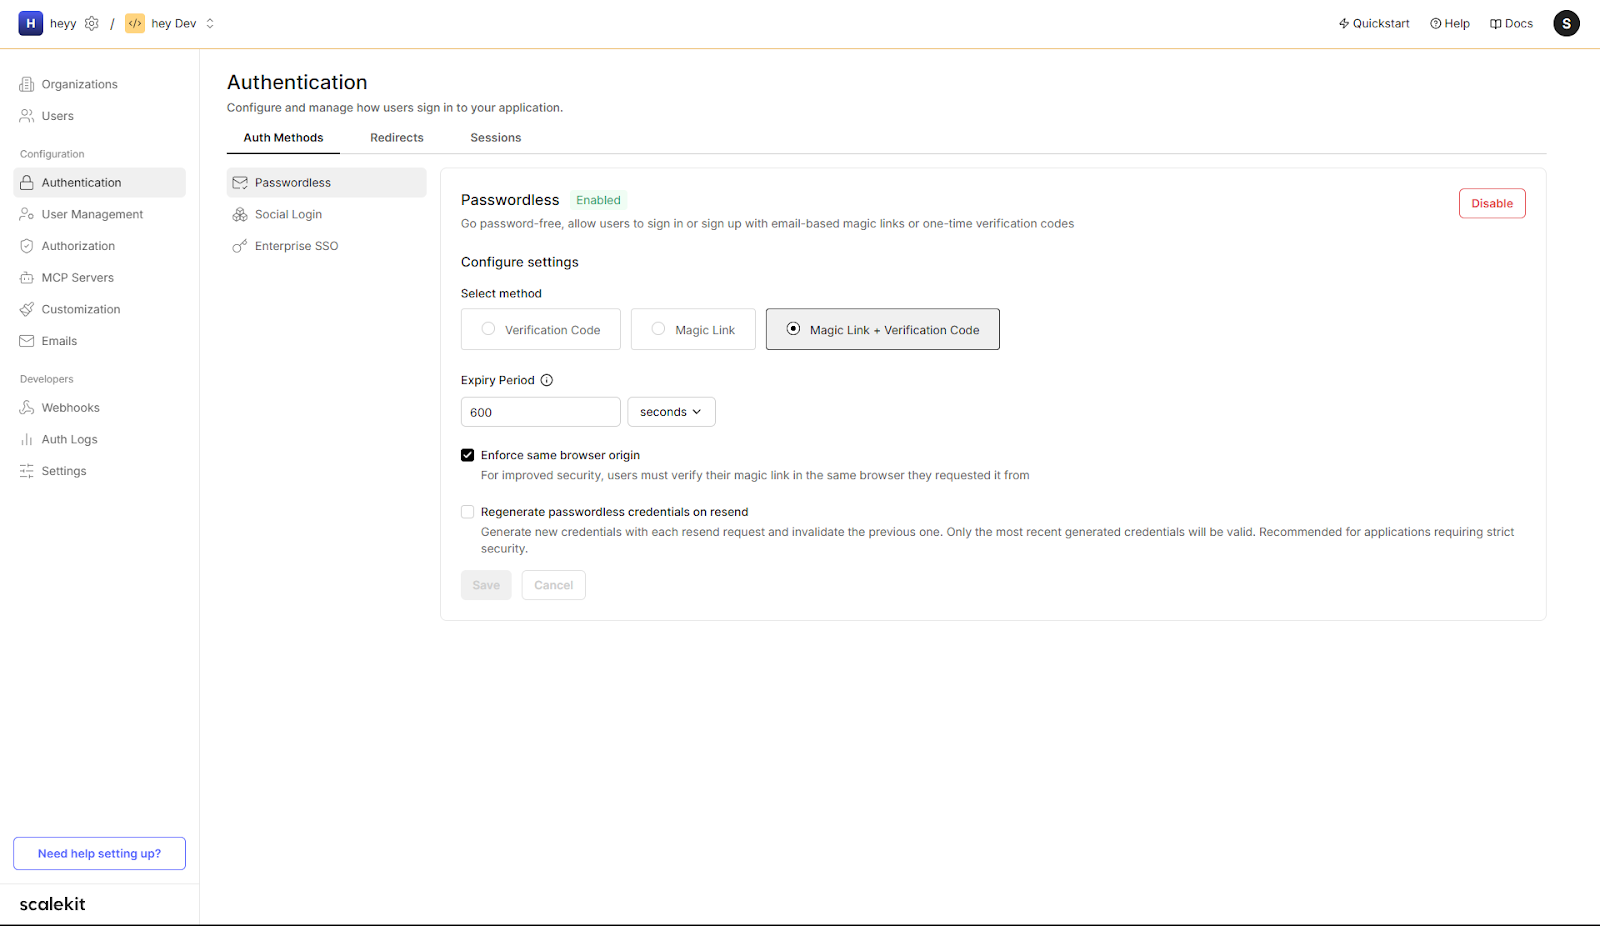
In Authentication → Passwordless:
- Select Magic Link + Verification Code (recommended for maximum reliability).
- Set the Expiry Period (e.g., 600 seconds for a 10-minute link/code lifetime).
- Enable Enforce same browser origin for phishing resistance.
- (Optional) Enable Regenerate credentials on resend to invalidate older links/codes if a resend occurs.
This configuration determines how Scalekit will issue and validate credentials; your app will call the API with these rules in effect.
Every secure authentication flow starts with one principle: secrets and verification logic must never leave the server. For the SaaS team in our story, this was one of the main reasons their client SDK approach failed; token generation and verification lived partly in the browser, making it impossible to enforce same-browser rules or fully control token expiry. Scalekit’s headless design solves this by letting you keep a single, server-only client instance, safely storing credentials in environment variables.
We’ll now scaffold a fresh Next.js 15 project, install Scalekit’s SDK, and create helper utilities for both Scalekit and session handling. These will form the backbone of our passwordless system. The project structure follows the App Router convention, with authentication routes and utilities placed under /app/api/auth and /lib.
Project structure (simplified):
├── .env.local
├── package.json
├── tsconfig.json
├── next.config.js
└── src/
├── app/
│ ├── layout.tsx
│ ├── globals.css
│ ├── page.tsx # Login UI (client)
│ ├── dashboard/
│ │ └── page.tsx # Protected page (server)
│ └── api/
│ └── auth/
│ ├── send-passwordless/
│ │ └── route.ts # POST /api/auth/send-passwordless
│ ├── resend-passwordless/
│ │ └── route.ts # POST /api/auth/resend-passwordless
│ ├── verify/
│ │ └── route.ts # GET (link), POST (code)
│ ├── session/
│ │ └── route.ts # GET /api/auth/session
│ └── logout/
│ └── route.ts # POST /api/auth/logout
└── lib/
└── session-store.ts # createSession/readSessionEmail/clearSession
This structure shows exactly where Scalekit integration points live: all sensitive operations (send, verify, logout, session) are implemented in /app/api/auth.
Code sample that sets/deletes cookies insideServer-only Scalekit use: all sensitive operations (send, verify, logout, session) live under /app/api/auth. Each API route instantiates its own Scalekit client with environment variables. Session helpers live in /lib/session-store.ts and only sign/verify JWTs; cookies are set in the API routes, not in the helper.
Why per-route clients? Creating the Scalekit instance inside each API route keeps secrets server-only, avoids accidental client imports, and keeps the code local to each handler. The SDK call cost is negligible compared to the network round-trip.
Reference Implementation: You can follow along with the code in the public GitHub repo, which contains the complete Next.js 15 project with all Scalekit integrations from this guide.
Create an .env.local file to hold your secrets. These values come from your Scalekit dashboard:
Server-only verification: API routes call sendPasswordlessEmail and verifyPasswordlessEmail. If same-browser enforcement is enabled, include the authRequestId in verification. After a successful verify, the route signs a JWT via createSession(email), sets it as an HttpOnly cookie, and redirects. Client components never import the Scalekit client or read raw cookies.
By locking Scalekit access and session logic to the server, you’re setting the foundation for a flow that works seamlessly with Next.js App Router’s server-first model, the same approach that let our SaaS team pass security audits and keep their branding intact. In the next step, we’ll wire up a server-first email capture form so the login process can start without ever exposing sensitive details to the browser.
For Server Actions, always include the "use server" directive at the top of your action file. Tokens are issued by calling sendPasswordlessEmail() inside the action, and validation (via verifyPasswordlessEmail()) must also run server-side. This ensures tokens never enter client code and stay protected by HttpOnly cookies.
2) Build an email capture form that submits to the server without exposing secrets
Server-first submission keeps secrets out of the browser and aligns with App Router. Once form posts hit a server route, same-browser enforcement and short-lived tokens work reliably.
Rate limiting and abuse protection
Add throttling at the app level (e.g., middleware.ts) or directly in these routes:
- src/app/api/auth/send-passwordless/route.ts
- src/app/api/auth/verify-otp/route.ts
Scalekit also enforces: 2 emails/min per address (including resends) and 5 OTP attempts within 10 minutes per auth request. Your throttle + Scalekit’s limits protect against brute force without harming UX.
Minimal login page (client component) that starts the flow and supports OTP fallback
Server endpoint that sends the verification email
This calls Scalekit’s sendPasswordlessEmail API (POST /api/v1/passwordless/email/send).
Server endpoint that verifies OTP and sets the session
This wraps Scalekit’s verifyPasswordlessEmail API (POST /api/v1/passwordless/email/verify).
Session endpoint used by the client to auto-redirect
This completes the send + OTP verify flow, with secrets isolated on the server and Scalekit enforcing expiration + attempt limits.
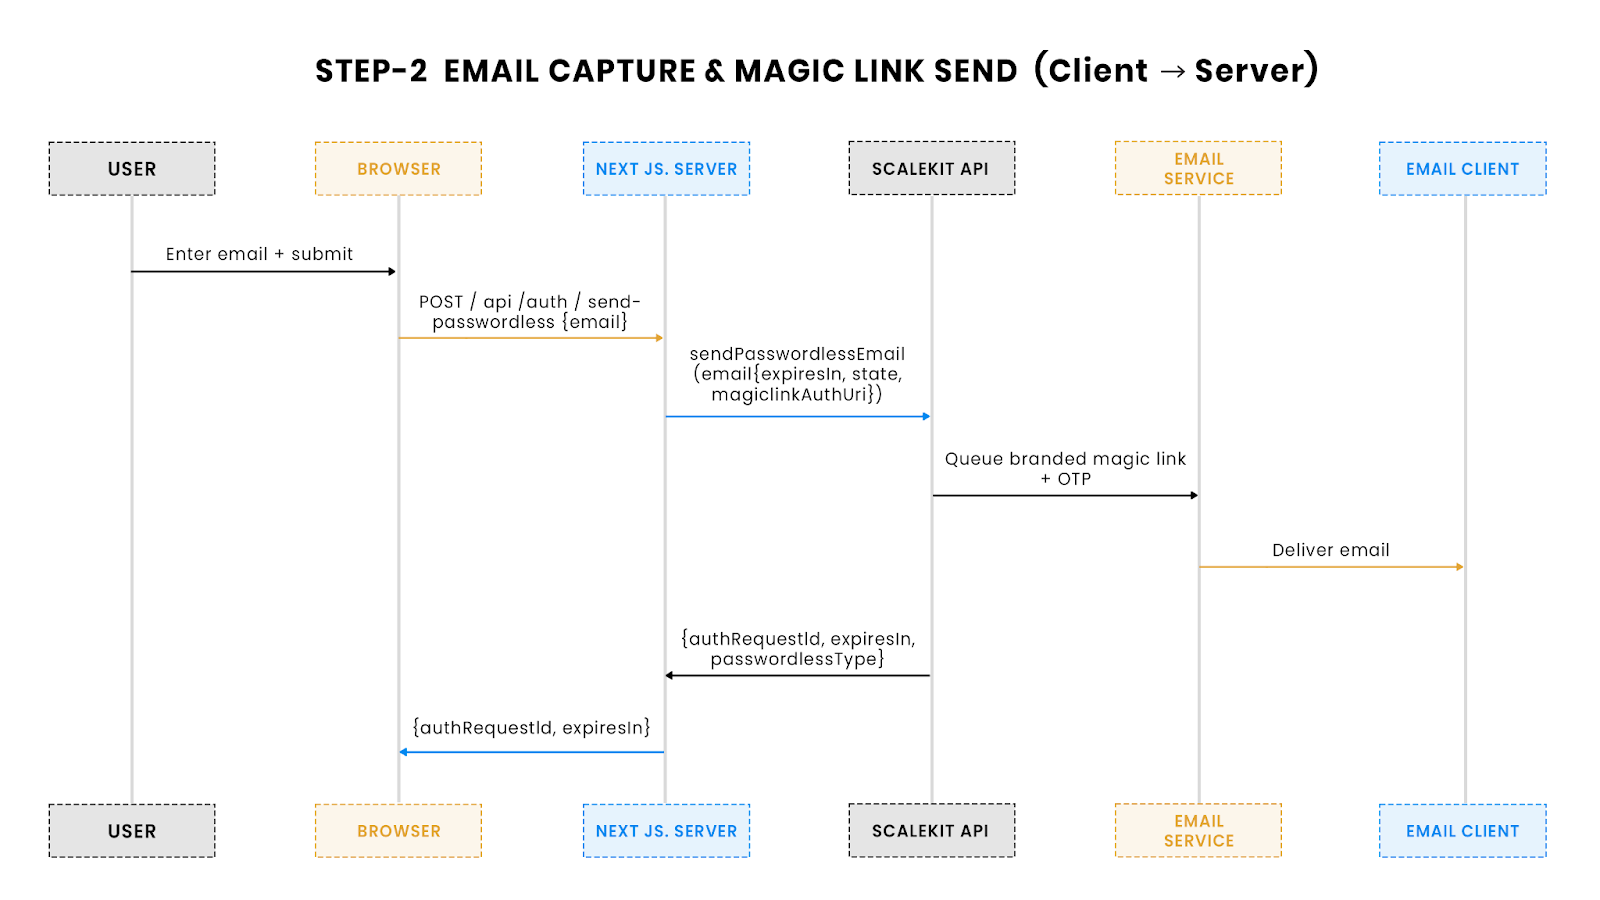
This diagram shows the start of the passwordless flow: the user enters their email, the server calls Scalekit to issue a magic link (and optional OTP), and Scalekit delivers it. All secrets remain server-side, protecting them from exposure in the browser.
Server endpoint that sends the magic link and returns authRequestId
Posting to an API route keeps credentials on the server and returns data your client needs for OTP and same-browser enforcement.
Optional: Server Action variant
If you prefer a pure Server Action submit (no fetch), return the same response shape to minimize UI changes.
Next.js 15 Server Action usage
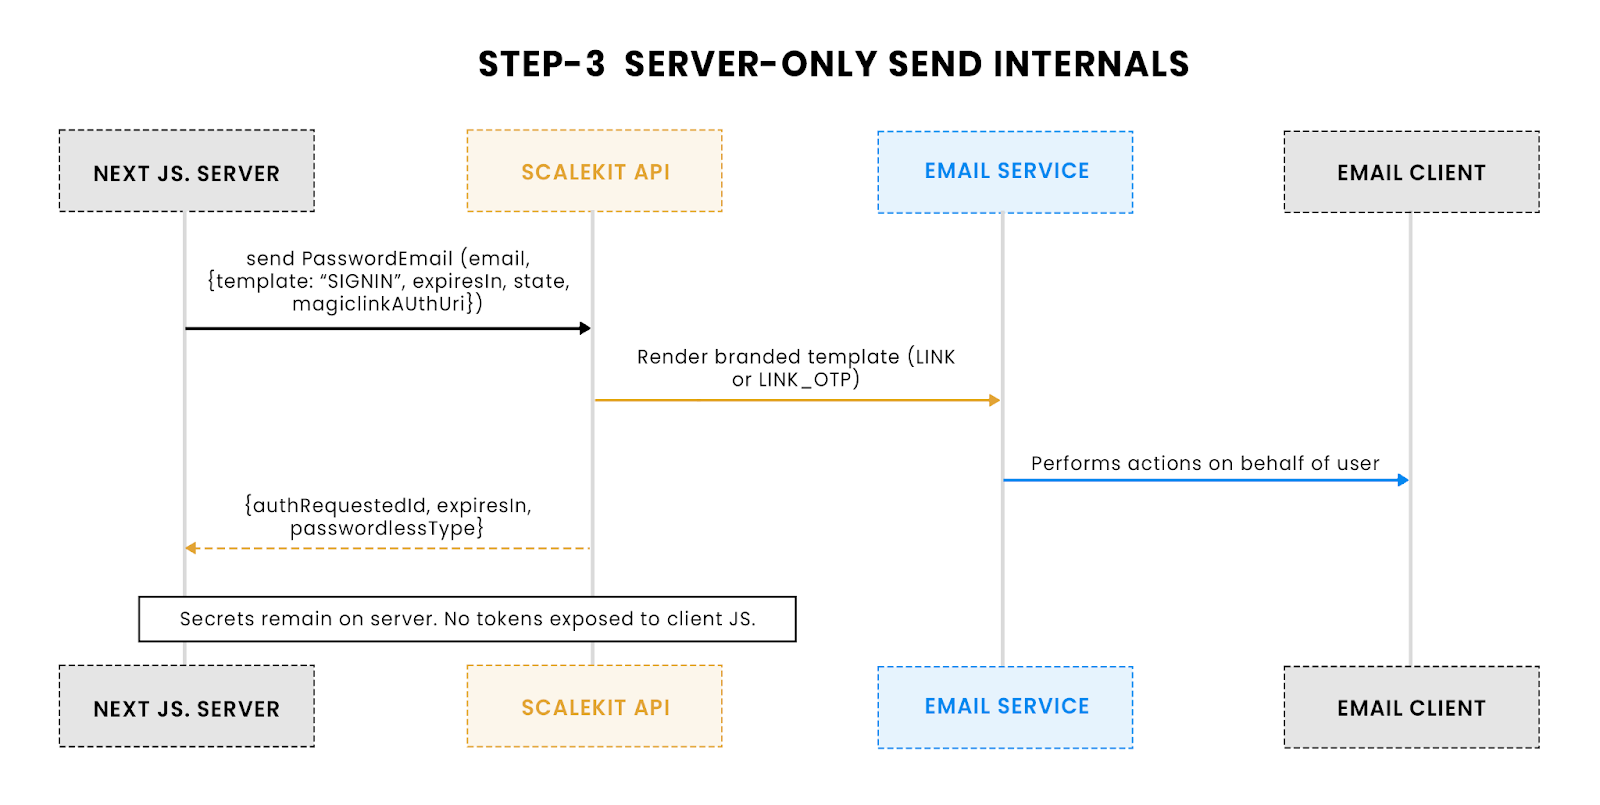
3) Generate and send the magic link from the server
Why server-only: Issuing magic links/OTPs on the server keeps secrets out of the browser, enforces short expirations, and enables same-browser controls when configured in Scalekit.
What the server does: Call sendPasswordlessEmail(email, options) with an expiry, optional state, and the URL that will handle magic-link clicks. Scalekit emails the user and returns an authRequestId you’ll reuse for OTP verification and resends.
How this fixes the old pain points
- No client secrets. Tokens are issued server-side; nothing sensitive touches client JS.
- Strong expiry. Configure expiresIn per request and/or in the Scalekit dashboard.
- Same-browser enforcement. When enabled in the dashboard, you’ll include the authRequestId at verification time so links opened on a different browser are rejected.
Next: With links being sent securely from the server, step 4 will cover verification: handling the magic-link click, validating the token, creating the session, and redirecting to the protected area of the app.
4) Verify the magic link and create a secure session
Why server-side verification matters:
Token checks must stay server-only to prevent replay attacks. With Route Handlers, tokens never touch client JS, and a valid response can immediately set a secure session cookie.
How it works:
When the user clicks a magic link, Scalekit appends link_token (and optionally auth_request_id if same-browser enforcement is on). Your verification route passes these into verifyPasswordlessEmail(). If valid, you create an HttpOnly session and redirect the user.
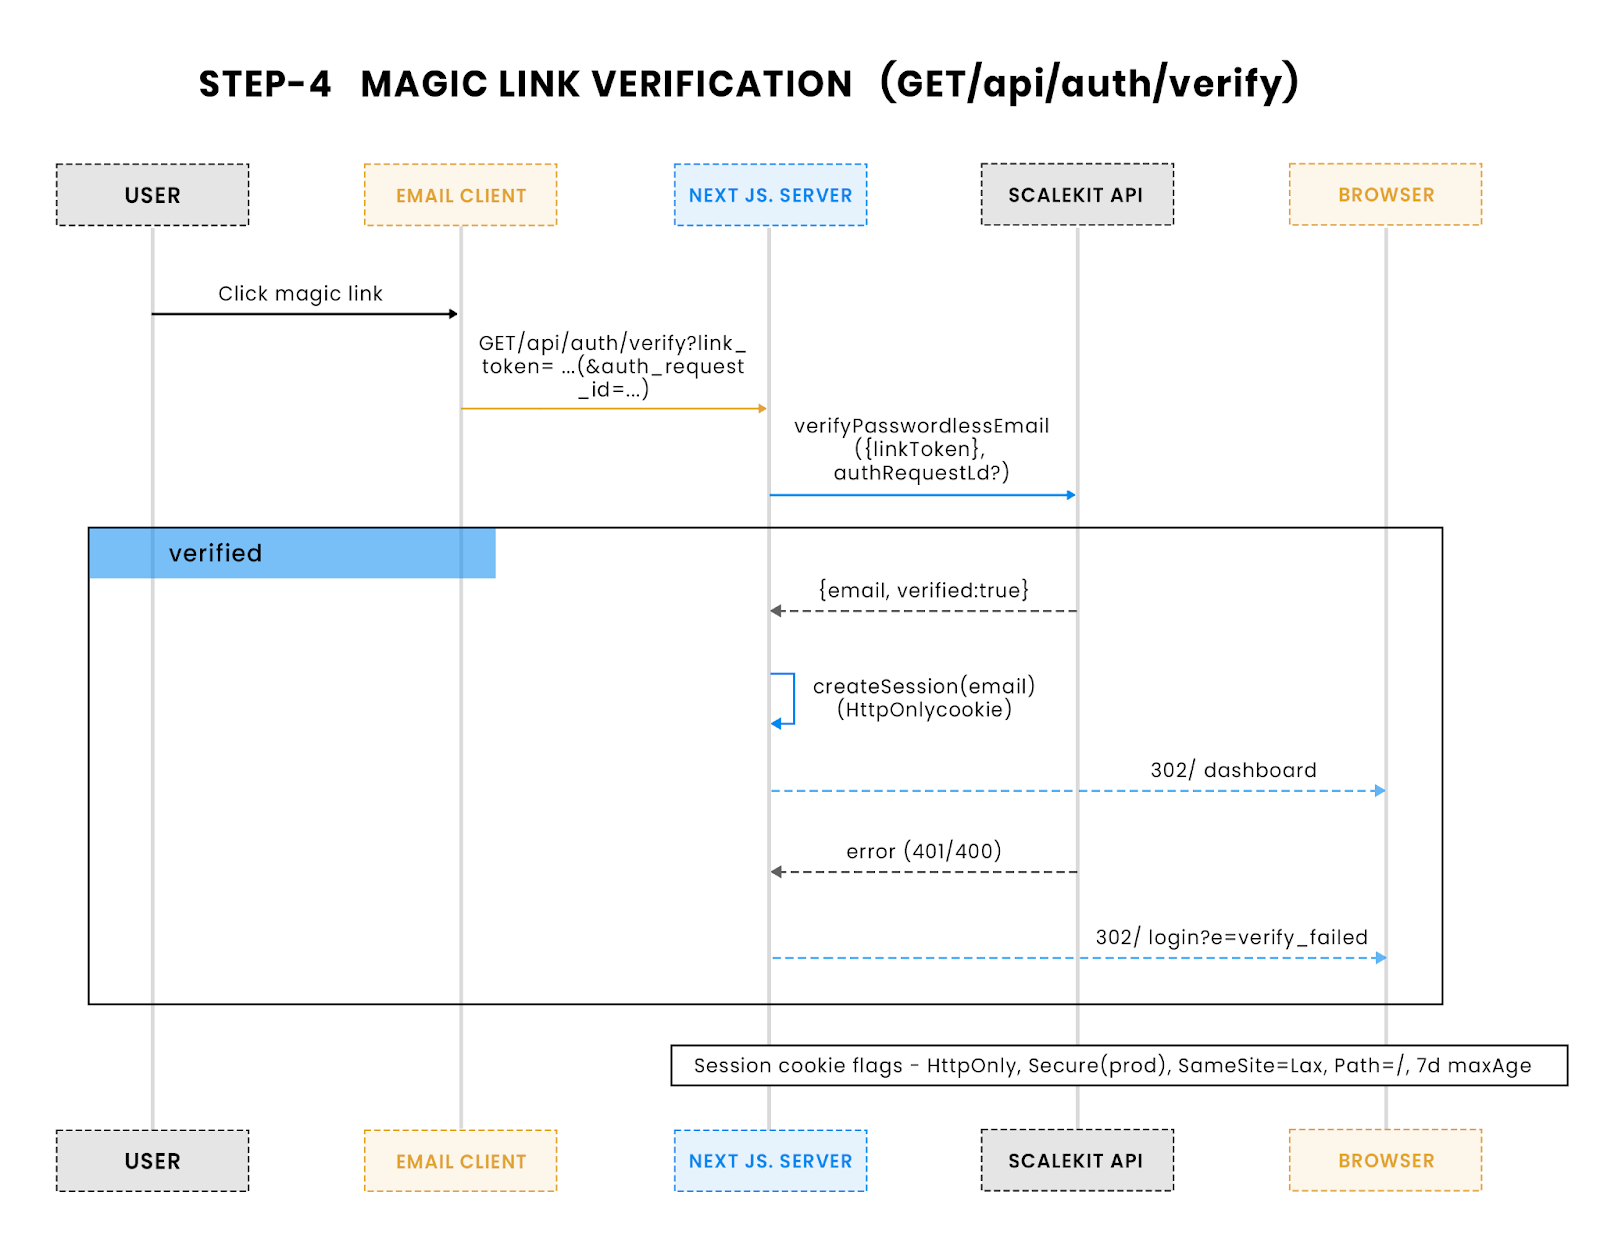
Here you can see what happens when a magic link is clicked: the request hits your verification route, Scalekit confirms the token, and your app sets a secure HttpOnly session before redirecting. Invalid or expired links follow the error branch.
Key safeguards:
- Same-browser enforcement: If enabled, Scalekit requires authRequestId; links opened on a different device will fail verification.
- HttpOnly cookies: Sessions are stored in server-set cookies, keeping tokens out of browser JS.
- Error handling: Expired or invalid links gracefully redirect to login with an error flag.
At this stage, the flow is secure: users click a link, Scalekit validates, and your app sets a session. In the next step, we’ll cover OTP fallback for cases where magic links can’t be used.
5) Add OTP fallback for cross-device and stripped-link cases
Why OTP fallback matters:
Even with magic links, real-world edge cases crop up: Gmail sometimes strips query parameters, and users often request a link on one device but open it on another. Without fallback, these cases mean failed logins and frustrated users.
How it works:
In LINK_OTP mode, Scalekit emails both a clickable magic link and a numeric OTP. The OTP is bound to the same authRequestId you got when sending the email, so expiry and rate limits still apply. The verification endpoint simply adds a POST handler for OTPs:

If the magic link can’t be used, maybe the email client stripped parameters or the user switched devices; this flow lets them enter the OTP from the email instead. The same authRequestId ties it back to the original request, enforcing expiry and rate limits.
Key safeguards:
- Same request ID: OTPs are tied to the original authRequestId, so they inherit the same expiry and rate limits.
- Attempt limits: Scalekit enforces a maximum of 5 attempts per 10 minutes; your UI should surface this to users and reset the flow if locked.
- Cross-device recovery: Even if the link fails, OTP ensures there’s always a path to successful login.
For the SaaS team, adding OTP fallback cut failed logins by over 90%. Now, whether the link works or not, users can always complete authentication securely.
Next up, we’ll wire session management and middleware so only verified users can reach protected routes.
6) Protect routes with session management and middleware
Why middleware matters:
The safest way to lock down routes is to check authentication before any page renders. In Next.js 15, that means using middleware at the edge. For our SaaS team, this eliminated the flicker effect they used to see when client-side checks briefly exposed secure pages, and gave them one central enforcement point.
Middleware check:
Every request hitting /dashboard/* first runs through middleware.ts. If the session cookie is missing, the user is redirected to /login with the intended URL preserved:
Server-only session read:
Because the session cookie is HttpOnly and signed, no client code can tamper with it. Server Components can read the email directly from the cookie:
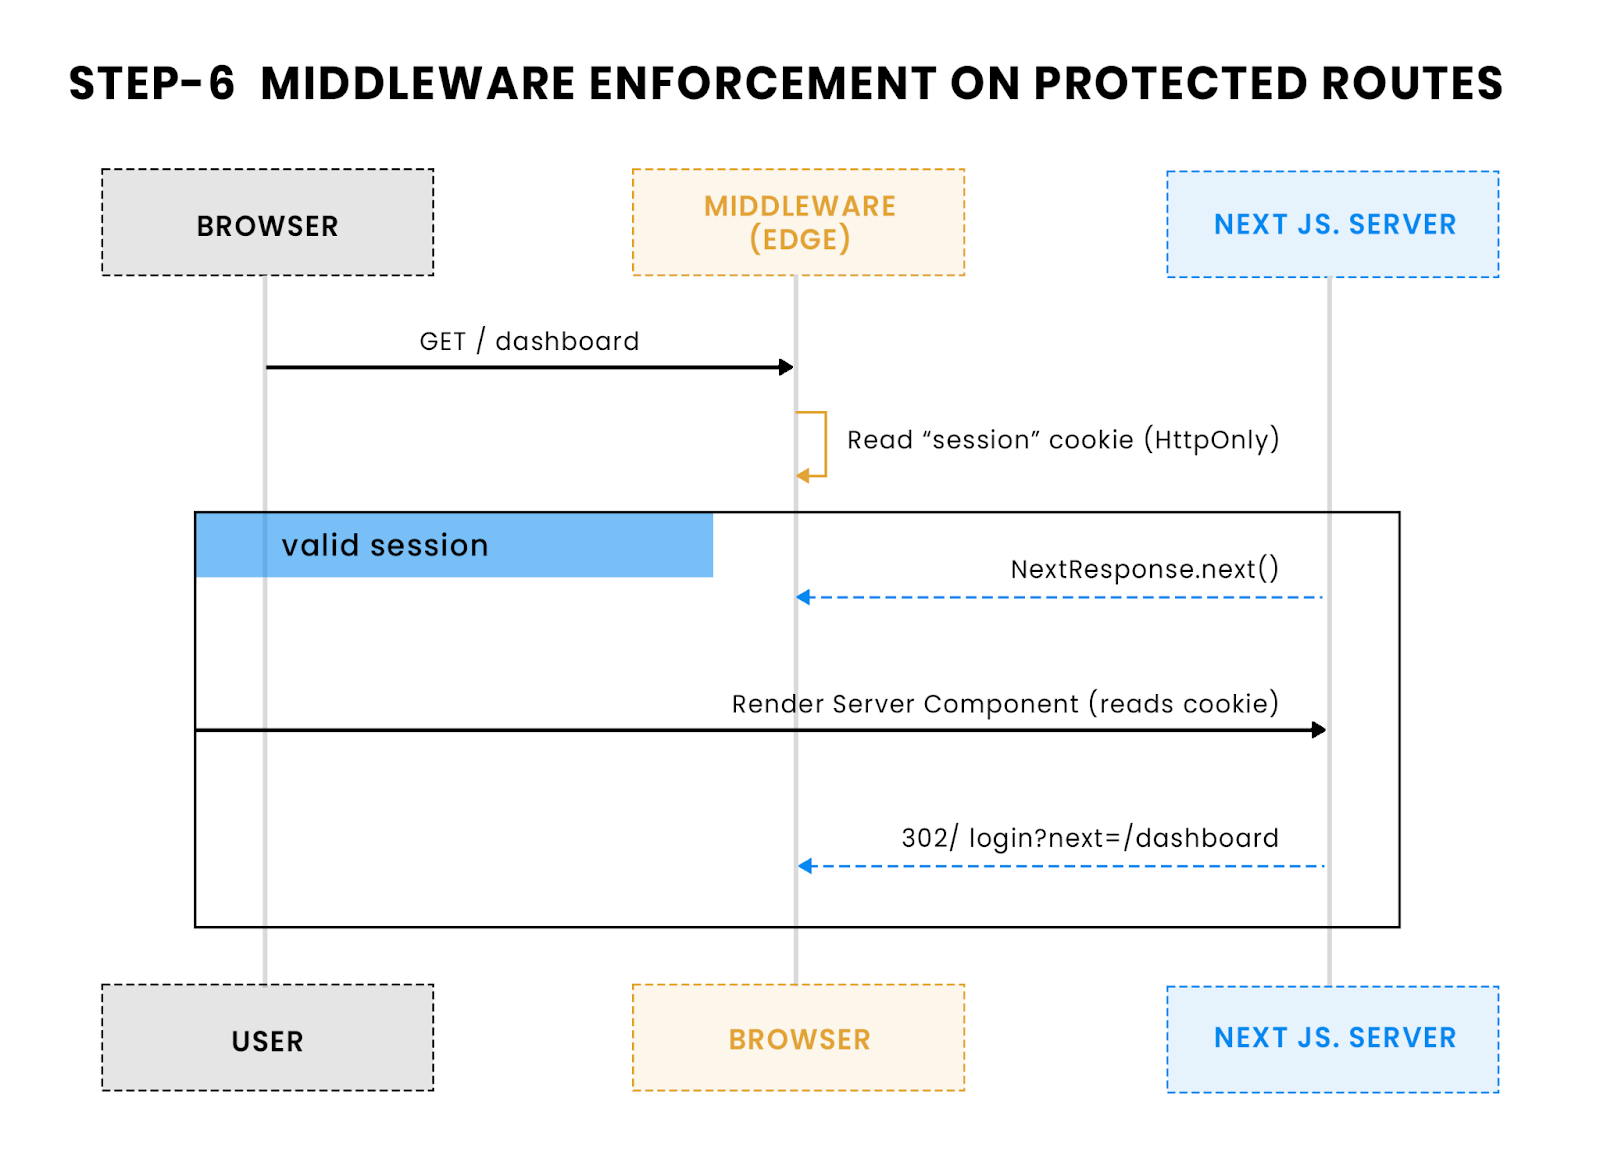
This diagram illustrates how Next.js middleware running at the Edge checks for the session cookie before letting users into protected routes. If no valid session is found, the request is redirected before any page code runs, eliminating flicker and securing content.
Result:
- No flicker: redirects happen before rendering.
- Central enforcement: all secure routes use the same guard.
- Zero client tokens: everything stays server-side, so cookies can’t be read or modified in JavaScript.
This gave the SaaS team a clean separation: middleware enforced access, while pages assumed the user was already verified.
With route protection in place, the last step is error handling and user feedback so failed logins don’t leave users stuck, that’s where Step 7 comes in.
7) Handle errors and give clear user feedback
Why it matters:
Clear error mapping turns failed logins into quick recoveries instead of tickets. For our SaaS team, showing users why a login failed (expired link, too many OTP attempts, missing fields) cut auth-related support requests in half.
Common Scalekit errors to map:
- 400 Bad Request → Missing or invalid parameters
- 401 Unauthorized → Expired or invalid token
- 429 Too Many Requests → Rate limit exceeded
Resend endpoint with clean error responses:
Client-side mapping:
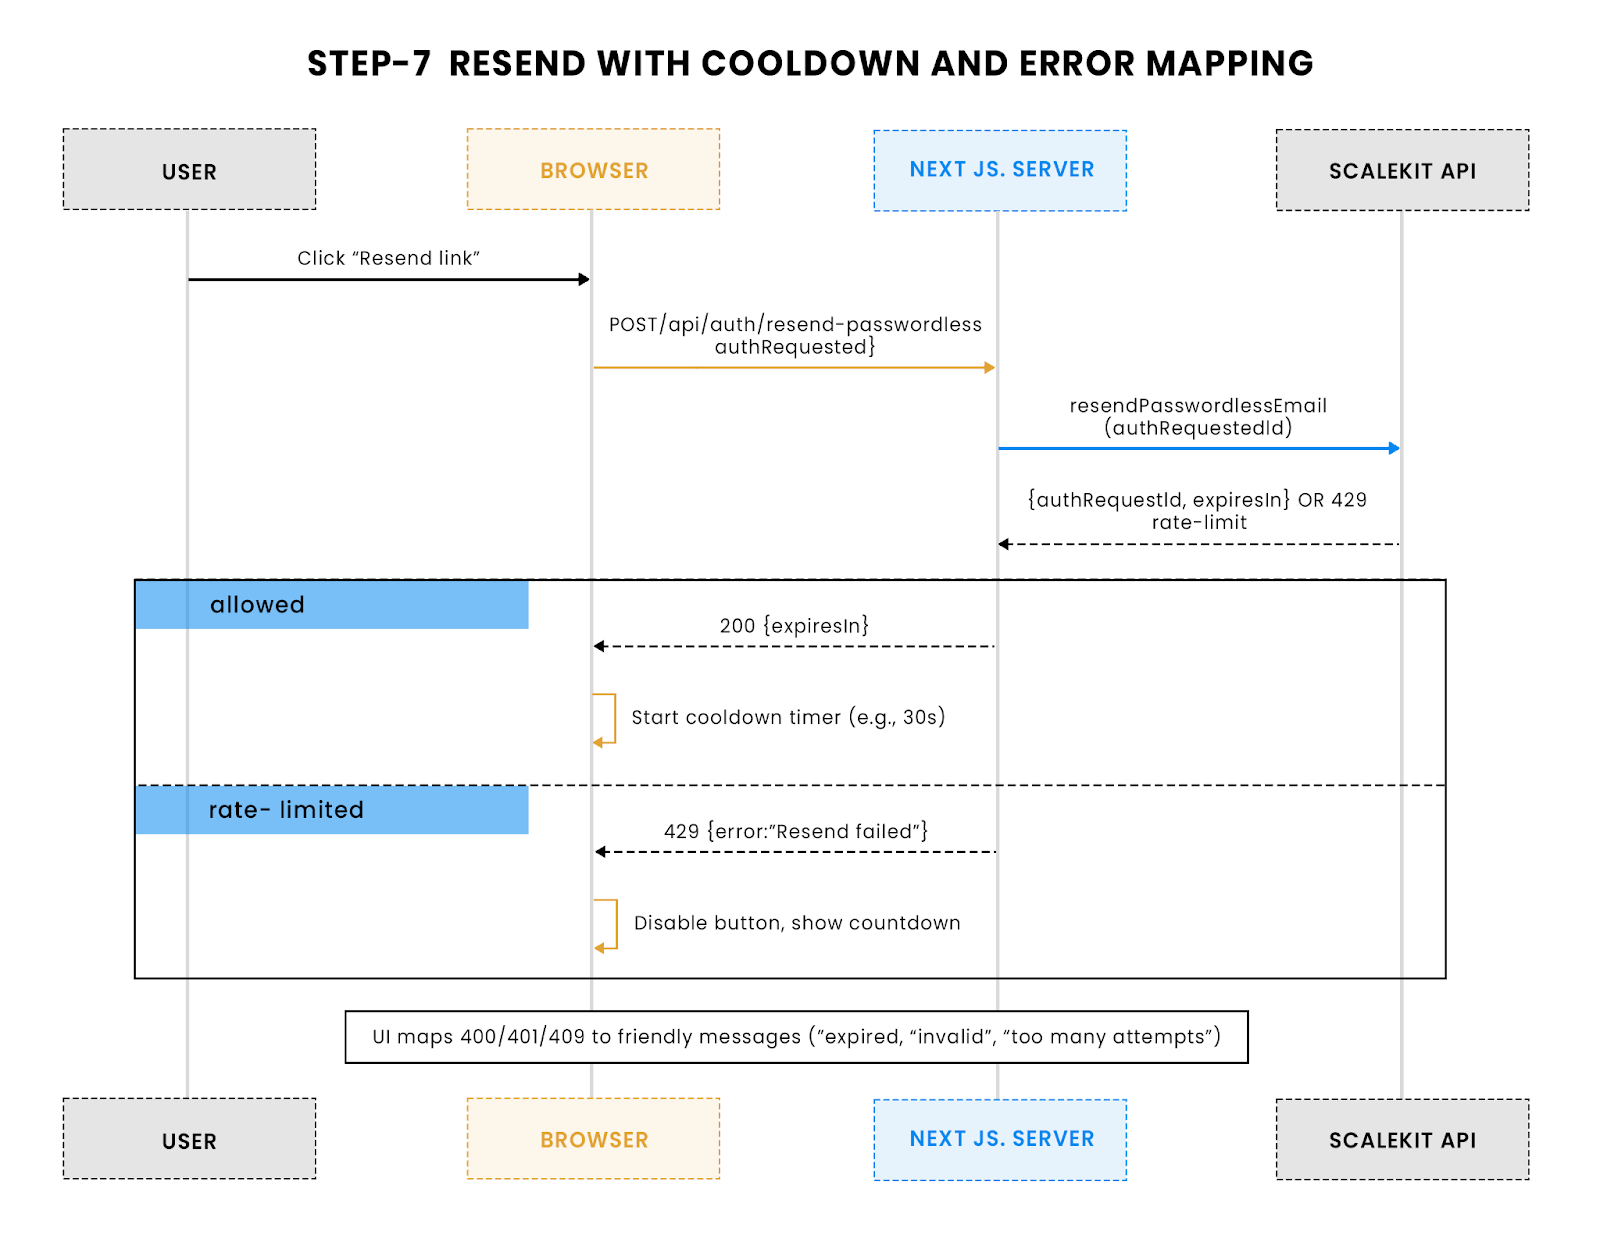
This shows the resend process: the client asks the server to generate a new magic link/OTP via Scalekit, with built-in rate limiting to prevent abuse. The UI can display a cooldown before allowing another resend.
Best practices:
- Disable resend/login buttons during cooldowns and show a countdown timer.
- If same-browser enforcement fails, skip showing a link error and take the user straight to OTP entry.
- Log backend errors (e.g., with Sentry) to spot patterns like deliverability drops.
Result:
Even when things went wrong, expired links, too many OTP attempts, or device mismatches, users always knew what to do next. The flow stayed reliable, and support load went down.
With error handling solid, the last step is production-hardening: secure deployment, monitoring, and enabling Scalekit’s protections. That’s Step 8.
8) Deploy to production with secure settings and active monitoring
Why it matters:
A passwordless flow is only as strong as its production setup. For our SaaS team, launch wasn’t just “push to Vercel”—it was securing cookies, verifying Scalekit’s limits, and wiring up monitoring so issues were caught before users noticed.
1. Match environment variables to production
Configure your host (.env.production) with live credentials and domain:
2. Harden cookies
Your session cookie must be:
- Secure → only sent over HTTPS
- HttpOnly → unreadable by JS
- SameSite=Lax → blocks CSRF without breaking links
Already handled in lib/session-store.ts with secure: process.env.NODE_ENV === "production".
3. Verify Scalekit dashboard settings
Before launch, confirm:
- Link expiry = your security policy (e.g., 5 minutes)
- OTP retry limits stop brute-force but stay usable
- Same-browser enforcement ON if phishing risk is high
- Email send rate limits enabled
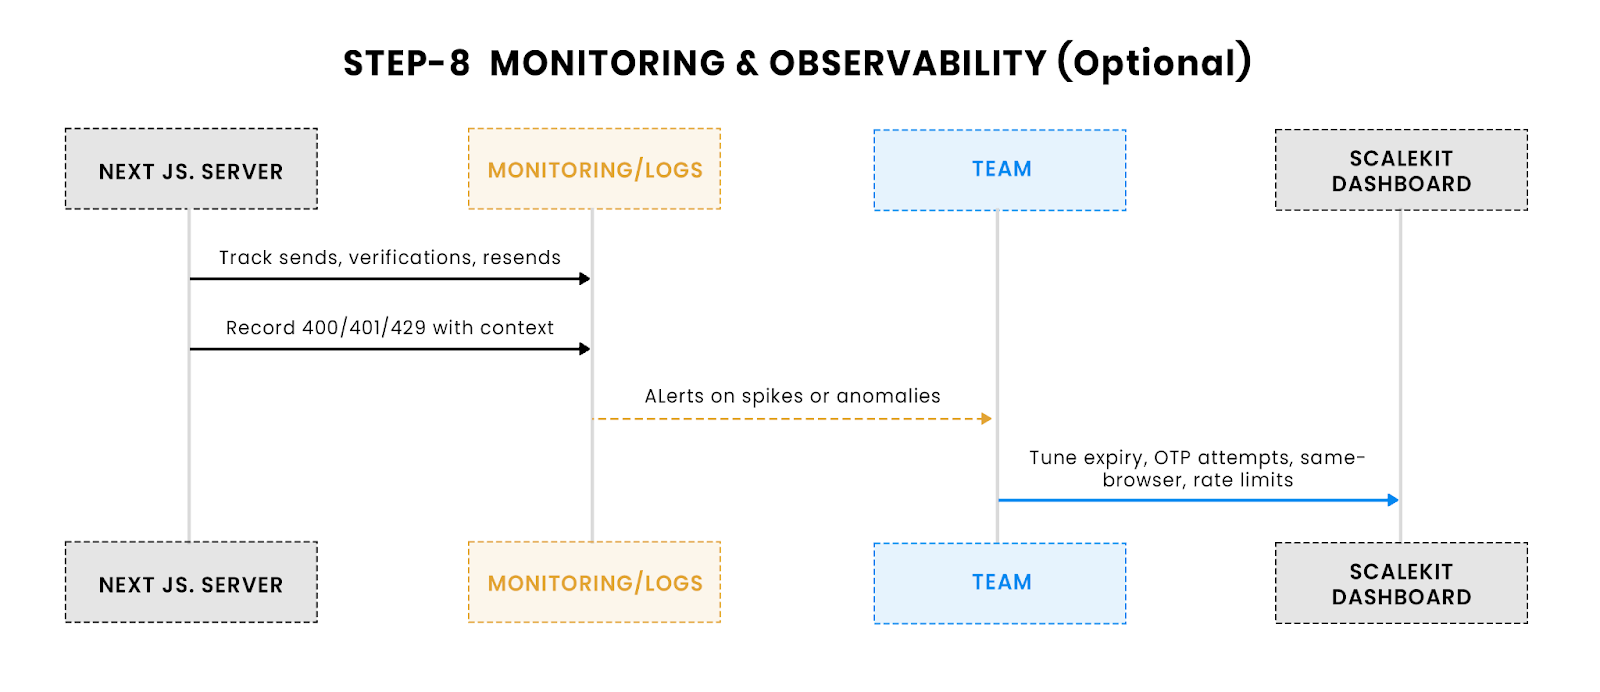
4. Monitor activity in production
Track and alert on:
- Volume of sends, verifications, resends
- 429 Too Many Requests → signals possible abuse
- Error spikes → may mean email deliverability issues
Scalekit API logs can pipe into tools like Sentry, LogRocket, or Datadog.
Result:
With these checks, our SaaS team turned a working dev build into a production-ready login system. Within a week, success rates jumped, link failures dropped near zero, and marketing controlled email branding without a single vendor UI creeping into the app.
What you’ve built
By following these steps, you’ve built a fully server-native, headless magic link authentication system in Next.js 15 using Scalekit. It’s:
- Free of vendor UI constraints, every pixel is yours to design.
- Driven by Server Actions and Route Handlers for all authentication logic.
- Protected by middleware-enforced sessions at the edge.
- Resilient with OTP fallback and Scalekit’s built-in abuse prevention.
The result is a production-grade passwordless login flow that works with your existing user store, keeps secrets server-side, and enforces modern security controls without changing your app’s look and feel.
Real world benefits of the headless Scalekit approach
When we first met our SaaS team, they were stuck between clunky vendor UIs and brittle, home-grown email flows. Moving to Scalekit’s headless magic link + OTP setup changed both their codebase and their day-to-day workflow.
Full branding control without vendor UI constraints: Their old login UI was a mismatched vendor widget in an otherwise polished app. Now, their login form uses the same component library as the rest of the dashboard, and authentication emails match their brand guidelines perfectly, no more generic “Dear user” templates.
Zero migration from their existing user store: Migrating millions of Firebase accounts was never an option. Scalekit’s API-first model lets them keep their entire identity layer untouched while layering passwordless authentication on top. Rollout was gradual, with zero lockouts.
Server-native security that fits App Router: Before Scalekit, tokens lived in the browser via client SDKs and localStorage. Now, every sensitive step, sending the email, verifying the token or OTP, enforcing sessions, happens server-side. Same-browser enforcement and OTP limits reduced phishing and brute-force risk, and compliance reviews became far easier.
Reliable UX with OTP fallback and operational controls: The biggest UX win came from handling the edge cases: Gmail stripping link parameters, users switching devices mid-login. LINK+OTP mode meant there was always a safe way in. Product managers could tweak expiry times and limits in the dashboard without waiting for developer changes.
Conclusion: Authentication without SDK bloat or UI lock-In
Our SaaS team didn’t set out to reinvent authentication; they just wanted a secure, branded, passwordless login that fit their Next.js 15 stack. Before Scalekit, they were juggling third-party widgets, inconsistent email flows, and security holes from client-side token handling.
Switching to Scalekit’s headless magic link + OTP flipped the equation. In under 200 lines of server-centric code, they gained:
- A login flow indistinguishable from the rest of their app.
- Server-only token verification aligned with App Router best practices.
- Centralized control over expiry, rate limits, and browser enforcement.
- The freedom to keep their existing user store untouched.
The result is an authentication system that belongs to the product, not the vendor. No more fighting SDK updates or UI limitations. No more “please fix the login” tickets. Just a set of primitives that scale with traffic, meet security standards, and leave the team free to focus on shipping features.
While this guide focused on building passwordless auth via magic links and OTP, Scalekit also supports passwordless flows using OpenID Connect (OIDC) if you want to integrate with existing identity providers. The Scalekit docs cover those patterns in detail, along with other authentication methods you might need down the line, so if you’re planning to add SSO, multi-factor, or other login options, it’s worth exploring their documentation for the broader picture.
If you’re stuck between over-opinionated providers and fragile DIY setups, Scalekit offers a middle ground: you own the UX, keep your architecture clean, and still get enterprise-grade security and reliability. Scalekit provides the tools; the experience is yours to define.
FAQs
Can I use Scalekit with Firebase or Supabase?
Yes. Scalekit doesn’t store your users; it simply manages the passwordless authentication lifecycle, generating tokens, sending emails, verifying identities, and then returns verified user data (like email). You can plug that into your existing Firebase, Supabase, or custom Postgres/Mongo user store without migrating any accounts.
Does Scalekit support OTP and Magic Links together?
Yes. In the dashboard, select LINK_OTP mode. This sends both a clickable magic link and a numeric OTP in the same email. If the link fails (e.g., Gmail strips the query parameters), users can fall back to entering the OTP in your UI.
Can I enforce same-browser validation for links?
Yes. Enable Same Browser Origin Enforcement in the Scalekit dashboard. This ensures that a magic link can only be verified from the browser session that initiated the request. It mitigates phishing and token theft risks.
What happens if a link is opened on another device?
If same-browser enforcement is on, the link will be rejected with a verification error. If OTP fallback is also enabled, the user can still log in by entering the OTP in your app.
Is the magic link flow secure?
Yes, provided you implement the verification step on the server only. Scalekit generates cryptographically secure, short-lived tokens and enforces rate limits. You should complete verification in a Next.js Route Handler or Server Action, then set an HttpOnly session cookie to avoid exposing tokens to client-side JavaScript.


