Passwordless authentication with Vue3 and Nuxt 4


TL;DR:
- Composable-driven flow: useAuth encapsulates all phases (idle → sending → sent → verifying → authenticated → error) so Vue components remain declarative and reusable.
- Server-first security: Scalekit issues and validates OTPs/magic links with expiry, origin enforcement, and replay protection; secrets never leave the server.
- Reusable building blocks: AuthEmailForm, OtpEntry, and VerifyPage consume composable state directly, handling retries, expired links, and redirects without ad-hoc glue code.
- SSR hydration + Pinia: Sessions are set in secure cookies, hydrated via session.server.ts, and synced into Pinia for consistent state across client and server.
- Resilient UX: Explicit loading states, error boundaries, rate-limit feedback, and lazy-loaded components keep the authentication flow fast, fault-tolerant, and user-friendly.
The growing demand for passwordless authentication in modern web development
In modern web applications, user experience is paramount, especially when it comes to authentication. Imagine a user accesses your site, enters their email, and receives a magic link, no passwords, no messy forms. They click the link and gain instant access. This frictionless experience is the essence of passwordless authentication.
For experienced Vue developers, the challenge goes beyond just enabling passwordless login. Building a secure and scalable system in server-side rendered (SSR) applications, like those built with Vue 3 and Nuxt 4, introduces complexities around hydration, session management, and state synchronization between the client and server. Passwordless authentication, especially when incorporating features like magic links or OTPs, requires a careful balance between security and seamless UX.
Nuxt 4, with its focus on SSR, composition API, and modularity, provides the perfect framework for tackling this challenge. By leveraging composables, server API routes, and SSR hydration techniques, you can architect a modern, scalable passwordless authentication system that’s easy to maintain and integrates smoothly with Vue 3’s reactive state management.
In this guide, we’ll walk through how to implement passwordless authentication in a Vue 3 + Nuxt 4 app using the Scalekit SDK. You’ll learn how to handle everything from authentication logic with composables to session management, route protection, and performance optimizations, all while maintaining a clean separation between frontend and backend.
Problem: Challenges in implementing passwordless authentication in SSR apps
While password-based authentication has long been the standard, it’s fraught with security risks, usability issues, and unnecessary complexity. Passwordless authentication, using one-time passcodes (OTPs) or magic links, offers a cleaner, more secure alternative, significantly improving both security and user experience by eliminating the need for passwords.
However, integrating passwordless authentication into SSR (server-side rendered) applications, like those built with Vue 3 and Nuxt 4, introduces specific challenges that require careful handling:
- State management and hydration: In an SSR application, maintaining state consistency between the server-rendered page and the client-side application is crucial. Managing authentication state, such as session tokens or user details, requires synchronization across both environments, ensuring there’s no mismatch or delay in rendering after the first paint.
- Security considerations: Ensuring a secure passwordless flow in SSR apps demands strict management of session cookies (e.g., JWTs), token expiration, and validation mechanisms. Additionally, route protection is vital, ensuring only authenticated users can access sensitive areas of the app.
- SSR specifics (Session handling and redirects): SSR apps face unique challenges in managing user sessions and redirects. The state must be fully hydrated on the initial page load, and routing must be handled efficiently to avoid flickers or broken experiences when transitioning from server-rendered to client-rendered content.
Building a passwordless authentication system that effectively addresses these challenges requires a deep understanding of both the authentication flow and the nuances of SSR in Vue 3 and Nuxt 4. In the following sections, we’ll explore how these frameworks, combined with Scalekit, provide a robust solution to these challenges.
Solution: Clean separation using composables and server API routes
To build a scalable and maintainable passwordless authentication system in Nuxt 4, we need to ensure a clean separation between the client-side and server-side logic. This can be achieved by leveraging composables for managing authentication state, server API routes for backend integration, and middleware for protecting routes.
- Composables for authentication logic: In Vue 3, composables provide a clean and reusable way to encapsulate business logic. By creating a useAuth composable, we can centralize the authentication flow, including the logic for sending and verifying OTPs or magic links. This composable manages the authentication state, allowing components to reactively access authentication data without repeating code.
- Nuxt server API routes for backend operations: Nuxt 4’s server-side functionality allows us to create API routes that interact with the backend. These routes, such as send, resend, and verify, handle key authentication actions like sending OTPs or magic links and verifying them. Keeping these operations on the server ensures sensitive data, such as API keys and session tokens, are never exposed to the client.
- Middleware for route protection: To secure protected routes (e.g., user dashboards), we use Nuxt’s middleware feature. Middleware intercepts navigation before the route is resolved, ensuring that only authenticated users can access protected pages. If no session is found, users are redirected to the login page.
By utilizing composables, server API routes, and middleware, we ensure a clean separation of concerns, maintainability, and security. The frontend focuses on managing the user interface and state, while the backend handles sensitive authentication operations.
Implementation: Full-stack Vue/Nuxt authentication with Scalekit
In the opening scenario, we painted a picture of a frictionless user experience where users simply enter their email, receive a magic link, and instantly gain access to an application. Now, let's take a deeper look at how we can build this end-to-end passwordless authentication system in Nuxt 4 using Scalekit, a robust platform that simplifies passwordless auth with APIs for magic links, OTPs, and verification.
For this implementation, we’re leveraging Scalekit’s API, Vue 3's reactivity with composables, Nuxt 4’s server-side routes to integrate backend logic, and Pinia for state management. Each piece of the architecture plays a crucial role in building a clean, maintainable, and secure solution that supports modern web development practices, such as server-side rendering (SSR). You can clone this GitHub repo for a pre-built sample of the same.
Setting up the project
To get started, let’s set up your Vue 3 + Nuxt 4 project with Scalekit. Follow these steps to ensure everything is correctly configured.
1. Clone or create a new Nuxt 4 project
If you don’t already have a Nuxt 4 project, you can create one from scratch or clone an existing starter project.
2. Install dependencies
Next, you’ll need to install all the necessary dependencies for Nuxt 4, Scalekit SDK, and Pinia for state management. You can do this by running:
3. Install Scalekit SDK
To communicate with the Scalekit API, you'll need to install the Scalekit SDK.
After installing the Scalekit SDK, create a file to initialize and configure it in your project. Add the following setup:
Ensure you have the correct Scalekit credentials from your Scalekit account (API credentials, environment URL, etc.).
4. Set up environment variables
Create a .env file in the root of your project to store your Scalekit credentials and other environment variables:
Make sure to update SCALEKIT_URL, SCALEKIT_CLIENT_ID, and SCALEKIT_CLIENT_SECRET with your Scalekit credentials.
5. Project folder structure
Here's a look at how your Nuxt 4 folder structure should be organized:
vue-passwordless-auth/
├─ .env # Environment variables
├─ nuxt.config.ts # Nuxt 4 configuration
├─ app.vue # Global root component
├─ components/
│ ├─ AuthEmailForm.vue # Form to capture user email
│ ├─ AuthStatus.vue # Display current auth status
│ └─ ui/ # Small reusable UI components
├─ composables/
│ └─ useAuth.ts # Authentication logic and state
├─ middleware/
│ └─ auth.global.ts # Route protection middleware
├─ plugins/
│ └─ session.server.ts # Server-side session hydration
├─ server/
│ ├─ api/
│ │ ├─ passwordless/
│ │ │ ├─ send.post.ts # Initiate passwordless flow
│ │ │ ├─ resend.post.ts # Resend email
│ │ │ └─ verify.post.ts # Verify code/link and create session
│ │ └─ auth/
│ │ ├─ session.get.ts # Fetch current session
│ │ └─ logout.post.ts # Logout user
├─ stores/
│ └─ auth.ts # Pinia store to manage auth state
├─ pages/
│ ├─ index.vue # Landing page (optional)
│ ├─ login.vue # Magic link and OTP request
│ ├─ dashboard.vue # Protected dashboard page
│ └─ passwordless/
│ ├─ code.vue # OTP entry page
│ └─ verify.vue # Magic link verification page
├─ package.json
├─ tsconfig.json
└─ README.md
This structure keeps the app modular and clean, with clear separations between components, logic, and API routes.
6. Run the project
Now that your environment is set up, you can run the development server:
Open your browser and go to http://localhost:3000 to view the application in action.
How this implementation works
- User submits their email via a form (e.g., AuthEmailForm.vue).
- Frontend sends the email to the backend via an API request (Nuxt server API route like send.post.ts).
- Backend communicates with Scalekit to send either a magic link or OTP to the user's email.
- User clicks the magic link or enters the OTP on a dedicated page (like verify.vue).
- Backend verifies the magic link or OTP with Scalekit via another API route (verify.post.ts).
- Session is created (usually using JWT stored as a secure cookie) and returned to the frontend.
- Protected pages (like the dashboard.vue) check the session using Nuxt middleware (auth.global.ts), ensuring only authenticated users can access them.
This structure sets up a passwordless authentication system that relies on Scalekit’s APIs for verification and session management, while leveraging Nuxt 4’s powerful SSR capabilities to ensure seamless user experience. Let’s break down how we can make this magic happen.
1. Composables for authentication logic and state
Composables allow us to encapsulate the authentication logic and state in a modular, reusable way. We’ll create a composable called useAuth that handles all the operations related to passwordless authentication, including sending and verifying OTPs or magic links. We’ll also manage the request state, showing loading states and handling errors. Here’s how we implement it:
Explanation:
- Scalekit API Integration: The sendAuthRequest function interacts with Scalekit's API to send either a one-time passcode (OTP) or a magic link to the user's email.
- State Management: The composable handles the loading state, error handling, and updates the UI when the magic link is sent.
- Pinia Store: The request ID returned by Scalekit is stored in the Pinia store, ensuring that the frontend is aware of the authentication flow’s progress.
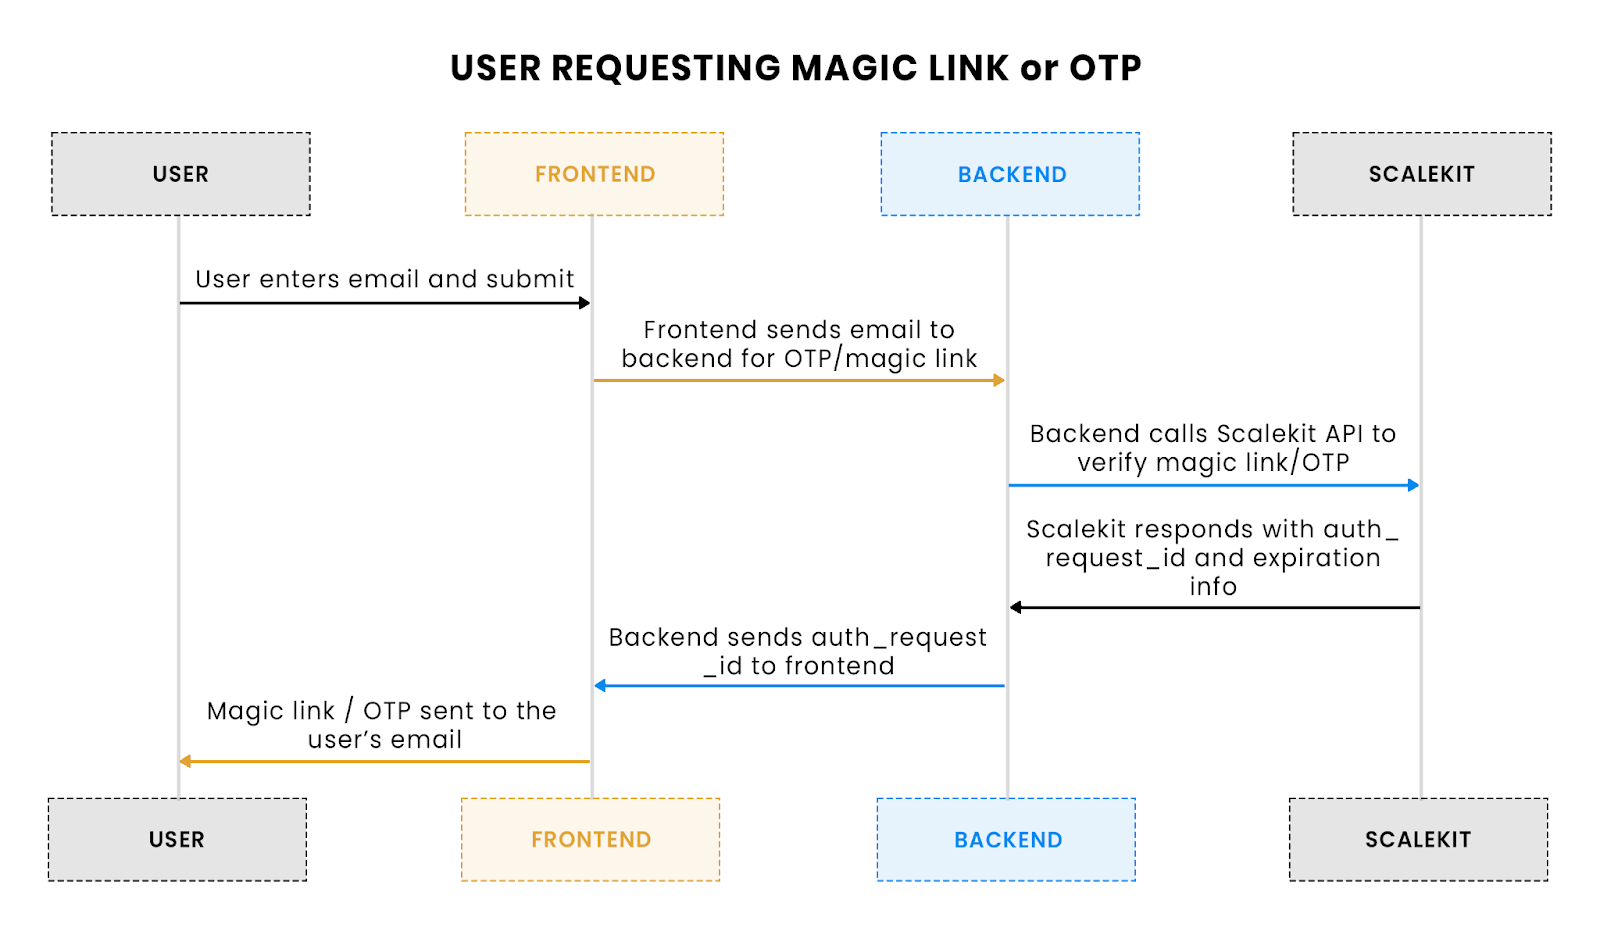
Flow explanation: This flow shows how a user enters their email to request a magic link or OTP. The frontend sends the request to the backend, which communicates with Scalekit to generate and send the OTP or magic link.
2. Nuxt Server API routes for backend integration
Now that we’ve set up the frontend to request a magic link or OTP, we need the backend to handle requests and communicate with Scalekit. Nuxt 4’s server-side API routes allow us to manage these processes securely. We'll create three main routes:
- send.post.ts: Initiates the passwordless authentication request.
- verify.post.ts: Verifies the submitted OTP or magic link token.
- resend.post.ts: Resends the OTP or magic link if the user requests it again.
Explanation:
- Server-Side Request Handling: This route accepts a POST request to initiate the passwordless flow by calling Scalekit’s API. It handles the backend logic for sending OTPs or magic links.
- Environment Variables: API keys and URLs are stored in environment variables, keeping sensitive data server-side and out of the client’s reach.
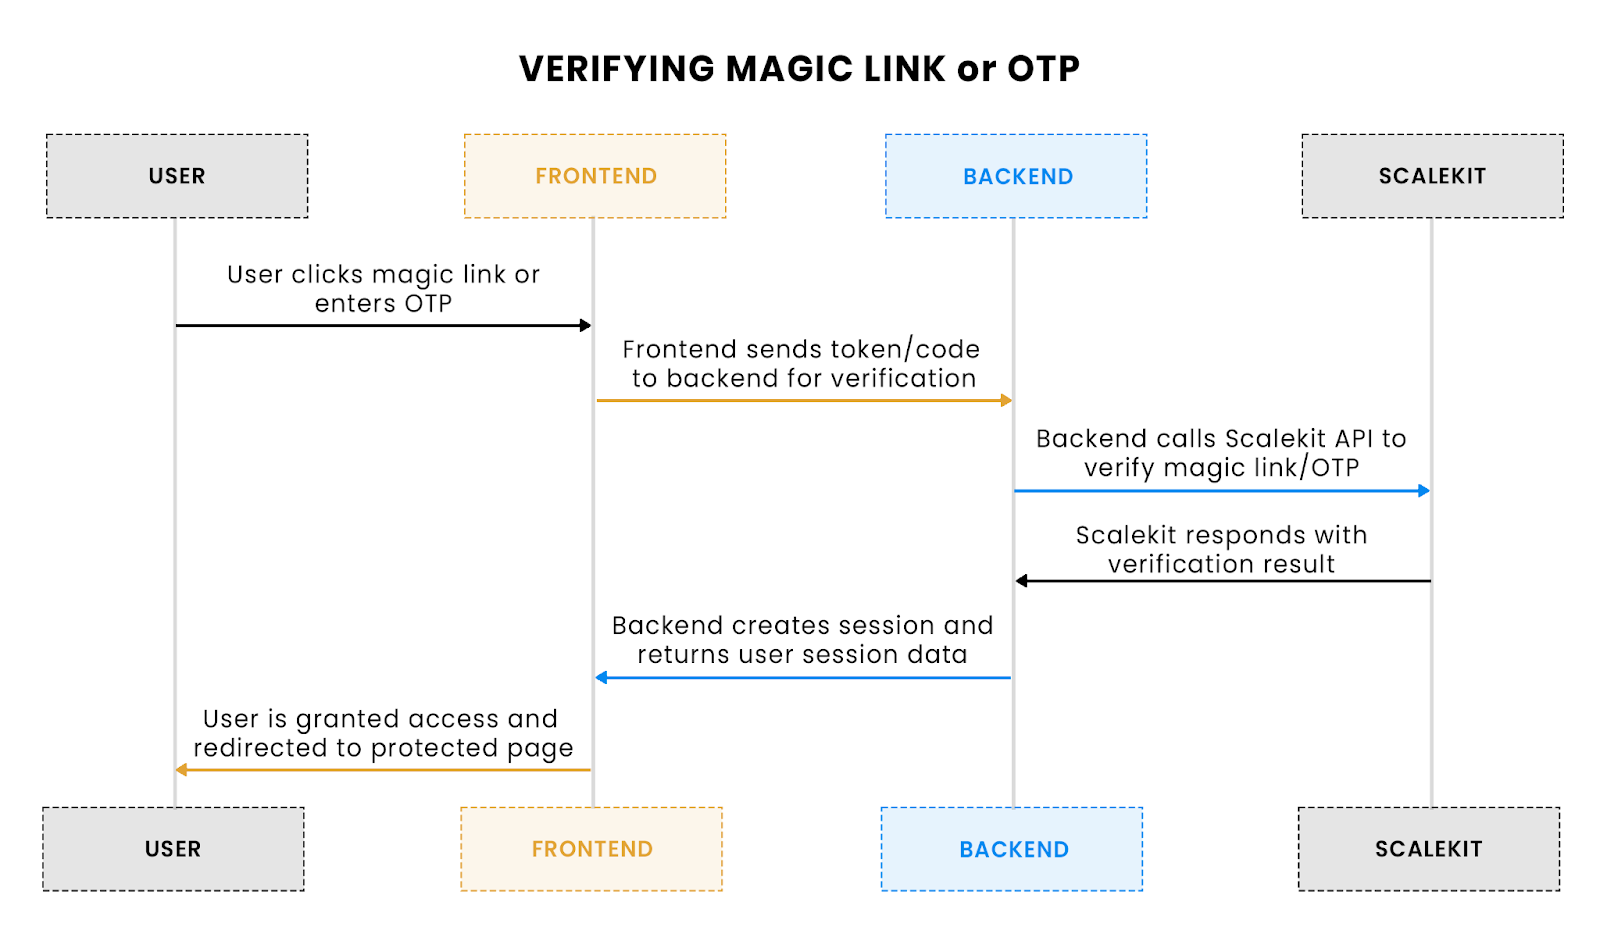
Flow explanation: This flow illustrates how the user verifies their identity by clicking the magic link or entering the OTP. The backend validates the token or code using Scalekit, and the user is granted access.
3. Verify user identity (Magic link or OTP verification)
Once the user receives the magic link or OTP, they need to verify it. Here’s how we handle verification using Scalekit’s API.
Explanation:
- Verification process: Based on whether the user received an OTP or a magic link, this route verifies the provided code or link token via Scalekit’s API.
- Session creation: After verification, we create a session (usually with JWT tokens) and return it to the client. This session is stored securely as a cookie.
4. Middleware for route protection
To protect certain pages, we need middleware that ensures users can only access routes if they are authenticated. This middleware checks if a valid session exists, ensuring that only authenticated users can access pages like the dashboard.
Explanation:
- Session verification: This middleware checks for a valid session cookie before allowing users to access protected routes. If no session is found, they are redirected to the login page.
5. SSR and hydration considerations
Nuxt 4 is SSR-friendly, so we need to ensure that user sessions are properly hydrated on the first paint. This allows the user’s session to be available immediately when the page loads, ensuring a smooth user experience.
Explanation:
- Session hydration: This plugin ensures that when the page is first rendered server-side, the session is available, and the Pinia store is hydrated with user data.
Wrapping it all up
By using Scalekit’s APIs to manage passwordless authentication and combining them with Nuxt 4’s SSR capabilities, we’ve built a secure, scalable authentication system. The flow is seamless, and the architecture is designed to handle real-world scenarios efficiently:
- Magic Link or OTP: Scalekit handles the heavy lifting of generating and verifying links or OTPs.
- Seamless state management: Pinia and composables ensure that the frontend is always in sync with the backend.
- Protected routes: Middleware ensures that users can only access authenticated areas of the app.
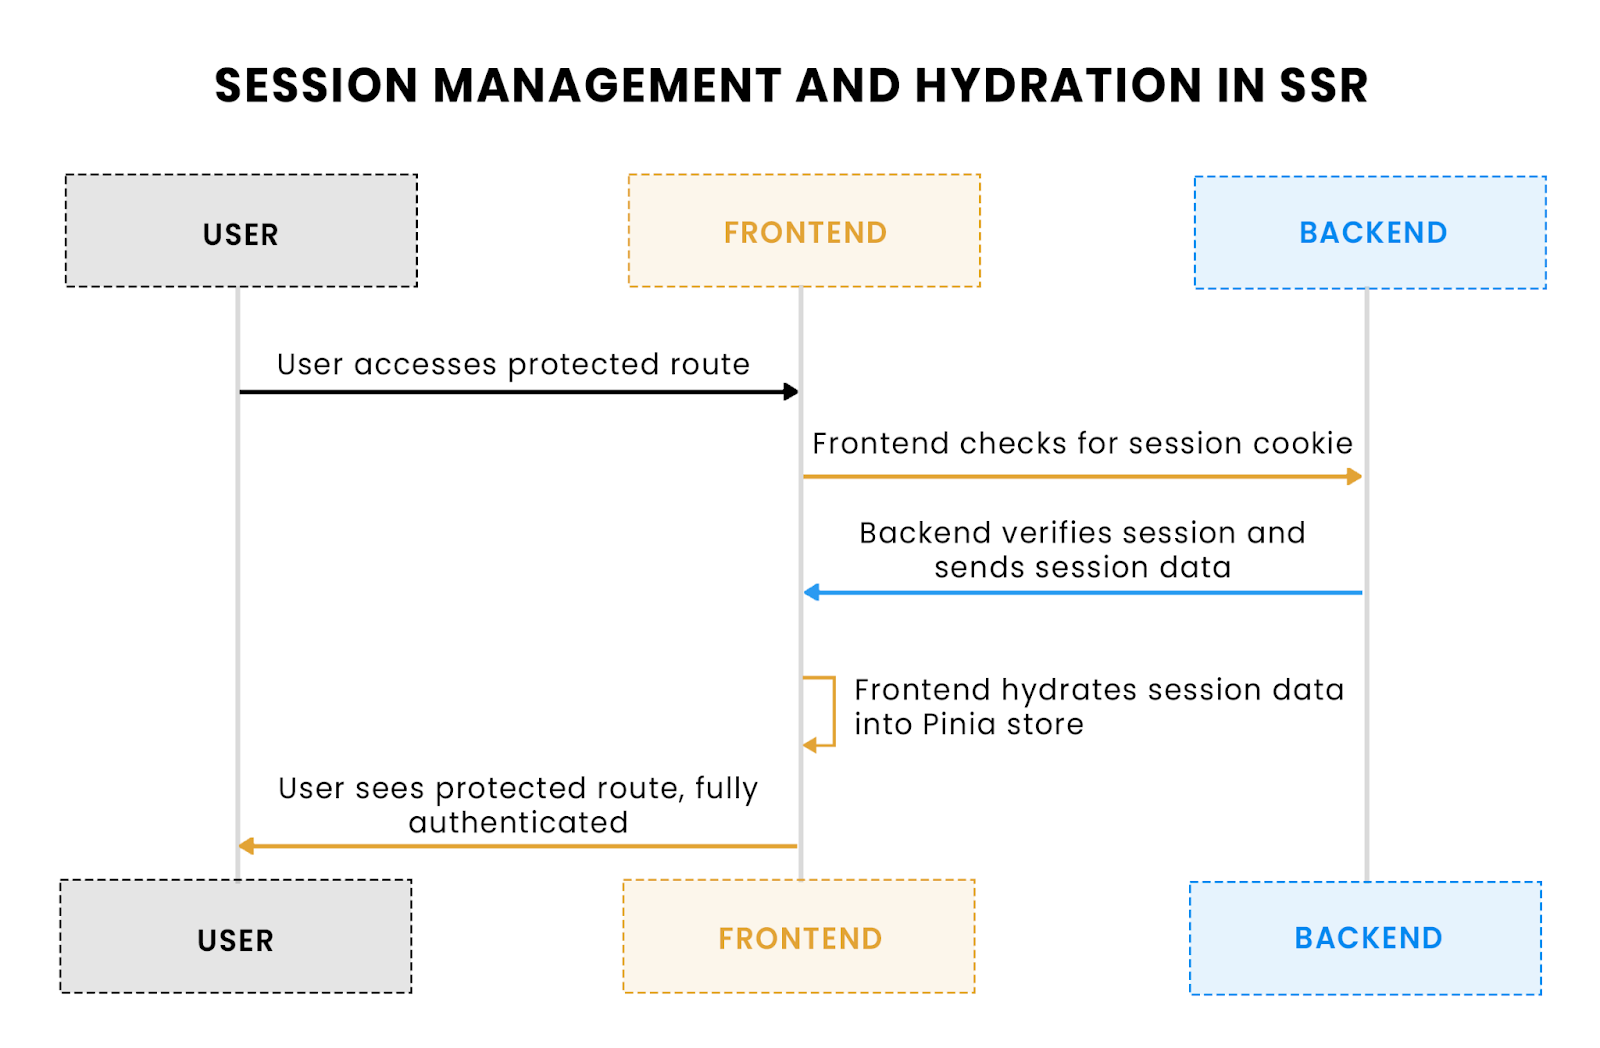
Flow Explanation: This flow visualizes how the user's session is hydrated during the first SSR render, ensuring that the user’s session data is available immediately after the page loads.
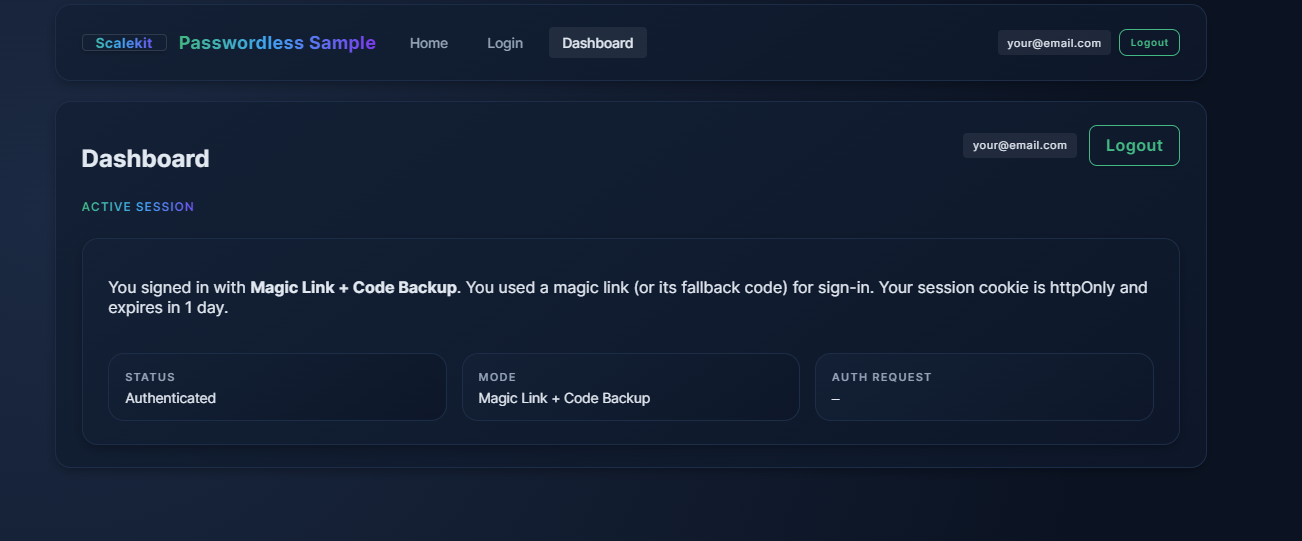
This solution brings to life the story we started with: A user enters their email, receives a magic link, and instantly gains access. No passwords. Just seamless authentication.
Wrapping it all up
By using Scalekit’s APIs to manage passwordless authentication and combining them with Nuxt 4’s SSR capabilities, we’ve built a secure, scalable authentication system. The flow is seamless, and the architecture is designed to handle real-world scenarios efficiently:
- Magic Link or OTP: Scalekit handles the heavy lifting of generating and verifying links or OTPs.
- Seamless state management: Pinia and composables ensure that the frontend is always in sync with the backend.
- Protected routes: Middleware ensures that users can only access authenticated areas of the app.
This solution brings to life the story we started with: A user enters their email, receives a magic link, and instantly gains access. No passwords. Just seamless authentication.
Error handling with Nuxt error boundaries
When building a production-grade authentication system, error handling isn’t just about catching exceptions; it’s about crafting a smooth and resilient user experience even when things go wrong. Authentication systems often face a variety of failure points: expired magic links, invalid OTPs, rate limiting, or even network issues. Without proper error handling, users could be left with confusing error messages or, worse, broken functionality.
Nuxt provides a powerful error boundary feature that we can leverage to catch and handle errors gracefully. By wrapping our app or specific components in a <NuxtErrorBoundary>, we ensure that all errors, whether from the backend or within the UI, are captured and displayed in a user-friendly manner.
Example: Setting up error boundaries
Explanation:
- Global error handling: By wrapping the entire app in a <NuxtErrorBoundary>, we can capture any uncaught errors, both from the server and client-side, ensuring that the app doesn’t break unexpectedly.
- Custom error components: You can extend this by creating a custom error component that provides users with helpful feedback, such as asking them to retry or providing instructions on what to do next.
Example: Handling errors in the authentication flow
In the passwordless authentication flow, common errors could occur when:
- The magic link is expired or invalid.
- The user has exceeded the number of OTP attempts.
- There are network failures or server issues.
We can handle these errors in the backend, but it’s essential that the frontend responds appropriately. Here’s how we handle errors during the magic link verification process:
Explanation:
- Graceful error handling: By using try...catch around the API call, we can handle errors like expired magic links and display user-friendly error messages to guide the user.
- Conditional UI rendering: The template conditionally renders an error message if there’s an issue with the authentication process. This allows users to get immediate feedback without breaking the flow of the app.

Flow explanation: This flow shows how expired or invalid tokens are handled, and how users are informed of the error and prompted to request a new magic link or OTP.
1. Handling rate limiting and retry logic
One common issue with passwordless authentication is rate limiting, both for the email sending process and OTP verification. For example, if a user requests multiple magic links or OTPs within a short period, the backend might reject the request due to rate limiting. To handle this, we can implement retry logic with informative messages for the user.
Here’s an example of how to handle rate-limited requests:
Explanation:
- Rate-limiting feedback: If the server responds with a 429 Too Many Requests status, the UI provides specific feedback, guiding the user to wait before trying again.
- Loading states: The button is disabled during the request to prevent repeated submissions, ensuring that users can’t flood the server with requests.
2. Backend error handling
Handling errors server-side is just as critical. For example, if the user provides an invalid or expired OTP, we should catch that error and respond with an appropriate status code and message.
Explanation:
- Detailed error responses: When an invalid OTP or expired magic link is provided, the server catches the error and throws a clear, user-friendly error message.
- Consistent error handling: By using createError with specific status codes and messages, we ensure that the backend communicates effectively with the frontend to display appropriate error messages.
Why it matters
Proper error handling ensures that the user isn’t left in the dark when something goes wrong. Instead of a blank screen or a cryptic error message, users receive clear instructions on what happened and how they can fix it. This is particularly important in authentication flows, where users expect a smooth and intuitive process.
By leveraging Nuxt’s error boundaries and implementing intelligent error handling both on the frontend and backend, we can create a resilient passwordless authentication system that’s secure, user-friendly, and adaptable to real-world scenarios.
Performance optimization and caching
When implementing passwordless authentication in modern web applications, performance is critical, especially for systems that rely on external services like Scalekit to send OTPs or magic links. Latency can cause delays in user interactions, and inefficient handling of requests can lead to unnecessary load on both the server and the client. In this section, we’ll look at performance optimization strategies to ensure a seamless and efficient passwordless authentication experience.
1. Minimizing unnecessary network requests
One of the key performance optimizations is reducing the number of requests that are made to the server. For example, if a user is already in the process of receiving a magic link or OTP, there’s no need to trigger another request for the same operation. We can implement a check to see if the user has already requested a magic link or OTP, and disable the request button accordingly:
Explanation:
- Duplicate request prevention: The isRequestPending flag prevents users from triggering multiple requests for the same magic link or OTP. This reduces unnecessary network traffic and prevents multiple submissions from the client.
- User feedback: The loading state is used to disable the request button during the network call, providing a better user experience by preventing users from accidentally spamming the request.
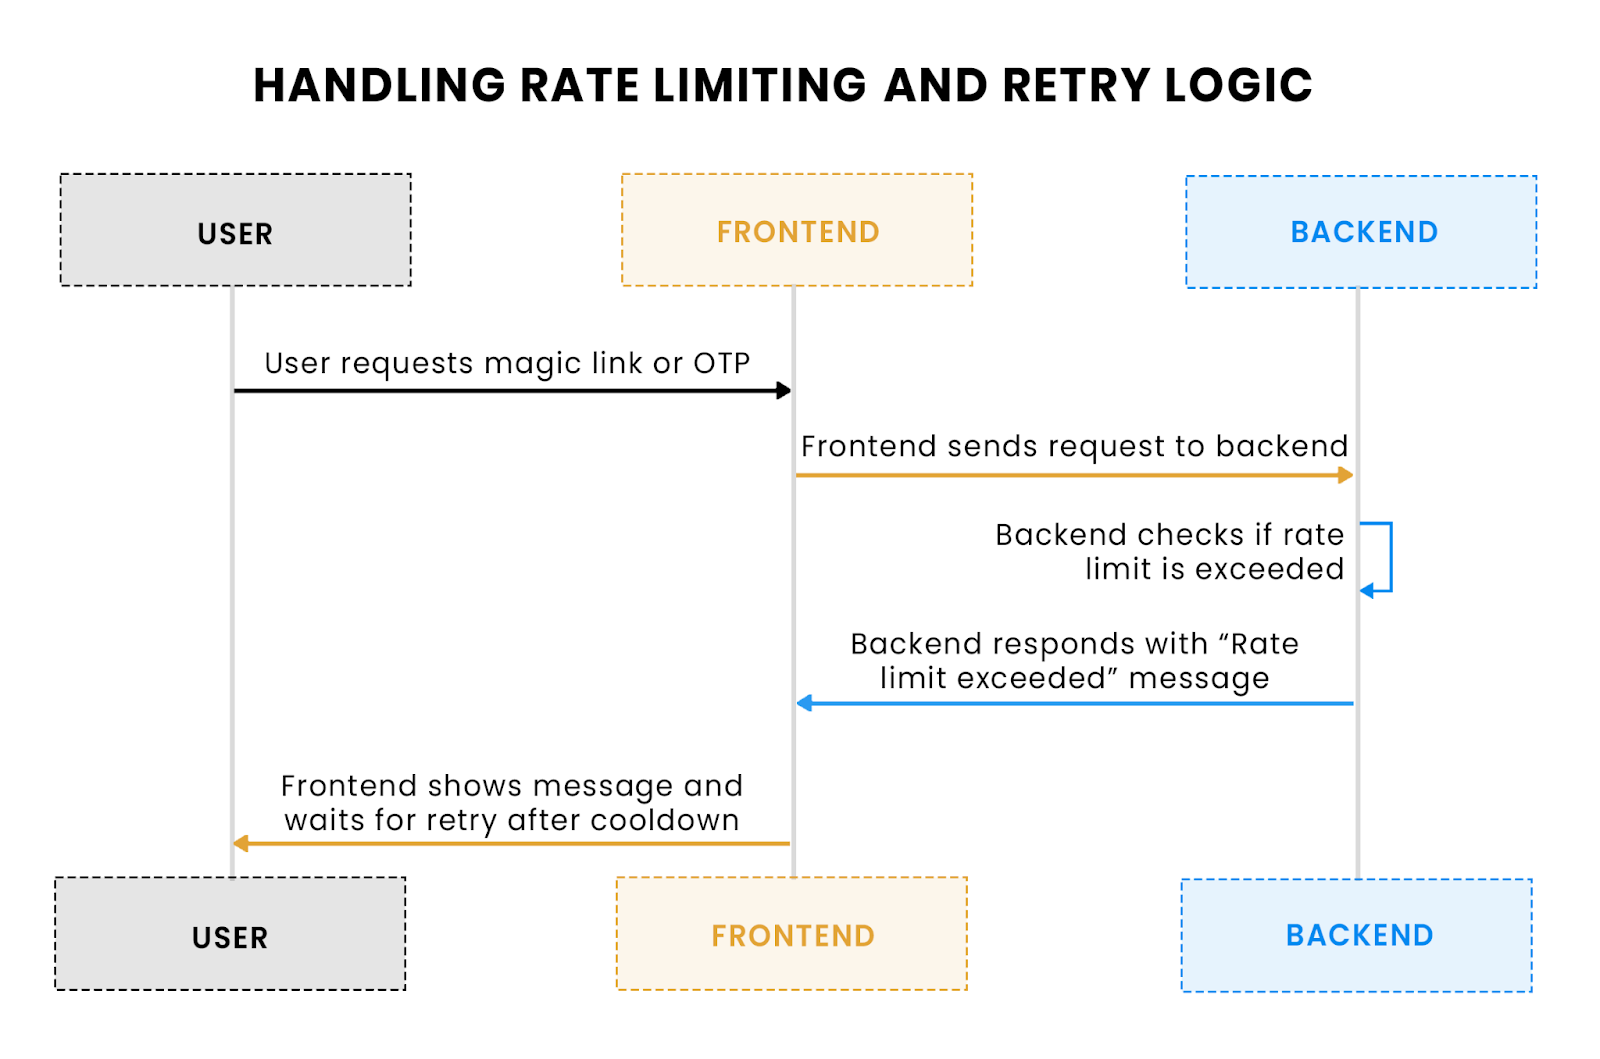
Flow explanation: This flow illustrates how rate-limiting is applied when a user requests too many magic links or OTPs within a short period, and how retry logic is implemented.
2. Caching authentication responses
Passwordless authentication often involves multiple API requests to send and verify the magic link or OTP. These requests can introduce latency, especially when dealing with external APIs like Scalekit. Caching authentication responses can reduce redundant calls and improve performance.
One common optimization strategy is to cache the authentication request ID and user session data in memory or a fast-access storage solution, like Redis or the browser’s localStorage. Here's an example of caching the request ID:
Explanation:
- Local storage caching: By storing the auth_request_id in localStorage, we ensure that even if the user refreshes the page or navigates away and returns, the authentication process can resume without triggering additional requests.
- Reduced redundant calls: If the request ID is cached, it’s used instead of making a new API request, which helps reduce the number of calls to the backend and the external Scalekit API.
3. Optimizing the hydration process in SSR
One of the challenges of SSR applications is ensuring that the page is hydrated properly without introducing delays or mismatches between server-rendered content and client-rendered content. Hydration mismatches can lead to flickering or delays, impacting the perceived performance of your app.
Nuxt 4 makes SSR easy, but we need to ensure that session data is properly hydrated when the app is loaded on the client. Let’s optimize the hydration process to improve the performance of passwordless authentication.
Explanation:
- Efficient hydration: This plugin ensures that session data is hydrated efficiently from the cookie without the need for redundant API requests. The client-side session is available immediately after the page loads, improving the perceived performance.
4. Network error handling and request timeout
Another performance consideration is handling network failures gracefully. Network latency or temporary issues with the Scalekit API could lead to delays. We can use an AbortController to manage timeouts and cancel requests that take too long.
Explanation:
- Abort controller: The AbortController is used to cancel the request if it takes too long, preventing the app from hanging due to network issues.
- Timeouts: A timeout is set for the request, ensuring that the user gets feedback if the request doesn’t complete within a reasonable timeframe.
5. Lazy loading for performance
While passwordless authentication is a critical part of the user flow, not all parts of the app need to be loaded upfront. By using dynamic imports in Nuxt 4, we can reduce the initial load time and improve performance by lazy-loading authentication-related components only when needed.
Explanation:
- Lazy Loading: The AuthForm component is only loaded when it’s actually needed (i.e., when the user navigates to the login page). This reduces the amount of JavaScript bundled initially, improving the page load time.
Conclusion: Scalable, secure, and seamless passwordless authentication system
By integrating Scalekit with Vue 3 and Nuxt 4, we've created a robust, full-stack passwordless authentication system that leverages modern web development principles such as SSR, composables, and state management. This architecture not only enhances security by eliminating passwords but also ensures a seamless, frictionless user experience, essential for today’s web applications.
In the process, we:
- Utilized Scalekit’s API to manage OTP and magic link flows securely.
- Leveraged Nuxt 4’s SSR capabilities to ensure fast, hydrated sessions and seamless server-client synchronization.
- Optimized performance through caching, lazy loading, and proper error handling, ensuring that users experience minimal latency and maximum responsiveness.
This system addresses the core challenges of building a passwordless authentication flow in SSR applications, from securing sensitive data with JWTs to managing session state across client-server boundaries. With the implementation of clear separation of concerns and efficient use of Nuxt 4's composables, API routes, and middleware, this solution is scalable, maintainable, and production-ready.
FAQ
How does Scalekit ensure secure OTP and magic link generation for passwordless authentication?
Scalekit uses advanced cryptographic techniques to generate time-sensitive one-time passcodes (OTPs) and magic links. The OTPs are securely hashed and stored server-side, while magic links are signed with a unique token to prevent tampering. Scalekit supports expiration, rate-limiting, and "same-browser" enforcement, ensuring the integrity and security of passwordless flows.
What is the role of Scalekit’s auth_request_id in the passwordless authentication flow?
The auth_request_id is a unique identifier generated by Scalekit when initiating the passwordless flow. It ensures that subsequent verification requests (whether for OTPs or magic links) are tied to the original authentication session. This ID allows secure and stateful verification, preventing attacks such as link replay and mismatched token validations.
How can I optimize SSR performance in a Nuxt application with multiple dynamic API routes?
To optimize SSR performance, minimize server-side delays by using async components and lazy load non-essential routes. Implement caching strategies like Edge Caching for API responses and SSR static generation for static pages. Utilize compression for large payloads and ensure API calls are debounced or throttled to prevent unnecessary server load.
How do I handle JWT expiration and session management in a scalable manner in Nuxt 4?
For scalable session management, implement JWT token rotation and refresh tokens. Store the JWT securely as an httpOnly cookie and use a background refresh strategy to get a new token before it expires. Implement server-side checks for expired sessions and leverage middleware to redirect users to the login page if necessary.
What strategies can I employ to ensure consistent state management across SSR and client-side Nuxt 4 applications?
Leverage Pinia for centralized state management, ensuring that session data is synchronized between the server and client. Use cookies or localStorage for persistent session storage, and implement a hydration process on the client side using Nuxt’s server plugin to seed the state on the first render. Avoid direct DOM conditionals to prevent hydration mismatches.